1. Introduction
The aqxreight YouPro YP-870 E2 is a wireless timing shutter release remote control designed for compatible camera systems. It utilizes an FSK 2.4GHz wireless system to provide stable and reliable control over your camera's shutter functions, including single shot, continuous shooting, bulb mode, delay, and precise timing. This manual provides detailed instructions for the setup, operation, and maintenance of your YP-870 E2 remote control.
2. Product Overview
2.1 Package Contents
Verify that all items are present in your package:
- 1 x Transmitter (TX)
- 1 x Receiver (RX)
- 1 x E2 Camera Connection Cable
- 1 x User Manual (this document)
- 4 x AAA Batteries
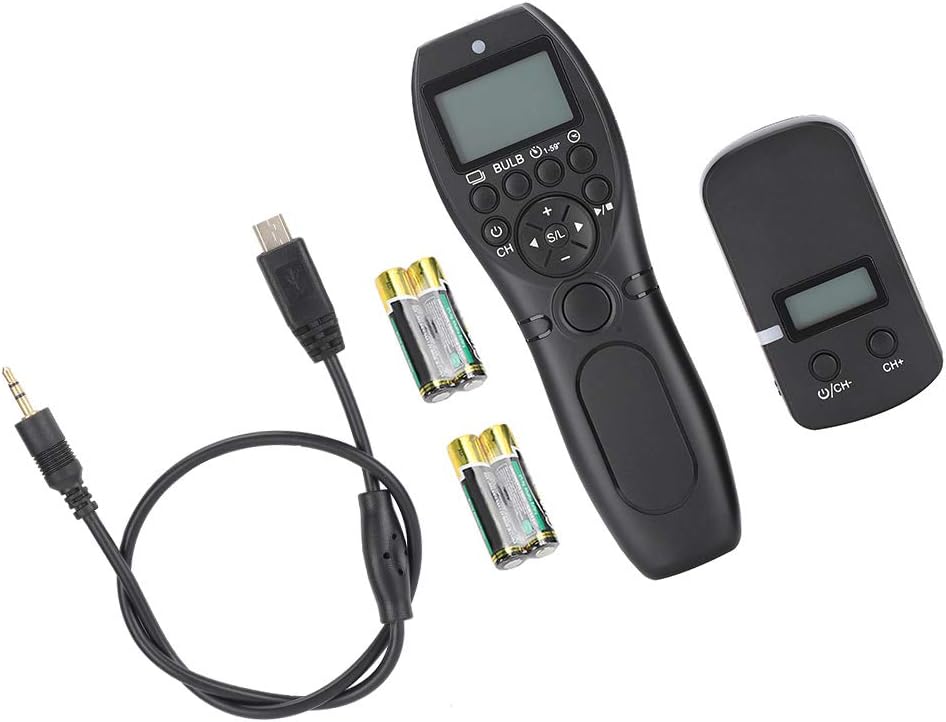
Image: Contents of the YP-870 E2 package, showing the transmitter, receiver, E2 cable, and AAA batteries.
2.2 Key Features
- Wireless System: FSK 2.4GHz global frequency for stable and reliable communication.
- Channels: 32 selectable channels to prevent signal interference.
- Operating Distance: Up to 100 meters (328 feet) remote control distance.
- Shooting Modes: Supports single shot, low-speed continuous, high-speed continuous, Bulb mode, delay shooting, and precise timing functions.
- Timing Settings: Accurate timing settings up to 99 hours, 59 minutes, and 59 seconds (in 1-second increments).
- Wired Functionality: The transmitter can operate as a wired shutter release without batteries when connected directly to the camera's control outlet.
- LCD Display: Clear LCD screen on the transmitter for displaying channel and mode information.
- Power Efficiency: Designed for low power consumption, suitable for extended use.
- User Interface: Intuitive design with shortcut buttons for quick access to functions.
- Compatibility: E2 cable compatible with various Fujifilm camera models (e.g., X-H1, X-M1, X100T, X-T20, X-T2, X-T1, X-T10, X-E2, X-E2S, X-A1, X-A3, X-A5, X-A10, X-A20, X70, X30, GFX50S, XQ1, XQ2, FinePix S1, X-PRO2).

Image: The YP-870 E2 transmitter and receiver units.
3. Setup
3.1 Battery Installation
Both the transmitter and receiver require two AAA batteries each.
- Locate the battery compartment cover on the back of both the transmitter and receiver.
- Slide or lift the cover to open the compartment.
- Insert two AAA batteries into each unit, ensuring correct polarity (+/-) as indicated inside the compartment.
- Close the battery compartment cover securely.
Note: For prolonged storage, remove batteries to prevent leakage.

Image: Battery compartment of the transmitter.
3.2 Connecting the Receiver to Your Camera
- Locate the remote control port on your camera.
- Connect one end of the E2 camera connection cable to the receiver's input port.
- Connect the other end of the E2 cable to your camera's remote control port.
- Mount the receiver onto your camera's hot shoe (if applicable) or attach it securely to avoid interference with camera operation.

Image: The receiver unit with its connection port.
3.3 Powering On and Channel Synchronization
- Press and hold the power button (usually marked with U/CH) on both the transmitter and receiver to power them on.
- Ensure both units are set to the same channel. Use the CH+ and CH- buttons on the receiver and the channel selection buttons on the transmitter to match the channels. The LCD display on the transmitter will show the current channel.
- A successful connection is indicated by a status light on the receiver or a corresponding icon on the transmitter's LCD.
4. Operating Instructions
The YP-870 E2 offers various shooting modes. Use the mode selection buttons on the transmitter to cycle through available options.
4.1 Basic Shutter Release (Single Shot)
- Select the single shot mode on the transmitter.
- Press the main shutter button on the transmitter halfway to focus (if your camera supports this via remote).
- Press the main shutter button fully to trigger the camera's shutter for a single exposure.
4.2 Continuous Shooting
The YP-870 E2 supports both low-speed and high-speed continuous shooting, depending on your camera's capabilities.
- Select the desired continuous shooting mode (low or high speed) on the transmitter.
- Press and hold the main shutter button on the transmitter to continuously capture images. Release the button to stop.
4.3 Bulb Mode
Bulb mode allows for exposures longer than typically available on your camera, controlled by the duration you hold the shutter button.
- Select Bulb mode on the transmitter.
- Press the main shutter button on the transmitter to open the camera's shutter.
- Press the main shutter button again to close the camera's shutter.
4.4 Delay Mode
Delay mode allows you to set a specific delay before the shutter is released, useful for self-portraits or reducing camera shake.
- Select Delay mode on the transmitter.
- Use the navigation buttons to set the desired delay time (e.g., 2 seconds, 10 seconds).
- Press the main shutter button to initiate the countdown. The shutter will release automatically after the set delay.
4.5 Timing Mode (Intervalometer)
The timing mode allows for advanced interval shooting, ideal for time-lapse photography.
- Select Timing mode on the transmitter.
- Use the navigation buttons to set the following parameters:
- Delay (DEL): Initial delay before the first shot.
- Long (LONG): Exposure time for each shot (for Bulb mode).
- Interval (INTVL): Time between the end of one exposure and the start of the next.
- Number (N): Number of shots to take.
- Repeat (RPT): Number of times to repeat the entire sequence.
- Press the start button to begin the timed sequence.
Example: To take 10 photos with a 5-second interval between each, set N=10, INTVL=00:00:05. If using Bulb mode, set LONG to your desired exposure time.
5. Maintenance
- Keep the remote control units clean and dry. Use a soft, dry cloth to wipe surfaces.
- Avoid exposing the units to extreme temperatures, humidity, or direct sunlight.
- Do not attempt to disassemble or repair the units yourself, as this may void any warranty and cause damage.
- Remove batteries from both the transmitter and receiver if the units will not be used for an extended period to prevent battery leakage.
6. Troubleshooting
| Problem | Possible Cause | Solution |
|---|---|---|
| Remote control does not trigger the camera. |
|
|
| LCD display is blank or dim. |
|
|
| Interference with other wireless devices. |
|
|
7. Specifications
| Model | YouPro YP-870 E2 |
| Wireless System | FSK 2.4GHz |
| Communication Channels | 32 |
| Operating Distance | Up to 100 meters (328 feet) |
| Transmitter Battery | 2 x AAA batteries |
| Receiver Battery | 2 x AAA batteries |
| Transmitter Standby Time | Approx. 1000 hours |
| Receiver Standby Time | Approx. 300 hours |
| Material | Plastic |
| Item Weight | 7 ounces (approx. 198g) |
| Package Dimensions | 6.69 x 4.72 x 1.57 inches |
8. Warranty and Support
For warranty information and technical support, please refer to the documentation provided at the point of purchase or contact the seller directly. Specific warranty terms may vary by region and retailer.