Introduction
Welcome to the world of intelligent aerial photography with your new A14 Pro MAX Foldable 4K Drone. This manual provides comprehensive instructions for safe operation, maintenance, and troubleshooting to ensure you get the most out of your drone. The A14 Pro MAX is designed for creators and enthusiasts, featuring dual 4K cameras, advanced obstacle avoidance, 5G FPV transmission, and a robust brushless motor system for stable and precise flight.
Please read this manual thoroughly before operating the drone and retain it for future reference.
Safety Guidelines
Operating a drone requires responsibility. Adhere to the following safety guidelines to prevent injury or damage:
- Local Regulations: Always comply with local aviation laws and regulations. Check for no-fly zones before operating.
- Environmental Conditions: Do not fly in strong winds, rain, snow, or fog. Maintain visual line of sight with the drone at all times.
- Battery Safety: Use only original batteries and chargers. Do not overcharge or puncture batteries. Store in a cool, dry place.
- Propeller Safety: Keep hands, face, and loose clothing away from rotating propellers. Ensure propellers are correctly installed before flight.
- Obstacle Avoidance: While the drone has obstacle avoidance, it is not foolproof. Always be aware of your surroundings and potential obstacles.
- Privacy: Respect the privacy of others when recording videos or taking photos.
- Age Restriction: This product is intended for adult use.
Package Contents
Verify that all items are present in your package:
- A14 Pro MAX Foldable 4K Drone
- Remote Control with Display
- Flight Battery(ies)
- USB Charging Cable
- Spare Propellers
- Screwdriver
- User Manual (this document)
Product Overview
Familiarize yourself with the components of your A14 Pro MAX drone and its remote control.
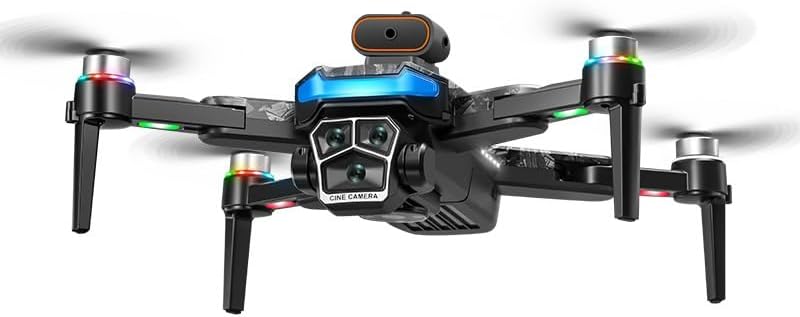
Figure 1: A14 Pro MAX Foldable 4K Drone with its arms extended, showcasing its dual cameras, LED lights, and propellers.
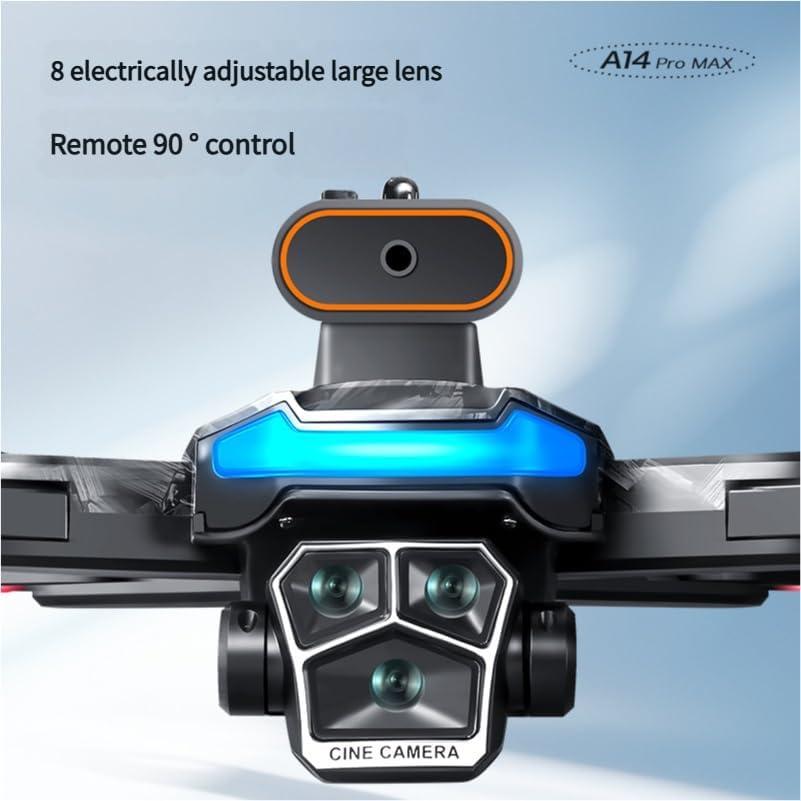
Figure 2: Close-up view of the A14 Pro MAX drone's dual camera system, highlighting the electrically adjustable large lens and remote 90° control capability.
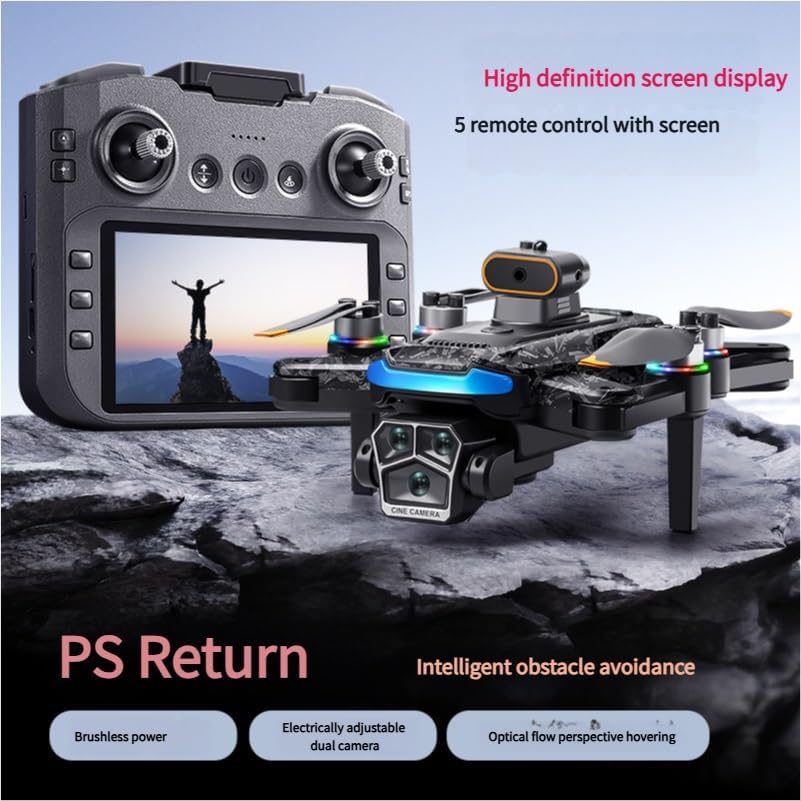
Figure 3: The A14 Pro MAX drone alongside its remote control, which features a high-definition screen display. Key features like brushless power, electrically adjustable dual camera, intelligent obstacle avoidance, and optical flow perspective hovering are highlighted.
Drone Components:
- Dual 4K Cameras: Front and bottom cameras for versatile shooting, with 90° remote tilt adjustment.
- Brushless Motors: Provide stable flight, wind resistance, and extended durability.
- Propellers: Four sets of propellers for lift and propulsion.
- LED Lights: Indicate drone status and orientation.
- Battery Compartment: Houses the flight battery.
- Obstacle Avoidance Sensors: Located on the front to detect and avoid obstacles.
- Optical Flow Sensor: Located on the bottom for precise hovering.
Remote Control Components:
- Integrated Display Screen: Provides real-time 5G FPV video feed and flight data.
- Control Sticks: Left stick for throttle/yaw, right stick for pitch/roll.
- Function Buttons: One-key return, headless mode, photo/video capture, speed switch, etc.
- Camera Angle Adjustment Dial: For remotely adjusting the camera tilt.
Setup
1. Charging the Battery
Before first use, fully charge the drone's flight battery and the remote control's internal battery.
- Connect the USB charging cable to the drone battery (if removable) or directly to the drone's charging port.
- Connect the other end to a USB power adapter (5V/2A recommended).
- Charging indicators will show progress. Once fully charged, disconnect the cable.
- Repeat for the remote control if it has a separate charging port.
2. Installing Propellers
Ensure propellers are installed correctly according to their markings (A and B) and the drone's motor arms.
- Match the 'A' propellers to the 'A' marked motor arms and 'B' propellers to 'B' marked arms.
- Secure each propeller with the provided screws using the screwdriver.
- Caution: Incorrect propeller installation can lead to unstable flight or loss of control.
3. Unfolding the Drone
Gently unfold the drone's arms until they click into place. Ensure all arms are fully extended and locked.
4. Pairing the Drone and Remote Control
- Place the drone on a flat, level surface.
- Press and hold the power button on the drone until the indicator lights flash.
- Turn on the remote control.
- Push the left control stick (throttle) all the way up, then all the way down. The drone's lights will become solid, indicating successful pairing.
Operating
1. Pre-Flight Checks
- Ensure batteries are fully charged for both drone and remote.
- Check that propellers are securely attached and undamaged.
- Verify that the drone and remote are successfully paired.
- Choose an open, clear area free from obstacles, people, and animals.
- Check weather conditions (no strong winds, rain).
2. Takeoff and Landing
- Manual Takeoff: Push both control sticks down and outwards simultaneously to arm the motors. Then, slowly push the left stick (throttle) up to ascend.
- One-Key Takeoff: Press the dedicated one-key takeoff button on the remote control. The drone will automatically ascend to a safe hovering height.
- Manual Landing: Slowly pull the left stick (throttle) down to descend. Once on the ground, hold the stick down for a few seconds until motors stop.
- One-Key Landing: Press the dedicated one-key landing button. The drone will automatically descend and land.
3. Flight Controls
| Control Stick | Movement | Drone Action |
|---|---|---|
| Left Stick | Up/Down | Ascend/Descend (Throttle) |
| Left Stick | Left/Right | Rotate Left/Right (Yaw) |
| Right Stick | Up/Down | Move Forward/Backward (Pitch) |
| Right Stick | Left/Right | Move Left/Right (Roll) |
4. Camera Operation
- Adjusting Camera Angle: Use the dedicated dial or button on the remote control to adjust the 90° tilt of the main camera.
- Taking Photos: Press the photo button on the remote control. The drone will take a single picture.
- Recording Video: Press the video button to start recording. Press again to stop. Video footage is saved to the drone's memory card (if installed) or transmitted to the remote's display.
- Switching Cameras: If applicable, use the camera switch button to toggle between the front and bottom cameras.
5. Intelligent Flight Modes
- Obstacle Avoidance: The drone's front sensors actively detect obstacles. When an obstacle is detected, the drone will automatically slow down or stop to prevent collision. This feature is designed for assistance and does not replace pilot vigilance.
- 5G HD FPV Transmission: The remote control's integrated screen displays real-time, high-definition video from the drone's camera. Ensure a clear line of sight between the drone and remote for optimal signal.
- Optical Flow Hovering: The bottom optical flow sensor helps the drone maintain a stable position indoors or in areas with good ground patterns, even without GPS signal.
- GPS Return (One-Key Return): When GPS signal is strong, pressing the One-Key Return button will command the drone to automatically fly back to its takeoff point. Ensure the takeoff point is clear.
- Headless Mode: In headless mode, the drone's orientation is relative to the pilot, regardless of the drone's front direction. This simplifies control for beginners.

Figure 4: The A14 Pro MAX drone in flight, showcasing its stability and maneuverability over a lush green forest landscape.
Maintenance
Proper maintenance ensures the longevity and optimal performance of your drone.
- Cleaning: Use a soft, dry cloth to clean the drone body and camera lenses. Do not use harsh chemicals or solvents.
- Propeller Inspection: Regularly check propellers for cracks, bends, or damage. Replace any damaged propellers immediately.
- Battery Care:
- Do not overcharge or over-discharge batteries.
- Store batteries at approximately 50% charge if not used for extended periods.
- Keep batteries away from extreme temperatures.
- Storage: Fold the drone arms and store it in its original packaging or a protective case in a cool, dry place, away from direct sunlight.
Troubleshooting
If you encounter issues, refer to the following common problems and solutions:
| Problem | Possible Cause | Solution |
|---|---|---|
| Drone does not power on. | Low battery; battery not inserted correctly. | Charge battery; reinsert battery firmly. |
| Drone does not respond to remote. | Not paired; remote battery low; interference. | Re-pair drone and remote; charge remote; move to an area with less interference. |
| Unstable flight/drifting. | Propellers damaged/incorrectly installed; drone not calibrated; strong wind. | Check/replace propellers; perform gyroscope calibration (refer to remote manual); avoid flying in windy conditions. |
| Poor video/image quality or no FPV feed. | Weak signal; camera lens dirty; memory card issues. | Fly closer to drone; clean lens; check/format memory card. |
| Obstacle avoidance not working. | Sensors dirty/blocked; flying too fast; specific lighting conditions. | Clean sensors; reduce speed; be aware of environmental limitations. |
Specifications
| Feature | Detail |
|---|---|
| Model Name | KFKBEBWYF |
| Brand | Generic |
| Cameras | Dual 4K, Electrically Adjustable 90° Tilt |
| Motor Type | Brushless |
| FPV Transmission | 5G HD Real-Time |
| Obstacle Avoidance | Yes, Front Sensors |
| Positioning System | GPS Return, Optical Flow Hovering |
| Remote Control | Integrated Display Screen |
| Foldable Design | Yes |
| Item Weight | 50 Grams (approx. 1.76 ounces) |
| Package Dimensions | 0.39 x 0.39 x 0.39 inches (approximate) |
Warranty and Support
For warranty information and technical support, please refer to the contact details provided with your purchase documentation or visit the manufacturer's official website. Keep your proof of purchase for warranty claims.
If you require further assistance or have questions not covered in this manual, please contact customer support.