1. Introduction
This manual provides essential information for the safe installation, operation, and maintenance of your YHMMYSHX ST-90 9KW Steam Generator. Please read these instructions thoroughly before installation and use to ensure proper function and longevity of the unit. This steam generator is designed to produce steam for sauna baths and steam showers in areas ranging from 4 to 9 cubic meters.
The ST-90 features a robust stainless steel water tank and an electrolytic plate for reliable performance. It includes a microcomputer digital display control panel for easy time and temperature adjustments, along with built-in water shortage and overheating protection mechanisms.
2. Safety Information
Adherence to the following safety guidelines is crucial to prevent injury and damage to the equipment. Always consult a qualified electrician and plumber for installation.
- Important Installation Orientation: The unit must be installed level with arrows pointing upwards. Incorrect orientation can lead to malfunction or damage.
- Electrical Safety: Disconnect all electrical service to the unit before performing any maintenance or installation. Installation must be performed by authorized personnel only, in accordance with local electrical codes.
- Water Connections: Ensure all water fittings are securely tightened to prevent leaks. Refer to the reverse side of the cover for detailed wiring and plumbing diagrams.
- Overheating Protection: The unit is equipped with high-temperature protection to prevent dry burning, ensuring safe operation.
- Children and Pets: Keep children and pets away from the steam generator and steam outlet during operation.

3. Product Components and Overview
The YHMMYSHX ST-90 Steam Generator system includes the main steam generator unit, a digital control panel, and necessary connection cables and sensors. Below is an overview of the main unit's external features and connections.
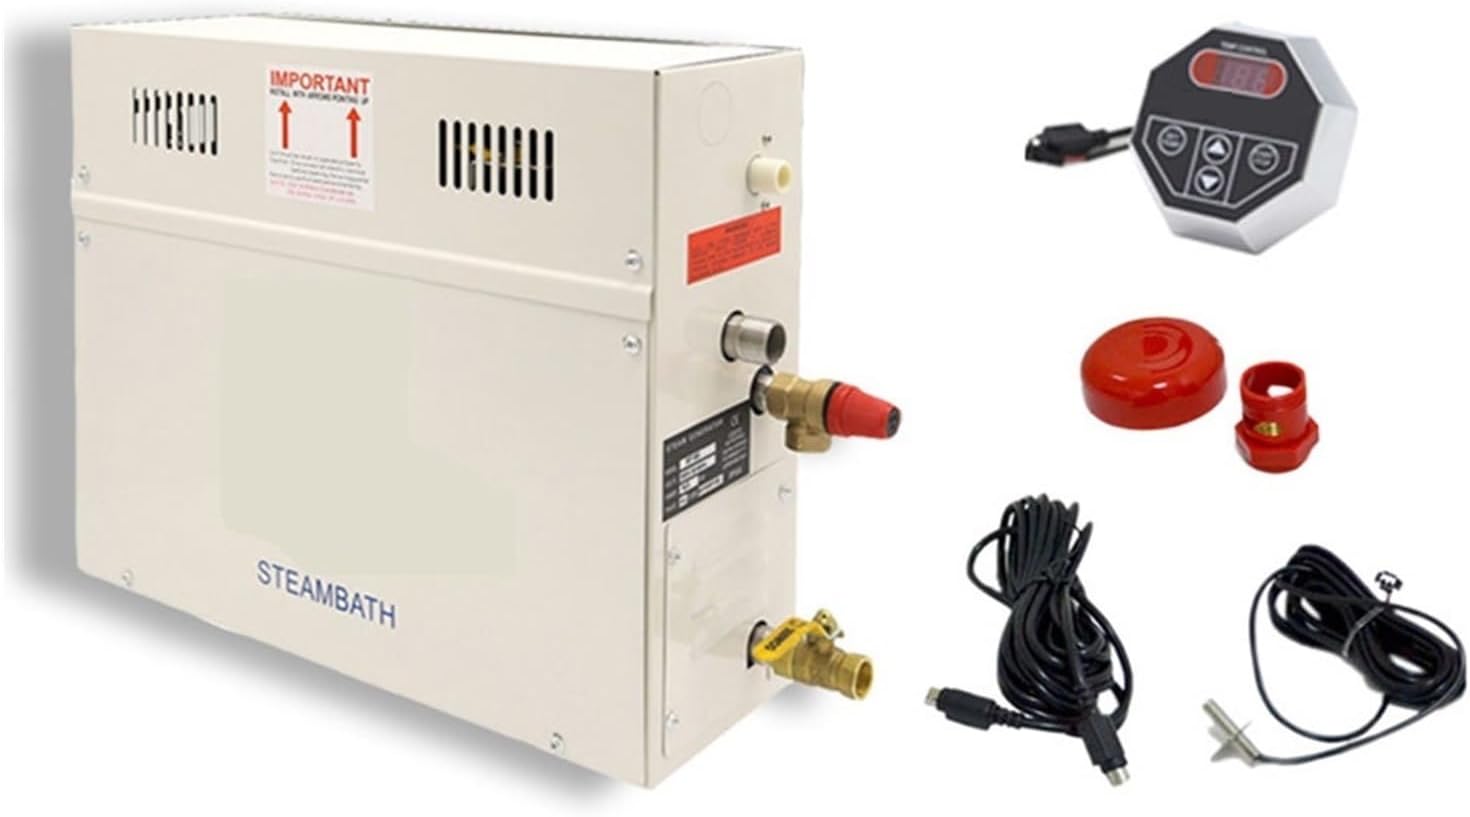

- Intake: Water inlet connection.
- Air Outlet: Vent for air release.
- Safety Valve: Pressure relief valve for safety.
- Outfall: Water drainage outlet.
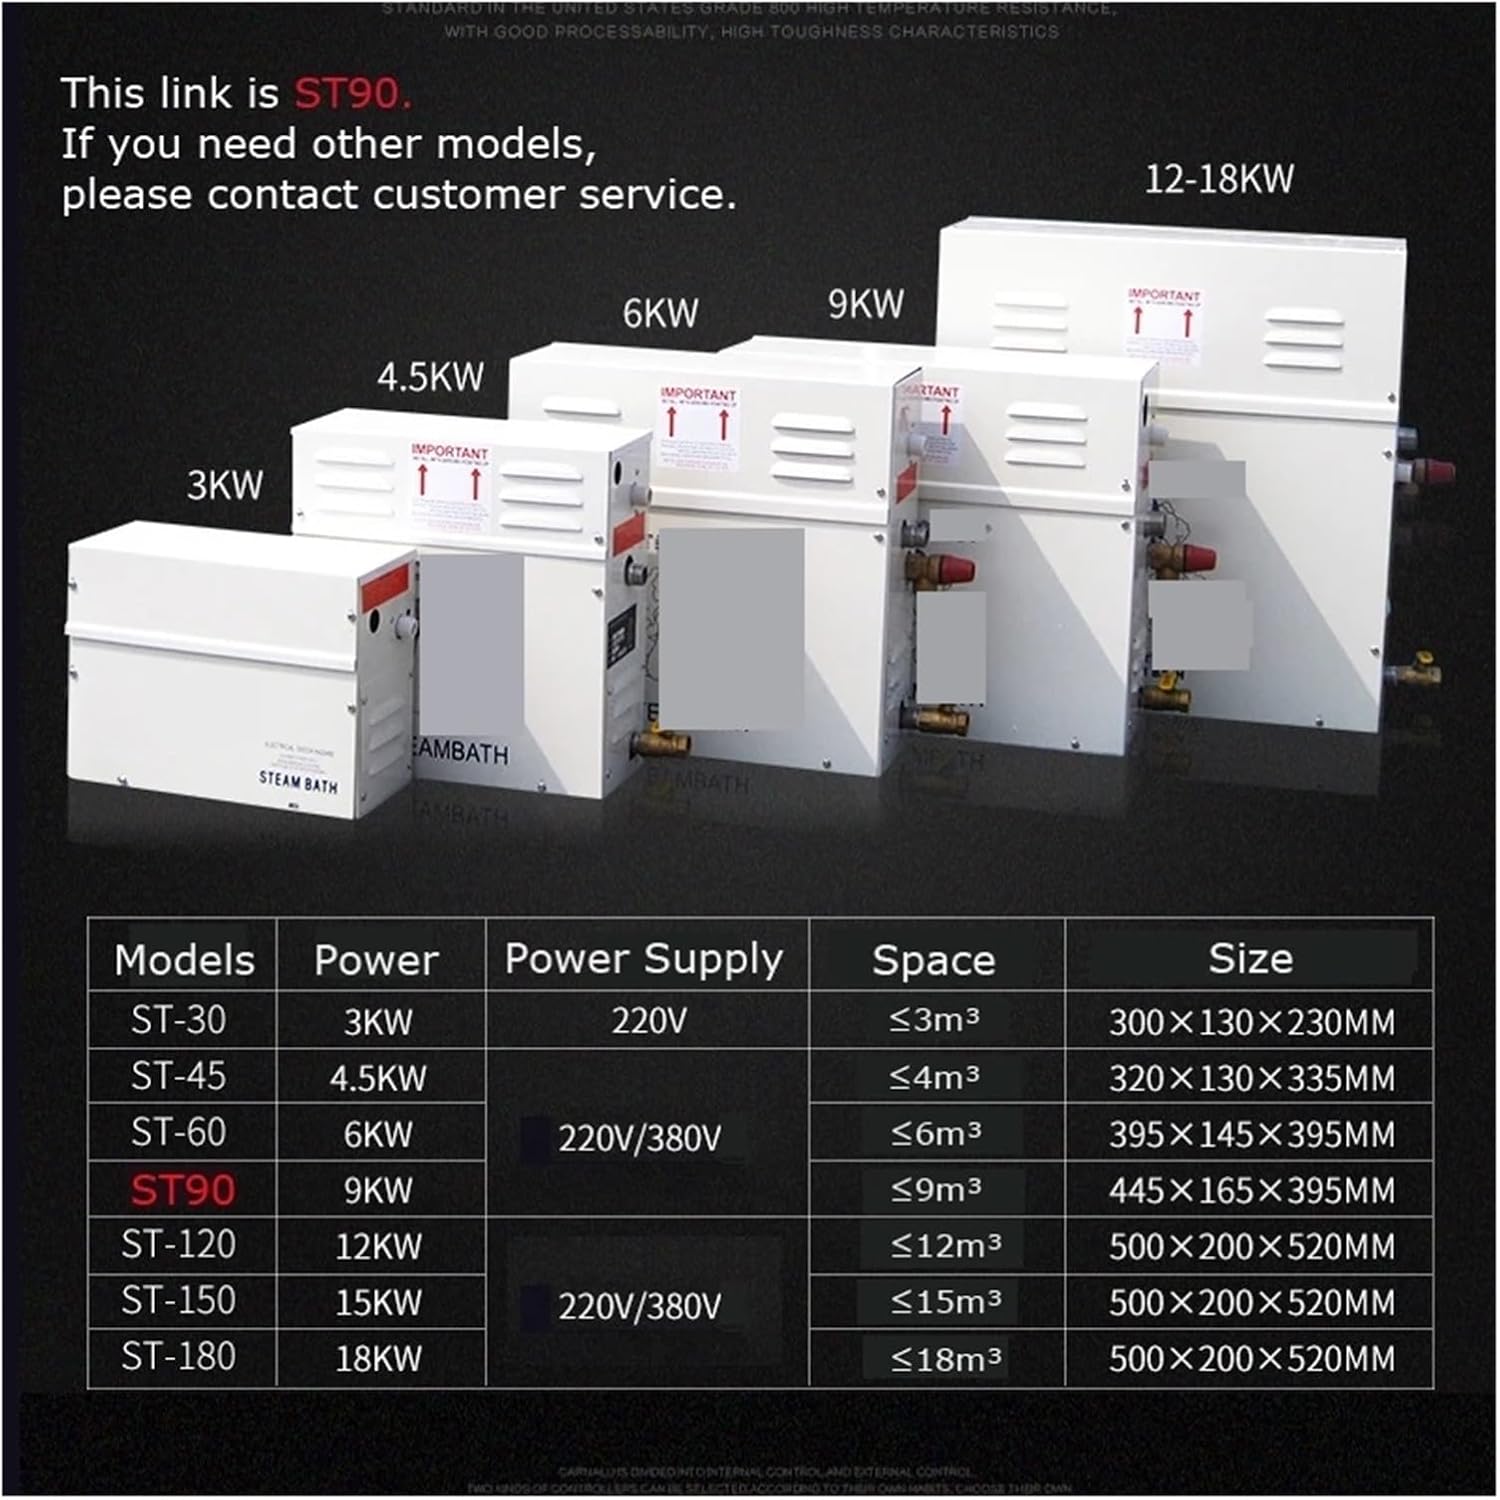
4. Specifications
Detailed technical specifications for the YHMMYSHX ST-90 Steam Generator.
| Parameter | Value |
|---|---|
| Model | ST-90 |
| Power | 9KW |
| Voltage | AC (Specific voltage depends on regional model, typically 220V/380V) |
| Suit Area | 4-9 m³ |
| Water Tank Material | Stainless Steel |
| Main Material | Electrolytic plate with spray, stainless steel |
| Function | Wet Steam Generation |
| Control Panel | Microcomputer digital display (Time and Temperature setup) |
| Package Dimensions | 18.9 x 14.96 x 7.09 inches |
| Item Weight | 21.2 pounds |
| Manufacturer | YHMMYSHX |
| Item Model Number | 456496968890226 |
5. Installation and Setup
Installation should only be performed by qualified professionals. Ensure all local codes and regulations are followed.
- Mounting Location: Select a dry, well-ventilated location for the steam generator, ensuring it is installed level and with the 'IMPORTANT' arrows pointing upwards. The unit should be accessible for maintenance.
- Water Supply Connection: Connect the water intake to a cold water supply line. Ensure a shut-off valve is installed for easy maintenance. Use appropriate plumbing fittings and sealants to prevent leaks.
- Steam Outlet Connection: Connect the steam outlet to the steam head inside the sauna or shower enclosure. Ensure the steam line is properly insulated and sloped to prevent condensation buildup.
- Drainage Connection: Connect the outfall (drainage outlet) to a suitable drain. This is essential for emptying the tank for maintenance or in case of an overflow.
- Electrical Wiring: All electrical connections must be made by a licensed electrician. Connect the unit to the appropriate power supply (e.g., 220V/380V, 50-60Hz) as specified on the unit's label. Ensure proper grounding and circuit protection (e.g., circuit breaker) are in place.
- Control Panel Connection: Connect the digital control panel to the main unit using the provided cable. Ensure the connection is secure.
- Initial Test: After all connections are made, slowly open the water supply valve to fill the tank. Check for any leaks. Then, power on the unit and perform a test run according to the operating instructions.
6. Operating Instructions
The ST-90 Steam Generator is controlled via a user-friendly digital display panel. Familiarize yourself with the panel's functions before operation.

Control Panel Functions:
- ON/OFF Button: Powers the unit on or off.
- SET Key: Used to enter setting mode for time and temperature.
- Up/Down Arrows: Adjust time and temperature values.
- Time Display: Shows the remaining operating time.
- Temperature Display: Shows the current or set temperature.
- Heating Indicator: Illuminates when the heating element is active.
- Heat Preservation Indicator: Illuminates when the unit is maintaining temperature.
- Lighting Button (if applicable): Controls internal lighting if connected.
Basic Operation Steps:
- Power On: Press the ON/OFF button to turn on the steam generator. The display will illuminate.
- Set Temperature: Press the SET key until the temperature display flashes. Use the Up/Down arrows to adjust to your desired temperature. Press SET again to confirm.
- Set Time: Press the SET key until the time display flashes. Use the Up/Down arrows to adjust the desired operating duration. Press SET again to confirm.
- Start Steaming: The unit will begin heating the water to generate steam. The heating indicator will be active.
- Power Off: Press the ON/OFF button to turn off the unit at any time. The unit will automatically shut off after the set time expires.
7. Maintenance
Regular maintenance ensures optimal performance and extends the lifespan of your steam generator. Always disconnect power before performing any maintenance.
- Descaling: Depending on water hardness, the steam generator may accumulate mineral deposits. Periodically descale the unit using a suitable descaling solution designed for steam generators. Follow the descaling product's instructions carefully.
- Drainage: Regularly drain the water tank to remove sediment. Use the outfall connection for this purpose.
- Cleaning: Wipe the exterior of the unit and the control panel with a soft, damp cloth. Do not use abrasive cleaners or solvents.
- Inspection: Periodically inspect all water and electrical connections for signs of wear, corrosion, or leaks. Address any issues promptly.
8. Troubleshooting
This section addresses common issues you might encounter with your steam generator. For problems not listed here, contact customer support.
| Problem | Possible Cause | Solution |
|---|---|---|
| Unit does not power on. | No power supply; loose electrical connection; faulty control panel. | Check power outlet and circuit breaker. Ensure all electrical connections are secure. If problem persists, contact a qualified electrician. |
| No steam production. | No water supply; low water level; heating element failure; incorrect temperature setting. | Ensure water supply is open and tank is filled. Check water level sensor. Verify temperature setting is above ambient. If heating element is suspected, contact service. |
| Water leakage. | Loose plumbing connections; damaged seals or pipes. | Inspect all water connections and tighten as necessary. Check for visible damage to pipes or seals. If damage is found, replace affected components. |
| Error code on display. | Specific system fault (e.g., water shortage, overheating). | Refer to the control panel's specific error code guide (if available) or contact customer support with the error code displayed. |
9. Warranty and Support
Specific warranty details for the YHMMYSHX ST-90 Steam Generator are not provided in this document. Please refer to your purchase documentation or contact the retailer/manufacturer directly for warranty information and customer support.
For technical assistance, spare parts, or service inquiries, please contact YHMMYSHX customer service through the contact information provided at the point of purchase or on the manufacturer's official website.