
1. Introduction
This manual provides comprehensive instructions for the proper installation and maintenance of the NBXYUFK Automotive Weather Stripping, specifically designed for the Lotus Emeya. This product is engineered to enhance your vehicle's interior comfort by reducing external noise, preventing the ingress of wind, rain, and dirt, and improving the efficiency of your vehicle's climate control system.
Our automotive seals feature a thick, durable rubber design that effectively blocks wind, rain, dirt, and noise, providing a more comfortable and quiet ride. Easy to install and long-lasting, they are an ideal choice for upgrading your door and window seals.

The NBXYUFK Automotive Weather Stripping, shown coiled, ready for installation. The red backing protects the adhesive layer.
2. Product Features
- Vehicle Specific Design: Designed for Lotus Emeya, this flexible rubber seal provides reliable performance for upgrading door, window, or trunk seals, effectively sealing against wind, dirt, and water.
- Premium Material: Made from high-quality rubber with strong structural stability and excellent surface adhesion, ensuring the seal remains fixed without peeling or slipping. Offers good water resistance, dirt protection, and noise reduction.
- Enhanced Protection: The thickened double-layer design enhances sealing, blocking wind, dirt, rain, and road noise for a quieter and cleaner cabin. Cushions door impact, reducing scratches and wear, and protecting vehicle paint and structure.
- Easy Installation: Features strong self-adhesive backing for easy, tool-free installation. Clean the surface, peel off the backing, and press the weatherstrip along the contour. Its flexible structure bends easily around curves and corners for a firm, seamless fit.

This visual highlights common issues addressed by effective weather stripping: reducing external noise, improving climate control efficiency, and preventing dirt and water ingress into the vehicle cabin.
3. Specifications
| Attribute | Detail |
|---|---|
| Brand | NBXYUFK |
| Model Number | NBXYUFK-89190284-01 |
| Part Number | 506592_NBXYUFK-89190284-01 |
| Applicable Car Model | Lotus Emeya |
| Material | Rubber |
| Size | 24M / 78.74ft |
| Color | Black (normal) |
| Item Weight | 2.2 pounds |
| Item Package Quantity | 1 |
| Batteries Required | No |

This image illustrates the cross-sectional dimensions of the weather stripping (1cm x 1cm) and confirms the 24-meter (78.74 feet) length, suitable for sealing four car doors.
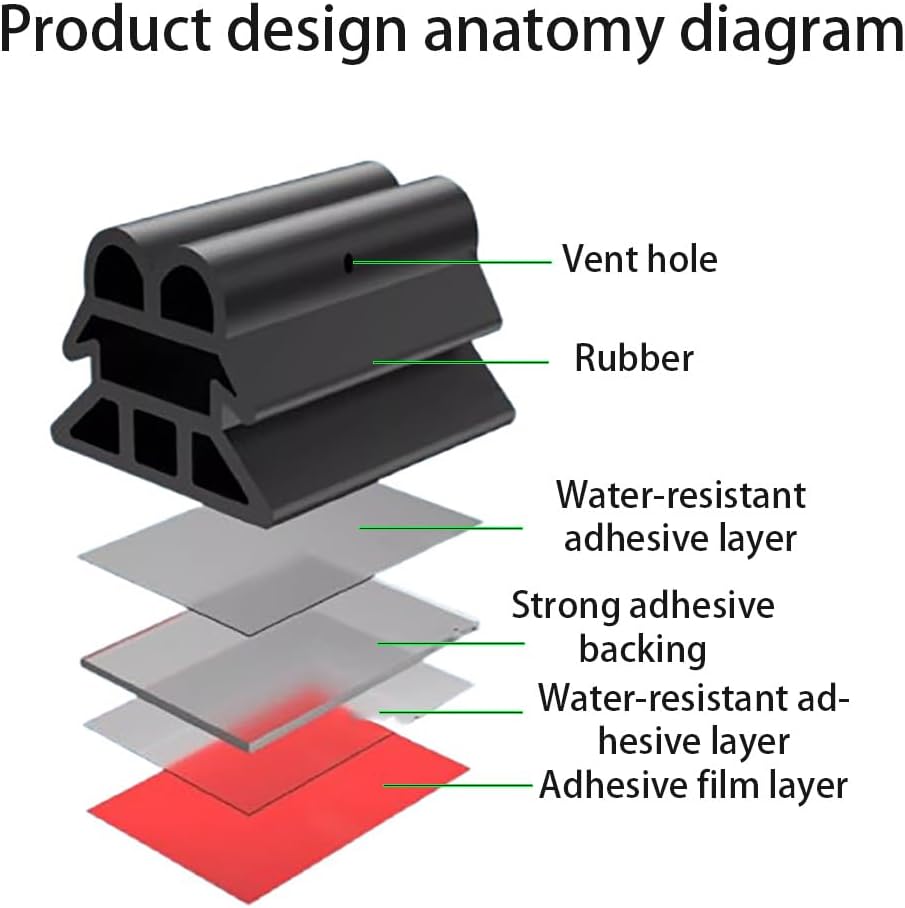
Anatomy of the weather stripping, detailing its construction from the outer rubber layer with a vent hole, through multiple adhesive layers, to the protective adhesive film.
4. Setup and Installation
Proper installation is crucial for the optimal performance of your weather stripping. Follow these steps carefully:
- Prepare the Surface: Before installation, thoroughly clean the surface where the weather stripping will be applied. Ensure the area is free of dust, dirt, grease, and moisture. A clean, dry surface is essential for proper adhesion.
- Measure and Mark: Measure the length required for each section (e.g., door frame, trunk lid). Mark the intended placement of the weather stripping to ensure accurate alignment and to avoid repeated adjustments.
- Apply the Stripping: Carefully peel off a small section of the red adhesive backing. Align the weather stripping with your marked line and press it firmly onto the surface. Continue peeling the backing and pressing the strip along the contour of the car's edge.
- Ensure Adhesion: After applying the entire length, go back and press firmly along the entire strip to ensure maximum adhesion. Pay special attention to curves and corners.
- Trim Excess: Use scissors or a sharp utility knife to carefully cut off any excess weather stripping at the end of the application area.
Important Notes:
- Avoid stretching the weather stripping during installation, as this can lead to an uneven seal.
- Allow at least 24 hours for the adhesive to fully cure before exposing the vehicle to heavy rain or washing.

Examples of where the weather stripping can be installed on a vehicle, including door frames, under the hood, rear passenger doors, and the trunk lid, marked with red lines for clarity.

Step-by-step guide for installation: 1. Wipe the installation surface clean. 2. Evenly apply the adhesive (implied, as it's self-adhesive). 3. Press the strip firmly along the car's contour. 4. Cut off any excess material.
5. Operating Instructions
Once installed, the NBXYUFK Automotive Weather Stripping operates passively to provide continuous sealing and protection. No active operation is required. The benefits include:
- Reduced external noise for a quieter cabin environment.
- Improved efficiency of heating and air conditioning by preventing air leaks.
- Protection against dust, dirt, rain, and other environmental elements entering the vehicle.
- Cushioning effect to reduce impact and wear when closing doors and trunk.

This image emphasizes the product's flexibility and strong sealing capability, designed for long-lasting durability.
6. Maintenance
To ensure the longevity and effectiveness of your weather stripping, consider the following maintenance tips:
- Regular Cleaning: Periodically wipe down the weather stripping with a damp cloth to remove accumulated dust and dirt. Avoid harsh chemicals that could degrade the rubber.
- Inspection: Regularly inspect the weather stripping for any signs of wear, cracking, or detachment. If any section appears loose, gently press it back into place to re-establish adhesion.
- Avoid Damage: Be mindful when loading or unloading items from your vehicle to avoid snagging or tearing the weather stripping.
7. Troubleshooting
If you experience issues with your weather stripping, consider these common troubleshooting steps:
- Poor Adhesion: If the stripping is peeling, ensure the surface was thoroughly cleaned and dry before initial installation. Re-clean the area and apply a new section if necessary, ensuring firm pressure during application.
- Incomplete Seal / Noise: Check for any gaps or areas where the stripping is not fully compressed when the door/trunk is closed. This might indicate improper placement or a need for additional sealing in that specific spot.
- Damage: If the rubber is torn or significantly worn, it may need to be replaced to maintain an effective seal.
8. Warranty and Support
For any questions, concerns, or support regarding your NBXYUFK Automotive Weather Stripping, please contact our customer service. While specific warranty details are not provided in this manual, we are committed to providing assistance for product-related inquiries.
Please refer to your purchase documentation or the retailer's website for specific warranty terms and contact information.