1. Introduction
This manual provides detailed instructions for the installation, operation, maintenance, and troubleshooting of your Auotac 850W Fully Modular Power Supply. This power supply unit (PSU) is designed to deliver stable and efficient power to your PC components, featuring 80 PLUS Gold certification, ATX 3.1 & PCIe 5.1 compliance, and a low-noise RGB fan.

Image: Auotac 850W Fully Modular Power Supply, showcasing its white casing and vibrant RGB fan.
2. Safety Information
Please read and follow these safety guidelines carefully to prevent injury or damage to your equipment:
- Ensure the power supply is disconnected from the main power outlet before installation or maintenance.
- Do not open the PSU casing. High voltages are present inside, even when disconnected.
- Install the PSU in a well-ventilated area, away from heat sources and moisture.
- Use only the modular cables provided with this power supply. Using incompatible cables can cause damage.
- Ensure all cable connections are secure before powering on the system.
3. Package Contents
Verify that all items are present in your package:
- Auotac 850W Fully Modular Power Supply Unit
- Modular Cable Set (including 24-pin Motherboard, 4+4-pin CPU, 12V-2x6 PCIe 5.1, 6+2-pin PCIe, SATA, 4-pin Molex)
- AC Power Cord
- PSU Tester
- Cable Management Combs
- Cable Ties
- Mounting Screws
- ARGB Light Cable

Image: Overview of the modular cables and their respective lengths included with the power supply.
4. Setup and Installation
Follow these steps to install your power supply:
4.1 Physical Installation
- Ensure your PC case is compatible with ATX power supplies. The Auotac 850W PSU has dimensions of 150mm (L) x 150mm (W) x 86mm (H).
- Mount the PSU into the designated PSU bay in your PC case using the provided mounting screws.
4.2 Modular Cable Connections
The fully modular design allows you to connect only the necessary cables, improving airflow and cable management.

Image: Fully modular power supply with organized cables using cable combs.
- Identify the required cables for your motherboard, CPU, graphics card(s), and storage devices.
- Connect the appropriate modular cables to the corresponding ports on the PSU. Refer to the labels on the PSU for correct placement (e.g., Motherboard, CPU/PCIe, SATA/Molex).
- Connect the other end of each cable to your PC components.
- 12V-2x6 PCIe 5.1 Cable: For modern high-end graphics cards, use the dual-color 12V-2x6 cable. The yellow connector is designed to indicate proper seating. Ensure it is fully inserted until the yellow portion is no longer visible, confirming a secure connection.

Image: Illustration of the dual-color 12V-2x6 cable, highlighting the yellow connector for proper connection verification.
4.3 Using the PSU Tester
The included PSU tester allows you to verify the power supply's functionality before connecting it to your motherboard.
- Connect the 24-pin main power cable from the PSU to the PSU tester.
- Plug the AC power cord into the PSU and a wall outlet.
- Turn on the PSU using the main power switch. The tester will indicate if the PSU is functioning correctly.
- Disconnect the PSU from power and the tester once testing is complete.
5. Operating Instructions
5.1 Power On/Off
After all components are connected, plug the AC power cord into the PSU and a wall outlet. Use the main power switch on the back of the PSU to turn the unit on or off.
5.2 Silent Mode and RGB Lighting Control
The PSU features a 140mm low-noise fan with a silent mode and adjustable RGB lighting. Control switches are located on the back of the unit.

Image: Rear panel of the PSU, indicating switches for Silent Mode and RGB Lighting control.
- Silent Mode: Toggle the switch to activate or deactivate silent mode. In silent mode, the fan operates at a lower RPM for reduced noise. Under high load conditions, the silent mode may automatically disable, and the fan speed will increase for optimal cooling.
- RGB Lighting: Use the RGB lighting switch to cycle through various lighting effects or turn the RGB off.
- A-RGB Sync: The PSU is compatible with A-RGB software from most mainstream motherboards. Connect the included ARGB light cable to your motherboard's 5V 3-pin ARGB header to synchronize lighting effects with your system.

Image: Example of A-RGB synchronization with other PC components.
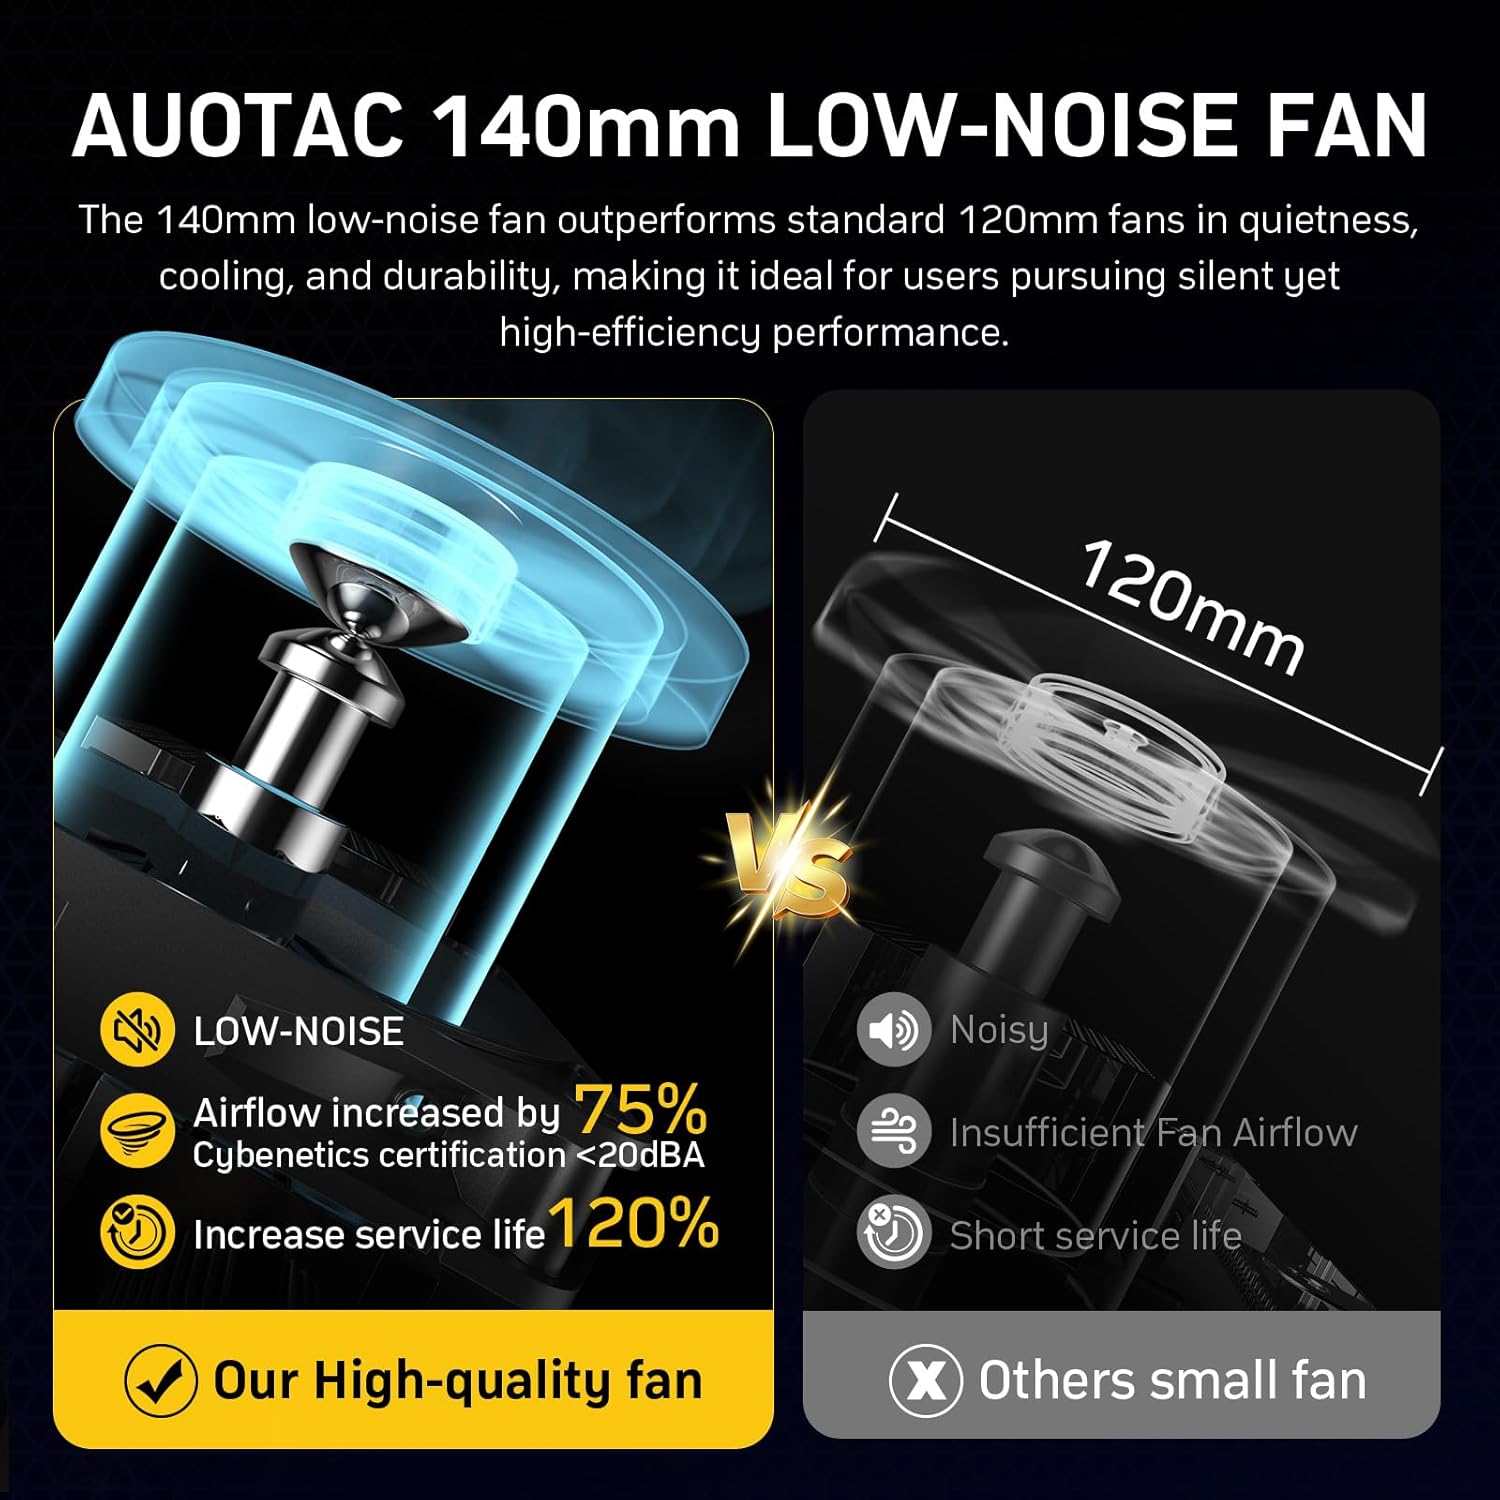
Image: Diagram illustrating the benefits of the 140mm low-noise fan compared to a standard 120mm fan.
6. Maintenance
Regular maintenance helps ensure the longevity and optimal performance of your power supply.
- Cleaning: Periodically clean the exterior of the PSU and its fan grille to prevent dust buildup. Use compressed air to gently remove dust from the fan blades and internal components. Ensure the PSU is powered off and unplugged before cleaning.
- Cable Management: Ensure cables are neatly routed and not obstructing airflow within the PC case. Use the provided cable combs and ties for organization.
7. Troubleshooting
If you encounter issues with your power supply, refer to the following common problems and solutions:
- No Power:
- Check if the AC power cord is securely plugged into both the PSU and the wall outlet.
- Ensure the main power switch on the PSU is in the 'ON' position.
- Verify all modular cables are correctly and securely connected to both the PSU and the components. Pay special attention to the 24-pin motherboard and CPU power connectors.
- Use the included PSU tester to confirm the power supply itself is functional.
- System Instability/Crashes:
- Ensure your system's power requirements do not exceed the PSU's 850W capacity.
- Check for loose cable connections, especially the 12V-2x6 PCIe cable for graphics cards. The yellow connector should be fully seated.
- Verify that your wall outlet is providing stable power.
- Fan Noise:
- Ensure silent mode is activated if you prefer quieter operation (note: it may disable under high load).
- Clean any dust buildup from the fan and grille.
If problems persist after following these steps, please contact Auotac customer support.
8. Specifications
| Feature | Detail |
|---|---|
| Model Name | S-850MZ 850A-GR |
| Brand | Auotac |
| Output Wattage | 850 Watts |
| Efficiency Certification | 80 PLUS Gold (92% efficiency) |
| Form Factor | ATX |
| Dimensions (L x W x H) | 150mm x 150mm x 86mm (5.91 x 5.91 x 3.39 inches) |
| Cooling Method | Air (140mm Low-Noise Fan) |
| Power Supply Design | Fully Modular |
| ATX Standard | ATX 3.1 & PCIe 5.1 Ready |
| Capacitors | 100% Japanese-made 105°C Electrolytic Capacitors |
| Minimum Input Voltage | 100 Volts (AC) |
| Maximum Input Voltage | 240 Volts (AC) |
| Frequency | 47-63Hz |
| System Bus Connector Type | 20+4 Pin |
| UPC | 746205393034 |
8.1 DC Output Table
| +3.3V | +5V | +12V | -12V | +5VSB |
|---|---|---|---|---|
| 20A | 20A | 70.5A | 0.3A | 3.0A |
| 846W | 3.6W | 15W | ||
| Combined Power: ≤130W (+3.3V & +5V) | Total Output: 850W | ||||

Image: Internal components of the PSU, emphasizing the high-quality Japanese capacitors.
9. Warranty Information
The Auotac 850W Fully Modular Power Supply comes with a 10-Year Limited Manufacturer's Warranty. This warranty covers defects in materials and workmanship under normal use. Please retain your proof of purchase for warranty claims. For full warranty terms and conditions, refer to the official Auotac website or contact customer support.
10. Customer Support
For technical assistance, warranty claims, or any questions regarding your Auotac 850W Fully Modular Power Supply, please visit the official Auotac website or contact their customer support team. Contact details can typically be found on the product packaging or the manufacturer's website.