1. Introduction
This manual provides detailed instructions for the assembly, operation, maintenance, and troubleshooting of your Veken ODH5V207 Electric Standing Desk. Please read this manual thoroughly before assembly and use to ensure proper function and safety. Keep this manual for future reference.
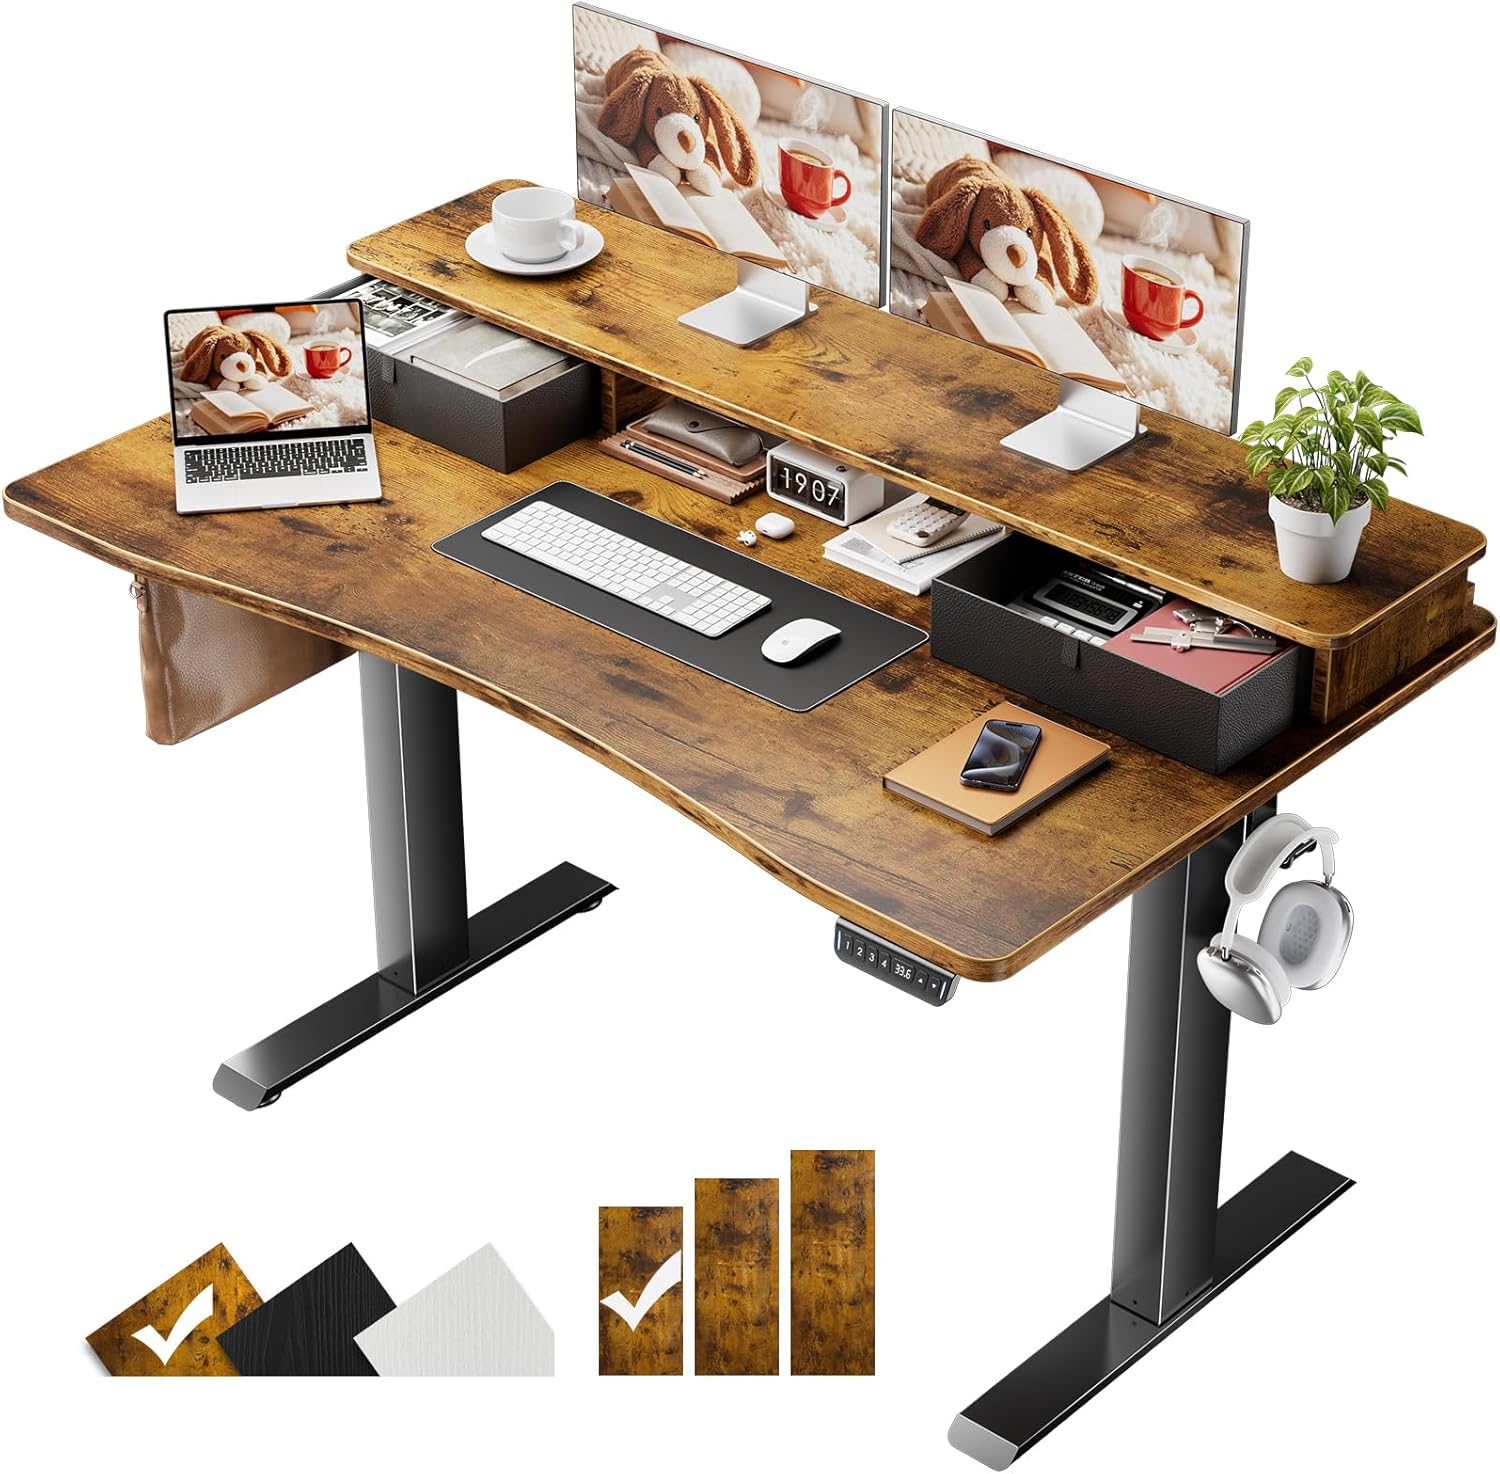
Figure 1: Veken Electric Standing Desk (Brown, 47.2x27.6 Inch) featuring a monitor shelf and integrated storage drawers.
2. Safety Information
- Ensure all components are securely fastened before use.
- Keep children and pets away from the desk during operation.
- Do not overload the desk. Refer to specifications for maximum weight capacity.
- Avoid placing liquids directly on the control panel or near electrical components.
- Disconnect power before cleaning or performing maintenance.
- Use only the provided power adapter.
3. Package Contents
Verify that all parts are present before beginning assembly:
- Desk Frame (Legs, Crossbar, Motor)
- Desktop Boards (Main Desktop, Monitor Shelf)
- Control Panel
- Power Adapter and Cable
- Storage Drawers (2 units)
- Headphone Hook
- Cable Clips
- Feet Pads (4 units)
- Assembly Hardware (Screws, Allen Wrench, etc.)
- User Manual
4. Setup and Assembly
Follow these steps to assemble your Veken Electric Standing Desk. An assembly video is available for visual guidance.
Video 1: Detailed assembly instructions for the Veken Electric Standing Desk. This video covers all steps from unboxing to final setup.
- Assemble Desk Legs and Crossbar: Attach the desk legs to the crossbar using the provided screws. Ensure the desktop board connectors are oriented upwards.
- Attach Side Plates and Transmission Rod: Secure the side plates to the desk frame. Install the transmission rod, ensuring it is fully inserted into the left leg's hexagonal nut. If the leg heights are different, turn the transmission rod clockwise until the left leg is in its lowest position.
- Attach Desktop to Frame: Carefully align the desktop boards with the pre-drilled holes on the frame. Use the provided screws to secure the desktop. Ensure the controller is on the same side as the motor.
- Connect Cables: Connect all necessary cables from the motor and control panel to the power adapter. Use the included cable clips to manage and secure the cables neatly under the desk.
- Assemble Monitor Shelf: Attach the monitor shelf to the main desktop using the designated hardware. Ensure cam locks are pointed downwards and rotated clockwise until tightened.
- Install Storage Drawers: Fold and insert the fabric storage drawers into their designated compartments on the monitor shelf.
- Attach Headphone Hook and Feet Pads: Secure the headphone hook to the side of the desk. Attach the feet pads to the bottom of the desk legs to protect your floor.

Figure 2: Exploded view illustrating the main components and pre-labeled accessories for quick and simple installation.

Figure 3: The Veken desk offers enhanced storage areas with integrated drawers and a monitor shelf, promoting a tidy workspace.
5. Operating Instructions
Your Veken Electric Standing Desk features an intuitive control panel for height adjustment and memory presets.
Video 2: Demonstration of programming and using the height memory presets on the Veken Electric Standing Desk.
- Adjusting Height: Use the Up (▲) and Down (▼) arrow buttons on the control panel to manually adjust the desk height. The current height will be displayed on the digital screen.
- Setting Memory Presets:
- Adjust the desk to your desired height using the arrow buttons.
- Press and hold one of the numbered preset buttons (1, 2, 3, or 4) until the display flashes or a beep is heard. This saves the current height to that preset.
- To recall a saved height, simply press the corresponding numbered preset button. The desk will automatically move to the saved position.
- Ergonomic Posture: Utilize the adjustable height feature to alternate between sitting and standing positions throughout your workday to reduce strain and improve comfort. The built-in monitor riser further supports ergonomic posture by elevating your screen to eye level.

Figure 4: The integrated monitor riser helps maintain an ergonomic posture, reducing neck and eye strain.
6. Maintenance
- Cleaning: Wipe the desk surfaces with a soft, damp cloth. Avoid harsh chemicals or abrasive cleaners.
- Cable Management: Periodically check and reorganize cables using the provided clips to prevent tangles and damage.
- Inspection: Regularly inspect all screws and connections to ensure they remain tight. Tighten if necessary.
- Motor Care: The electric motor is designed for durability. Avoid excessive or continuous operation without short breaks.
7. Troubleshooting
If you encounter issues with your Veken Electric Standing Desk, refer to the following common problems and solutions:
- Issue: Only one leg is moving up or down.
Reason: Incorrect installation of the transmission rod, preventing synchronized movement.
Solution:
- Unscrew the middle knob on the transmission rod.
- Remove the transmission rod.
- Press the left leg (the leg without the motor) to its lowest height.
- Connect the power cord.
- Press the down button until the right leg reaches its lowest height.
- Reinsert the transmission rod fully into the hexagonal nut on the left leg hole position.
- Tighten the middle knob. After correct installation, both legs should move simultaneously.
Video 3: Troubleshooting guide for when only one desk leg is moving.
- Issue: Side plate holes do not align with desk board holes.
Reason: Incorrect installation direction of the side plate.
Solution:
- Remove the side plates.
- Identify the outer side of the plates (usually indicated in the assembly diagram).
- Reinstall the side plates, ensuring the outer side is connected to the leg of the table as shown in the manual.
Video 4: Troubleshooting guide for misaligned side plate holes during assembly.
8. Specifications
| Feature | Detail |
|---|---|
| Brand | Veken |
| Model Number | ODH5V207 |
| Product Dimensions | 27.6"D x 47.2"W x 27.9"H |
| Adjustable Height Range | 27.9" – 45.6" |
| Number of Height Positions | 4 (Programmable Memory Presets) |
| Desktop Material | Blockboard (Laminated) |
| Base Material | Cold-rolled steel |
| Item Weight | 43.4 Pounds |
| Special Features | Adjustable Height, Electric, Ergonomic, Hassle-free Installation, Memory Preset, Built-in Monitor Riser, Storage Drawers |
9. Warranty and Support
For warranty information or technical support, please refer to the contact details provided with your purchase documentation. You may also visit the official Veken website for additional resources.


