1. Important Safety Information
WARNING: Always keep hands and other body parts away from rotating parts. Wear appropriate protective gear, including gloves and eye protection, when operating the machine. Store the machine properly to prevent damage or injury. Read and understand all instructions before operating this snow shovel. Failure to follow these instructions may result in electric shock, fire, and/or serious personal injury.
- Ensure the battery is removed before performing any adjustments, cleaning, or maintenance.
- Do not operate the snow shovel in wet conditions or rain.
- Keep children and bystanders away from the operating area.
- Inspect the area to be cleared for foreign objects before operation.
- Use only MAXLANDER approved batteries and chargers.
2. Product Overview
The MAXLANDER 20V 12-Inch Cordless Electric Snow Shovel is designed for efficient snow removal on decks, steps, patios, and sidewalks. It features a powerful motor, an adjustable handle, and an LED light for enhanced visibility.

Image 1: Overview of the MAXLANDER Cordless Snow Shovel and its included accessories: the main shovel unit, a 20V 4.0Ah battery, a quick charger, a pair of protective gloves, and a storage cover.
3. Package Contents
Verify that all items are present in the package:
- MAXLANDER 20V 12-inch Electric Cordless Snow Shovel
- LED Light (integrated)
- Directional Plate (integrated)
- Adjustable Handle (integrated)
- 4.0Ah Battery Pack
- Quick Charger
- Snow Shovel Cover
4. Assembly Instructions
The MAXLANDER Cordless Snow Shovel is designed for quick and easy assembly.
- Attach the Handle: Align the lower shaft with the upper handle assembly.
- Secure the Connection: Insert the lock knob into the designated hole and rotate it to secure the two sections together. Ensure it is firmly tightened to prevent wobbling during operation.

Image 2: Visual guide for the 2-step quick assembly process, illustrating the insertion of the lock knob and rotation to secure the handle.
5. Operating Instructions
5.1 Charging the Battery
Before first use, fully charge the 4.0Ah battery pack using the provided quick charger. Insert the battery into the charger, and connect the charger to a power outlet. The indicator lights on the charger will show the charging status.
5.2 Starting the Snow Shovel
To start the snow shovel:
- Insert the fully charged battery into the battery slot on the shovel.
- Press and hold the safety button located on the handle.
- While holding the safety button, press the trigger switch to activate the motor. Release the safety button once the motor starts.

Image 3: Illustration of the 2-step quick start process, highlighting the safety button and trigger for activation.
5.3 Snow Removal Techniques
The snow shovel is capable of clearing a 12-inch wide and 6-inch deep path, throwing snow up to 23 feet.
- Clearing Path: Push the shovel forward at a steady pace. For deeper snow, make multiple passes, clearing a thinner layer each time.
- Directional Plate: Adjust the integrated directional plate to control the snow throwing direction. This allows you to direct snow away from cleared areas or sensitive objects. The plate offers 60 degrees of adjustment (30 degrees left or right from center).
- LED Light: Utilize the integrated LED light for improved visibility when operating in low-light conditions, such as dawn, dusk, or nighttime.

Image 4: A user demonstrating the snow shovel's efficient snow removal, showing snow being thrown a significant distance.
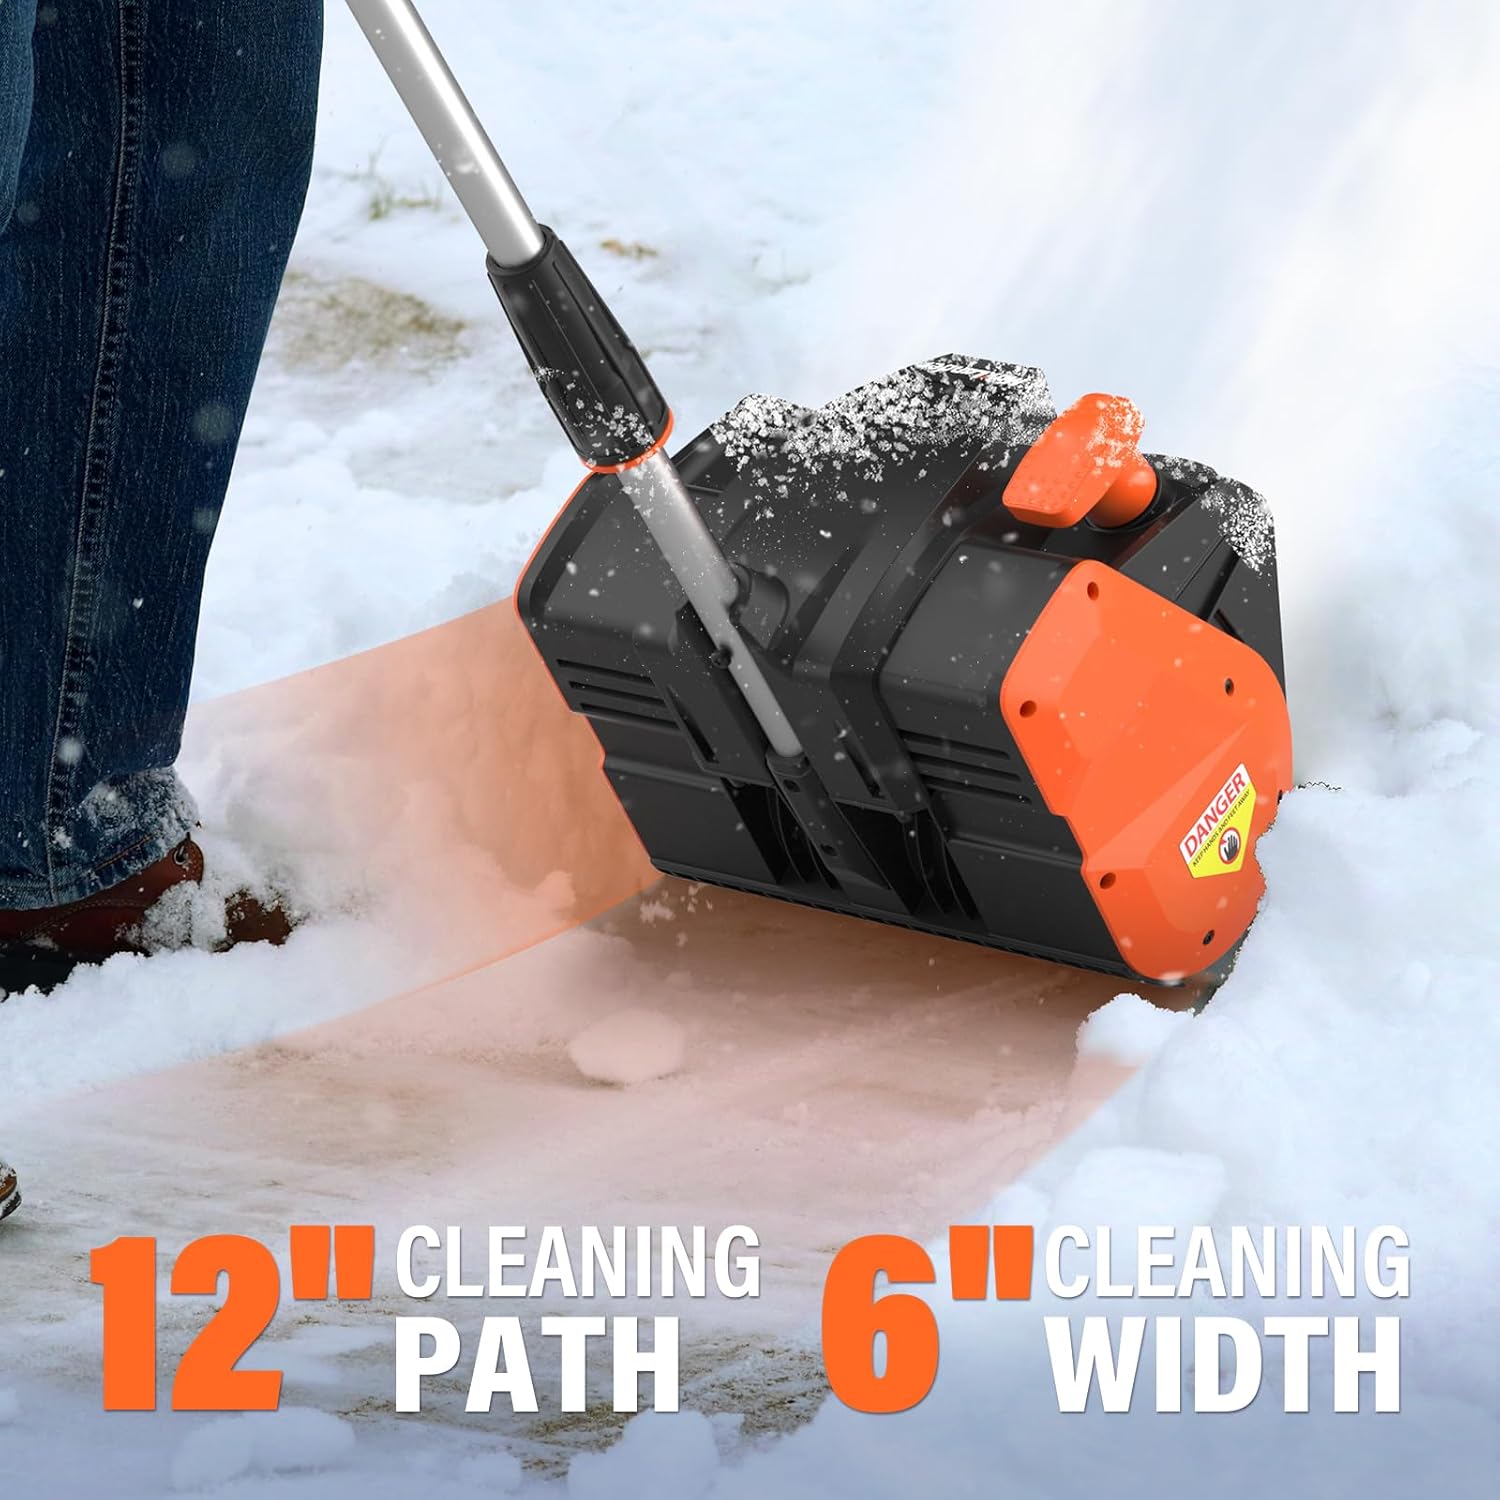
Image 5: The snow shovel clearing a path, illustrating its 12-inch cleaning width and 6-inch cleaning depth.

Image 6: The snow shovel in use during low light conditions, with its high-intensity LED headlights providing enhanced visibility.

Image 7: Detail of the adjustable directional plate, indicating its 60-degree range for controlling snow throwing direction.

Image 8: A user adjusting the ergonomic handle, designed for comfortable operation and reduced back strain.
6. Maintenance
Regular maintenance ensures optimal performance and extends the lifespan of your snow shovel.
- Cleaning: After each use, remove the battery and clean any snow, ice, or debris from the auger and housing. Use a damp cloth; do not use harsh chemicals.
- Storage: Store the snow shovel in a dry, protected area. Use the provided cover to protect it from dust and moisture. Ensure the battery is removed and stored separately in a cool, dry place. The compact design allows for less storage space.
- Inspection: Periodically check all fasteners and connections for tightness. Inspect the auger blade for wear or damage. Replace worn parts as necessary.

Image 9: The snow shovel stored compactly in a shed, highlighting its space-saving design.
7. Troubleshooting
If you encounter issues with your MAXLANDER Cordless Snow Shovel, refer to the following common problems and solutions:
| Problem | Possible Cause | Solution |
|---|---|---|
| Shovel does not start | Battery not charged or improperly inserted; Safety button not pressed; Trigger switch not engaged. | Ensure battery is fully charged and correctly inserted. Press the safety button before engaging the trigger switch. |
| Reduced snow throwing distance | Wet, heavy snow; Auger clogged; Low battery charge. | Clear snow in thinner passes. Remove any clogs from the auger (with battery removed). Recharge or replace battery. |
| Excessive vibration or noise | Loose components; Damaged auger blade; Foreign object in auger. | Check all fasteners. Inspect auger for damage or obstructions (with battery removed). |
If the problem persists after attempting these solutions, please contact MAXLANDER customer support.
8. Specifications
| Feature | Detail |
|---|---|
| Model Number | ML-WRSS01 |
| Voltage | 20 Volts |
| Clearing Width | 12 inches |
| Clearing Depth | 6 inches |
| Max Throwing Distance | Up to 23 feet |
| No-Load Speed | 2750 RPM |
| Item Weight (with battery) | Approximately 9.8 lbs |
| Product Dimensions | 10.43 x 19.88 x 12.59 inches |
| Battery Type | Lithium Ion (4.0Ah included) |
| Features | LED Light, Directional Plate, Adjustable Handle |

Image 10: An internal view of the snow shovel's motor and auger, illustrating its 2750 RPM no-load speed for high efficiency.
9. Warranty and Support
MAXLANDER products are manufactured to high-quality standards. For warranty information, product support, or to purchase replacement parts, please visit the official MAXLANDER website or contact their customer service department. Keep your purchase receipt as proof of purchase.
MAXLANDER Customer Service: Refer to your product packaging or the official MAXLANDER website for current contact information.