1. Introduction
This manual provides detailed instructions for the installation, operation, and maintenance of your Depvko 30A PWM Solar Charge Controller and 100A MPPT Solar Charge Controller. These devices are designed to manage power flow from your solar panels to your battery bank, ensuring efficient charging and protecting your batteries from overcharge and over-discharge. Please read this manual thoroughly before use to ensure proper functionality and safety.

Figure 1: Depvko 30A PWM and 100A MPPT Solar Charge Controllers.
2. 30A PWM Solar Charge Controller
2.1 Features
- Overcurrent, short-circuit, inverse connection, low voltage, and overcharge protection.
- Fully 3-stage PWM charge management.
- Compatible with 12V and 24V systems (automatic adaptation).
- Dual USB output 5V/2.5A (max) for charging mobile devices.
- LCD display for status and data.

Figure 2: Front view of the 30A PWM Solar Charge Controller.
2.2 Setup and Connection
Important: Connect the components in the specified order to prevent damage to the controller. Disassembly should be done in the reverse order.
- Connect Battery: First, connect the battery to the charge controller. Ensure the battery has sufficient voltage for the controller to recognize the correct battery type (12V or 24V).
- Add Solar Panels: Connect the solar panels to the charge controller.
- Connect DC Loads (Optional): If using DC loads directly from the controller, connect them next.
- Connect Inverter (Optional): If using an inverter, connect it to the battery bank.

Figure 3: Connection diagram for the 30A PWM Solar Charge Controller. Follow the numbered sequence for installation.
2.3 LCD Display and Settings
The LCD display provides real-time status and data. Use the buttons below the display to navigate and configure settings.

Figure 4: PWM Controller LCD Display and Setting Interface. Cycle through Main Display, Float Voltage, Discharge Reconnect, Discharge Stop, Work Mode, and Type of Battery.

Figure 5: PWM Controller LCD Display and Key Functions. The 'MENU' button switches display interfaces and enters/exits parameter settings. 'UP' and 'DOWN/ON/OFF' buttons adjust parameters and control load output.
Setting Parameters:
- In interfaces 2-5 (Float Voltage, Discharge Reconnect, Discharge Stop, Work Mode), press and hold the 'MENU' key for five seconds to restore defaults.
- To enter manual settings, press and hold the 'MENU' key for five seconds. The number will flash.
- Use the 'UP' and 'DOWN/ON/OFF' keys to adjust parameter values.
- Press the 'MENU' key for three seconds to exit the setting.
3. 100A MPPT Solar Charge Controller
3.1 Features
- Innovative MPPT technology for maximum charging current detection.
- High tracking efficiency of up to 99%.
- Compatible with 12V and 24V systems (automatic adaptation).
- Dual USB output 5V/2A for charging mobile devices.
- LCD display for status and data.
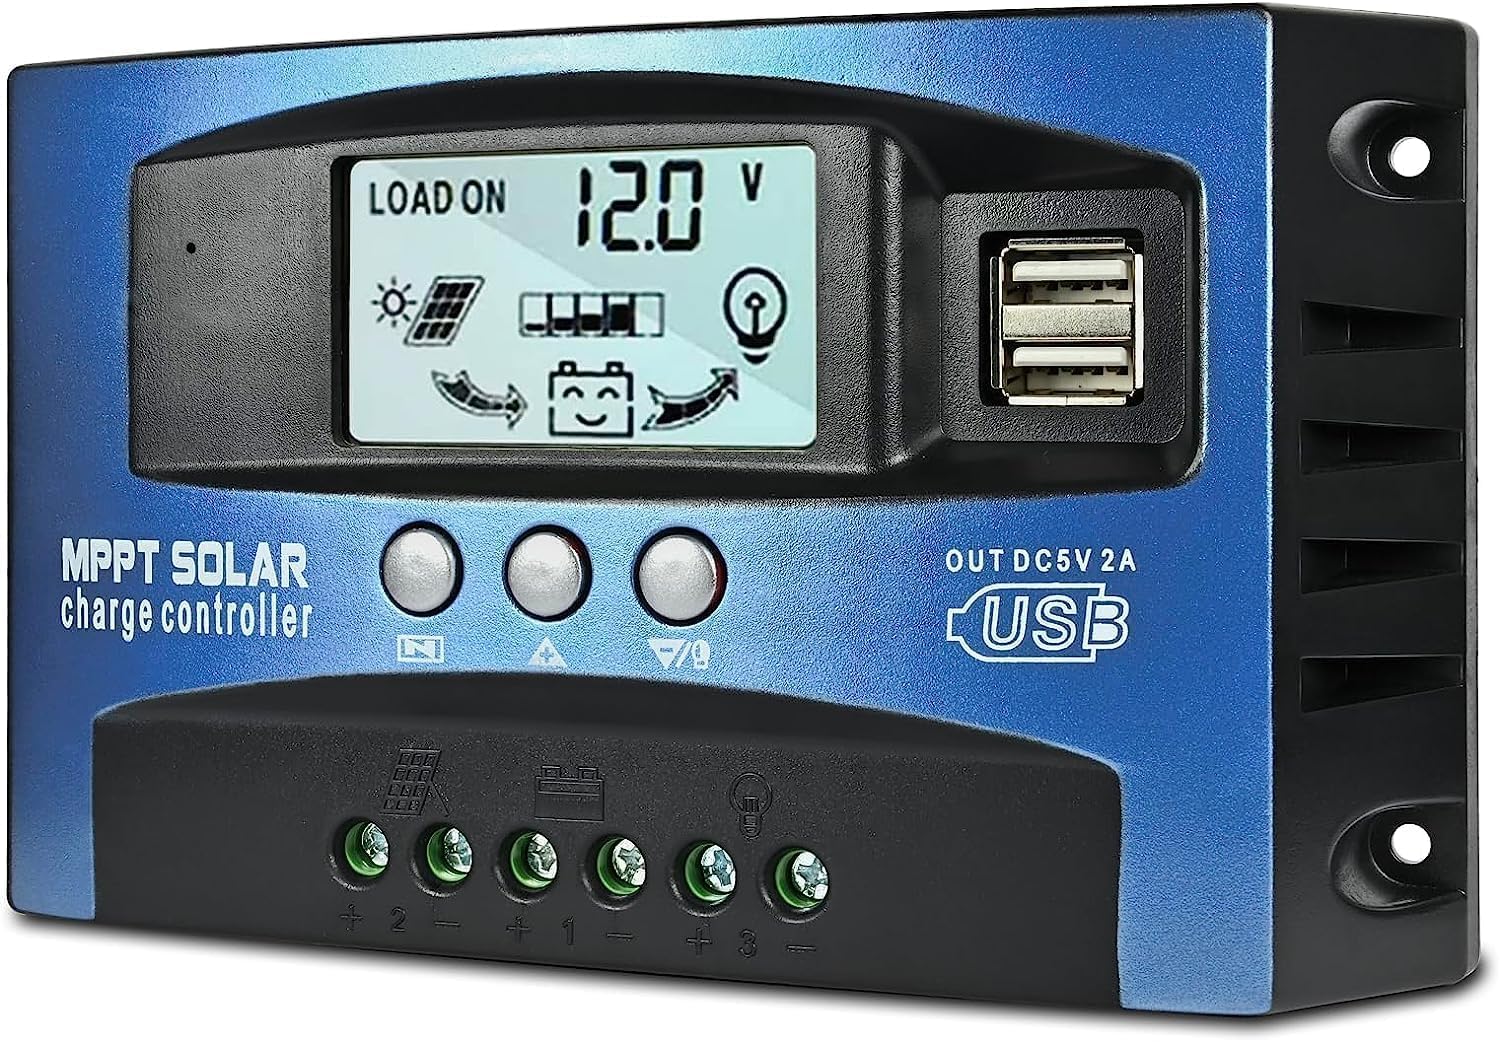
Figure 6: Front view of the 100A MPPT Solar Charge Controller.
3.2 Setup and Connection
Important: Connect the components in the specified order to prevent damage to the controller. Disassembly should be done in the reverse order.
- Connect Battery: First, connect the battery to the charge controller. Ensure the battery has sufficient voltage for the controller to recognize the correct battery type (12V or 24V).
- Add Solar Panels: Connect the solar panels to the charge controller.
- Connect DC Loads (Optional): If using DC loads directly from the controller, connect them next.
- Connect Inverter (Optional): If using an inverter, connect it to the battery bank.
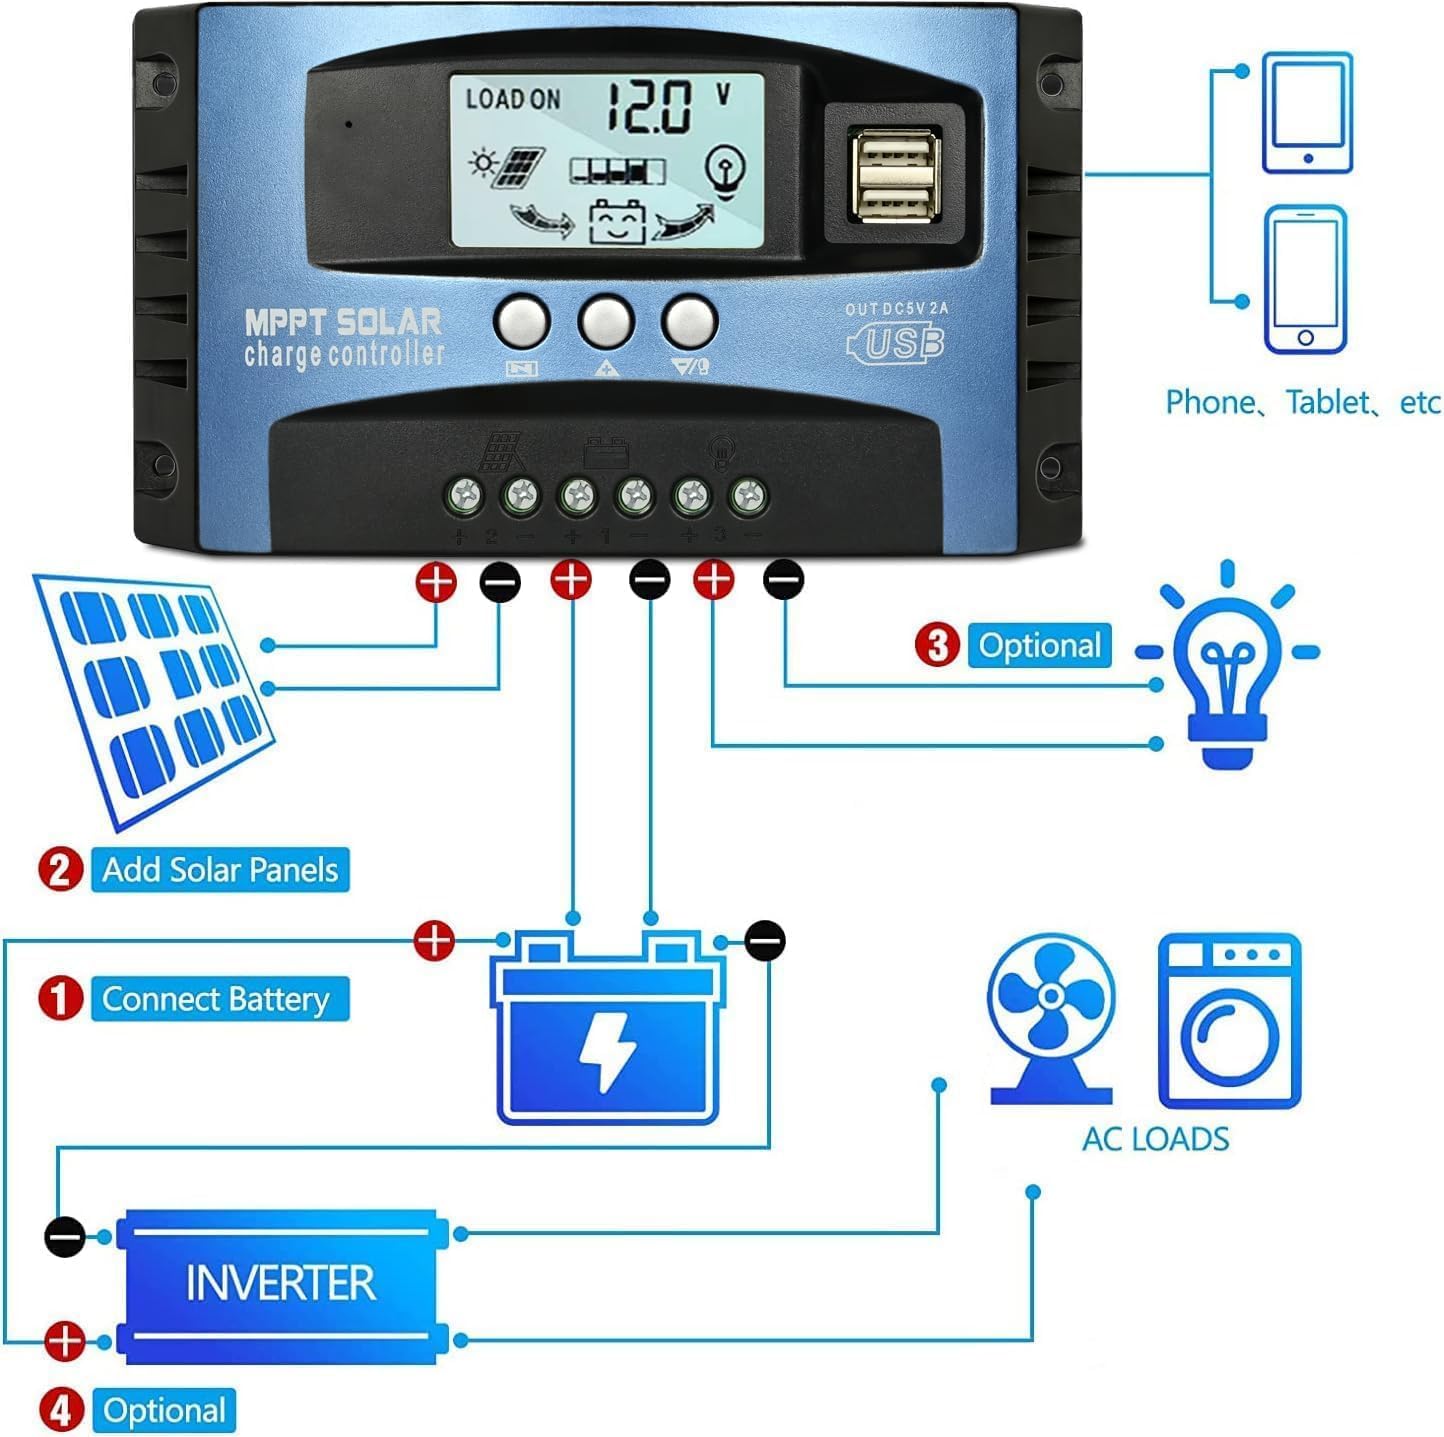
Figure 7: Connection diagram for the 100A MPPT Solar Charge Controller. Follow the numbered sequence for installation.
3.3 LCD Display and Settings
The LCD display provides real-time status and data. Use the buttons below the display to navigate and configure settings.

Figure 8: MPPT Controller LCD Display and Setting Interface. Cycle through Battery Voltage, Solar Panel Charge Current, Load Discharge Current, High Voltage Disconnection (HVD), Accumulated Discharging Power (Ah), Accumulated Charging Power (Ah), Low Voltage Reconnection (LVR), Low Voltage Disconnection (LVD), and Load Working Mode.
Operation Instructions:
- Short press the menu button to cycle through the interface and parameters.
- Long press the menu button for 3 seconds to enter the settings manually. The number will flash. Adjust values using the up/down keys. After completion, the system automatically saves settings and exits setup mode.
Function Declarations:
- Discharge recovery voltage: Refers to the battery discharge protection. The battery voltage to restore voltage, open the output.
- Discharge cut-off voltage: Refers to the battery discharge to the voltage when the load is off, to protect the battery, to prevent the battery over discharge damage.
- Load operation mode:
- [24H] Load output 24 Hours: (except for battery under voltage)
- [1-15H] Load on after sunset and closed after setting hours:
- [0H] Dusk to dawn:
Note:
- The light control function is controlled by the solar panel. The use of light control function requires access to the solar panel, otherwise the light has no effect.
- The load symbol (light bulb icon) indicates that the load output has been turned on, and there is no connection to the load.
- For [1-15H] or [0H] modes, the optical delay model is battery not under pressure condition. The battery symbol does not blink. Single short press the turn key can open/close load output.
4. Safety Precautions
- Ensure all connections are tight and correct to avoid loose connections that can cause excessive heat.
- Always connect the battery first, then the solar panels. Disconnect in reverse order.
- Do not attempt to repair or modify the controller yourself. Contact qualified personnel for service.
- Install the controller in a well-ventilated area, away from direct sunlight, high temperatures, and moisture.
- Use appropriate circuit breakers or fuses for all connections to protect against overcurrent.
5. Maintenance
- Regularly check all wiring for signs of wear, damage, or loose connections.
- Keep the controller clean and free from dust and debris. Use a dry cloth for cleaning.
- Ensure proper ventilation around the controller to prevent overheating.
- Monitor the LCD display periodically to ensure normal operation and correct parameter settings.
6. Troubleshooting
If you encounter issues, refer to the following common problems and solutions:
- Controller not turning on: Check battery connections and ensure the battery has sufficient voltage.
- No charging current: Verify solar panel connections, ensure panels are receiving sunlight, and check for any shading.
- Load not working: Check load connections, ensure the load is within the controller's capacity, and verify load output settings on the LCD.
- Battery not fully charging: Check solar panel output, battery health, and charging parameters on the controller.
- Error codes on display: Consult the specific controller's detailed manual (if available) or contact customer support with the error code.
7. Specifications
| Feature | Detail |
|---|---|
| Brand | Depvko |
| Model | B0FDWH62CT (Package includes 30A PWM and 100A MPPT controllers) |
| Voltage Compatibility | 12V / 24V (Automatic Adaptation) |
| Display Type | LCD |
| PWM Controller Current | 30A |
| MPPT Controller Current | 100A |
| USB Output (PWM) | Dual USB 5V/2.5A (max) |
| USB Output (MPPT) | Dual USB 5V/2A |
8. Warranty and Support
Depvko products are designed for reliability and performance. For warranty information, technical support, or service inquiries, please refer to the contact information provided with your purchase or visit the official Depvko website. Please have your product model number (B0FDWH62CT) available when contacting support.
9. Application Examples
These solar charge controllers are suitable for a wide range of applications, including home solar systems, RVs, boats, and other off-grid power solutions.

Figure 9: Examples of solar power system applications where these controllers can be utilized.