1. Introduction and Overview
This manual provides essential information for the safe and efficient installation, operation, and maintenance of your Auotac 1000W Fully Modular Power Supply. This power supply is designed to deliver stable and efficient power to your PC components, featuring 80 PLUS Gold certification, ATX 3.1 & PCIe 5.1 compliance, and a low-noise RGB fan.

Image: The Auotac 1000W Fully Modular Power Supply unit, presented alongside its packaging, highlighting its sleek black design and key features.
2. Safety Information
- Always disconnect the power cord from the wall outlet before installing or servicing the power supply.
- Ensure the power supply is installed in a well-ventilated area.
- Do not open the power supply casing. High voltages are present inside, and opening it will void the warranty.
- Use only the original modular cables provided with your Auotac power supply. Using incompatible cables from other power supplies may cause damage to your system.
- Ensure the power switch on the rear of the PSU is in the "O" (off) position before connecting to the AC power.
- Avoid exposing the power supply to moisture or extreme temperatures.
3. Package Contents
Your Auotac 1000W Fully Modular Power Supply package includes the following items:
- Auotac 1000W Power Supply Unit
- AC Power Cord
- Modular Cable Set (including 24-pin Motherboard, 4+4-pin CPU, 12V-2x6 PCI-E 5.1, 6+2-pin PCI-E, SATA, and 4-pin Molex cables)
- Cable Management Combs
- Mounting Screws
- ARGB Light Cable
- User Manual
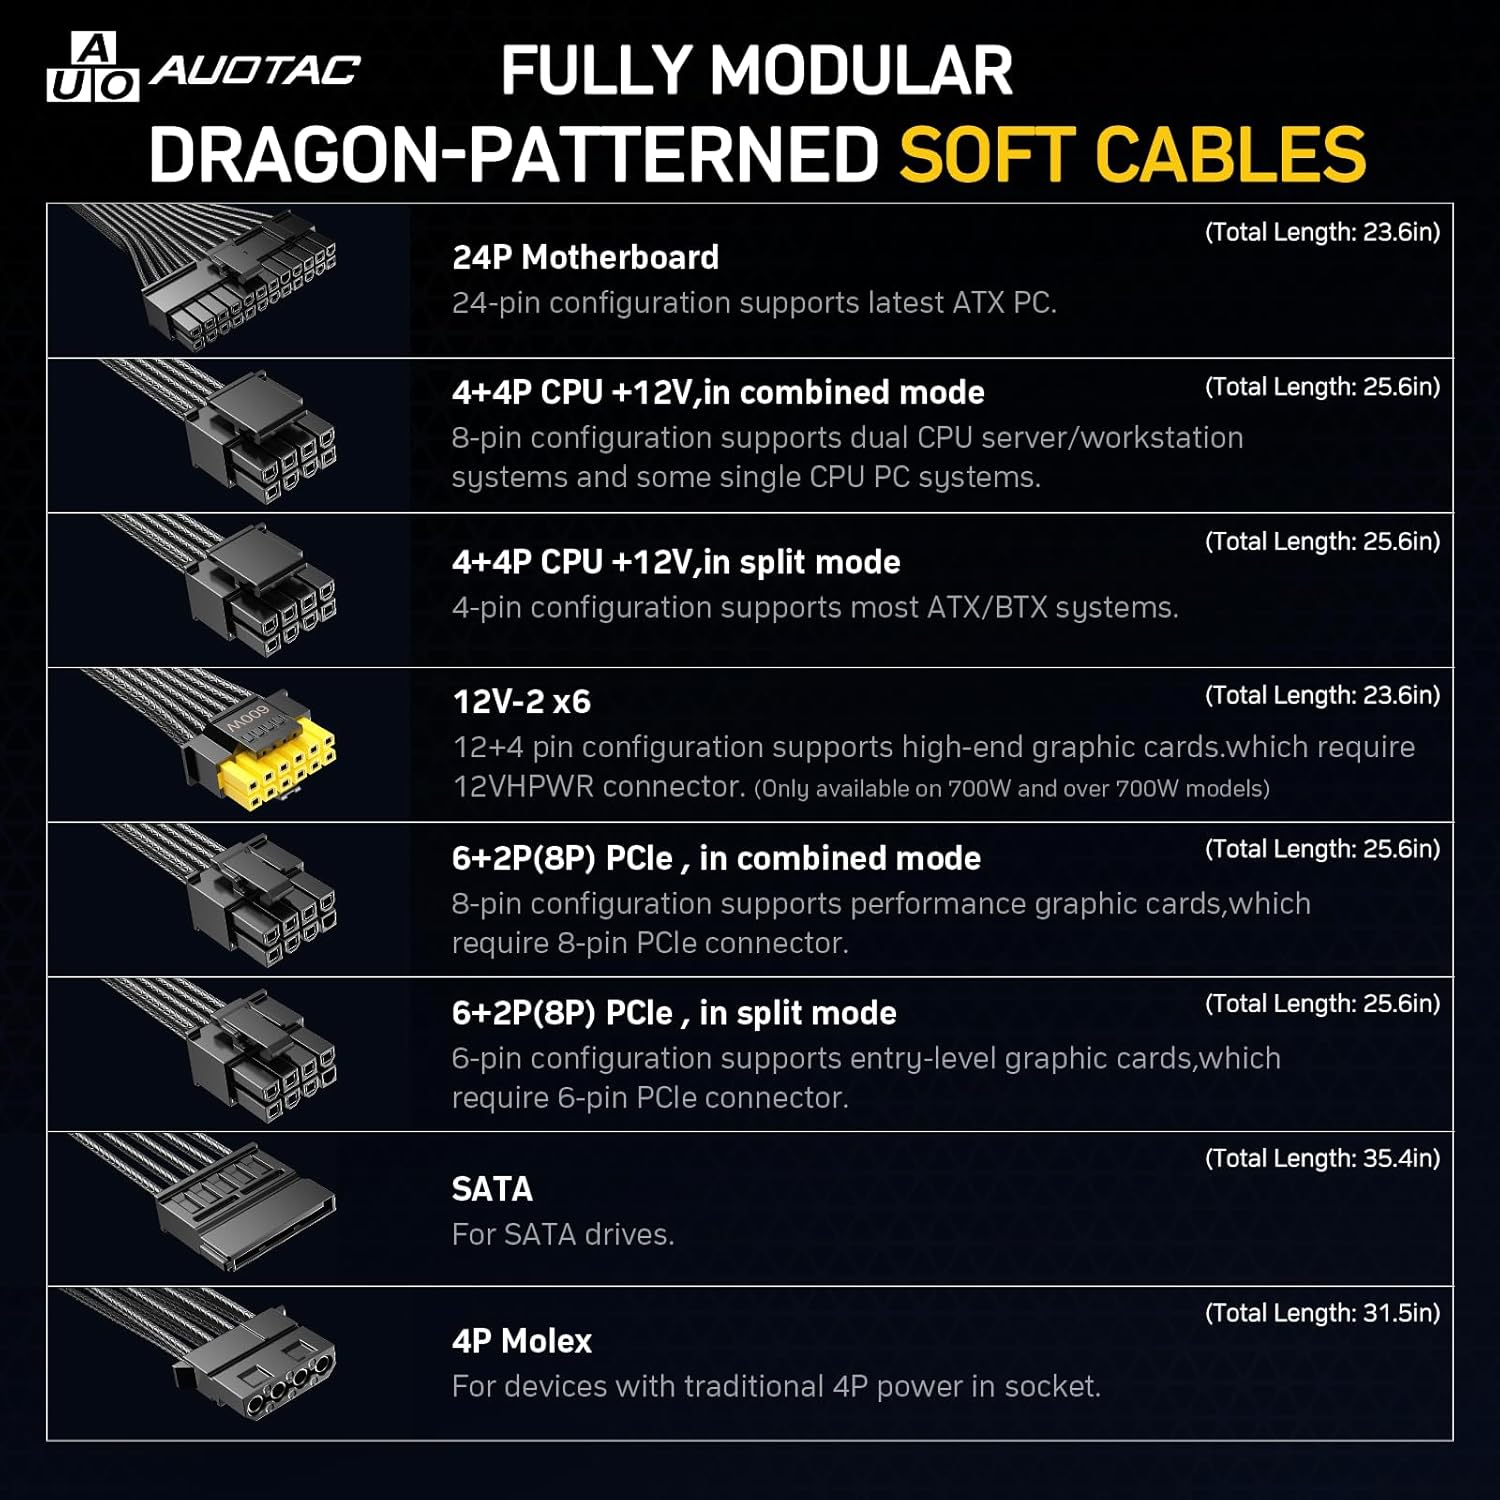
Image: An illustration of the comprehensive set of fully modular cables provided, including 24-pin, CPU, PCIe, SATA, and Molex connectors, along with their respective lengths.
4. Product Features
- 80 PLUS Gold Certified: Delivers gold-level performance with up to 92% efficiency, ensuring effective power transmission and reduced energy waste.
- Fully Modular Design: Equipped with dragon-patterned modular cables to minimize cable clutter, optimize airflow, and enhance overall system efficiency and thermal performance.
- ATX 3.1 & PCIe 5.1 Compliant: Supports the latest ATX 3.1 standard for stable and efficient power delivery to high-performance PC components. PCIe 5.1 compliance ensures compatibility with modern graphics cards, withstanding 2x transient power excursions.
- Dual-Colour 16-Pin Cable: Features a unique dual-color dragon-pattern 12V-2x6 PCI-E 5.1 cable for high-end graphics cards. The yellow connector provides a visual indicator for proper cable seating.
- 140mm RGB Low-Noise Smart Fan: A larger 140mm fan offers quieter operation and superior heat dissipation compared to standard 120mm fans. Includes a silent mode and adjustable ARGB lighting for customizable aesthetics.
- 105°C-Rated Japanese Capacitors: Utilizes 100% Japanese-made 105°C electrolytic capacitors for extremely high reliability, durability, and maximum power supply stability.
5. Setup and Installation
Follow these steps to install your Auotac power supply:
- Prepare Your System: Ensure your PC case is ready for PSU installation. Remove any old power supply if applicable.
- Mount the PSU: Secure the Auotac power supply into the designated PSU bay in your PC case using the provided mounting screws.
- Connect Essential Cables:
- Connect the 24-pin motherboard cable to the motherboard.
- Connect the 4+4-pin CPU cable(s) to the CPU power connector(s) on your motherboard.
- For graphics cards, use the appropriate PCI-E cables (e.g., 12V-2x6 for modern GPUs, 6+2-pin for others). Ensure the yellow connector on the 12V-2x6 cable is fully seated.

Image: The modular interface of the power supply, clearly labeling each port for easy and organized cable connection.
- Connect Peripheral Cables: Attach SATA cables to your storage drives (SSDs, HDDs) and Molex cables to any other compatible peripherals as needed.
- Cable Management: Utilize the provided cable management combs and Velcro straps to route cables neatly, improving airflow and aesthetics within your PC case.
- Connect AC Power: Ensure the power switch on the PSU is in the "O" (off) position. Connect the AC power cord to the PSU and then to a wall outlet.
- Power On: Flip the power switch on the PSU to the "I" (on) position.
Warm Reminder: The power switch is set to the "O" (off) position by default at the factory. Please switch it to the "I" (on) position prior to use.
6. Operating Instructions
Your Auotac power supply features a smart fan and customizable RGB lighting:
- Silent Mode: The 140mm low-noise fan operates in a silent mode under low load conditions. Under high load, the silent mode will automatically disable, and the fan will activate its cooling function.
- RGB Lighting Control: The PSU features ARGB lighting. Use the dedicated switch on the rear panel to adjust the lighting style according to your preferences. Connect the ARGB light cable to your motherboard's ARGB header for software control and synchronization with other components.

Image: The rear panel of the power supply, illustrating the power switch and the dedicated toggle for Silent Mode and RGB Lighting control.
7. Maintenance
To ensure the longevity and optimal performance of your power supply:
- Cleaning: Periodically clean the exterior of the power supply and its fan grille to prevent dust buildup, which can impede airflow and cooling efficiency. Use a soft, dry cloth or compressed air. Ensure the power supply is turned off and unplugged before cleaning.
- Cable Inspection: Regularly check all modular cable connections to ensure they are secure and free from damage.
- Ventilation: Ensure your PC case has adequate airflow and that the power supply's fan is not obstructed.
8. Troubleshooting
If you encounter issues with your power supply, consider the following:
- No Power:
- Check if the AC power cord is securely connected to both the PSU and the wall outlet.
- Ensure the power switch on the rear of the PSU is in the "I" (on) position.
- Verify that your wall outlet is functioning correctly.
- System Instability/Crashes:
- Ensure all modular cables are correctly and securely connected to the PSU and your components.
- Confirm that your system's power requirements do not exceed the 1000W capacity of the PSU.
- Fan Not Spinning:
- The fan may be in silent mode under low load. It will activate automatically when the system load increases.
- Check for any obstructions preventing the fan from spinning.
- RGB Lighting Issues:
- Ensure the ARGB light cable is properly connected to your motherboard's ARGB header.
- Use your motherboard's RGB software or the PSU's dedicated switch to adjust lighting modes.
9. Specifications
| Feature | Specification |
|---|---|
| Model Name | S-850MZ 1000A-GR |
| Output Wattage | 1000 Watts |
| Efficiency Certification | 80 PLUS Gold |
| Form Factor | ATX |
| ATX Standard | ATX 3.1 |
| PCIe Standard | PCIe 5.1 (with 12V-2x6 cable) |
| Cooling Method | Air (140mm RGB Low-Noise Smart Fan) |
| Capacitors | 105°C-Rated Japanese Electrolytic Capacitors |
| Product Dimensions (L x W x H) | 6 x 6 x 3.7 inches (150mm x 150mm x 85mm) |
| Item Weight | 3.2 pounds (51.18 Ounces) |
| Compatible Devices | Personal Computer |
| Connector Type | ATX |
10. Warranty and Support
Your Auotac 1000W Fully Modular Power Supply comes with a 10-Year Limited Warranty, guaranteeing long-term reliable operation.
For technical support, troubleshooting assistance, or warranty claims, please contact Auotac customer service through their official website or the retailer where the product was purchased.