1. Introduction
This manual provides instructions for the safe and effective use of your Vivitar VES829 20MP 8X Optical Zoom Digital Camera. Please read this manual thoroughly before operating the camera and retain it for future reference. The Vivitar VES829 is designed to capture high-resolution photos and videos with ease, featuring a 20MP sensor, 8x optical zoom, and Wi-Fi connectivity.
2. Package Contents
Verify that all items listed below are present in your camera kit:
- Vivitar VES829 Digital Camera
- USB Cable
- Wrist Strap
- Carrying Pouch
- User Manual (this document)

Image: Included carrying pouch for the Vivitar VES829 camera.
3. Camera Overview
Familiarize yourself with the various parts of your Vivitar VES829 camera.
Front View

Image: Front view of the Vivitar VES829 camera, highlighting the 8x optical zoom lens and built-in flash.
Rear View

Image: Rear view of the Vivitar VES829 camera, displaying the 2.8-inch LCD screen and navigation controls.
Side View
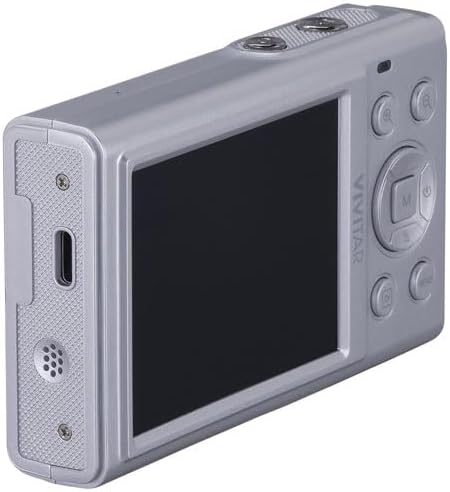
Image: Side view of the Vivitar VES829 camera, illustrating the USB port for charging and data transfer, and the speaker.
4. Getting Started (Setup)
4.1 Inserting Batteries
The Vivitar VES829 camera does not include batteries. You will need to purchase compatible batteries separately. Refer to the camera's battery compartment for the correct battery type and orientation. Ensure the camera is powered off before inserting or removing batteries.
4.2 Inserting a Memory Card
A memory card (not included) is required to store photos and videos. Locate the memory card slot, typically near the battery compartment. Insert the memory card in the correct orientation until it clicks into place. To remove, press the card gently until it springs out.
4.3 Charging the Camera
Connect the camera to a power source using the provided USB cable. The charging indicator light will illuminate. Once fully charged, the indicator light will change or turn off. Do not use unauthorized chargers.
4.4 Powering On/Off
Press and hold the Power button (usually marked with a power symbol) to turn the camera on or off. The LCD screen will activate upon power-on.
4.5 Setting Date and Time
Upon first power-on or after battery replacement, you may be prompted to set the date and time. Use the navigation buttons to adjust the settings and confirm your selection. Correct date and time settings are important for organizing your photos and videos.
5. Basic Operation
5.1 Taking Photos
- Power On: Turn on the camera.
- Frame Your Shot: Use the 2.8-inch full-color LCD display to compose your image.
- Adjust Zoom: Use the zoom controls (often marked 'W' for Wide and 'T' for Telephoto) to adjust the 8x optical zoom.
- Focus: The camera features autofocus. Half-press the shutter button to allow the camera to focus.
- Capture: Fully press the shutter button to take a 20MP photo.
- Flash: The built-in flash has automatic and red-eye reduction modes. Adjust flash settings via the menu if needed.
5.2 Recording Videos
- Switch to Video Mode: Select video mode using the mode dial or menu.
- Start Recording: Press the dedicated video record button or the shutter button to begin recording. The camera supports HD video and audio recording, with a maximum resolution of 4K at 30fps.
- Stop Recording: Press the record button again to stop.
5.3 Reviewing Media
Press the Playback button (often marked with a play icon) to view your captured photos and videos on the LCD screen. Use the navigation buttons to scroll through your media. Press the Playback button again to exit playback mode.
5.4 Connecting to Wi-Fi
The Vivitar VES829 features built-in Wi-Fi for seamless sharing. Access the Wi-Fi settings through the camera's menu. Follow the on-screen instructions to connect to a Wi-Fi network and transfer your media to compatible devices.
6. Advanced Features
6.1 Shooting Modes
The camera offers multiple shooting modes to enhance your creativity, including Antique, Gray, and Lomo. These modes can be selected via the camera's menu to apply unique effects to your photos.
6.2 Face Detection
The precise face detection feature automatically identifies and sharpens facial features in your photos, ensuring clear and well-focused portraits.
7. Maintenance and Care
7.1 Cleaning
- Lens: Use a soft, lint-free cloth specifically designed for camera lenses. Avoid touching the lens with your fingers.
- LCD Screen: Wipe gently with a soft, dry cloth. Do not use abrasive cleaners.
- Camera Body: Use a soft, dry cloth to clean the camera body. Avoid moisture.
7.2 Storage
When not in use, store the camera in a cool, dry place, away from direct sunlight and extreme temperatures. Use the provided carrying pouch for protection.
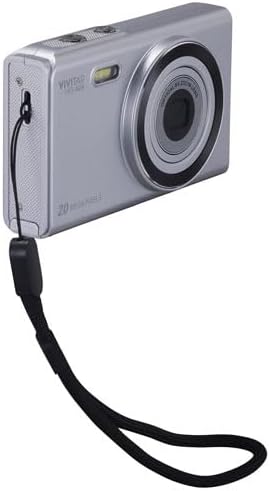
Image: Vivitar VES829 camera with an attached wrist strap for secure handling.
7.3 Battery Care
Remove batteries if the camera will not be used for an extended period. Dispose of batteries according to local regulations.
8. Troubleshooting
If you encounter issues with your camera, refer to the following common problems and solutions:
- Camera does not power on: Ensure batteries are correctly inserted and fully charged.
- Photos are blurry: Check that the lens is clean. Ensure the camera has focused before fully pressing the shutter button. Image stabilization is digital; hold the camera steady.
- Memory card error: Ensure the memory card is inserted correctly and is not full or corrupted. Try reformatting the card (this will erase all data).
- Wi-Fi connection issues: Verify that Wi-Fi is enabled on the camera and the receiving device. Ensure you are within range of the Wi-Fi network.
- Flash not firing: Check flash settings in the menu to ensure it is not set to 'Off' or 'Red-Eye Reduction' in bright conditions.
For persistent issues, contact customer support.
9. Specifications
| Feature | Specification |
|---|---|
| Model Number | VES829 |
| Photo Sensor Resolution | 20 MP |
| Total Still Resolution | 64 MP |
| Optical Zoom | 8x |
| Image Stabilization | Digital |
| Autofocus | Yes (Phase Detection) |
| Maximum Video Resolution | 4K at 30fps (1080p listed in some specs) |
| Display Type | 2.8-inch Full-Color LCD |
| Connectivity | Wi-Fi, USB |
| Flash Modes | Automatic, Red Eye Reduction |
| Shooting Modes | Antique, Gray, Lomo, and more |
| Photo Sensor Technology | CMOS |
| Supported File Format | MP4 (Video) |
| Water Resistance Level | Not Water Resistant |
10. Warranty Information
The Vivitar VES829 Digital Camera comes with a 30-day limited warranty from the date of purchase. This warranty covers manufacturing defects. Please retain your proof of purchase for warranty claims. The warranty does not cover damage caused by misuse, accidents, unauthorized repairs, or normal wear and tear.
11. Customer Support
For further assistance, technical support, or warranty inquiries, please contact Vivitar customer service. Refer to the Vivitar official website or product packaging for the most current contact information.