1. Product Overview
This manual provides detailed instructions for the Roinvou Android 15 Qualcomm 8 Core 4+64G Autoradio, a 9-inch touchscreen car stereo system designed for Peugeot 308 and 408 models manufactured between 2007 and 2015. This system integrates advanced features such as Android 15, Qualcomm 8-core processor, wireless CarPlay, Android Auto, Bluetooth 5.1, GPS navigation, and DSP audio processing to enhance your in-car entertainment and connectivity experience.

Image 1.1: Roinvou Autoradio with included rear camera and external microphone.
2. Safety Information
Please read all safety instructions carefully before installation and operation. Failure to follow these instructions may result in injury or damage to the device or vehicle.
- Professional Installation Recommended: Due to the complexity of car electrical systems, professional installation is highly recommended.
- Power Disconnection: Always disconnect the vehicle's battery before performing any electrical work to prevent short circuits.
- Wiring: Ensure all wiring connections are secure and correctly insulated to prevent electrical hazards.
- Driving Safety: Do not operate the device in a manner that distracts you from driving. Always prioritize road safety.
- Temperature: Avoid exposing the device to extreme temperatures or direct sunlight for prolonged periods.
3. Package Contents
Verify that all items listed below are present in your package. If any items are missing or damaged, please contact customer support.
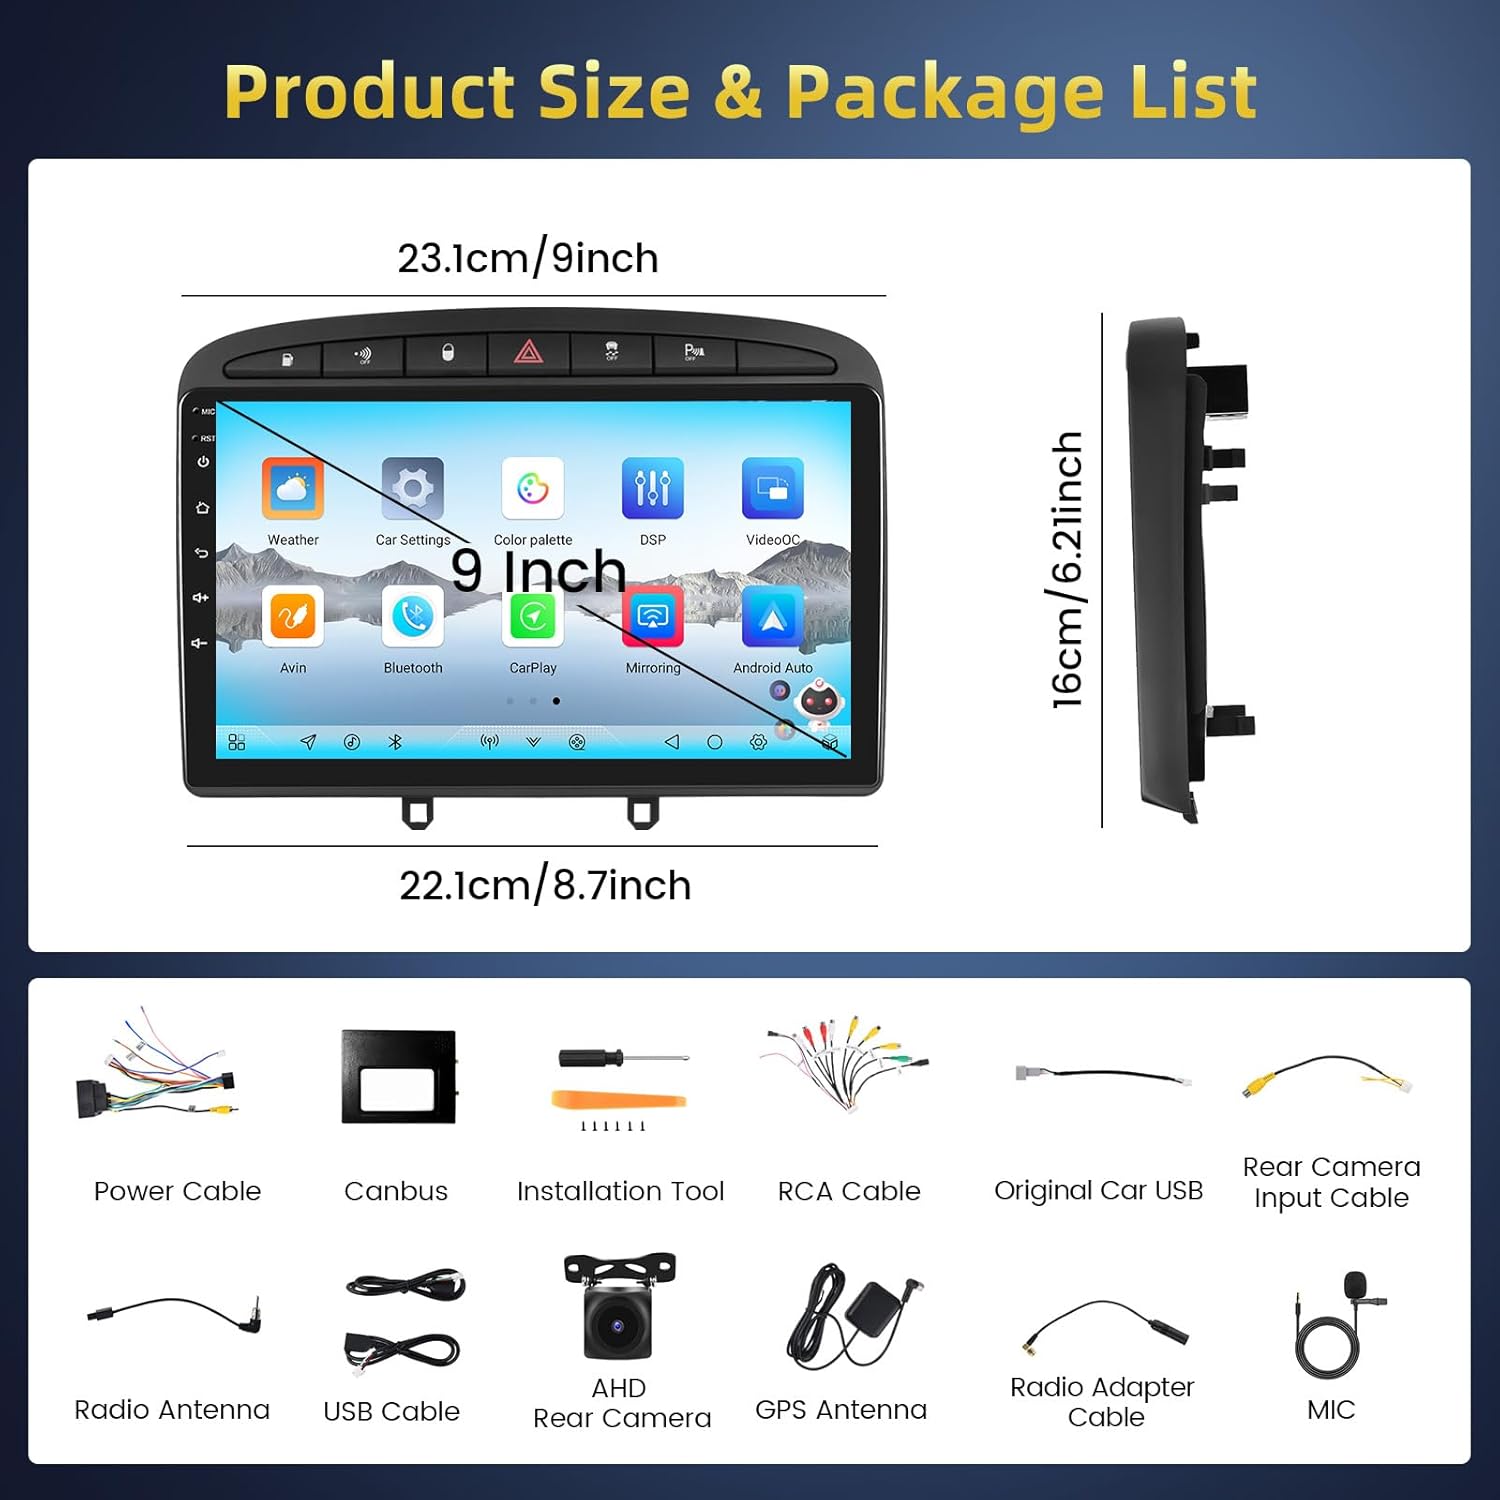
Image 3.1: Product dimensions and a visual representation of all included components.
- Roinvou Android Autoradio (Main Unit)
- Power Cable
- CANBUS Decoder
- Radio Cable
- Original Car USB Cable
- RCA Cable
- Rear Camera Input Cable
- GPS Antenna
- Dual USB Cable
- Radio Adapter Cable
- Rear Camera
- External Microphone
- Mounting Bracket
- Installation Tool
4. Setup and Installation
This section outlines the general steps for installing the Roinvou Autoradio. Specific vehicle disassembly and reassembly procedures are not covered and may require consulting your vehicle's service manual or a professional installer.
4.1 Pre-Installation Check
- Ensure the vehicle's ignition is off and the battery's negative terminal is disconnected.
- Carefully remove the original car stereo unit and trim panels.
- Compare the new Roinvou Autoradio with the original unit and the vehicle's dashboard opening to ensure compatibility.

Image 4.1: Visual comparison of the car's dashboard before and after the Roinvou Autoradio installation.
4.2 Wiring Connections
Refer to the wiring diagram below for proper connection of all cables.

Image 4.2: Wiring port diagram showing connections for radio adapter, GPS antenna, camera input, USB, RCA, and power cables.
- Power Cable: Connect the main power harness to the vehicle's power supply. Ensure the CANBUS decoder is correctly integrated if required by your vehicle model.
- Radio Antenna: Connect the radio antenna cable.
- GPS Antenna: Mount the GPS antenna in a location with a clear view of the sky (e.g., dashboard, corner of the windshield) and connect it to the unit.
- USB Cables: Connect the provided USB cables for external devices or data transfer.
- RCA Cables: Connect RCA cables for external amplifiers, subwoofers, or auxiliary video inputs/outputs as needed.
- External Microphone: Connect the external microphone for improved call quality.
4.3 Rear Camera Installation
The included AHD rear camera provides a clear view when reversing. Follow these steps for installation:

Image 4.3: Reversing camera wiring diagram, showing connections to the car's reverse light cable.
- Mount the rear camera securely at the rear of your vehicle, ensuring a clear view.
- Connect the red cable (1) of the camera's power wire to the positive terminal of the car's reverse light cable.
- Connect the black cable (2) to the negative terminal of the car's reverse light cable.
- Connect the camera's video output cable to the 'Camera Input' port on the autoradio.
- Tip: The reverse input cable must be plugged in even if the reverse camera is not being used. Otherwise, it may affect Bluetooth and WiFi signal reception.
4.4 Final Assembly
- Carefully route all cables to avoid pinching or interference.
- Secure the autoradio unit into the dashboard using the provided mounting brackets.
- Reinstall all trim panels and reconnect the vehicle's battery.
- Turn on the ignition and test all functions of the autoradio.
5. Operating Instructions
This section details the primary functions and features of your Roinvou Autoradio.
5.1 Basic Operations
- Power On/Off: The unit typically powers on with the vehicle's ignition. A long press on the power button (if available) may turn it off or put it into standby.
- Volume Control: Adjust volume using the on-screen controls or steering wheel controls (if configured).
- Touchscreen Interface: Navigate through menus and applications by tapping, swiping, and pinching on the 9-inch IPS touchscreen.

Image 5.1: The 9-inch QLED touchscreen with 1280x720 resolution and 2.5D design.
5.2 Wireless CarPlay & Android Auto / Mirror Link
Connect your smartphone wirelessly for seamless integration of navigation, music, and communication apps.

Image 5.2: Wireless CarPlay, Android Auto, and Mirror Link interfaces.
- Wireless Connection: Enable Bluetooth and Wi-Fi on your smartphone. On the autoradio, open the CarPlay or Android Auto application. Follow the on-screen prompts to pair your device.
- Mirror Link: For Mirror Link, connect your phone via USB or Wi-Fi and follow the instructions in the Mirror Link app on the autoradio to display your phone's screen.
5.3 Bluetooth Connectivity
Bluetooth 5.1 allows for fast and stable connections for hands-free calling and audio streaming.

Image 5.3: Bluetooth 5.1 interface for phone connection, music, and calls.
- Go to the Bluetooth settings on the autoradio.
- Enable Bluetooth on your smartphone and search for available devices.
- Select the autoradio from the list and confirm the pairing code.
- Once connected, you can make/receive calls and stream audio.
5.4 GPS Navigation
The integrated GPS module supports both online and offline maps, offering voice guidance and real-time traffic information.

Image 5.4: GPS Navigation interface.
- Open the Navigation application from the main menu.
- Enter your destination using the touchscreen keyboard or voice input.
- The system will calculate the route and provide turn-by-turn voice guidance.
- Ensure the GPS antenna is properly installed for optimal signal reception.
5.5 FM/RDS Radio
Access local radio stations with clear reception and RDS information.

Image 5.5: FM/RDS Radio interface.
- Select the Radio application from the main menu.
- Use the on-screen controls to scan for stations, manually tune, or select presets.
- RDS (Radio Data System) will display station information, song titles, and traffic announcements where available.
5.6 DSP Audio Settings
The built-in Digital Signal Processor (DSP) allows for precise audio customization.

Image 5.6: DSP System interface for sound customization.
- Access the DSP settings from the main menu or audio settings.
- Adjust equalizer settings, sound field, and other audio parameters to your preference.
5.7 Steering Wheel Control (SWC)
Integrate your vehicle's steering wheel controls for convenient operation.

Image 5.7: Steering Wheel Control learning interface.
- Go to the SWC settings in the system menu.
- Follow the on-screen instructions to map your steering wheel buttons to specific functions (e.g., volume up/down, track skip, mode).
5.8 Other Features
- 3D Car Dynamic Display: Customize the on-screen 3D model of your car, including colors and rim styles.
- Picture-in-Picture (PIP): Allows you to view two applications simultaneously.
- Split-Screen Functionality: Run multiple apps side-by-side on the screen.
- Voice Assistant: (Optional, requires activation) Use voice commands for navigation, music, and other functions.
- Weather Display: (Optional, requires activation) View real-time weather forecasts.
- OBD2 Compatibility: Connect an optional OBD2 scanner to monitor vehicle diagnostics.
- DAB+ Support: (Optional) Connect an external DAB+ module for digital radio.

Image 5.8: Split-screen functionality and user interface examples.

Image 5.9: Voice Assistant and Weather Display interfaces.
6. Maintenance
Proper maintenance ensures the longevity and optimal performance of your autoradio.
- Screen Cleaning: Use a soft, lint-free cloth to clean the touchscreen. Avoid abrasive cleaners or solvents.
- Software Updates: Periodically check for software updates provided by Roinvou to ensure the system is running the latest features and bug fixes.
- Cooling System: The unit features a built-in cooling fan. Ensure the fan vents are not obstructed to prevent overheating.

Image 6.1: Manual/Automatic Cooling Fan system for heat dissipation.
7. Troubleshooting
If you encounter issues, refer to the following common problems and solutions.
- No Power:
- Check all power cable connections.
- Verify vehicle's fuse for the stereo system.
- Ensure the vehicle's battery is properly connected and charged.
- No Sound:
- Check speaker wire connections.
- Ensure volume is not muted or set too low.
- Verify DSP settings are correctly configured.
- GPS Signal Loss:
- Ensure the GPS antenna is securely connected and has a clear view of the sky.
- Move the vehicle to an open area away from tall buildings or dense foliage.
- Bluetooth Connection Issues:
- Ensure Bluetooth is enabled on both the autoradio and your smartphone.
- Delete previous pairings and try reconnecting.
- Restart both devices.
- Rear Camera Not Displaying:
- Check the camera input cable connection.
- Verify the camera's power connection to the reverse light.
- Ensure the reverse input cable is connected to the head unit.
For further assistance, please contact Roinvou customer support.
8. Specifications
| Feature | Specification |
|---|---|
| Brand | Roinvou |
| Model Number | Roinvou-A7086A4135H1MI2EU31D |
| Operating System | Android 15 |
| Processor | Qualcomm 8 Core, 1.8 GHz |
| RAM | 4 GB |
| Internal Storage | 64 GB |
| Screen Size | 9 Inches |
| Screen Type | IPS Touchscreen |
| Screen Resolution | 1280*720 |
| Connectivity | Bluetooth 5.1, USB, WiFi, FM RDS |
| Special Features | Wireless CarPlay, Android Auto, Mirror Link, DSP, GPS, SWC, 3D Modeling, Cooling Fan, Rear Camera Support |
| Compatible Devices | Smartphone |
| Audio Output Modes | APE/FLAC/WAV/MP3/WMA |
9. Warranty and Support
Roinvou provides the following warranty and support for your product:
- Manufacturer's Warranty: 24 months.
- Online Support: Lifetime online assistance for inquiries.
- Response Time: Customer support aims to respond within 24 hours.
For warranty claims or technical support, please refer to the contact information provided with your purchase or visit the official Roinvou website.