1. Introduction
Thank you for choosing the YWangQiang TM4 Digital 4-Channel Audio Mixer. This compact and versatile mixing console is designed for a variety of audio applications, including studio recording, live performances, DJ setups, and online streaming. It integrates essential features such as 48V phantom power for condenser microphones, Bluetooth connectivity for wireless audio streaming, and a USB input for direct MP3 playback. Please read this manual thoroughly before operating the device to ensure proper use and to maximize its potential.
2. Key Features
- Compact 4-Channel Mixer: Ideal for studio recording, DJ equipment, and online live applications.
- Flexible Power Supply: Supports both power bank supply and 110-220V universal voltage for outdoor and indoor use.
- USB Input: Connect devices to play MP3 files with independent volume control.
- 3-Band EQ: High, Mid, and Low frequency controls on all channels for precise tone shaping.
- Built-in Effects: Integrated reverberation delay effect for enhanced audio.
- 48V Phantom Power: Provides power for condenser microphones.
- Bluetooth (BT) Function: Wireless audio streaming capability.
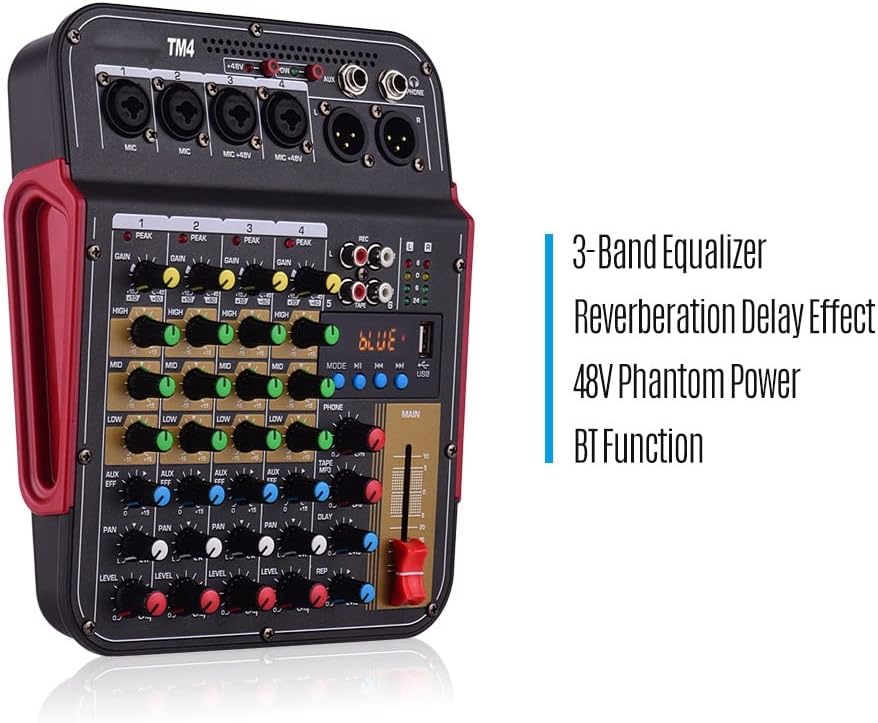
Image 2.1: Key features of the TM4 mixer, including its 3-band equalizer, reverberation delay effect, 48V phantom power, and Bluetooth functionality.
3. Product Overview
3.1 Front Panel Layout
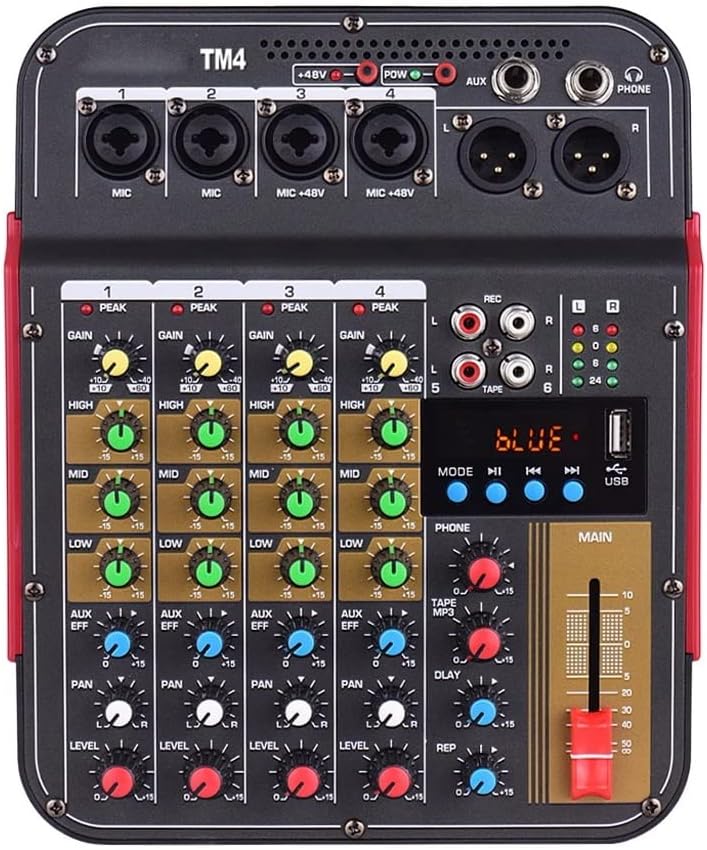
Image 3.1: Top view of the TM4 mixer, displaying its various inputs, outputs, and control knobs.
The front panel of the TM4 mixer provides access to all primary controls and input/output connections. Each channel features GAIN, HIGH, MID, LOW, AUX/EFF, PAN, and LEVEL controls. The master section includes controls for TAPE/MP3, DELAY, REPEAT, and the MAIN output fader. Indicators for PEAK, REC, and signal levels are also present.
3.2 Rear and Side Panel Connections

Image 3.2: Multiple views of the TM4 mixer, illustrating its compact dimensions and the location of power input and other side connections.
The rear and side panels house the power input, additional auxiliary inputs/outputs, and the USB port. The compact design allows for easy integration into various setups.
4. Setup Guide
4.1 Power Connection
- Ensure the mixer's power switch is in the OFF position.
- Connect the provided charging adapter to the DC IN port on the mixer.
- Plug the adapter into a standard 110-220V AC power outlet.
- Alternatively, for portable use, connect a compatible power bank to the USB power input.
4.2 Audio Input Connections
- Microphones: Connect XLR or 1/4" TRS cables from your microphones to the MIC inputs (Channels 1-4). For condenser microphones requiring phantom power, ensure the +48V switch is engaged after connecting the microphone.
- Line-Level Devices: Connect instruments (keyboards, guitars with preamps) or other line-level audio sources to the 1/4" TRS LINE inputs.
- Stereo Input: Use the L/R RCA inputs for connecting stereo devices like CD players or media players.
4.3 Audio Output Connections
- Main Output: Connect the MAIN L/R outputs (1/4" TRS or RCA) to your amplifier, powered speakers, or recording interface.
- Headphone Output: Plug your headphones into the PHONE 1/4" TRS jack for monitoring.
4.4 USB and Bluetooth Connection
- USB Playback: Insert a USB flash drive containing MP3 files into the USB port. Use the MP3 section controls to navigate and play tracks.
- Bluetooth Pairing: Activate the BT function on the mixer. On your Bluetooth-enabled device (smartphone, tablet), search for "TM4" and pair. Once connected, audio from your device will stream to the mixer.
5. Operating Instructions
5.1 Channel Controls
- GAIN: Adjusts the input sensitivity for each channel. Set this to achieve a strong signal without clipping (indicated by the PEAK LED).
- HIGH, MID, LOW (EQ): These knobs control the 3-band equalizer for each channel. Adjust them to shape the tone of your audio source.
- AUX/EFF: Sends a portion of the channel's signal to the internal effects processor (reverb) or an external auxiliary device.
- PAN: Pans the channel's signal between the left and right stereo outputs.
- LEVEL: Controls the overall output volume of the individual channel to the main mix.
5.2 Main Output Control
- MAIN Fader: Controls the overall output volume of the stereo mix. Adjust this to the desired listening level.
- REC Output: The REC L/R RCA outputs provide a stereo signal for recording purposes.
5.3 USB/MP3 Playback
- Insert a USB drive. The display will show track information.
- Use the MODE button to switch between USB and Bluetooth.
- Use the PLAY/PAUSE, PREV, and NEXT buttons to control playback.
- Adjust the TAPE/MP3 volume knob to control the playback level.
5.4 Bluetooth Function
- Press the MODE button until "BLUE" is displayed.
- Enable Bluetooth on your device and select "TM4" to pair.
- Once connected, audio from your device will play through the mixer. Control playback and volume from your device or the mixer's MP3 section.
5.5 48V Phantom Power
- The +48V switch activates phantom power for condenser microphones connected to Channels 3 and 4.
- Important: Ensure condenser microphones are connected before activating phantom power. Do not activate phantom power for dynamic microphones or ribbon microphones unless specifically designed to handle it, as this may cause damage.
5.6 Reverb Delay Effect
- Use the DELAY and REP (Repeat) knobs in the master section to adjust the characteristics of the built-in reverberation effect.
- The AUX/EFF knob on each channel controls how much of that channel's signal is sent to the effect processor.
6. Specifications
| Parameter | Value |
|---|---|
| Model | TM4 |
| Noise | -80dB |
| Frequency Response | 20Hz-20kHz ±0.5dB |
| THD | ≤0.03% @ 1KHz |
| SNR | ≥82dB |
| Max Input Level of Mic | 16dBu |
| Max Input Level of Circuit | 30dBu |
| Max Input Level of Stereo | 20dBu |
| Headphone Output | 200Ω/300mW |
| Other Output | +20dBu |
| Size | 20 * 24.6 * 5.8cm / 7.87 * 9.69 * 2.28in |
7. Maintenance
- Cleaning: Use a soft, dry cloth to clean the mixer's surface. For stubborn dirt, a slightly damp cloth can be used, but ensure no liquid enters the device. Avoid abrasive cleaners or solvents.
- Storage: Store the mixer in a cool, dry place away from direct sunlight, extreme temperatures, and high humidity.
- Handling: Avoid dropping or subjecting the mixer to strong impacts, which can damage internal components.
- Ventilation: Ensure proper ventilation around the mixer during operation to prevent overheating.
8. Troubleshooting
- No Power:
Solution: Check if the power adapter is securely connected to both the mixer and the power outlet. Ensure the power outlet is functional. If using a power bank, verify it is charged and providing sufficient power. - No Sound Output:
Solution: Verify that the MAIN fader is raised. Check all channel LEVEL knobs are up. Ensure input sources are connected correctly and producing sound. Check connections to speakers/headphones. - Distorted Sound:
Solution: Reduce the GAIN knob for the input channel. Lower the channel LEVEL or MAIN fader. Ensure input signals are not too strong. Check cables for damage. - Microphone Not Working (Condenser Mic):
Solution: Ensure +48V phantom power is activated for the connected channel. Check microphone cable and connection. - Bluetooth Not Connecting:
Solution: Ensure the mixer is in BT mode. Turn off and on Bluetooth on your device. Move your device closer to the mixer. Disconnect any other devices previously paired with the mixer. - USB Playback Issues:
Solution: Ensure the USB drive is formatted correctly (FAT32) and contains supported MP3 files. Try a different USB drive.
9. Warranty and Support
This product comes with a standard manufacturer's warranty. For specific warranty terms, duration, and conditions, please refer to the warranty card included in your product packaging or contact your point of purchase. For technical support, troubleshooting assistance beyond this manual, or service inquiries, please contact YWangQiang customer support through the retailer where you purchased the product or visit the official YWangQiang website for contact information.