1. Introduction
This manual provides detailed instructions for the setup, operation, and maintenance of your MINISFORUM N5 Pro 5-Bay Desktop AI NAS. Please read this manual thoroughly before using the device to ensure proper functionality and data security.

Image 1.1: Front view of the MINISFORUM N5 Pro NAS device.
2. Package Contents
Verify that all items listed below are included in your package:
- 1x MINISFORUM N5-PRO-P370 NAS Unit
- 1x US Power Adapter
- 1x HDMI Cable
- 1x Network Cable
- 1x M.2 to U.2 Adapter
3. Hardware Overview
3.1. Front Panel
- Power Button: To power on/off the device.
- Status LED: Indicates system status.
- NIC LED: Network Interface Card activity indicator.
- HDD LED: Hard Disk Drive activity indicators for each bay.
- USB4 (Alt DP 2.0) Ports: Two USB4 ports for high-speed data transfer and display output.
- USB 3.2 Gen2 Port: One USB 3.2 Gen2 port for data transfer.
3.2. Rear Panel
- HDMI 2.1 Port: For video output, supporting up to 8K@60Hz/4K@144Hz.
- USB 3.2 Gen2 Port: One USB 3.2 Gen2 port.
- 10GbE LAN (RJ45) Port: High-speed network connection.
- 5GbE LAN (RJ45) Port: Additional network connection.
- DC 19V Power Input: Connect the power adapter here.
- Reset Hole: For system reset.
- Anti-theft Lock Hole: For securing the device.
- OCuLink Port: For connecting external PCIe devices, such as discrete graphics cards. Note: This interface does not support hot-swapping. Ensure the NAS is powered off before connecting or disconnecting.
- USB 2.0 Port: One USB 2.0 port.
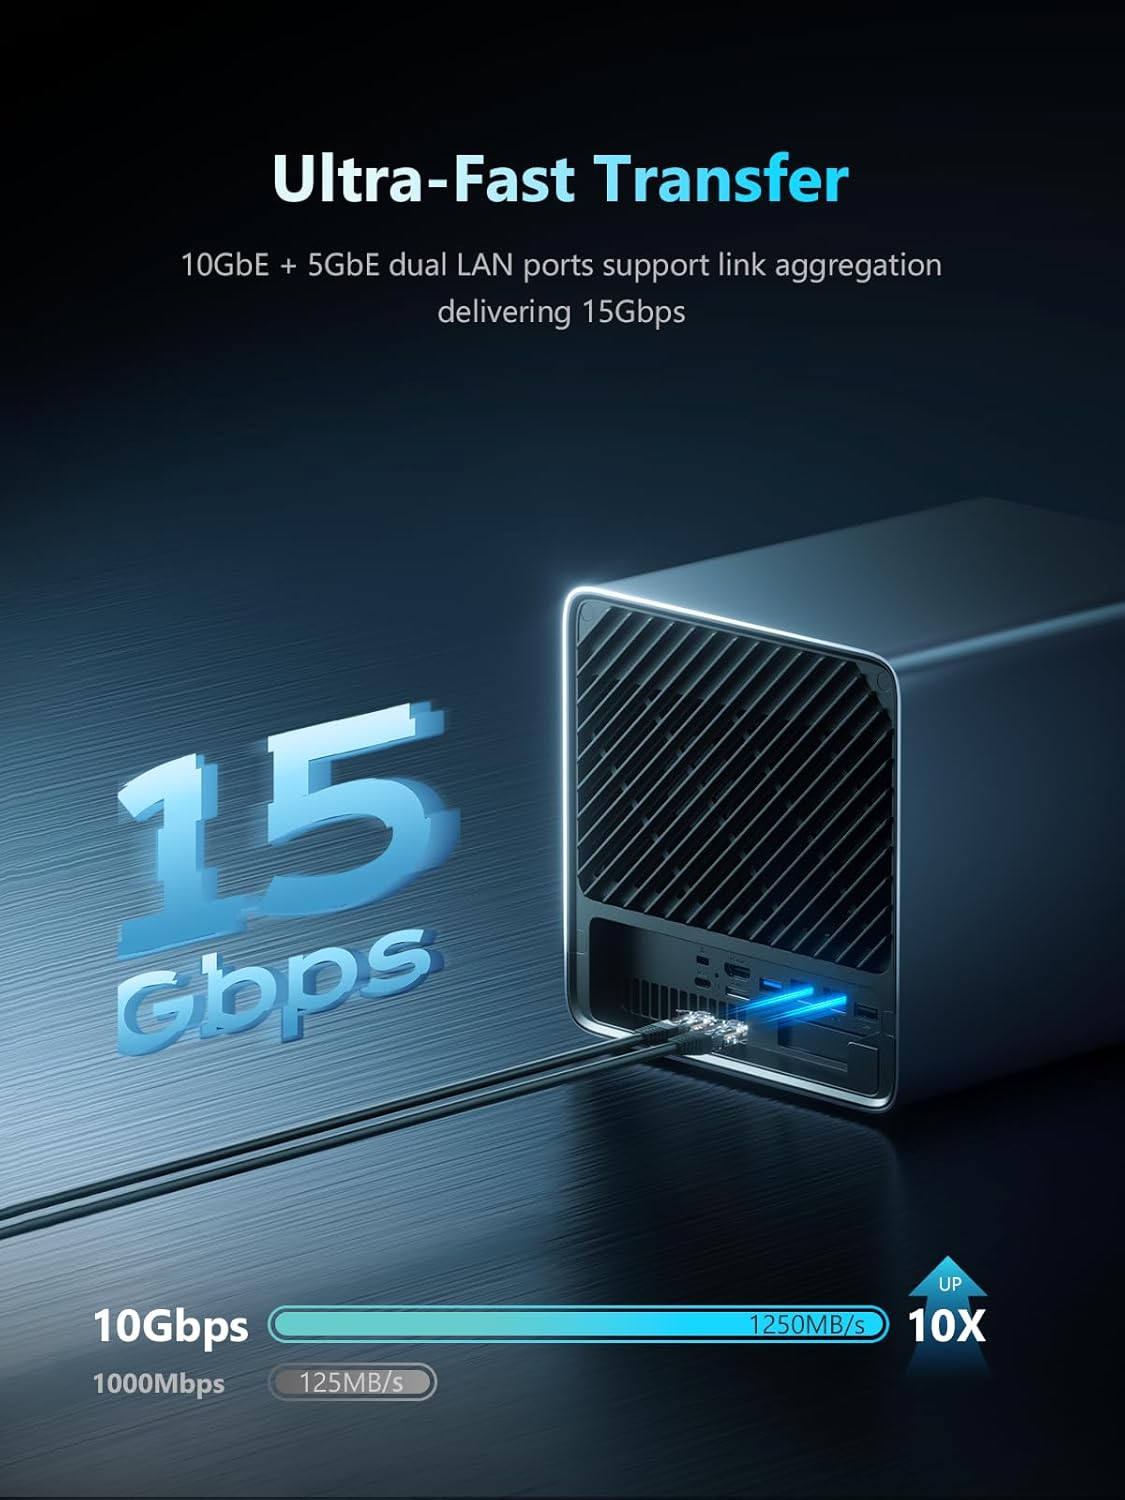
Image 3.1: Detailed view of the front and rear panel ports and indicators.
4. Setup Guide
4.1. Installing Storage Drives
The N5 Pro supports up to five 3.5-inch SATA HDDs and three M.2 NVMe SSDs (or one M.2 NVMe SSD + two U.2 NVMe SSDs using the provided adapter).
- Power Off: Ensure the NAS is completely powered off and disconnected from the power source.
- Access Drive Bays: The N5 Pro features a slide-out motherboard design for easy access. Gently slide out the motherboard tray to expose the drive bays.
- Install HDDs: Insert 3.5-inch SATA HDDs into the five available bays. Secure them with screws if necessary (screws typically included with HDDs, not NAS).
- Install SSDs:
- Locate the M.2 NVMe slots on the motherboard.
- Insert M.2 NVMe SSDs into the slots and secure them with the provided screws.
- If using U.2 NVMe SSDs, connect them via the M.2 to U.2 adapter to the appropriate M.2 slots.
Note: The system's built-in 128GB SSD occupies one M.2 slot. If you require all three M.2 slots for user storage, you will need to uninstall the system disk and install a third-party OS via a USB flash drive inserted into the internal USB port.
- Secure Components: Once all drives are installed, carefully slide the motherboard tray back into place and secure it.
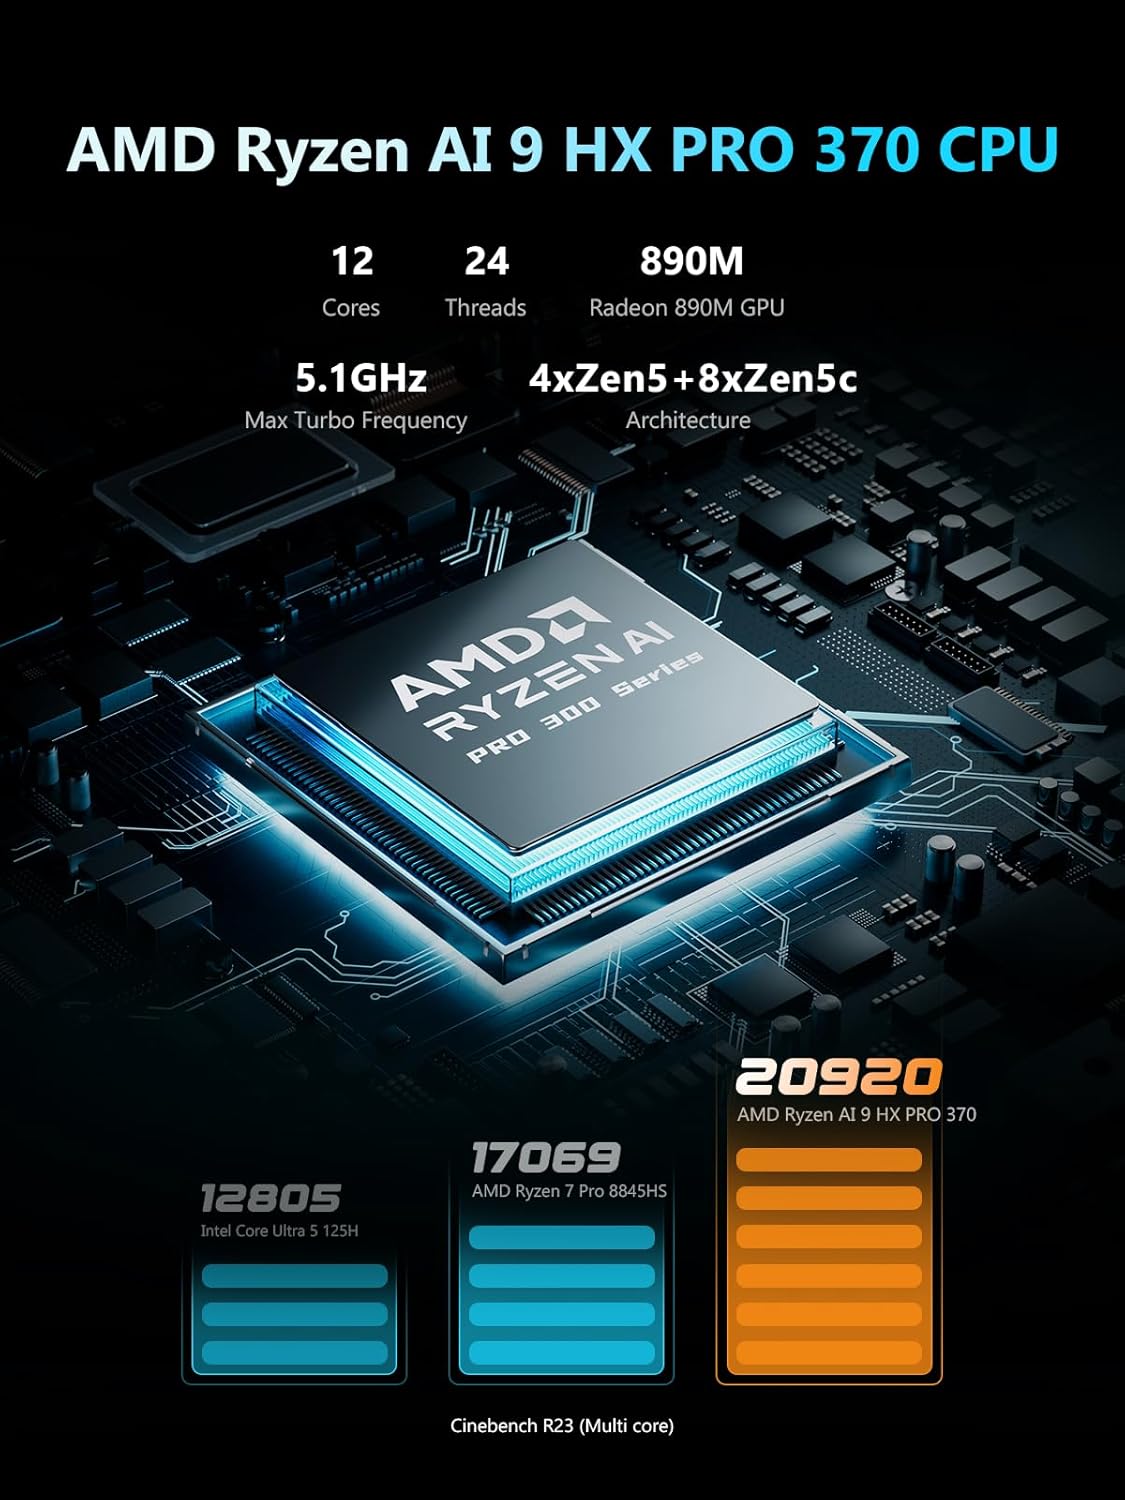
Image 4.1: MINISFORUM N5 Pro with storage drives installed.

Image 4.2: Illustration of the slide-out design for easy drive installation and maintenance.
4.2. Connecting Peripherals
- Network Connection: Connect one or both Ethernet ports (10GbE or 5GbE) to your network router or switch using the provided network cable.
- Display Connection (Optional): If you wish to connect a monitor, use an HDMI cable or a USB4 cable to connect to your display.
- Power Connection: Connect the power adapter to the DC 19V input on the rear panel, then plug the adapter into a power outlet.
4.3. Initial Power On
Press the power button on the front panel. The status LEDs will illuminate, indicating the system is booting up.
5. Operating Instructions
5.1. MinisCloud OS Overview
The MINISFORUM N5 Pro comes with MinisCloud OS pre-installed on a 128GB SSD. This operating system provides a user-friendly interface for managing your NAS.
- Cross-Platform Support: Compatible with Windows, macOS, iOS, and Android devices.
- Key Features: Includes ZFS snapshots, LZ4 compression, multi-user isolation, Docker application support, AI photo albums, and one-click remote access.

Image 5.1: MinisCloud OS interface shown across multiple devices (PC, Mac, iPhone, Android).
5.2. Accessing MinisCloud OS
Refer to the quick start guide or the official MINISFORUM website for detailed instructions on initial access and configuration of MinisCloud OS. Typically, you will access it via a web browser on a device connected to the same network.
5.3. Storage Management and RAID Configuration
The N5 Pro supports various RAID modes for data security and performance:
- RAID0: Multi-Drive Accelerate (Striping)
- RAID1: Secure and Stable (Mirroring)
- RAID5/RAIDZ1: Balanced Performance and Redundancy
- RAID6/RAIDZ2: Maximum Security with Dual Parity
Configure your desired RAID level through the MinisCloud OS interface. Consult the MinisCloud OS documentation for specific steps on creating storage pools and volumes.

Image 5.2: Visual representation of supported RAID modes for data security.
5.4. Data Transfer
Utilize the 10GbE and 5GbE network ports for high-speed data transfers. Link aggregation is supported to achieve speeds up to 15 Gbps for demanding tasks like large file handling and multi-user access.

Image 5.3: Illustration of the 10GbE and 5GbE dual LAN ports supporting link aggregation for 15 Gbps transfer speeds.
6. Maintenance
6.1. System Updates
Regularly check for and install updates for MinisCloud OS to ensure optimal performance, security, and access to new features. Follow the update procedures outlined within the MinisCloud OS interface.
6.2. Cleaning
To maintain proper airflow and cooling, periodically clean the exterior of the NAS with a soft, dry cloth. Ensure the ventilation grilles are free from dust accumulation. Do not use liquid cleaners directly on the device.
6.3. Drive Health Check
Monitor the health of your installed HDDs and SSDs through the MinisCloud OS. Replace any failing drives promptly to prevent data loss, especially if not using a redundant RAID configuration.
7. Troubleshooting
7.1. No Power
- Ensure the power adapter is securely connected to both the NAS and a working power outlet.
- Verify the power outlet is functional by plugging in another device.
7.2. Network Connectivity Issues
- Check that Ethernet cables are securely connected to both the NAS and your router/switch.
- Verify that your router/switch is powered on and functioning correctly.
- Restart the NAS and your network equipment.
7.3. Drives Not Detected
- Ensure drives are properly seated in their bays and securely connected.
- If installing new drives, they may need to be initialized and formatted within MinisCloud OS before use.
- Check the drive health status in MinisCloud OS.
7.4. OCuLink Port Usage
Remember that the OCuLink port does not support hot-swapping. Always power off the NAS completely before connecting or disconnecting any device from this port to prevent damage.
8. Specifications
| Feature | Specification |
|---|---|
| Model | N5-PRO-P370 |
| Processor | AMD Ryzen AI 9 HX PRO 370 (12 Cores/24 Threads, up to 5.1GHz) |
| Graphics | AMD Radeon 890M |
| Memory | 16GB DDR5 (5600 MT/s), expandable up to 96GB ECC memory (2x SO-DIMM slots) |
| Internal Storage | 128GB SSD (MinisCloud OS pre-installed) |
| Drive Bays | 5x SATA (for 3.5" HDDs, up to 22TB each) |
| SSD Slots | 1x M.2 NVMe Slot + 2x U.2/M.2 NVMe Slots (via adapter) |
| Max Storage Capacity | Up to 144 TB |
| Network | 1x 10GbE LAN (RJ45), 1x 5GbE LAN (RJ45) |
| Video Output | 1x HDMI (8K@60Hz/4K@144Hz), 2x USB4 (8K@60Hz/4K@144Hz) |
| USB Ports | 2x USB4, 2x USB 3.2 Gen2, 1x USB 2.0 |
| Expansion Slot | 1x OCuLink Port (PCIe4.0 x4), 1x PCIe x16 slot (internal) |
| Operating System | MinisCloud OS (pre-installed) |
| Dimensions (LxWxH) | 7.95 x 7.83 x 9.92 inches |
| Weight | 15 pounds |

Image 8.1: Overview of the MINISFORUM N5 Pro's key features and specifications.
9. Warranty and Support
MINISFORUM products typically come with a standard manufacturer's warranty. For specific warranty terms, duration, and support options, please refer to the warranty card included with your product or visit the official MINISFORUM website.
For technical assistance, troubleshooting, or service requests, please contact MINISFORUM customer support through their official channels.


