1. Introduction
Thank you for choosing the ROBOTIME Cuckoo Clock 3D Wooden Puzzle. This intricate model kit provides a rewarding building experience, culminating in a functional cuckoo clock with hourly chimes and warm lighting. This manual provides detailed instructions for assembly, operation, maintenance, and troubleshooting to ensure a successful and enjoyable experience.

Figure 1: Fully assembled ROBOTIME Cuckoo Clock 3D Wooden Puzzle kit, showcasing its intricate details and illuminated interior.
2. Safety Information
Please read and understand all safety warnings before beginning assembly. This kit contains small parts and is not suitable for children under 14 years of age without adult supervision due to choking hazards.
- Keep all parts out of reach of small children and pets.
- Exercise caution when handling laser-cut wooden pieces to avoid splinters.
- Do not expose the assembled model to direct sunlight, high humidity, or extreme temperatures.
- Ensure proper battery installation and disposal if using battery power.
- Do not attempt to modify the electrical components.
3. Setup and Assembly
The ROBOTIME Cuckoo Clock kit consists of 435 precision laser-cut wooden pieces. No glue is required for assembly, as parts are designed to interlock securely. Follow the step-by-step instructions provided in the included manual carefully.
3.1 Unpacking and Inspection
- Carefully open the packaging and remove all wooden sheets and components.
- Verify that all 435 pieces are present and undamaged by comparing them with the parts list in your manual.
- Familiarize yourself with the assembly diagrams before starting.

Figure 2: Components of the ROBOTIME Cuckoo Clock 3D Wooden Puzzle kit laid out, demonstrating the laser-cut wooden sheets and assembly instructions.
3.2 Assembly Process
Follow the numbered steps in your physical instruction booklet. Pay close attention to the orientation of each piece. Gentle pressure is usually sufficient to connect parts. Do not force pieces together, as this may cause damage.
- Start by carefully detaching pieces from their wooden frames. A small craft knife or sandpaper may be used to smooth edges if necessary.
- Assemble sub-components as indicated before integrating them into the main structure.
- Ensure all gears and moving parts are aligned correctly and can move freely.
- Install the internal lighting components and wiring as per the instructions.
- Integrate the cuckoo mechanism and pendulum during the specified steps.

Figure 3: Detailed view of the assembled cuckoo clock, highlighting key features such as the attic wooden window, Roman clock dial, viewing terrace, rotating water wheel, hand-pull switch, and pendulum hall.
4. Operating Instructions
Once assembled, your ROBOTIME Cuckoo Clock offers both time-telling and lighting functions.
4.1 Power Supply
The clock supports dual-mode power supply:
- Type-C Interface: Connect a Type-C USB cable (not included) to the designated port for continuous power.
- Battery Drive: Insert batteries (not included) into the hidden battery box. Refer to the assembly manual for battery type and orientation.

Figure 4: Close-up view of the hidden battery box, among other intricate details.
4.2 Hourly Time Signal Function
The cuckoo clock features an hourly chime function where the cuckoo emerges and makes a sound.
- Activate Chime: Long press the hidden switch (located near the cuckoo's window) to activate the hourly timekeeping function. The light will flash twice to confirm activation.
- Manual Chime: Tap the hidden switch once to trigger a single cuckoo chime.
- Deactivate Chime: Long press the hidden switch again. The light will flash four times to confirm deactivation.
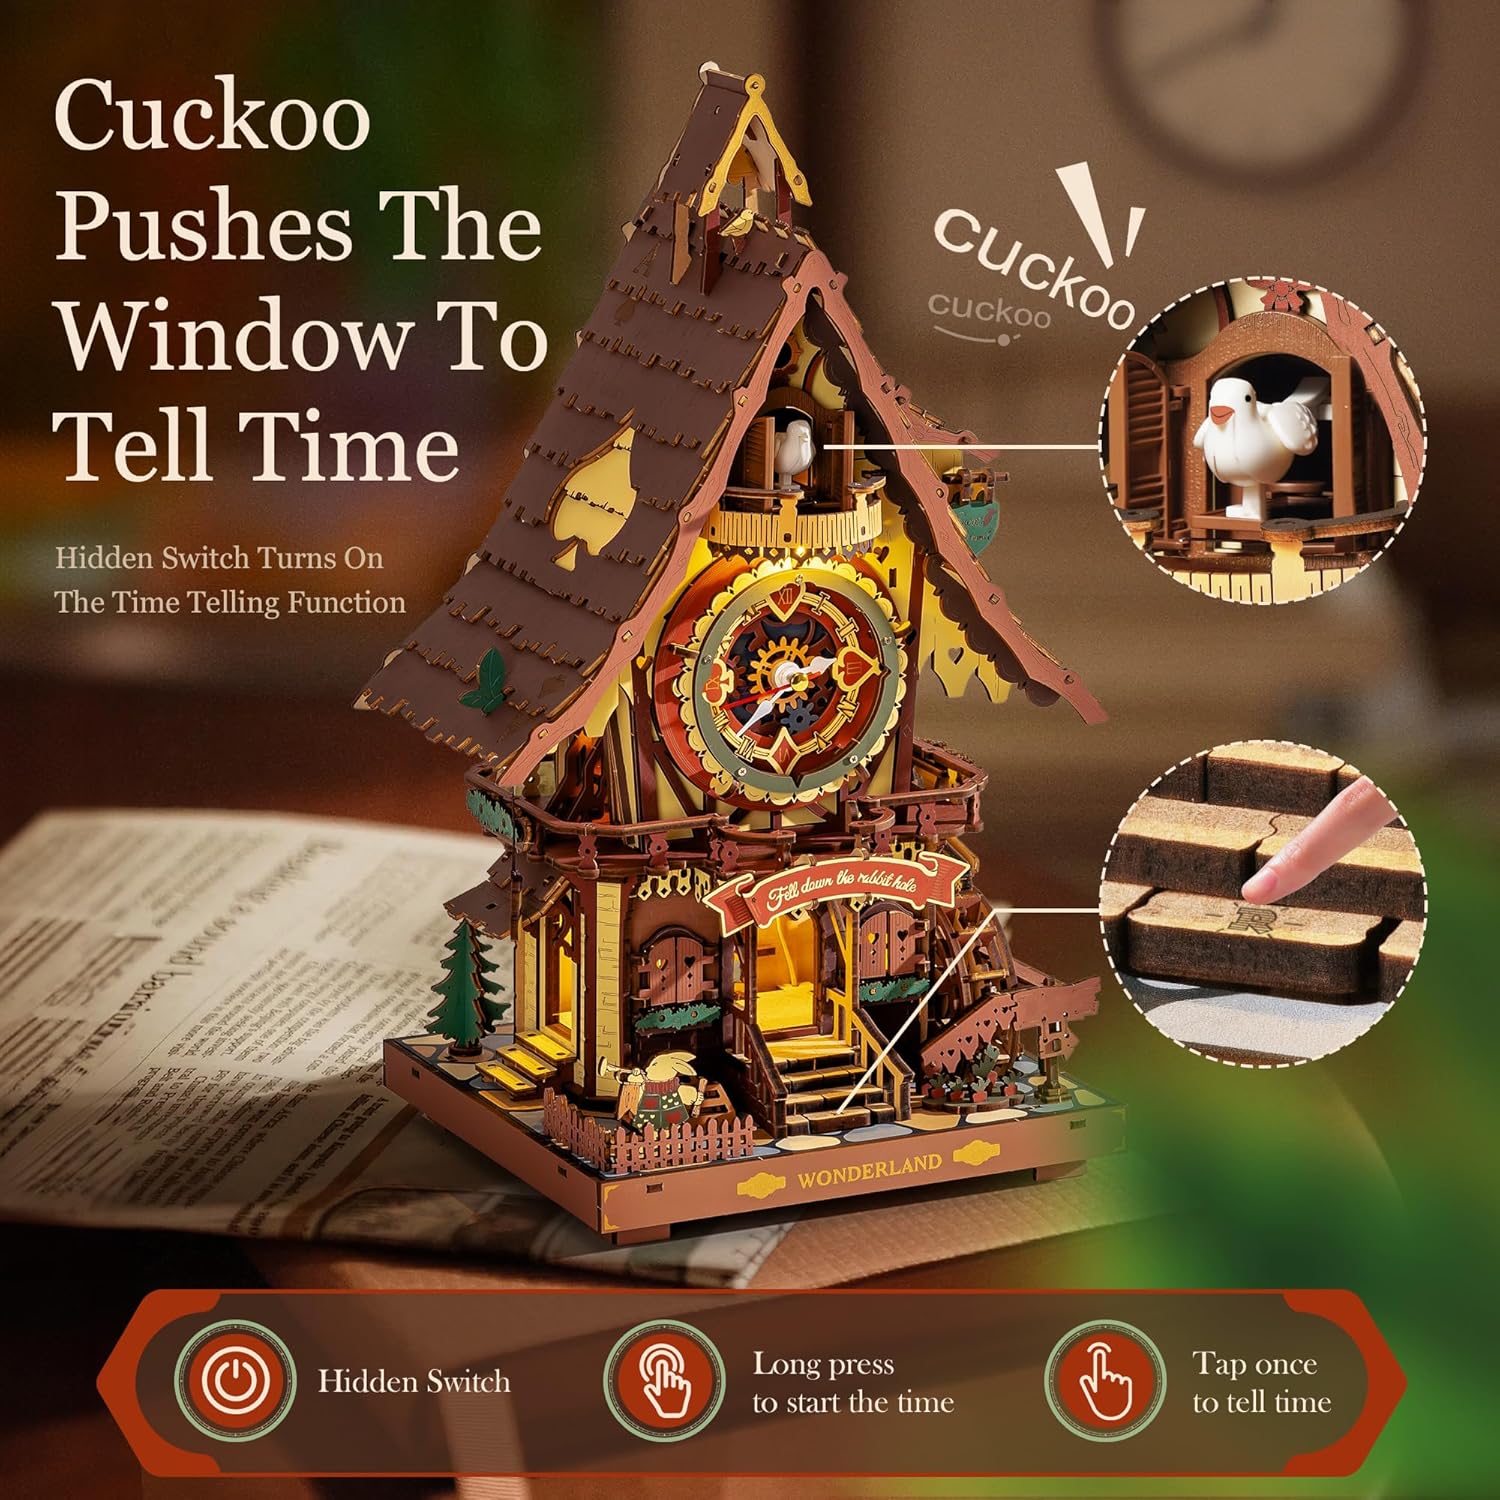
Figure 5: Illustration of the cuckoo mechanism and the hidden switch for time-telling function activation.
4.3 Lighting Effects
The model includes two warm lights that illuminate the interior and the pendulum.
- Activate Lights: Gently pull the retro pull rope switch (located on the side of the clock) to turn on the warm lights.
- Deactivate Lights: Pull the rope switch again to turn off the lights.

Figure 6: The assembled cuckoo clock illuminated by its two warm internal lights.
5. Maintenance
Proper care will ensure the longevity and appearance of your ROBOTIME Cuckoo Clock.
- Cleaning: Use a soft, dry cloth to gently wipe dust from the surface. Avoid abrasive cleaners or excessive moisture.
- Storage: If storing the model, keep it in a cool, dry place away from direct sunlight and extreme temperature fluctuations.
- Moving Parts: Periodically check that all gears and moving components (cuckoo, pendulum, water wheel) operate smoothly. Do not apply lubricants unless specifically instructed by the manufacturer.
6. Troubleshooting
If you encounter any issues with your cuckoo clock, refer to the following common problems and solutions:
| Problem | Possible Cause | Solution |
|---|---|---|
| Cuckoo does not chime or emerge. | Power issue; chime function deactivated; mechanism jammed. | Ensure power supply (Type-C or batteries) is connected/installed correctly. Long press the hidden switch to activate chime function. Check for any obstructions in the cuckoo's path. |
| Lights do not turn on. | Power issue; loose connection; faulty LED. | Verify power supply. Check all wire connections to the LEDs and power source. Ensure the pull rope switch is functioning. |
| Parts do not fit together. | Incorrect orientation; burrs on edges. | Double-check the assembly manual for correct part orientation. Gently sand any rough edges or burrs on the wooden pieces. Do not force parts. |
| Pendulum does not swing freely. | Obstruction; incorrect assembly. | Inspect the pendulum for any obstructions. Review the assembly steps for the pendulum mechanism to ensure it was installed correctly. |
7. Specifications
| Feature | Detail |
|---|---|
| Model Number | LC901 |
| Number of Pieces | 435 |
| Assembly Time (Approx.) | 8 hours |
| Recommended Age | 14+ years |
| Power Supply | Type-C USB (cable not included) or Battery (not included) |
| Dimensions (Assembled) | 12 x 9 x 3 inches (Package Dimensions) |
| Item Weight | 3 pounds |

Figure 7: Approximate dimensions of the assembled Cuckoo Clock.
8. Warranty and Support
ROBOTIME is committed to providing high-quality products and customer satisfaction. If you encounter any issues or require replacement parts, please contact our professional customer support team. We are ready to assist you and ensure you are fully satisfied with your purchase.
For support, please refer to the contact information provided on the product packaging or the official ROBOTIME website.