1. Introduction
This manual provides instructions for the operation and maintenance of your ciciglow 14MP Film and Slide Scanner. This device is designed to convert various film types and slides into digital JPEG images, offering a convenient way to preserve and share your memories.

Figure 1: The ciciglow 14MP Film and Slide Scanner, displaying a vibrant autumn landscape on its 5-inch LCD screen.
2. Package Contents
Please verify that all items listed below are included in your package. If any items are missing or damaged, please contact customer support.
- 1 x ciciglow Film Scanner
- 1 x HD Data Cable
- 1 x Type-C Cable
- 1 x Cleaning Brush
- 1 x User Manual (this document)
- 1 x 110 Film Stand
- 1 x Super8 Film Stand
- 1 x 126 Film Stand
- 1 x Negative Adapter
- 1 x Slide Adapter
3. Product Overview
Familiarize yourself with the scanner's components and controls.
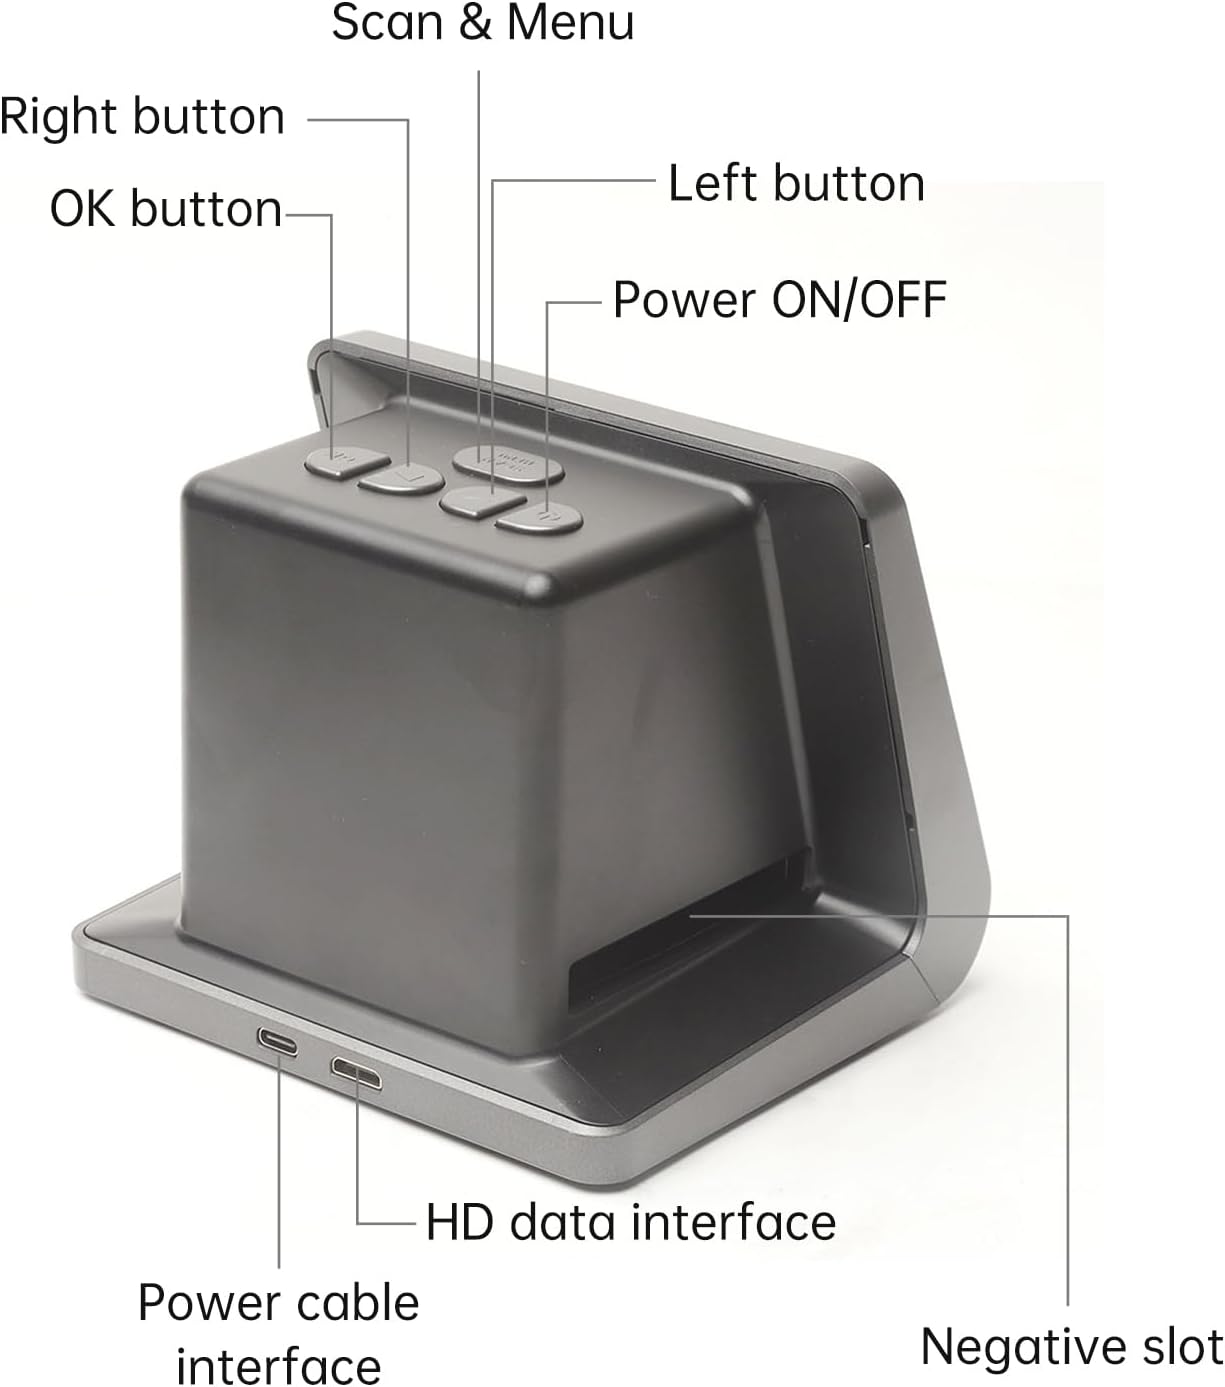
Figure 2: Labeled diagram of the scanner's top panel buttons and rear ports.
- Power ON/OFF: Turns the device on or off.
- Scan & Menu: Initiates scanning or accesses the menu.
- Left button: Navigates left in menus or adjusts settings.
- Right button: Navigates right in menus or adjusts settings.
- OK button: Confirms selections or actions.
- Power cable interface: Connects to the DC 5V power adapter or USB port.
- HD data interface: Connects to a computer or TV for display/data transfer.
- Negative slot: Slot for inserting film stands.
4. Setup
- Power Connection: Connect the provided Type-C cable to the "Power cable interface" on the scanner and the other end to a DC 5V adapter (not included) or a USB port on a computer.
- Power On: Press the Power ON/OFF button to turn on the scanner. The 5-inch LCD screen will illuminate.
- Language Selection: If this is your first use, you may be prompted to select a language. Use the Left and Right buttons to navigate and the OK button to confirm. Supported languages include English, French, German, Italian, Spanish, Japanese, S-Chinese, and T-Chinese.
- Optional: Connect to External Display: To view scanned images on a larger screen, connect the HD Data Cable from the scanner's "HD data interface" to an available HD input on your TV or monitor.
5. Operating Instructions
5.1 Loading Film and Slides
The scanner supports various film types using specific adapters and stands.

Figure 3: Visual guide for preparing and inserting slides into the scanner's slide adapter.
- Prepare the Slide/Film: Hold the slide or film strip up to the light to identify the correct orientation.
- Open the Adapter/Stand: Take out the appropriate film stand (e.g., 110, 126, Super8) or slide adapter. Open it carefully.
- Place Film/Slide: Place your film or slide into the recessed area of the adapter/stand. Ensure it is seated correctly. For film strips, align them within the guides.
- Close and Secure: Close the adapter/stand and press the edges firmly until it locks in place.
- Insert into Scanner: Insert the loaded adapter/stand into the "Negative slot" on the right side of the film scanner, as indicated in Figure 3.
5.2 Scanning Process
- Select Film Type: On the scanner's screen, navigate to the "Film Type" option in the menu (use Scan & Menu button to access, then Left/Right to navigate). Select the type of film you have loaded (e.g., 135 Film, 110 Film, Slide).
- Adjust Settings (Optional): You can adjust exposure compensation (Automatic / Manual -2.0 EV to +2.0 EV) and white balance (Automatic) via the menu if needed.
- Preview Image: The scanner's 5-inch LCD screen will display a live preview of your film or slide.
- Scan: Press the Scan & Menu button to capture the image. The scanner will process the image and save it to the built-in 16GB memory.
- Review: After scanning, the image will be displayed. You can use the Left/Right buttons to browse through saved images.
- Continue Scanning: Remove the scanned film/slide from the adapter, advance to the next frame, or load a new slide, then repeat the process.
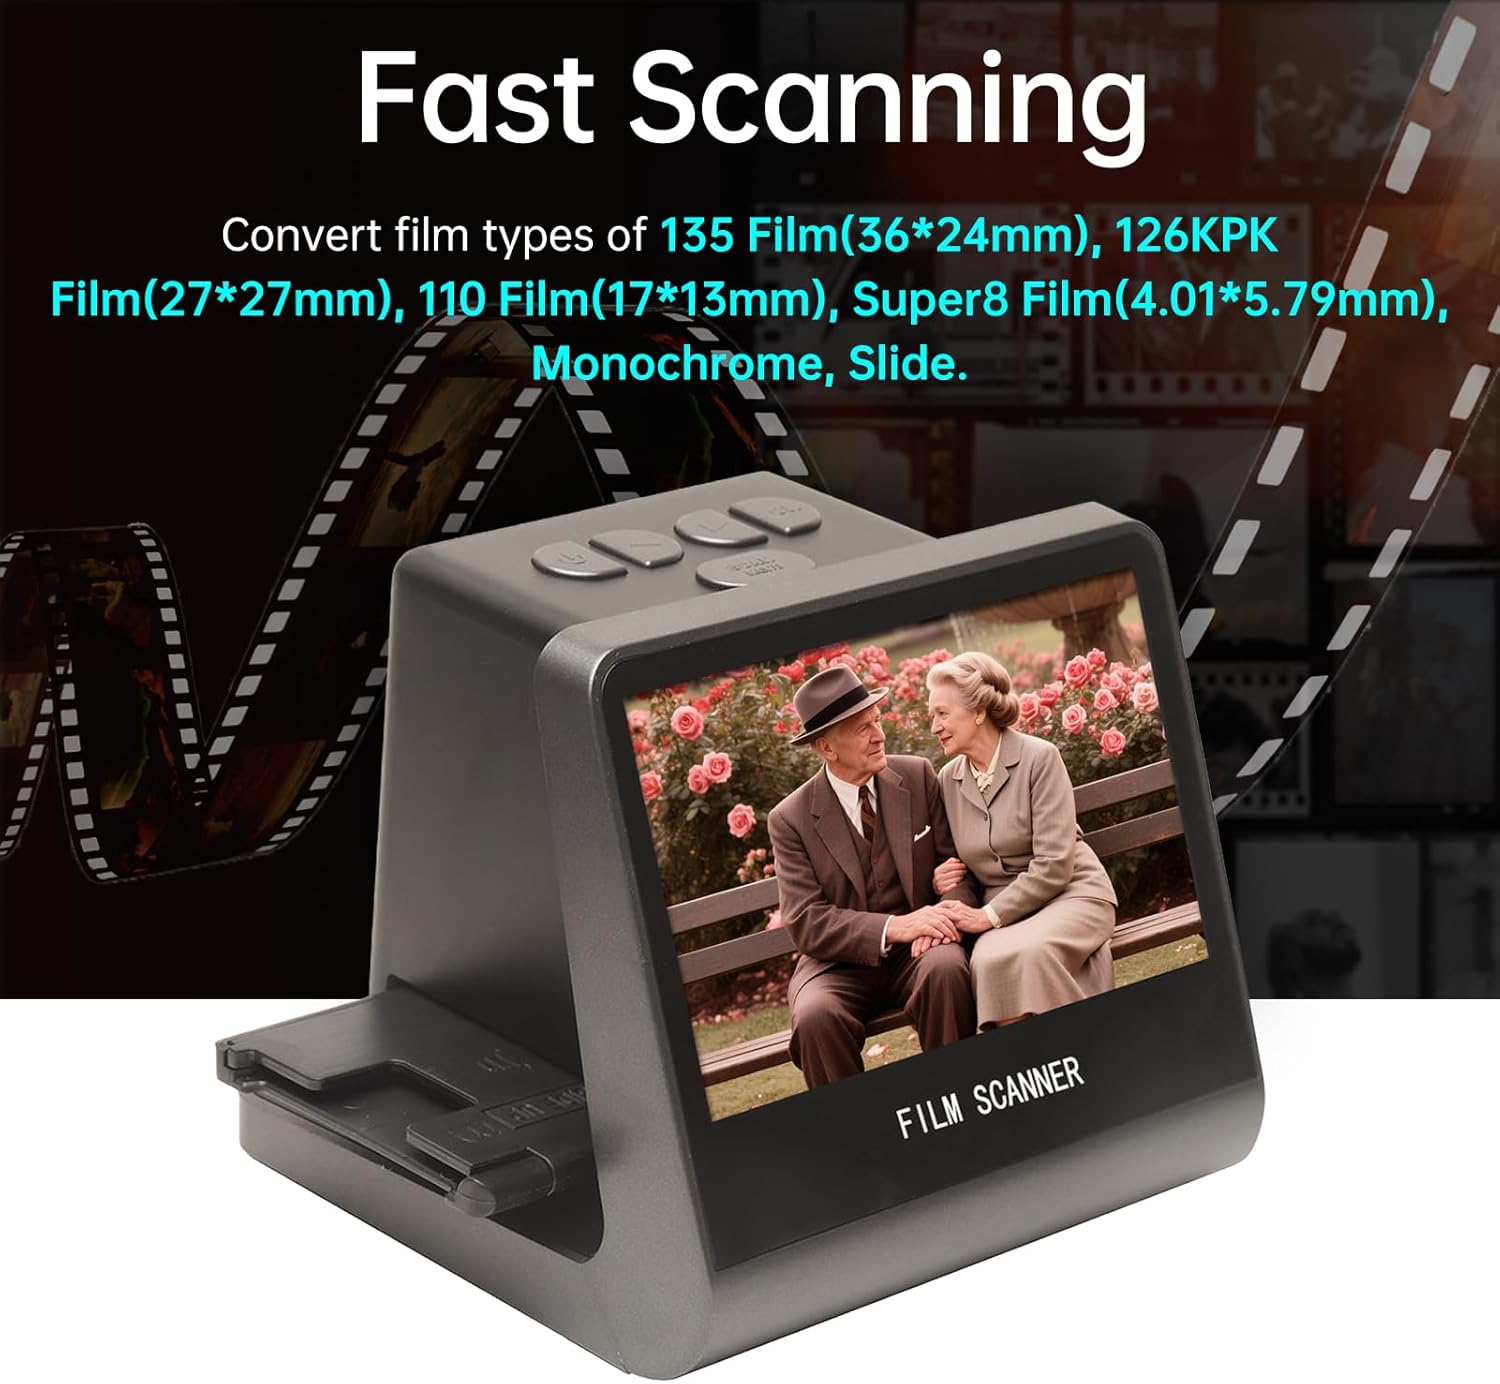
Figure 4: The scanner in operation, demonstrating its ability to quickly convert various film types into digital images.
5.3 Transferring Images to a Computer
The scanner can connect to a computer to transfer your digitized photos.
- Connect to Computer: With the scanner powered off, connect the Type-C cable to the scanner and your computer's USB port.
- Power On: Power on the scanner. It should enter USB MSDC (Mass Storage Device Class) mode.
- Access Files: Your computer will recognize the scanner as an external drive. Navigate to the drive to access your saved JPEG images.
- Copy Files: Copy the desired images from the scanner's internal memory (16GB) to your computer.
- Eject Safely: Safely eject the scanner from your computer before disconnecting the cable.

Figure 5: The scanner connected to a computer for data transfer and a television for larger display, illustrating its versatile connectivity.
6. Specifications
| Feature | Specification |
|---|---|
| Function | Film scanner / USB MSDC |
| Interface | Type-C, Mini HD |
| Image Sensor | 14.0 Megapixels (4416x3312), 1/2.33” CMOS sensor |
| Display | Color 5" LCD HD Screen |
| Exposure Control | Automatic / Manual (-2.0 EV ~ +2.0 EV) |
| White Balance | Automatic |
| Resolution | 14.0 Megapixels / 22 Megapixels (interpolation) |
| Supported Film Types | 135 Film (36x24mm), 126KPK Film (27x27mm), 110 Film (17x13mm), Super8 Film (4.01x5.79mm), Single Color, Slide |
| File Format | JPEG |
| TV-OUT Type | NTSC/PAL |
| Built-in Memory | 16GB |
| Power Supply | DC 5V Adapter / USB Port |
| Supported Languages | S-Chinese, T-Chinese, English, French, German, Italian, Spanish, Japanese |
| Supported Operating Systems | Windows Vista, Windows 7, Windows 8, OS X 10.7.3 and above |
| Product Dimensions | 132 x 115 x 110 mm (5.2 x 4.5 x 4.3 inches) |
| Item Weight | 1.6 pounds (approx. 725g) |

Figure 6: Physical dimensions of the ciciglow 14MP Film and Slide Scanner.
7. Maintenance
- Cleaning the Lens: Use the provided cleaning brush to gently remove dust or debris from the scanner's lens and film slot. Do not use liquid cleaners directly on the lens.
- Exterior Cleaning: Wipe the exterior of the scanner with a soft, dry cloth. Avoid abrasive materials or harsh chemicals.
- Storage: When not in use, store the scanner in a cool, dry place away from direct sunlight and excessive dust.
- Film Handling: Always handle film and slides by their edges to avoid fingerprints and scratches.
8. Troubleshooting
| Problem | Possible Cause | Solution |
|---|---|---|
| Scanner does not power on. | Power cable not connected properly or power source issue. | Ensure the Type-C cable is securely connected to both the scanner and a working 5V power source. Try a different USB port or power adapter. |
| Images appear blurry or dusty. | Dust on film/slide or scanner lens. | Clean the film/slide with a soft, lint-free cloth or air blower. Use the provided brush to clean the scanner lens and film slot. |
| Cannot transfer files to computer. | Incorrect connection mode or driver issue. | Ensure the scanner is powered on and connected via the Type-C cable to the computer. The scanner should appear as a removable drive. If not, try a different USB port or cable. No special drivers are typically required for MSDC mode. |
| Colors are inaccurate. | Incorrect white balance setting or film type selection. | Check the "Film Type" setting in the menu to ensure it matches your film. Verify "White Balance" is set to Automatic or adjust manually if available. |
9. Warranty and Support
For warranty information or technical support, please refer to the documentation provided at the time of purchase or contact ciciglow customer service through their official website or the retailer where the product was purchased.
Manufacturer: ciciglow
Date First Available: June 18, 2025