1. Product Overview
The GIGABYTE B840M Eagle WIFI6 is a Micro-ATX motherboard designed for AMD Socket AM5 processors, supporting AMD Ryzen 9000, 8000, and 7000 series. It features DDR5 memory support, dual M.2 slots, PCIe 4.0 connectivity, USB 3.2 Gen 1, WIFI6, and 2.5GbE LAN. This motherboard is engineered to provide a stable and high-performance foundation for your personal computer system.


2. Key Features
- AMD Socket AM5: Supports AMD Ryzen 9000 / Ryzen 8000 / Ryzen 7000 Series Processors.
- DDR5 Compatible: Features 2 DIMM slots for DDR5 memory.
- Power Design: Robust 5+2+2 power phase design for stable performance.
- Thermals: Equipped with VRM and M.2 Thermal Guards for efficient heat dissipation.
- Connectivity: Includes PCIe 4.0, 2x M.2 Slots, and USB-C ports.
- DIY Friendly: Features M.2 EZ-Latch, PCIe EZ-Latch, and Wi-Fi EZ-Plug for simplified installation.
- Networking: Integrated WIFI6 and 2.5GbE LAN for high-speed network connectivity, plus BT 5.3.
3. Setup Guide
This section provides a general guide for installing your GIGABYTE B840M Eagle WIFI6 motherboard. Always refer to the detailed instructions provided with your CPU, RAM, and other components for specific installation procedures.
3.1. Preparation
- Ensure your workspace is clean and well-lit.
- Discharge static electricity by touching a grounded metal object before handling components.
- Gather all necessary components: CPU, CPU cooler, RAM, M.2 SSDs, graphics card, power supply, and PC case.
3.2. CPU Installation
- Locate the AMD Socket AM5 on the motherboard.
- Open the CPU socket retention lever.
- Carefully align the CPU with the socket, ensuring the golden triangle on the CPU matches the triangle on the socket. Do not force the CPU into place.
- Close the retention lever to secure the CPU.
3.3. CPU Cooler Installation
Install your chosen CPU cooler according to its manufacturer's instructions. Ensure proper thermal paste application for optimal cooling.
3.4. RAM Installation
- Open the clips on both ends of the DDR5 DIMM slots.
- Align the RAM module with the slot, ensuring the notch on the module matches the key in the slot.
- Press down firmly on both ends of the RAM module until the clips snap into place.
3.5. M.2 SSD Installation
The motherboard features 2 M.2 slots with EZ-Latch. Refer to the motherboard diagram for their locations.
- Locate an M.2 slot and remove the M.2 Thermal Guard if present.
- Insert the M.2 SSD into the slot at an angle.
- Gently push down the SSD and secure it using the M.2 EZ-Latch mechanism.
- Reinstall the M.2 Thermal Guard.
3.6. Motherboard Mounting
- Install the I/O shield into your PC case (if not pre-attached).
- Align the motherboard with the standoffs in your PC case.
- Secure the motherboard with screws, ensuring not to overtighten.
3.7. Power Connections
- Connect the 24-pin ATX main power connector from your power supply to the motherboard.
- Connect the 8-pin (or 4+4-pin) ATX 12V CPU power connector.
3.8. Front Panel and Peripheral Connections
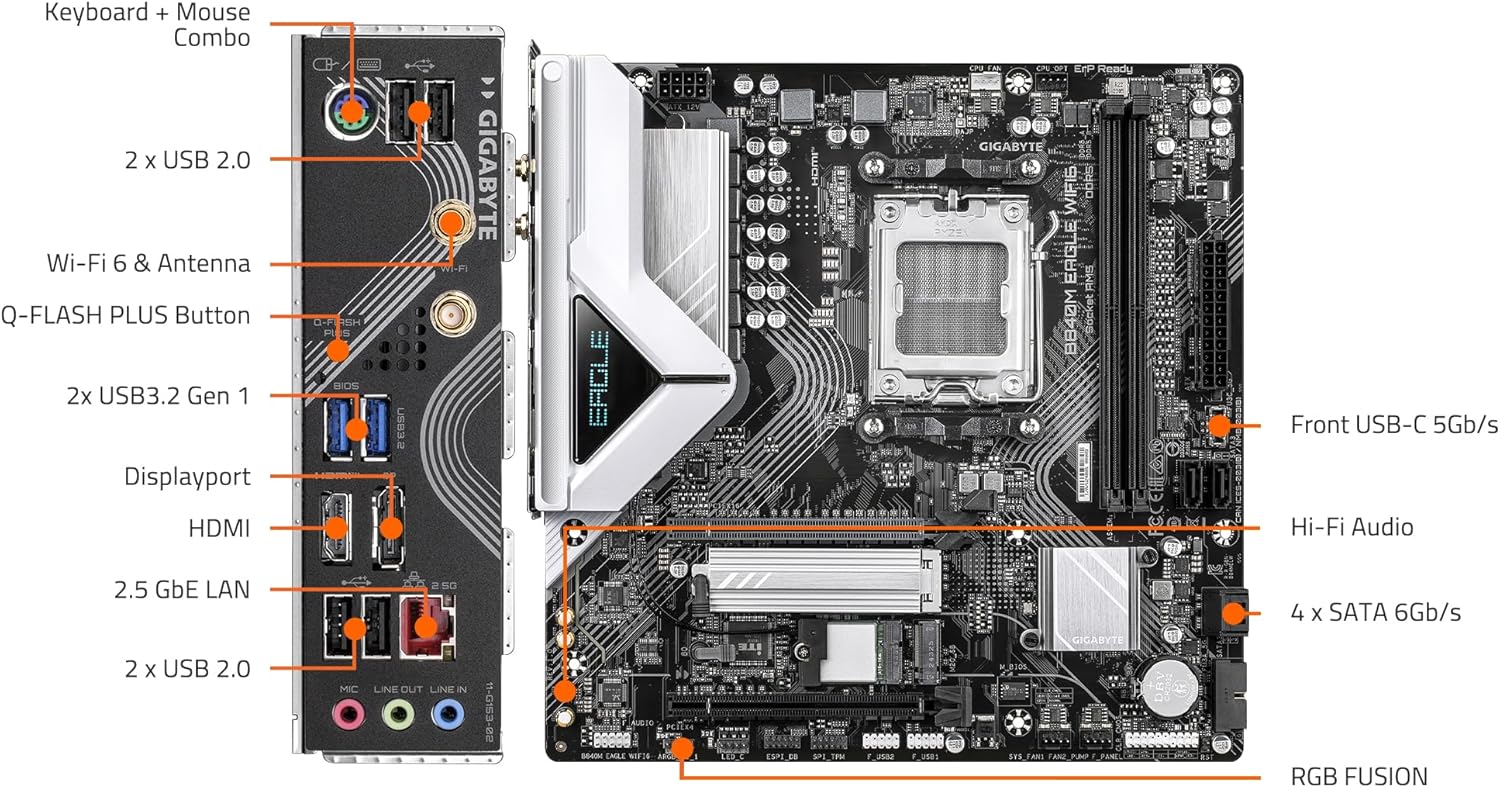
Connect the front panel headers (power button, reset button, USB ports, audio jacks) and other peripherals (SATA drives, case fans) to the appropriate headers on the motherboard. Refer to the labeled diagram below for assistance.

3.9. Graphics Card Installation
- Open the PCIe EZ-Latch on the primary PCIe x16 slot.
- Insert your graphics card firmly into the slot until it clicks into place.
- Secure the graphics card to the PC case with screws.
- Connect any necessary PCIe power cables from your power supply to the graphics card.
4. Operating Instructions
4.1. First Boot and BIOS/UEFI Setup
- After connecting all components and peripherals, power on your system.
- Press the designated key (usually DEL or F2) during startup to enter the BIOS/UEFI setup utility.
- Configure boot order, system time, and other essential settings as needed. Save changes and exit.
4.2. Operating System Installation
Insert your operating system installation media (USB drive or DVD) and follow the on-screen prompts to install your preferred OS.
4.3. Driver Installation
After OS installation, install the latest drivers for your motherboard, graphics card, and other components. You can find the latest drivers on the GIGABYTE official website for your B840M Eagle WIFI6 motherboard.
4.4. Network Connectivity
- Wired LAN: Connect an Ethernet cable to the 2.5GbE LAN port on the rear I/O panel.
- Wireless (WIFI6): Attach the included Wi-Fi antennas to the connectors on the rear I/O panel. Ensure Wi-Fi drivers are installed for wireless connectivity.
5. Maintenance
Regular maintenance helps ensure the longevity and optimal performance of your motherboard and PC system.
- Dust Cleaning: Periodically clean dust from inside your PC case, especially from fans, heatsinks, and motherboard components, using compressed air. Ensure the system is powered off and unplugged before cleaning.
- BIOS/UEFI Updates: Check the GIGABYTE website for the latest BIOS/UEFI updates. Updates can improve compatibility, stability, and performance. Follow GIGABYTE's instructions carefully when updating the BIOS.
- Driver Updates: Keep your system drivers updated to ensure compatibility and optimal performance with new software and hardware.
- Component Checks: Occasionally check all cable connections (power, data, front panel) to ensure they are secure.
6. Troubleshooting
This section addresses common issues you might encounter. For more complex problems, refer to the GIGABYTE support website or contact technical support.
6.1. No Power / No POST (Power-On Self-Test)
- Ensure all power cables (24-pin ATX, 8-pin CPU, PCIe power) are securely connected.
- Verify the power supply is switched on and functioning correctly.
- Check front panel connections, especially the power button header.
- Reseat RAM modules and the graphics card.
- Try booting with minimal components (CPU, one RAM stick, graphics card) to isolate the issue.
- Clear CMOS by removing the CMOS battery for a few minutes or using the clear CMOS jumper (refer to motherboard manual for exact location).
6.2. System Instability / Crashes
- Ensure all drivers are up to date.
- Check CPU and GPU temperatures to rule out overheating.
- Run memory diagnostic tools to check for faulty RAM.
- Verify power supply wattage is sufficient for all components.
6.3. Network Connectivity Issues
- Wired: Check Ethernet cable connection and router/modem status. Ensure LAN drivers are installed.
- Wireless: Ensure Wi-Fi antennas are properly attached and Wi-Fi drivers are installed. Check Wi-Fi network settings in your operating system.
6.4. Peripheral Not Detected
- Ensure the peripheral is correctly connected to the appropriate port.
- Install the latest drivers for the peripheral.
- Test the peripheral on another port or another system if possible.
7. Technical Specifications
| Feature | Specification |
|---|---|
| CPU Socket | AMD Socket AM5 |
| Compatible Processors | AMD Ryzen 9000 / Ryzen 8000 / Ryzen 7000 Series |
| Chipset | AMD B840 |
| RAM Memory Technology | DDR5 |
| Memory Slots | 2x DIMMs |
| Memory Clock Speed | Up to 5200 MHz (and higher via OC) |
| Storage | 2x M.2 Slots, 4x SATA 6Gb/s |
| PCIe Slots | PCIe 4.0 |
| USB Ports | USB 3.2 Gen 1, USB-C |
| Networking | WIFI6, 2.5GbE LAN, BT 5.3 |
| Form Factor | Micro-ATX |
| Dimensions (LxWxH) | 8.82 x 8.82 x 1 inches |
| Item Weight | 4.4 pounds |
| Operating System Support | Windows 11 |
8. Warranty and Support
For detailed warranty information, technical support, driver downloads, and BIOS updates, please visit the official GIGABYTE website. You can find product-specific support by navigating to the support section and searching for your model, B840M Eagle WIFI6.
GIGABYTE Official Website: https://www.gigabyte.com/
Always ensure you are downloading software and drivers from the official manufacturer's website to prevent security risks.


