1. Introduction
Welcome to the user manual for your HuiTinJesh Si4732 DSP Radio. This portable radio receiver is designed for enthusiasts and casual listeners alike, offering a wide range of reception capabilities including AM, FM, LSB, USB, and shortwave bands. Equipped with a 1.9-inch screen and a headphone amplifier, it provides a versatile listening experience. This manual will guide you through the setup, operation, and maintenance of your device to ensure optimal performance and longevity.
2. Product Overview
2.1. Package Contents
Upon unpacking, please ensure all items listed below are present:
- Radio Receiver
- Pull Rod Antenna
- Loop Antenna
- USB Cable
- Owner's Manual (this document)
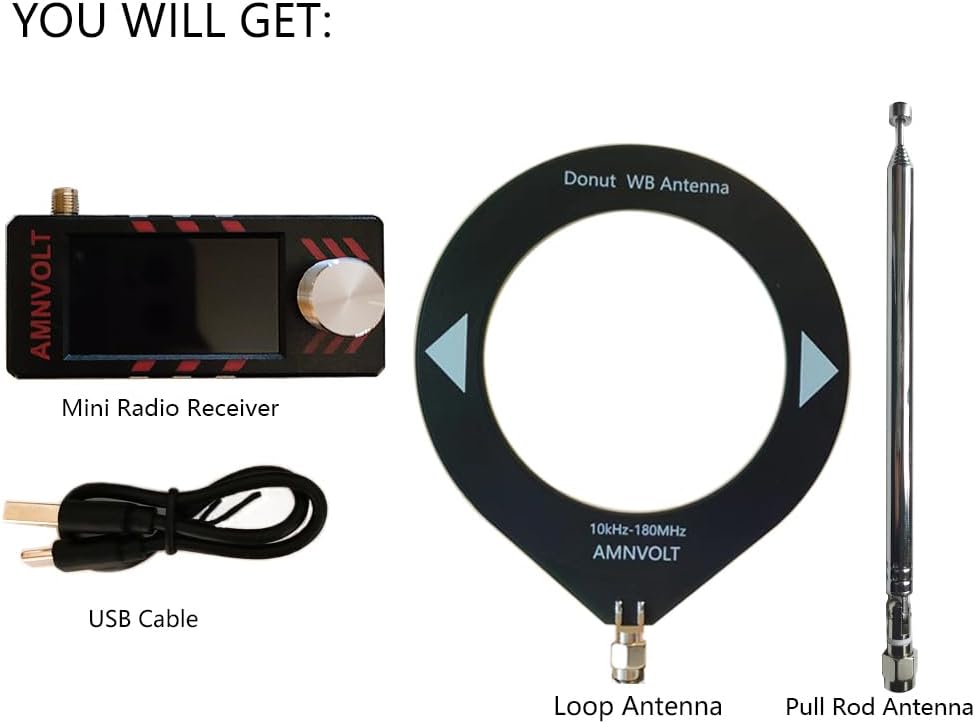
Image: The package contents, including the mini radio receiver, USB cable, loop antenna, and pull rod antenna.
2.2. Key Features
- Advanced DSP Chip: Utilizes the SI4732 DSP chip for high sensitivity and minimal interference across various bands.
- Wide Band Support: Supports LSB, USB, AM, and FM modes, covering a comprehensive range of broadcast bands.
- Enhanced Audio: Features a headphone amplification function for improved audio quality when using headphones.
- Clear Display: A 1.9-inch HD screen provides a clear and vibrant display for easy navigation and information viewing.
- Durable Design: Housing upgraded to PC injection-molded material for a smoother tactile feel and robust construction.
- Portable: Lightweight and pocket-sized, suitable for outdoor activities such as walking, hiking, and camping.
- Rechargeable Battery: Equipped with an 800mAh rechargeable battery for extended use.
- Dual Antenna System: Includes both a pull rod antenna and a loop antenna for versatile reception capabilities.
- Open Source Firmware: Supports firmware updates, allowing for future enhancements and customization.

Image: Front view of the Si4732 DSP Radio, highlighting its 1.9-inch screen and attached antenna.

Image: Illustration of the radio's compact design, cavity speaker, and independent ear amplifier circuit for enhanced sound, especially with headphones.

Image: Diagram illustrating the integration of the ESP32-S3 main control unit and the SI4732 DSP chip, supporting SW, LW, FM, and AM bands.
3. Setup
3.1. Charging the Battery
Before first use, fully charge the radio's internal 800mAh battery. Connect the provided USB cable to the Type-C charging port on the radio and to a standard USB power adapter (not included) or a computer USB port. The charging indicator on the screen will show the charging status. Avoid using fast chargers as they are not supported.
3.2. Attaching the Antenna
Your radio comes with two antenna options: a pull rod antenna and a loop antenna. Choose the appropriate antenna based on your reception needs.
- Pull Rod Antenna: Screw the pull rod antenna into the antenna connector on the top of the radio. Extend it fully for optimal reception, especially for FM and shortwave bands.
- Loop Antenna: For enhanced reception on certain bands, particularly for shortwave, connect the loop antenna to the radio's antenna input. Position the loop antenna away from electronic interference sources.

Image: The radio with the loop antenna attached, demonstrating a setup for enhanced signal reception.
4. Operating Instructions
4.1. Power On/Off
To power on the radio, press and hold the main control knob for a few seconds. To power off, repeat the action.
4.2. Basic Navigation and Tuning
The radio features a single encoder (tuning knob) for most functions. Rotate the knob to navigate menus or change frequencies. Press the knob to select an option or confirm a setting.
- Band Selection: Navigate through available bands (AM, FM, LSB, USB, Shortwave) using the encoder.
- Frequency Tuning: Once a band is selected, rotate the encoder to tune to desired frequencies. The step size can often be adjusted within the menu.
- Volume Control: Adjust the audio output level by rotating the encoder when in volume adjustment mode, or through a dedicated menu option.
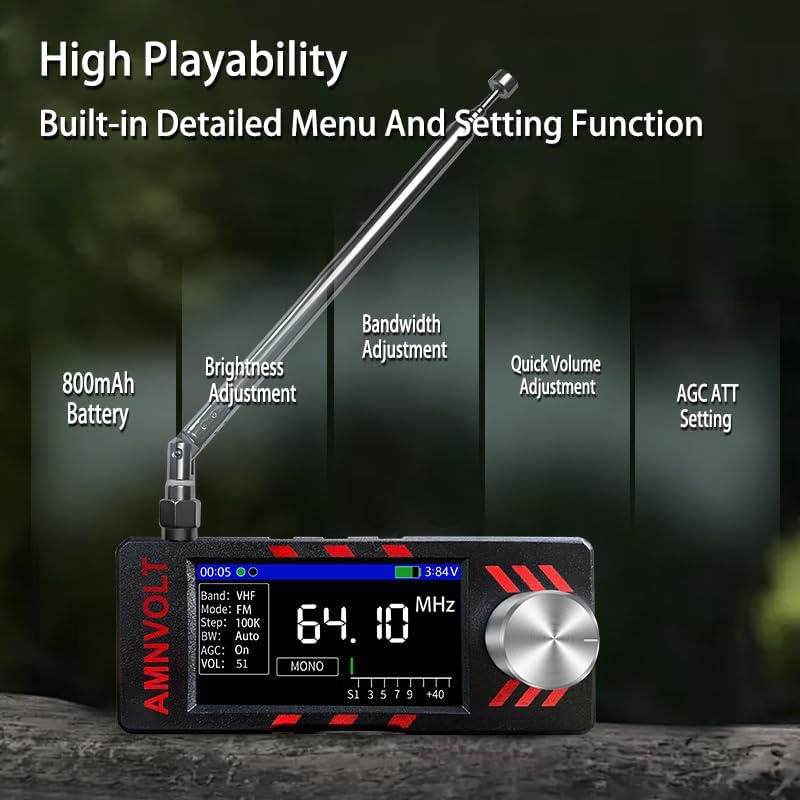
Image: The radio's display showing various menu settings such as 800mAh Battery status, Brightness Adjustment, Bandwidth Adjustment, Quick Volume Adjustment, and AGC ATT Setting.
4.3. Headphone Use
Connect your headphones to the 3.5mm headphone jack. The radio includes a headphone amplifier for an enhanced listening experience. Adjust the volume to a comfortable level to prevent hearing damage.
4.4. Firmware Updates
The Si4732 DSP Radio operates on an open-source system and supports firmware updates. This allows for continuous improvement and new features. For detailed instructions on how to update the firmware, please refer to the official project documentation or community resources online. A USB cable is used for connecting the radio to a computer for this process.

Image: The radio connected to a laptop via a USB cable, illustrating its capability for firmware updates through an open-source system.
5. Maintenance
- Cleaning: Use a soft, dry cloth to clean the radio's exterior. Avoid using abrasive cleaners or solvents, which can damage the finish.
- Battery Care: To prolong battery life, avoid fully discharging the battery frequently. If storing the radio for an extended period, charge it to about 50% and recharge every few months.
- Storage: Store the radio in a cool, dry place away from direct sunlight and extreme temperatures.
- Antenna Care: Handle antennas with care. Avoid bending or forcing the pull rod antenna.
6. Troubleshooting
| Problem | Possible Cause | Solution |
|---|---|---|
| Radio does not power on. | Low battery or power button not pressed correctly. | Charge the battery fully. Press and hold the power button for a few seconds. |
| Poor reception. | Antenna not extended/connected properly, environmental interference, weak signal. | Ensure antenna is fully extended or properly connected. Try repositioning the radio or using the loop antenna. Move away from electronic devices. |
| Tuning knob (encoder) unresponsive or erratic. | Physical damage to the encoder or internal component. | Avoid applying excessive force or pushing down on the knob while turning. If the issue persists, contact customer support. |
| Battery drains quickly even when off. | Internal fault or residual current draw. | Ensure the radio is completely powered off. If the issue continues, contact customer support. |
7. Specifications
| Product Dimensions | 3.15 x 0.79 x 1.38 inches (8 x 2 x 3.5 cm) |
| Item Weight | 5 ounces (141.75 grams) |
| Model Number | si4732 |
| Batteries | 1 C battery required (included), 800mAh rechargeable |
| Manufacturer | HuiTinJesh |
| Color | Black |
| Special Features | Lightweight, Portable, Rechargeable, Headphone Amplifier |
| Connectivity Technology | Antenna, USB (Type-C for charging) |
| Tuner Technology | AM/FM/LSB/USB/Shortwave (DSP) |
| Power Source | Battery Powered |
| Radio Bands Supported | 4-Band (AM, FM, LSB, USB, Shortwave) |

Image: Detailed dimensions of the radio receiver and the loop antenna.
8. Warranty and Support
HuiTinJesh products are manufactured to high-quality standards. For warranty information and customer support, please refer to the documentation included with your purchase or contact the seller directly through the platform where the product was purchased. Please retain your proof of purchase for any warranty claims.
For technical assistance or inquiries, please visit the official HuiTinJesh support channels or contact their customer service department.