Introduction
Thank you for choosing the NEEWER MS007 Low Profile Microphone Stand. This manual provides essential information for the safe and efficient assembly, operation, and maintenance of your new microphone stand. Please read these instructions carefully before use and retain them for future reference.
Package Contents
Before proceeding with assembly, please verify that all components listed below are present in your package:
- 1 x Microphone Boom Arm
- 1 x Heightening Pole
- 1 x C Clamp
- 1 x Ball Head
- 1 x 1/4" to 3/8" Screw Adapter
- 1 x 1/4" to 5/8" Screw Adapter
- 1 x 5mm L Shaped Hex Wrench
- 1 x 4mm L Shaped Hex Wrench
- 1 x 3mm L Shaped Hex Wrench
- 1 x Phillips Head Hex Wrench
- 4 x Cable Ties

Image: All components included in the NEEWER MS007 package.
Setup Instructions
1. Attaching the C-Clamp to Your Desk
The C-clamp securely mounts the microphone stand to your desk. Ensure your desk thickness is within the maximum supported range of 2.4 inches (6 cm).
- Unscrew the C-clamp to open its jaws sufficiently.
- Position the C-clamp on the edge of your desk. The clamp features non-slip silicone pads to protect your desk surface from scratches.
- Tighten the screw until the clamp is firmly secured to the desk. Do not overtighten.
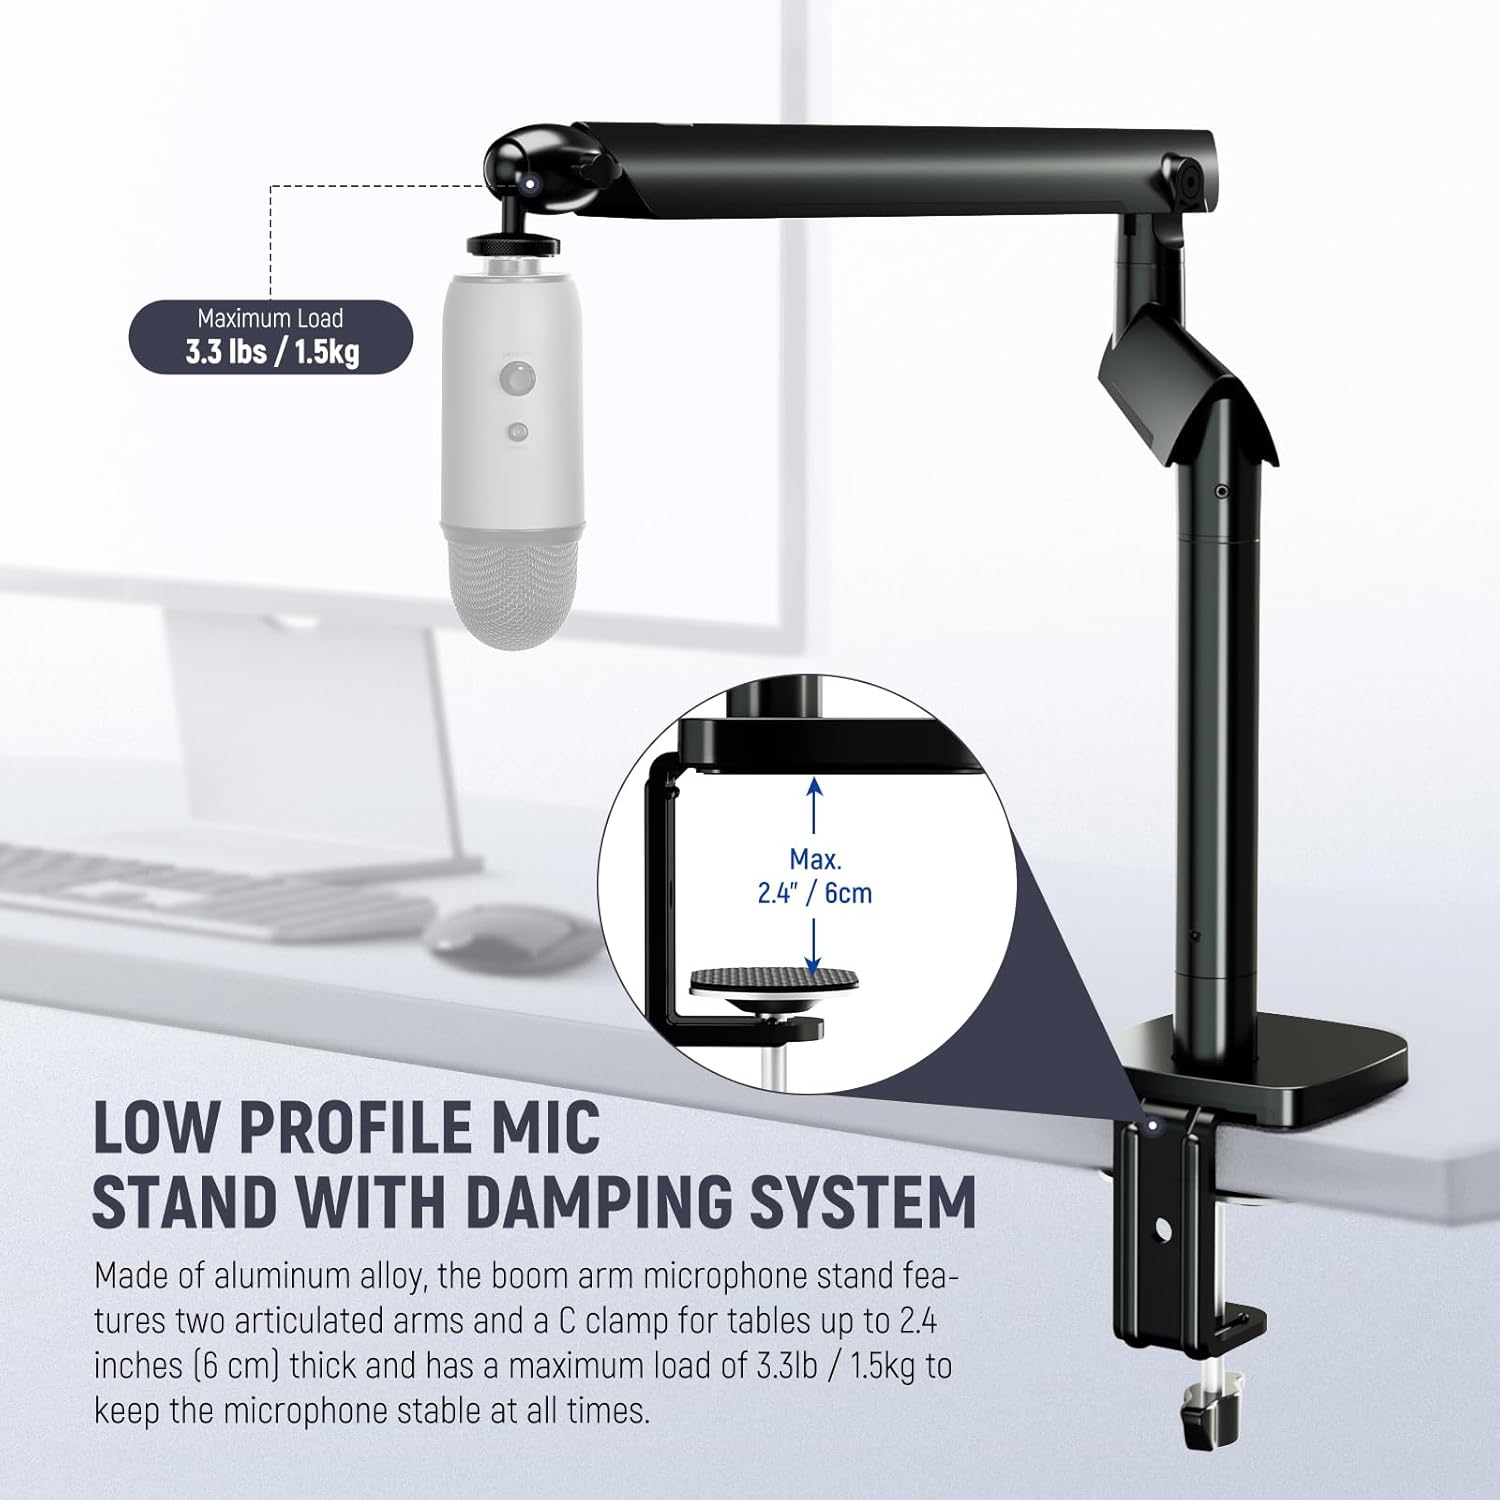
Image: The C-clamp securely attached to a desk, illustrating the maximum desk thickness.
2. Installing the Boom Arm and Heightening Pole
The boom arm connects to the C-clamp. An optional heightening pole can be added for increased vertical reach.
- Insert the base of the microphone boom arm into the vertical slot of the C-clamp.
- If additional height is desired, insert the heightening pole into the C-clamp first, then insert the boom arm into the top of the heightening pole.
- Ensure the boom arm (and heightening pole, if used) is seated firmly.

Image: The microphone stand configured with and without the heightening pole.
3. Attaching Your Microphone
The stand includes adapters for wide compatibility with various microphones and other equipment.
- Identify the thread size of your microphone or accessory. The stand features a 1/4" top screw.
- If your microphone requires a 3/8" or 5/8" thread, use the appropriate 1/4" to 3/8" or 1/4" to 5/8" screw adapter. Screw the adapter onto the 1/4" top screw of the boom arm.
- Attach your microphone or accessory to the ball head or directly to the adapter.
- Ensure all connections are secure. The stand supports a maximum load of 3.3 lbs (1.5 kg).

Image: Compatibility with various microphones and accessories using included adapters.
4. Cable Management
The boom arm features integrated cable channels to keep your workspace tidy.
- Route your microphone cable along the boom arm, tucking it into the built-in channels.
- Use the provided cable ties to further secure the cable if needed, especially at joints or along the heightening pole.

Image: Hidden cable channels for organized cable management.
Operating Instructions
Adjusting the Boom Arm
The NEEWER MS007 features dual articulating boom arms with a damping system for flexible and stable positioning.
- Rotation: The boom arms allow for smooth 360° rotation at their joints, enabling precise microphone placement.
- Pitch Adjustment: The upper arm offers a pitch range of +70° to -30°, accommodating various microphone sizes and positions.
- Damping System: The advanced damping system ensures quick, stable, and silent adjustments, preventing unwanted movement or noise during operation.
Adjusting the Ball Head
The included ball head provides additional flexibility for fine-tuning microphone angles.
- 360° Rotation: The ball head can rotate a full 360°, allowing for horizontal adjustment of the microphone.
- 90° Tilt: The ball head also supports a 90° tilt, enabling vertical angle adjustments for optimal sound capture.
- Loosen the locking knob on the ball head to adjust, then tighten to secure the desired position.

Image: Flexible angles and rotation capabilities of the boom arms and ball head.
Maintenance
To ensure the longevity and optimal performance of your NEEWER MS007 microphone stand, follow these simple maintenance guidelines:
- Cleaning: Wipe the stand regularly with a soft, dry cloth to remove dust and debris. For stubborn marks, a slightly damp cloth can be used, followed by immediate drying. Avoid abrasive cleaners or solvents.
- Check Connections: Periodically check all screws and clamps to ensure they are securely tightened. Loose connections can affect stability and performance.
- Storage: When not in use, the stand can be folded under a desktop monitor for space-saving storage. Store in a clean, dry environment.
Troubleshooting
If you encounter any issues with your NEEWER MS007 microphone stand, refer to the following common solutions:
- Stand is unstable or sags: Ensure the C-clamp is securely tightened to the desk. Verify that the microphone and accessories attached do not exceed the maximum load capacity of 3.3 lbs (1.5 kg). Check that all boom arm joints are properly secured.
- Difficulty with cable management: The built-in cable channels are designed for standard microphone cables. If cables are too thick, they may not fit perfectly. Consider using thinner cables or external cable management solutions if necessary.
- Microphone not fitting: Confirm you are using the correct 1/4" to 3/8" or 1/4" to 5/8" screw adapter for your microphone's thread size.
Specifications
| Model | MS007 |
| Item Type | Low Profile Mic Stand |
| Compatibility | Microphones, Cameras, Monitors |
| Application | Photo & Video, Gaming, Live Streaming, Studio Podcast, Singing, Video Recording, Zoom Calls, Podcasting, Music Creation |
| Main Features | Low Profile, Flexible Use, Damping System, Hidden Cable Channel |
| Mounting Points | 1/4", 3/8", 5/8" |
| Main Material | Aluminum Alloy |
| Load Capacity | 3.3 lb / 1.5 kg |
| Dimensions (L×W×H) | 29.1" × 16.9" × 3.9" / 73.9 × 43 × 10 cm |
| Item Weight | 28.3 g |
| Color | Black |
Warranty and Support
No specific warranty or support information is provided in the product details. For warranty inquiries or technical support, please refer to the NEEWER official website or contact your retailer directly.


