VEVOR ZWE-03
VEVOR L Shaped Electric Standing Desk
Model: ZWE-03
Introduction
This manual provides detailed instructions for the assembly, operation, and maintenance of your VEVOR L Shaped Electric Standing Desk, Model ZWE-03. Please read this manual thoroughly before installation and use to ensure proper function and safety. Keep this manual for future reference.

Image: The VEVOR L Shaped Electric Standing Desk, Model ZWE-03, showcasing its spacious design and integrated features like the monitor stand and power strip.
Safety Instructions
- Ensure all components are present and undamaged before assembly. Do not use if any parts are missing or defective.
- Keep children and pets away from the desk during operation, especially during height adjustments.
- Do not overload the desk. Refer to the specifications for maximum weight capacity.
- Ensure the power cord is properly connected and routed to prevent tripping hazards.
- Avoid placing liquids directly on the desk surface, especially near electrical components.
- Do not attempt to disassemble or repair the motor or control system yourself. Contact qualified service personnel.
- Operate the desk on a level surface to ensure stability.
Package Contents
Verify that all items listed below are included in your package:
- 1 x Cable Collection Hole
- 1 x Instruction Manual
- 2 x ST416 Screws
- 4 x M440 Screws
- 80 x M612 Screws
- Desk components (desktop panels, legs, frame, drawers, control panel, power strip, LED strip)
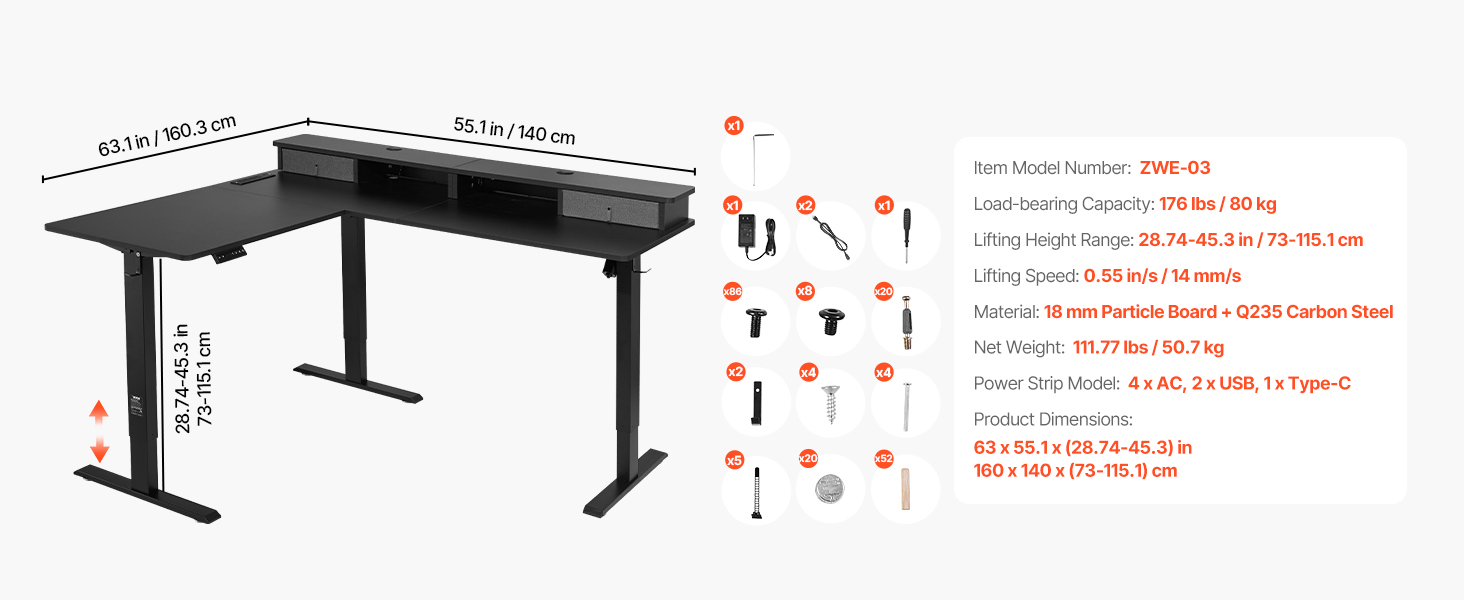
Image: An overview of the desk's dimensions and a visual representation of the various components and hardware included in the package.
Assembly Instructions
Follow these general steps for assembling your L Shaped Electric Standing Desk. Refer to the included instruction manual for detailed diagrams and specific hardware usage for each step.
- Unpack and Organize: Carefully unpack all components and lay them out on a clean, soft surface to prevent scratches. Group similar parts and hardware.
- Assemble Desk Legs and Frame: Attach the lifting columns to the foot supports. Connect the crossbars and side frames to form the main desk structure.
- Attach Desktop Panels: Secure the L-shaped desktop panels to the assembled frame using the provided screws. Ensure proper alignment.
- Install Drawers and Monitor Stand: Mount the two fabric drawers into their designated slots and attach the elevated monitor stand to the desktop.
- Connect Electrical Components: Install the control panel, power strip, and LED light strip. Connect all necessary cables to the control box and power supply.
- Cable Management: Use the cable collection hole and any provided cable ties to organize and secure all wires, ensuring they do not interfere with desk movement.
- Final Check: Double-check all screws and connections to ensure they are tight and secure before plugging in the desk.

Image: A visual breakdown of the desk's integrated features, including the two drawers, cable collection hole, accessory hooks, and the built-in power strip with AC, USB, and Type-C ports.
Operating Instructions
Your VEVOR Electric Standing Desk features an intuitive control panel for easy height adjustment and memory functions.
Control Panel Overview
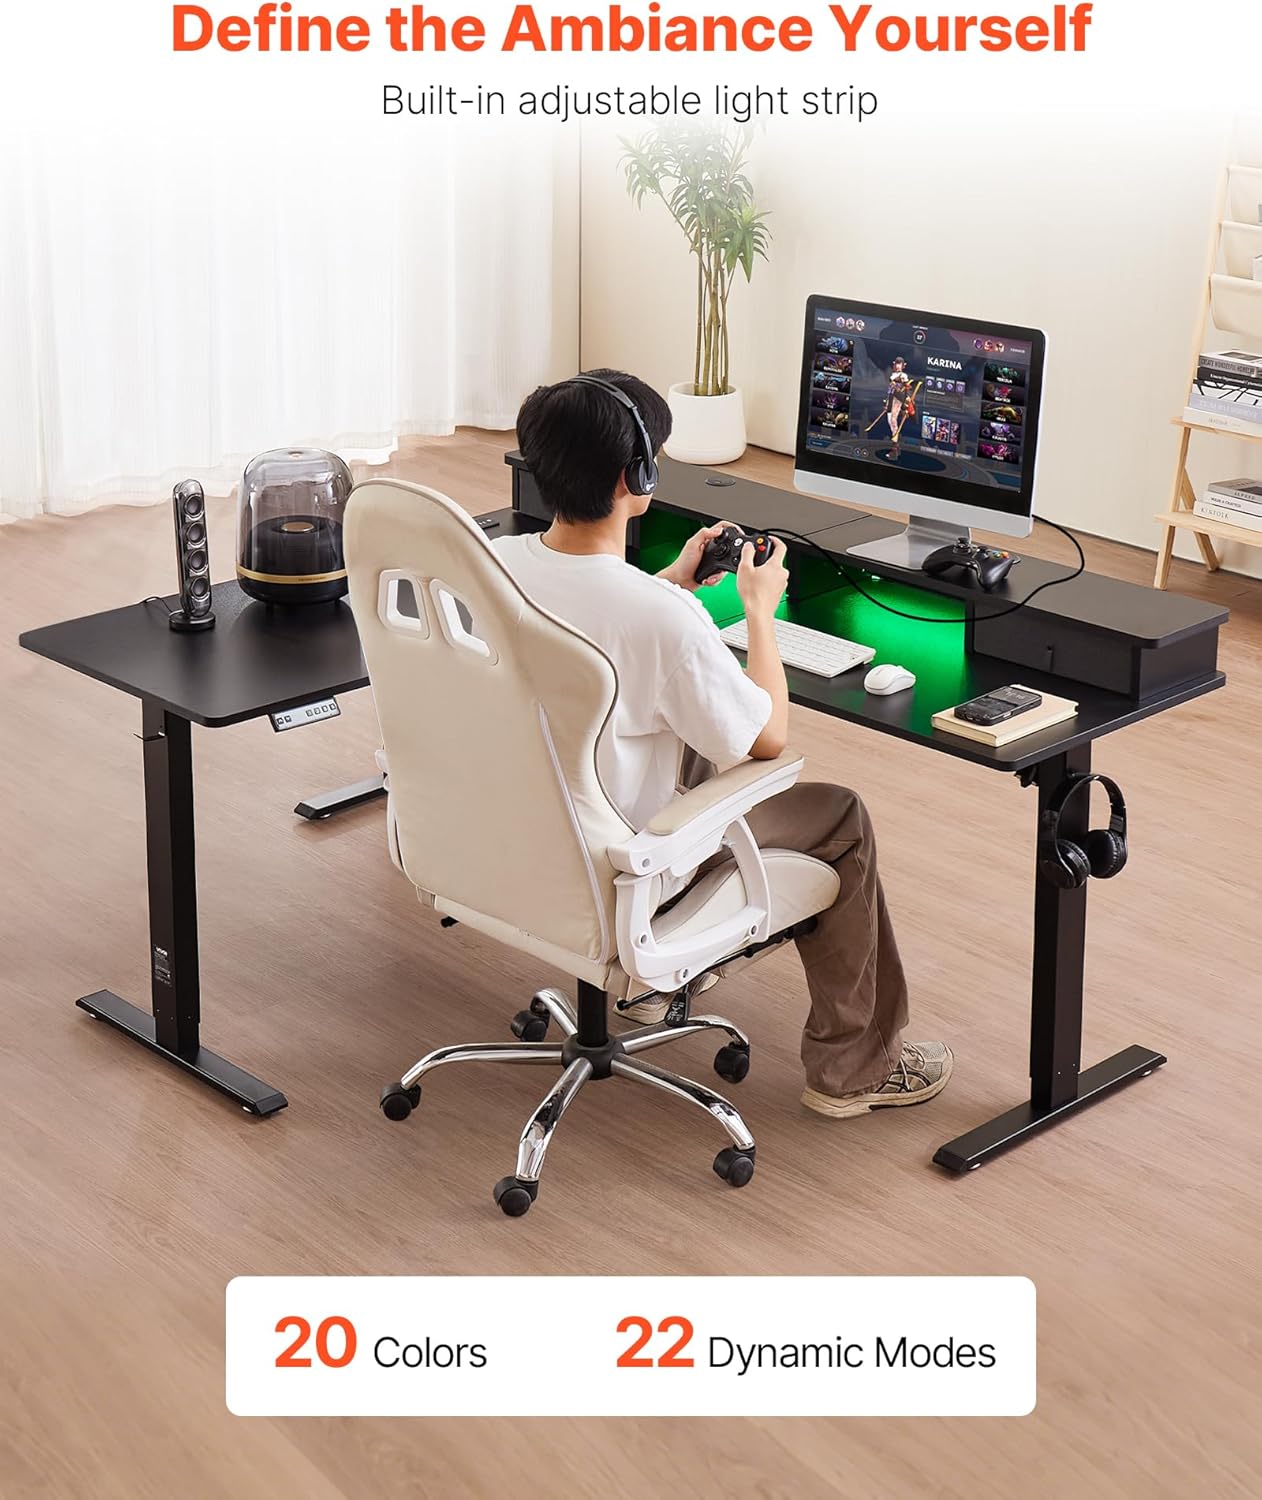
Image: A detailed view of the intelligent control panel, highlighting the Up/Down keys, digital display, memory keys (1, 2, 3), and the Set key (S).
- Up/Down Keys (▲ / ▼): Press and hold to adjust the desk height upwards or downwards. Release the button to stop at the desired height.
- Display Screen: Shows the current desk height in inches or centimeters.
- Memory Keys (1, 2, 3): Used to save and recall preferred height settings.
- Set Key (S): Used to program memory presets.
Height Adjustment
To adjust the desk height, simply press and hold the Up (▲) or Down (▼) button until the desk reaches your desired sitting or standing position. The desk will move smoothly between 28.54 inches (72.5 cm) and 45.28 inches (115 cm).

Image: A user demonstrating the smooth transition between sitting and standing heights, illustrating the desk's adjustable range.
Setting Memory Presets
You can save up to three preferred height settings for quick adjustments:
- Adjust the desk to your desired height using the Up/Down keys.
- Press the 'S' (Set) button. The display will show 'S-'.
- Within 3 seconds, press one of the memory keys (1, 2, or 3). The display will show 'S-1', 'S-2', or 'S-3' to confirm the setting is saved.
- To recall a saved height, simply press the corresponding memory key (1, 2, or 3). The desk will automatically move to the programmed height.
LED Light Strip Operation
The integrated LED light strip can be controlled via a dedicated button or remote (if included). Refer to the specific instructions for the LED strip controller for details on changing colors and dynamic modes.
Power Strip Usage
The built-in power strip provides 4 AC outlets, 2 USB ports, and 1 Type-C port for convenient charging of multiple devices. Ensure devices are compatible with the power strip's output specifications.
Maintenance
- Cleaning: Wipe the desk surface with a soft, damp cloth. Avoid abrasive cleaners or harsh chemicals that may damage the finish.
- Inspection: Periodically check all screws and connections to ensure they remain tight. Retighten if necessary.
- Cable Management: Ensure cables are not pinched or tangled, especially during height adjustments.
- Motor Care: The electric motors are designed for maintenance-free operation. Do not lubricate or attempt to open the motor housing.
Troubleshooting
If you encounter issues with your desk, refer to the following common problems and solutions:
- Desk Not Moving:
- Check if the power cord is securely plugged into both the desk and the wall outlet.
- Ensure all cables connected to the control box are properly seated.
- If an error code appears on the display, consult the full instruction manual for specific code meanings.
- Uneven Movement:
- Ensure the desk is placed on a level surface.
- Check that the weight on the desk is evenly distributed and not exceeding the maximum capacity.
- Memory Presets Not Working:
- Re-program the memory presets following the instructions in the 'Operating Instructions' section.
- Noise During Operation:
- A slight motor sound is normal. Excessive or unusual noise may indicate loose connections or an obstruction. Check for any objects interfering with the lifting mechanism.
If problems persist after attempting these solutions, please contact VEVOR customer support for assistance.
Specifications

Image: A detailed diagram illustrating the overall dimensions of the VEVOR L Shaped Electric Standing Desk, including its length, width, and the adjustable height range.
| Feature | Specification |
|---|---|
| Brand | VEVOR |
| Model Number | ZWE-03 |
| Product Dimensions (D x W x H) | 63.1"D x 55.1"W x 28.74"H (160.3 x 140 x 73 cm) |
| Adjustable Height Range | 28.54 - 45.28 in (72.5 - 115 cm) |
| Load-bearing Capacity | 176 lbs (80 kg) |
| Lifting Speed | 0.49 in/s (12.4 mm/s) |
| Desktop Material | 18 mm Particle Board |
| Base Material | Q235 Carbon Steel |
| Color | Black |
| Power Strip | 4 x AC Outlets, 2 x USB Ports, 1 x Type-C Port |
| Item Weight | 111.8 Pounds (50.7 kg) |
Warranty and Support
For warranty information or technical support, please refer to the warranty card included with your product or visit the official VEVOR website. You may also contact VEVOR customer service directly for assistance with product inquiries, troubleshooting, or replacement parts.
Ask a question about this manual
Ask about setup, troubleshooting, compatibility, parts, safety, or missing instructions. Manuals+ will review the question and use this page’s manual context to help answer it.