Introduction
This manual provides essential instructions for the safe and efficient operation, installation, and maintenance of your IKT Self Cleaning Bottom Load Water Cooler Dispenser. Please read this manual thoroughly before using the appliance and retain it for future reference.
Important Safety Information
- Always place the dispenser on a flat, stable surface.
- Ensure adequate ventilation. Maintain a minimum of 4-6 inches clearance from the back wall for proper air circulation.
- Do not operate the dispenser with a damaged cord or plug.
- Keep children away from the hot water dispenser. The hot water spigot includes a child safety lock.
- Do not immerse the appliance, cord, or plug in water or other liquids.
- Unplug the dispenser before cleaning or performing any maintenance.
- This appliance is designed for use with 3 or 5-gallon water bottles.
Product Overview
The IKT Water Cooler Dispenser offers convenient access to hot, cold, and room-temperature water with a user-friendly bottom-loading design and integrated self-cleaning features.
Key Features
- Three Temperature Settings: Provides hot, cold, and room-temperature water for various needs.
- Bottom Loading Design: Eliminates heavy lifting of water bottles, accommodating 3 or 5-gallon jugs.
- UV Self-Cleaning: An integrated UV light system helps maintain the cleanliness of the water tanks and reduces contaminants. This feature operates continuously when the unit is plugged in.
- Child Safety Lock: Located on the hot water spigot to prevent accidental dispensing.
- Empty Bottle Alert: An indicator light notifies you when the water bottle needs replacement.
Components

Figure 1: Front view of the IKT Water Cooler Dispenser with the bottom loading door open, showing a 5-gallon water bottle inside.

Figure 2: Close-up of the control panel showing "Hot", "Empty", and "Cold" indicators, along with the child safety lock mechanism for hot water dispensing.

Figure 3: Visual representation of the three available water temperatures: Hot (red wavy lines), Room (yellow bottle), and Cold (blue snowflake).

Figure 4: Internal diagram illustrating the UV-infused cleaning system, showing the UV light reducing contaminants in the water tanks.
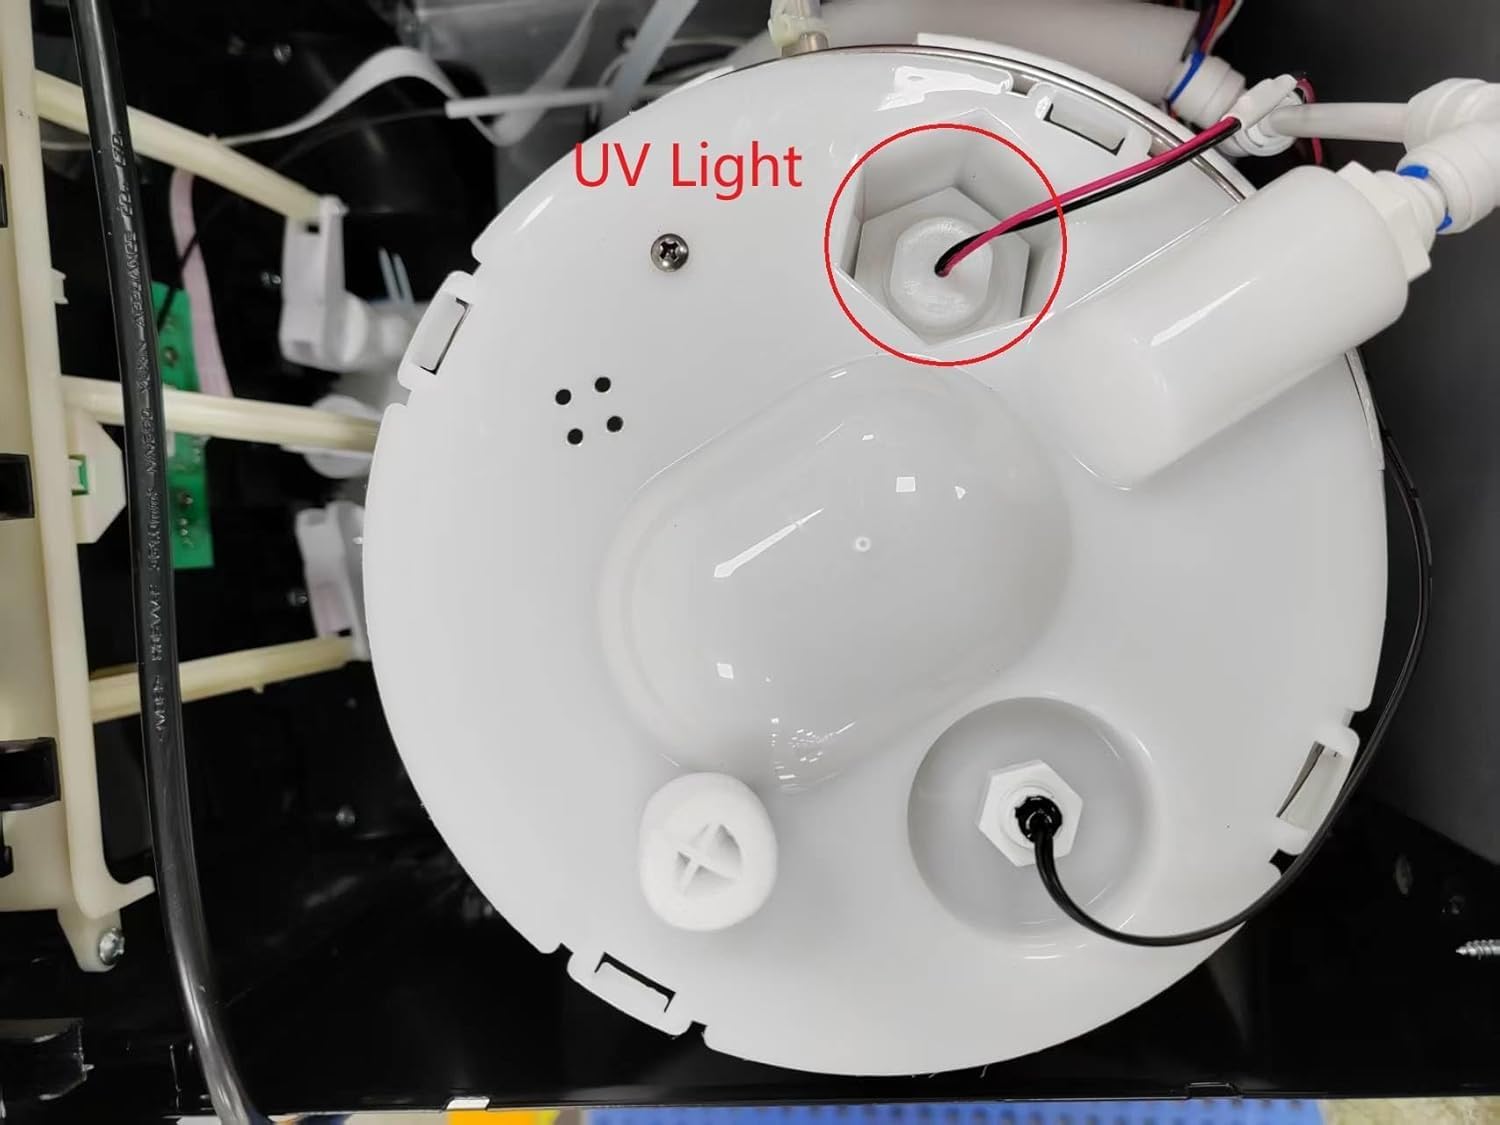
Figure 5: Detailed view of the UV light component located within the water tank, circled in red.

Figure 6: Rear panel of the dispenser showing the red "Hot" switch and green "Cold" switch for activating heating and cooling functions.
Setup Instructions
- Unpack the Dispenser: Carefully remove all packaging materials. Inspect the unit for any damage.
- Placement: Position the dispenser on a level, stable surface in a cool, dry place away from direct sunlight and heat sources. Ensure there is at least 4-6 inches of clearance from the back wall to allow for proper ventilation.
- Initial Cleaning/Flushing: Before first use, it is recommended to flush the system.
- Install a water bottle as described in the next step.
- Place a large container under the cold water spigot.
- Dispense approximately 1-2 liters of cold water to flush the lines.
- Repeat for the room temperature spigot.
- For hot water, wait until the hot water indicator light turns off, then dispense 1-2 liters. Exercise caution as the water will be hot.
- Install Water Bottle:
- Open the bottom loading door.
- Remove the cap from a new 3 or 5-gallon water bottle.
- Insert the probe into the bottle opening.
- Slide the bottle into the cabinet and close the door.
- Connect Power: Plug the power cord into a grounded electrical outlet.
- Activate Heating and Cooling: Locate the red (Hot) and green (Cold) switches on the back of the unit (refer to Figure 6). Flip both switches to the "ON" position. The corresponding indicator lights on the front panel will illuminate. Allow approximately 15-30 minutes for the water to reach optimal hot and cold temperatures.
Operating Instructions
Dispensing Water
The dispenser features three push-button spigots for hot, room, and cold water.
- Cold Water: Place your cup under the cold water spigot and press the cold water button.
- Room Temperature Water: Place your cup under the room temperature water spigot and press the room temperature button.
- Hot Water (with Child Safety Lock): To dispense hot water, first slide the child safety lock (refer to Figure 2), then press the hot water button. Release the safety lock after dispensing.
Empty Bottle Alert
When the water bottle is empty, the "Empty" indicator light on the front panel will illuminate. Replace the water bottle as described in the "Setup Instructions" section.
Maintenance
Self-Cleaning Feature (UV Light)
This dispenser is equipped with a UV self-cleaning system. The UV light operates automatically and continuously when the unit is plugged in, helping to sanitize the water tanks and reduce biofilm and other contaminants. There is no manual button or specific indicator for this function, other than the UV lamp itself inside the tank (Figure 5).
External Cleaning
- Unplug the dispenser from the power outlet.
- Wipe the exterior surfaces with a soft, damp cloth. Do not use abrasive cleaners or solvents.
- Clean the drip tray regularly by removing it, emptying any collected water, washing it with mild soap and water, and then drying it thoroughly before reinserting.
Draining the System (If Storing or Moving)
- Unplug the dispenser and remove the water bottle.
- Place a large bucket under the drain plug located at the back of the unit.
- Open the drain plug to empty all water from the tanks.
- Once drained, close the plug and allow the interior to air dry before storage or transport.
Troubleshooting
| Problem | Possible Cause | Solution |
|---|---|---|
| No hot or cold water. | Hot/Cold switches are off. Unit not plugged in. | Ensure the dispenser is plugged in. Check the red (Hot) and green (Cold) switches on the back of the unit are in the "ON" position. Allow 15-30 minutes for heating/cooling. |
| Water not dispensing. | Water bottle is empty. Probe not properly inserted. | Check the "Empty" indicator light. Replace the water bottle if empty. Ensure the probe is fully inserted into the bottle. |
| Hot water not dispensing (or child safety lock issue). | Child safety lock not disengaged. | Ensure the child safety lock is properly slid before pressing the hot water button. |
| Unit is noisy. | Compressor cycling (normal operation). Unit not level. | Some noise during compressor operation is normal. Ensure the unit is on a level surface. Check for adequate clearance from walls. |
| "Self-cleaning" not visible/working. | Misunderstanding of feature. | The UV self-cleaning feature operates automatically and continuously when the unit is plugged in. There is no manual button or specific indicator for this function, other than the UV lamp itself inside the tank (Figure 5). |
Specifications
| Feature | Detail |
|---|---|
| Brand | IKT |
| Model Number | CAIKTBY1185S |
| Color | Silver |
| Capacity | 3 or 5 Gallons (water bottle) |
| Product Dimensions (D x W x H) | 14.17"D x 12.2"W x 41.34"H |
| Installation Type | Freestanding |
| Power Source | Corded Electric |
| Rated Voltage | 115V~ |
| Rated Frequency | 60Hz |
| Heating Power | 500 W |
| Cooling Power/Current | 85W/0.8A |
| Hot Water Temperature | ≥90°C (194°F) |
| Cold Water Temperature | ≤10°C (50°F) |
| Environmental Temperature | ST |
| Coolant | R600a: 20g |
| Relative Humidity | ≤90% |
Warranty and Support
The IKT Self Cleaning Bottom Load Water Cooler Dispenser comes with a one-year warranty from the date of purchase. Additionally, a 30-day return policy is offered.
For any issues, questions, or warranty claims, please contact IKT customer support. Refer to your purchase documentation or the IKT official website for specific contact details.
Note: Please retain your proof of purchase for warranty validation.


