1. Introduction
Thank you for choosing the Mayer 3L Instant Heating Water Dispenser, Model MMIWD603. This appliance is designed to provide instant hot water for your convenience, featuring quick heating technology and multiple temperature and volume settings. Please read this manual thoroughly before operation to ensure safe and proper use, and retain it for future reference.
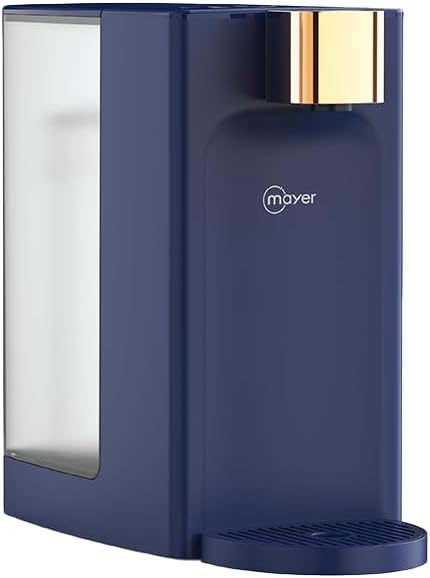
Figure 1.1: Mayer 3L Instant Heating Water Dispenser (MMIWD603)
This image shows the Mayer 3L Instant Heating Water Dispenser from an angled perspective, highlighting its compact design and the transparent water tank on the side. The main body is dark blue with a gold-colored dispenser spout.
Key Features:
- Installation-free operation with a detachable 3-liter water tank.
- Quick hot water dispense in approximately 5 seconds.
- Intuitive sensor touch control panel.
- Four preset cup size water volumes: 150ml, 250ml, 350ml, and 500ml.
- Five preset water temperatures: 45°C, 55°C, 85°C, Room Temperature, and Hot Temperature.
- Instant heating technology for energy efficiency.
- Child lock safety feature for enhanced security.
- Detachable drip tray for easy cleaning and maintenance.
- Compact design to optimize counter space.
- Low water level reminder indicator.
- Boil dry and overheating protection mechanisms.
- Non-slip feet for stable placement.
2. Important Safety Instructions
When using electrical appliances, basic safety precautions should always be followed to reduce the risk of fire, electric shock, and injury to persons.
- Read all instructions: Before operating the appliance, read all instructions carefully.
- Electrical Safety:
- Ensure the voltage rating on the appliance matches your local power supply (2200 Volts).
- Do not immerse the appliance, cord, or plug in water or other liquids.
- Do not operate any appliance with a damaged cord or plug, or after the appliance malfunctions or has been damaged in any manner.
- Unplug from outlet when not in use and before cleaning. Allow to cool before putting on or taking off parts, and before cleaning the appliance.
- Hot Surfaces: The heating element and water dispenser spout will become hot during operation. Avoid contact with hot surfaces. Use handles or knobs.
- Child Safety:
- This appliance is not intended for use by persons (including children) with reduced physical, sensory or mental capabilities, or lack of experience and knowledge, unless they have been given supervision or instruction concerning use of the appliance by a person responsible for their safety.
- Children should be supervised to ensure that they do not play with the appliance.
- Always activate the child lock feature when the dispenser is not in active use, especially in households with children.
- Water Usage:
- Only fill the water tank with clean, potable water. Do not add other liquids.
- Do not operate the appliance without water in the tank. The boil dry protection will activate, but it is best to avoid this.
- Placement:
- Place the appliance on a stable, flat, heat-resistant surface, away from the edge of the countertop.
- Do not place on or near a hot gas or electric burner, or in a heated oven.
- Ensure adequate ventilation around the appliance.
- Maintenance: Refer to the cleaning and maintenance section for proper care.
3. Product Components
Familiarize yourself with the parts of your Mayer Instant Heating Water Dispenser.

Figure 3.1: Front View of the Dispenser
This image provides a direct front view of the Mayer Water Dispenser, clearly showing the sensor touch control panel at the top, the water dispensing spout, and the drip tray at the base.
- Water Dispensing Spout: Where hot water is dispensed.
- Sensor Touch Control Panel: For selecting temperature, volume, and activating child lock.
- Water Tank (3L): Detachable tank for holding water. Located at the back/side of the unit.
- Drip Tray: Detachable tray at the base to catch any spills or drips.
- Power Cord: For connecting the appliance to an electrical outlet.
- Non-slip Feet: Located at the bottom for stability.

Figure 3.2: Detachable Water Tank
This image illustrates the detachable water tank of the Mayer Water Dispenser, shown tilted away from the main unit, demonstrating its ease of removal for filling or cleaning.
4. Setup and First Use
- Unpacking: Carefully remove the water dispenser from its packaging. Retain packaging materials for future storage or transport if needed.
- Placement: Place the appliance on a flat, stable, and heat-resistant surface. Ensure there is sufficient space around the unit for ventilation. The non-slip feet will help secure its position.
- Clean the Water Tank: Before first use, remove the detachable water tank and wash it thoroughly with clean water. Do not use abrasive cleaners.
- Fill the Water Tank: Fill the water tank with clean, potable water up to the MAX fill line. Do not overfill. Reattach the water tank securely to the main unit.
- Connect to Power: Plug the power cord into a grounded electrical outlet. The appliance will emit a beep sound, and the indicator lights on the control panel will illuminate briefly.
- Initial Rinse (Recommended): For the first use, it is recommended to dispense a full tank of hot water (e.g., at 85°C or Hot Temperature) without consuming it, to clean the internal components. Place a large heat-resistant container under the spout.
5. Operating Instructions
The Mayer Instant Heating Water Dispenser features a user-friendly sensor touch control panel.
Control Panel Overview:
The control panel typically includes buttons for power, temperature selection, volume selection, and child lock.
Steps for Dispensing Water:
- Ensure Water Tank is Filled: Check that the water tank has sufficient water. If the low water level indicator is on, refill the tank.
- Place Cup: Position your cup or container directly under the water dispensing spout.
- Select Temperature: Touch the temperature selection button repeatedly to cycle through the available temperature options: Room Temperature, 45°C, 55°C, 85°C, and Hot Temperature. The selected temperature will be indicated on the display.
- Select Volume: Touch the volume selection button repeatedly to choose your desired water volume: 150ml, 250ml, 350ml, or 500ml. The selected volume will be indicated.
- Dispense Water: Once temperature and volume are set, press the dispense button (often indicated by a water drop icon or similar). The dispenser will begin heating and dispensing water within approximately 5 seconds.
- Stop Dispensing: To stop dispensing water before the selected volume is reached, press the dispense button again.
Child Lock Feature:
The child lock feature prevents accidental dispensing of hot water, enhancing safety, especially in homes with children.
- Activating Child Lock: To activate, press and hold the child lock button (usually indicated by a lock icon) for a few seconds until the lock indicator light illuminates.
- Deactivating Child Lock: To deactivate, press and hold the child lock button again for a few seconds until the lock indicator light turns off. Water dispensing is only possible when the child lock is deactivated.
Low Water Level Indicator:
The dispenser is equipped with a sensor that detects low water levels. When the water in the tank is insufficient, a specific indicator light will illuminate, prompting you to refill the tank. The dispenser will not operate if the water level is too low.
6. Cleaning and Maintenance
Regular cleaning and maintenance will ensure the longevity and optimal performance of your water dispenser.
- Unplug Before Cleaning: Always unplug the appliance from the power outlet and allow it to cool completely before cleaning.
- Clean the Drip Tray: The detachable drip tray should be emptied and cleaned regularly. Simply slide it out, discard collected water, and wash with mild soap and water. Rinse thoroughly and dry before reinserting.
- Clean the Water Tank: Remove the water tank and wash it with mild dish soap and water. Use a soft brush if necessary to remove any residue. Rinse thoroughly to ensure no soap residue remains. Air dry or wipe dry before reattaching.
- Exterior Cleaning: Wipe the exterior of the dispenser with a soft, damp cloth. Do not use abrasive cleaners, scouring pads, or harsh chemicals, as these can damage the surface.
- Descaling (Recommended Periodically): Over time, mineral deposits (limescale) can build up inside the heating elements, especially in areas with hard water.
- Fill the water tank with a mixture of water and a descaling solution (e.g., white vinegar or a commercial descaler designed for kettles/coffee makers) according to the descaler's instructions.
- Place a large heat-resistant container under the spout.
- Dispense the entire tank of the descaling solution. Do not consume this water.
- After descaling, rinse the tank thoroughly and fill it with clean water. Dispense 2-3 full tanks of clean water to flush out any remaining descaling solution.
- Storage: If storing the appliance for an extended period, ensure it is clean and dry. Store in a cool, dry place.
7. Troubleshooting
Before contacting customer service, please refer to the following troubleshooting guide for common issues.
| Problem | Possible Cause | Solution |
|---|---|---|
| Appliance does not turn on. | No power supply. | Check if the power cord is securely plugged into a working electrical outlet. Test the outlet with another appliance. |
| No water dispenses. | Water tank is empty or low. Child lock is activated. | Refill the water tank. Deactivate the child lock by pressing and holding the child lock button. |
| Water is not hot enough. | Incorrect temperature setting. Limescale buildup. | Ensure the desired hot temperature (e.g., 85°C or Hot) is selected. Perform descaling if the appliance has been used for a long time, especially in hard water areas. |
| Water flow is slow or inconsistent. | Limescale buildup in the spout or internal components. | Perform a descaling procedure as described in the maintenance section. |
| Low water level indicator remains on after refilling. | Water tank not properly seated. Sensor malfunction. | Ensure the water tank is securely and correctly placed on the unit. If the issue persists, contact customer support. |
| Appliance shuts off unexpectedly. | Boil dry or overheating protection activated. | This is a safety feature. Check water level and allow the unit to cool down before restarting. If it happens frequently, contact customer support. |
8. Specifications
Technical specifications for the Mayer 3L Instant Heating Water Dispenser MMIWD603.
| Attribute | Detail |
|---|---|
| Brand | Mayer |
| Model Number | MMIWD603 |
| Capacity | 3 Liters (Water Tank) |
| Voltage | 2200 Volts |
| Product Dimensions (L x W x H) | 27.6 cm x 14 cm x 26 cm |
| Package Dimensions | 31.9 cm x 30 cm x 19 cm |
| Item Weight | 1.9 kg |
| Color | Blue |
| Heating Technology | Instant Heating |
| Control Type | Sensor Touch |
| Safety Features | Child Lock, Boil Dry Protection, Overheating Protection |
9. Warranty and Support
For information regarding warranty coverage, terms, and conditions, please refer to the warranty card included with your product packaging or visit the official Mayer website. Keep your purchase receipt as proof of purchase for warranty claims.
If you encounter any issues that cannot be resolved using the troubleshooting guide, or require further assistance, please contact Mayer customer support. Contact details can typically be found on the product packaging, the official Mayer website, or your purchase documentation.
Note: Product specifications and features are subject to change without prior notice for product improvement.


