1. Introduction
The Firlarm Gas Leak Detector YC-805 is designed to provide continuous monitoring for combustible gases such as natural gas (methane), liquefied petroleum gas (LPG), propane, and butane. This device offers audible and visual alerts to enhance home safety in various environments including kitchens, apartments, hotels, and RVs. Its plug-in design ensures easy installation and reliable operation.
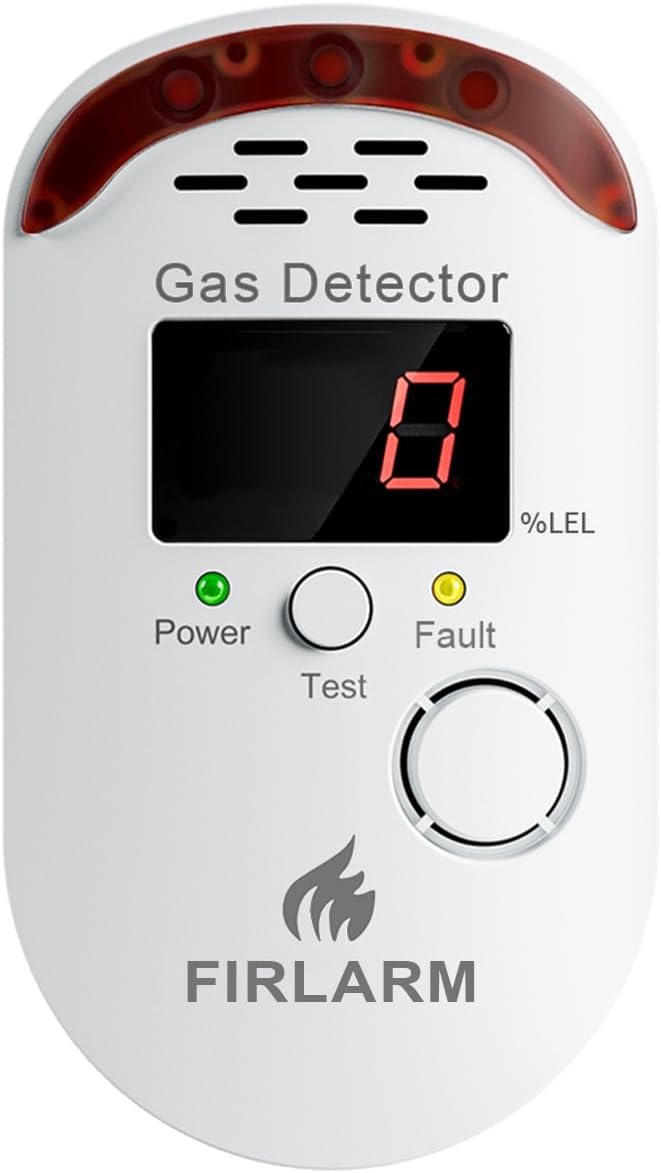
Image 1.1: Front view of the Firlarm Gas Leak Detector YC-805, showing the LED display, power and fault indicators, and test button.
2. Safety Information
- This device is intended for detecting combustible gases. It is not designed to detect carbon monoxide or smoke.
- Install the detector in clean, dry locations. Avoid areas with excessive humidity, dust, or grease, which can affect sensor accuracy.
- Maintain adequate separation from detergent storage areas, as volatile chemical compounds or aromatic vapors may interfere with proper detector operation.
- Do not paint the detector. Paint can clog the sensor openings and interfere with the unit's ability to detect gas.
- Do not block the ventilation openings on the detector.
- In case of an alarm, immediately ventilate the area, turn off gas appliances, and contact your gas supplier or emergency services.
3. Setup and Installation
The Firlarm Gas Leak Detector YC-805 features a simple plug-in design for easy installation.
3.1 Placement Guidelines
- For Natural Gas (Methane): Natural gas is lighter than air. Install the detector 0.3-1 meter (1-3.3 feet) below the ceiling and at least 1.5 meters (5 feet) away from gas appliances to avoid false alarms from normal appliance operation.
- For LPG (Propane, Butane): LPG is heavier than air. Install the detector 0.3-1 meter (1-3.3 feet) above the floor and at least 1.5 meters (5 feet) away from gas appliances.
- Avoid installing near windows, doors, ventilation fans, or areas with strong air currents, as this can dilute gas concentrations and delay detection.
- Avoid installing in direct sunlight or areas exposed to extreme temperatures.

Image 3.1: Diagram illustrating recommended installation heights for natural gas (lighter than air) and LPG (heavier than air) detectors relative to the ceiling and floor.
3.2 Powering On
- Plug the detector directly into a standard AC power outlet (AC100V~AC240V).
- Upon power-on, the device enters a 180-second warm-up mode. During this time, the display may show a countdown or fluctuating numbers.
- Once the warm-up is complete, the display will show "0" and the green Power indicator will remain steadily lit, indicating it is in standby detection mode.
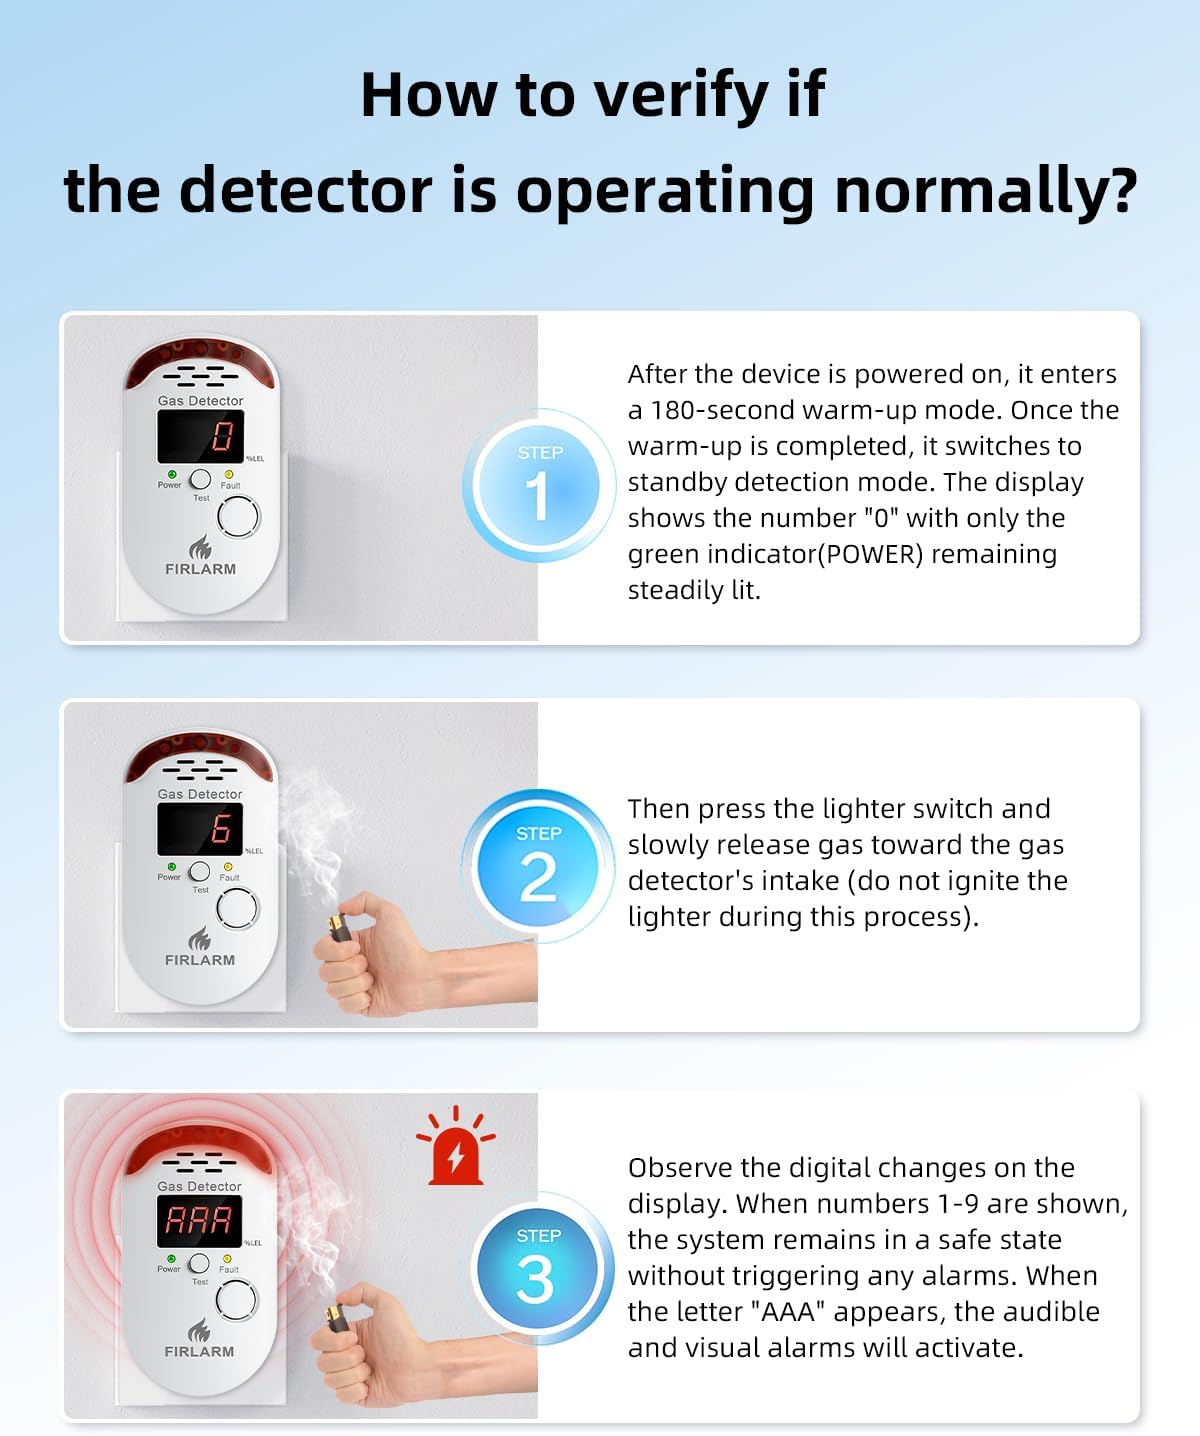
Image 3.2: The Firlarm Gas Leak Detector plugged into a standard wall outlet, ready for operation.
4. Operating Instructions
The detector provides 24/7 monitoring with clear visual and audible alerts.
4.1 Normal Operation (Standby Mode)
- In standby mode, the LED display shows "0" and the green Power indicator is steadily lit. This indicates no detectable gas concentration.
4.2 Gas Detection and Alarm
- The LED display shows the index of combustible gas concentration in the air.
- When gas concentration reaches a dangerous level, the screen displays "AAA", the red indicator light flashes, and an 85dB alarm sounds.
- The high-visibility indicators and high-decibel alarm ensure clear perception of alerts.

Image 4.1: The gas detector displaying "AAA" with a red flashing light and sound waves indicating an active alarm.
4.3 Operating Modes Display
The detector features three operating modes indicated by the LED display:
- Standby (0): Green indicator, no gas detected.
- Safe (1-9): Yellow indicator, low gas concentration detected but below alarm threshold.
- Dangerous (AAA): Red indicator, high gas concentration detected, alarm active.
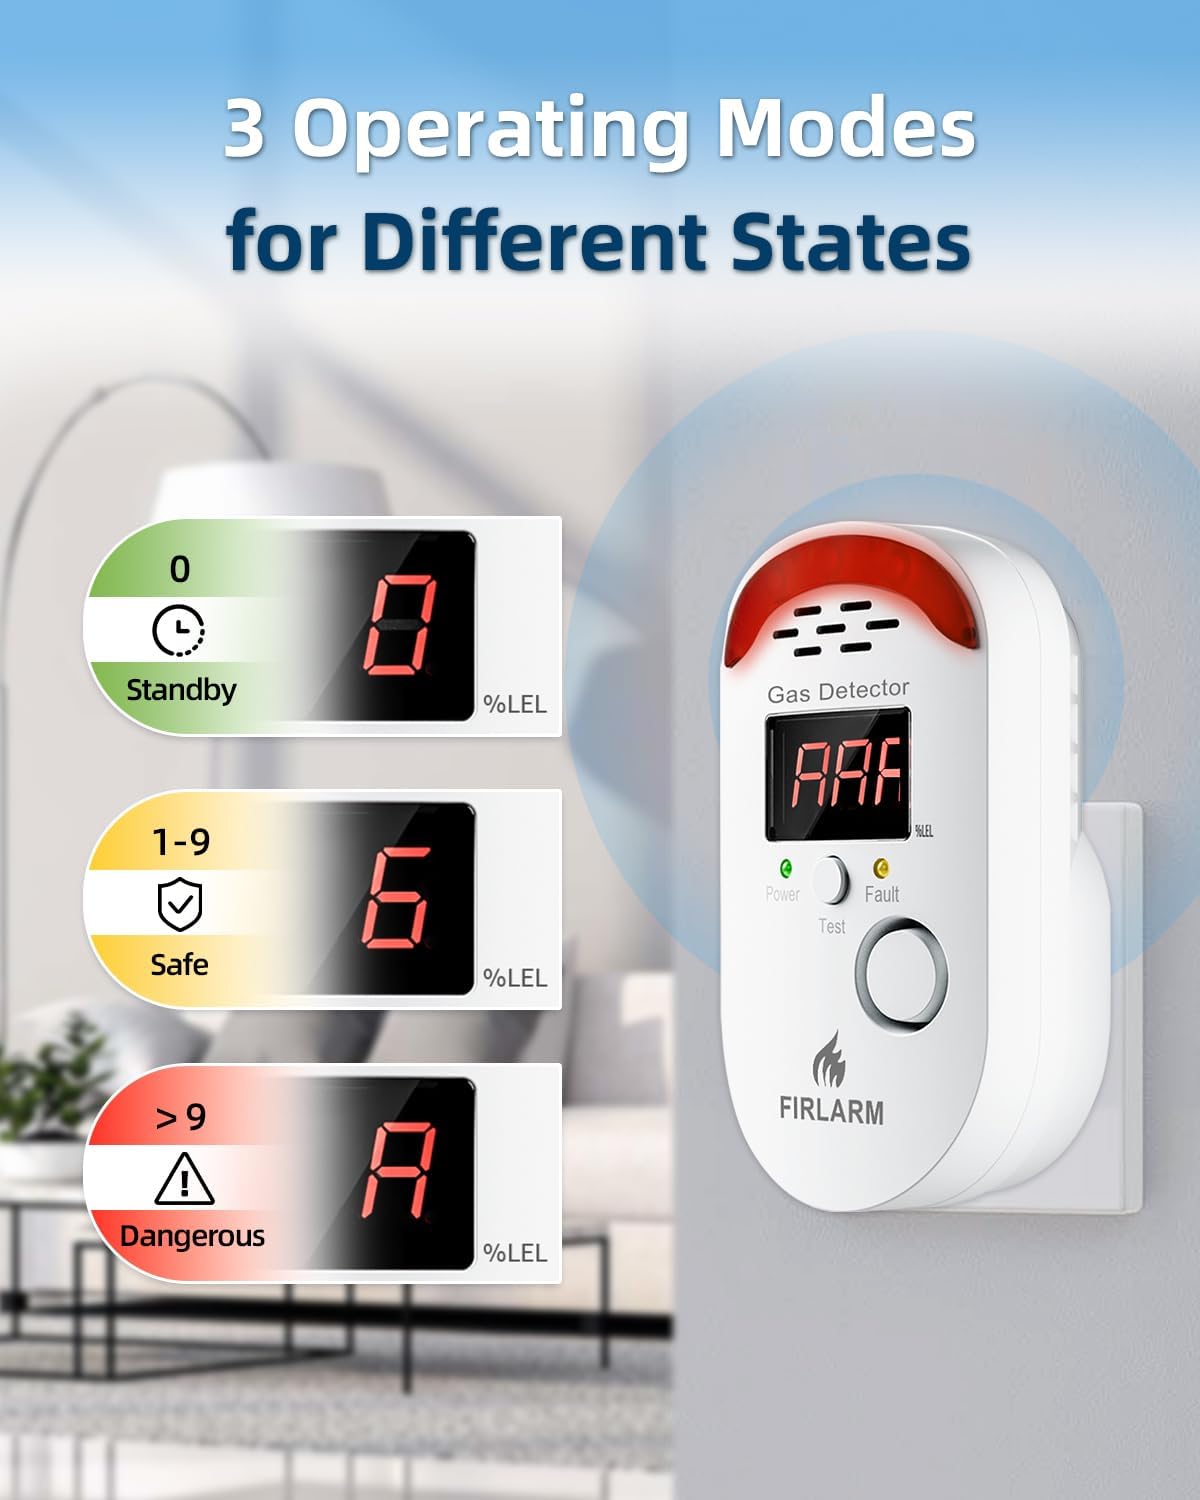
Image 4.2: Visual representation of the three operating modes: Standby (0, green), Safe (1-9, yellow), and Dangerous (AAA, red).
5. Testing and Verification
Regular testing ensures the detector is functioning correctly.
5.1 Test Button Method
- Press the Test button on the front of the device.
- If the yellow indicator remains steadily lit, the red indicator flashes, accompanied by a continuous alarm sound, and the LED screen displays "000", then all functions are operating normally.
5.2 Gas Simulation Test
You can also test the alarm's response to elevated gas concentrations:
- After the device is powered on and completes its 180-second warm-up, it switches to standby detection mode, displaying "0" with the green Power indicator steadily lit.
- Press a lighter switch and slowly release gas toward the air intake of the gas detector. Do not ignite the lighter during this process.
- Observe the digital changes on the display. When numbers 1-9 are shown, the system remains in a safe state without triggering any alarms. When the letter "AAA" appears, the audible and visual alarms will activate, confirming proper operation.

Image 5.1: Step-by-step guide on how to verify the gas detector's functionality by exposing it to a small amount of unignited gas from a lighter.
6. Maintenance
- Cleaning: The smooth surface made of flame retardant PC material is easy to clean. Use a soft, damp cloth to wipe the exterior. Do not use harsh chemicals or abrasive cleaners.
- Sensor Reliability: Install the detector in clean, dry locations to maintain its precision detection capabilities and ensure consistent sensor reliability.
- Replacement: Replace the detector promptly after 12 months of use to maintain proper operation and ensure optimal sensor performance.
7. Troubleshooting
If the detector does not respond as expected during testing or if you suspect a malfunction, perform the following checks:
- No Power/Display Off: Ensure the detector is securely plugged into a working AC outlet. Check if the outlet has power.
- No Alarm During Gas Simulation Test: Ensure the gas source (e.g., unignited lighter gas) is directed close enough to the air intake. Verify the warm-up period is complete. If the issue persists, the sensor may be faulty or expired.
- False Alarms: Ensure the detector is not installed near strong air currents, cleaning agents, or cooking fumes that could trigger false alerts. Relocate the detector if necessary, following placement guidelines in Section 3.1.
- Fault Indicator Lit: If the yellow Fault indicator lights up, it suggests an internal malfunction. Unplug the device, wait a few minutes, and plug it back in. If the fault persists, the unit may need replacement.
If troubleshooting steps do not resolve the issue, contact customer support.
8. Specifications
| Brand | Firlarm |
| Model Number | YC-805 |
| Power Source | AC |
| Voltage | 240 Volts (AC) |
| Wattage | 2 watts |
| Alarm Type | Audible and Visual (85dB) |
| Material | PC (Flame Retardant) |
| Product Dimensions | 2.36"D x 2.76"W x 4.72"H |
| Item Weight | 0.3 Pounds (4.8 ounces) |
| Installation Method | Wall-Mounted |
| Usage Environment | RV, apartment, garage, home, kitchen |
9. Warranty and Support
9.1 Warranty Information
This Firlarm Gas Leak Detector YC-805 comes with a 2-year warranty from the date of purchase. This warranty covers defects in materials and workmanship under normal use. It does not cover damage caused by misuse, accident, unauthorized modification, or improper installation.
9.2 Customer Support
For technical assistance, warranty claims, or any questions regarding the operation of your Firlarm Gas Leak Detector, please refer to the contact information provided with your product packaging or visit the official Firlarm website.


