1. Introduction
Thank you for choosing the NBDDIGITAL K200 4K 64MP Digital Camera. This manual provides detailed instructions for the proper use, setup, and maintenance of your camera. Please read this manual thoroughly before operating the device to ensure optimal performance and longevity.
2. Product Overview
2.1 Package Contents
Verify that all items are present in your package:
- NBDDIGITAL K200 Camera Body
- 32GB Memory Card
- Lanyard
- USB Data Cable (Type-C)
- Card Reader
- Camera Cleaning Cloth
- User Manual (this document)

Image: The NBDDIGITAL K200 camera shown with its standard accessories, including a 32GB memory card, lanyard, USB data cable, card reader, and cleaning cloth.
2.2 Camera Components
Familiarize yourself with the camera's physical features:

Image: Front view of the NBDDIGITAL K200 camera displaying the lens, 'ULTRA HD 4K' and 'K200' branding. The rear view shows the LCD screen and control buttons.
- Lens: Captures images and videos.
- LCD Screen: Displays menus, live view, and playback.
- Control Buttons: For navigation and function selection (Menu, OK, Up/Down, etc.).
- Scroll Wheel: Used for zoom control and menu navigation.
- USB Type-C Port: For charging and data transfer.
- Memory Card Slot: For inserting the 32GB memory card.
3. Setup
3.1 Charging the Battery
- Connect the camera to a power source using the provided USB Type-C cable.
- The charging indicator will illuminate. A full charge typically takes approximately 30 minutes.
- Once fully charged, the camera can record for about 1 hour or take approximately 300 photos.

Image: Illustration of the camera being fast-charged via its USB-C port, alongside visual representations of its battery life for photos and videos.
3.2 Inserting the Memory Card
- Locate the memory card slot on the camera.
- Insert the provided 32GB memory card into the slot until it clicks into place. Ensure the card is oriented correctly.
3.3 Initial Power On
- Press and hold the power button to turn on the camera.
- Follow any on-screen prompts for initial setup, such as setting the date and time.
4. Operating the Camera
4.1 Taking Photos
The camera supports 64MP high-resolution photos.
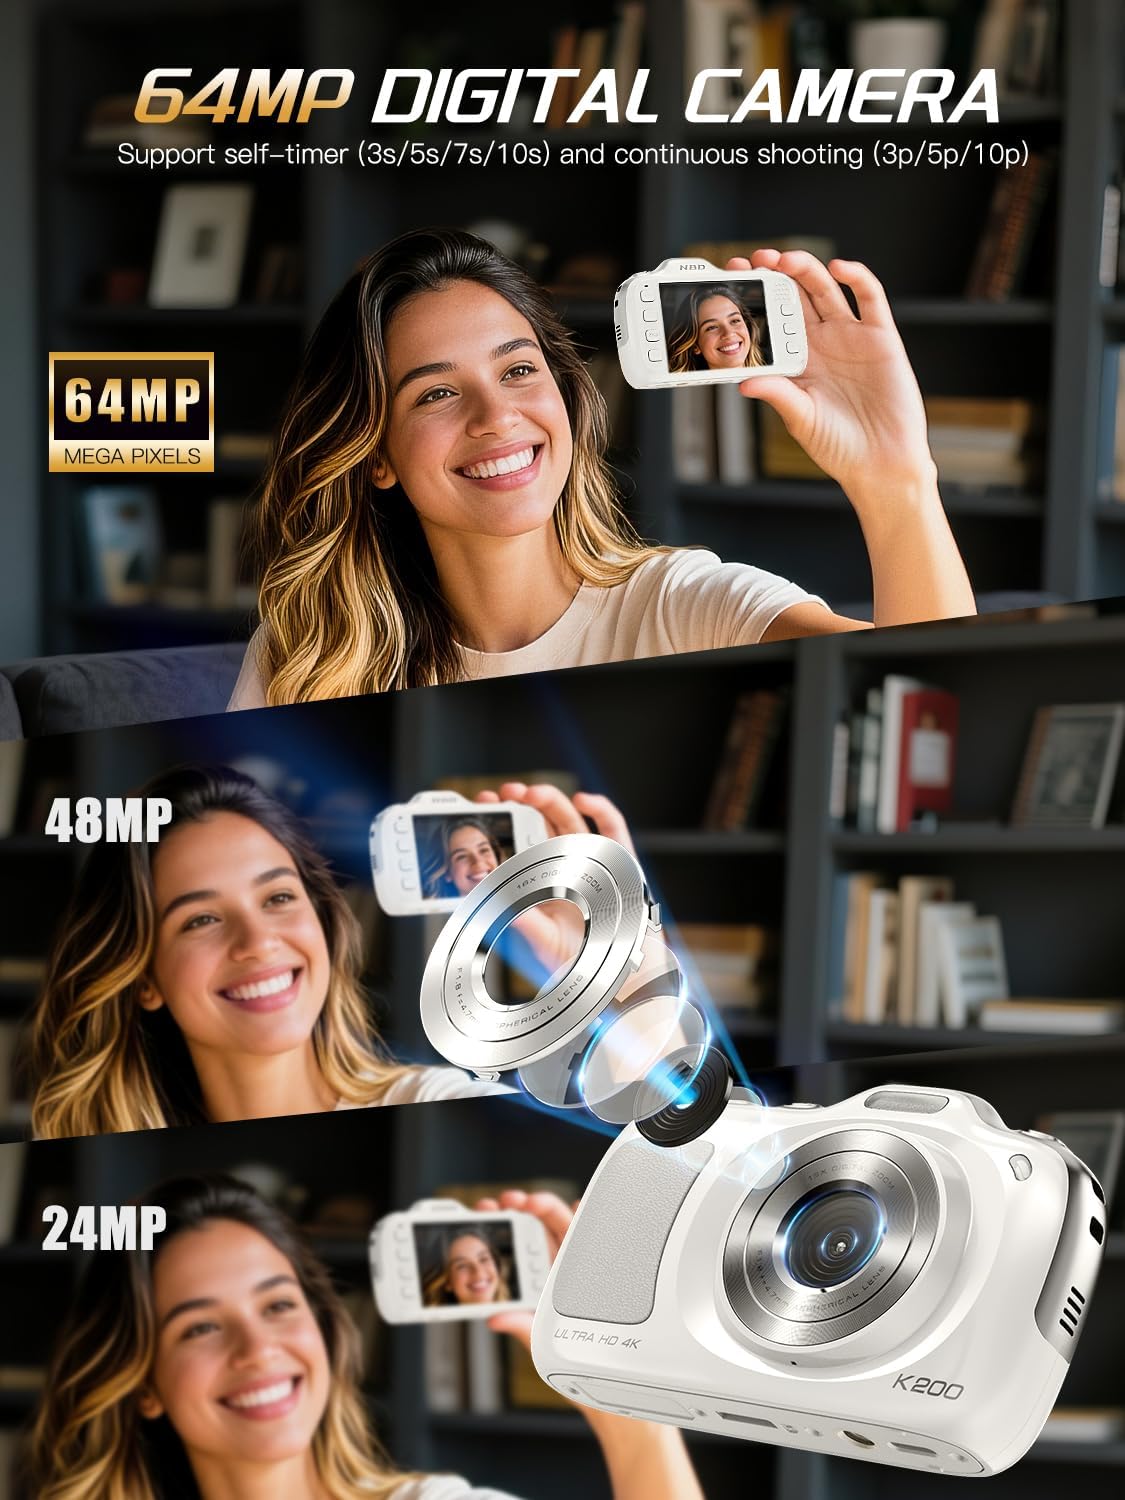
Image: Visual representation of the camera's capability to capture images at 64MP, 48MP, and 24MP resolutions.
- Turn on the camera.
- Frame your shot using the LCD screen.
- Press the shutter button halfway to focus, then fully press to capture the photo.
4.2 Recording Videos
The camera records smooth 4K/30fps videos.
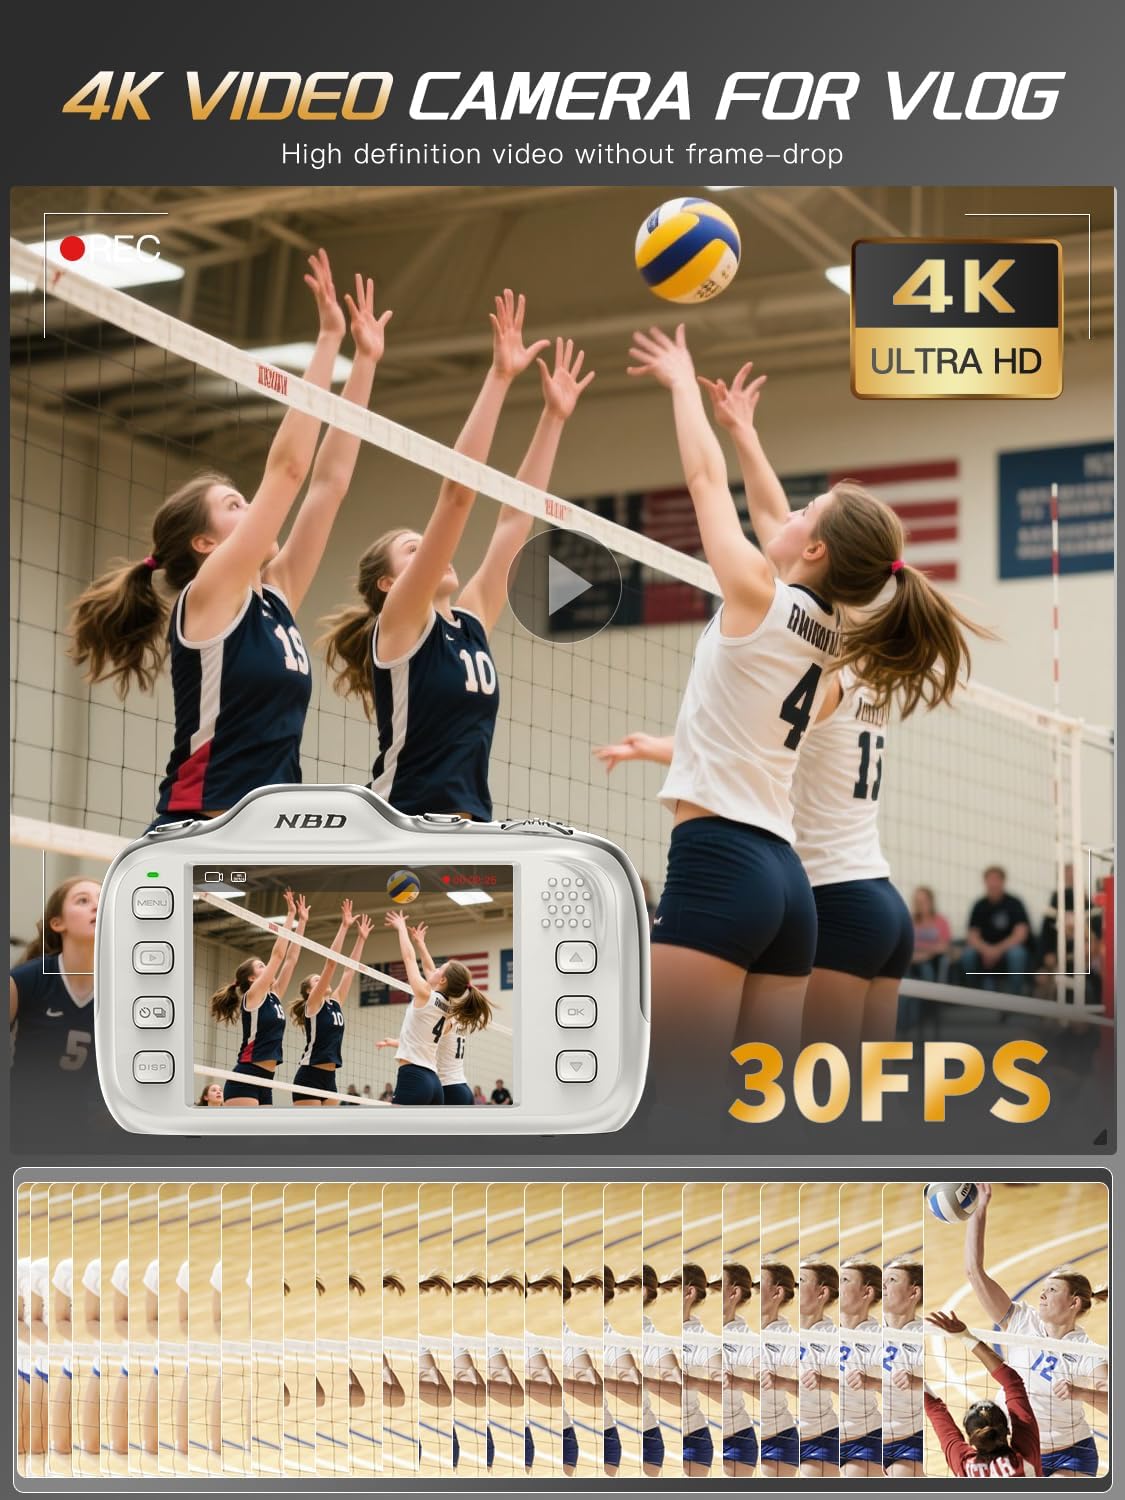
Image: A scene of a volleyball game being recorded by the camera, highlighting its 4K Ultra HD and 30FPS video capabilities.
- Switch the camera to video mode (refer to your camera's specific button layout).
- Press the record button to start recording. Press again to stop.
4.3 Zoom Function
Utilize the 16X digital zoom for distant subjects.

Image: A detailed view of the camera's scroll wheel, indicating its function for noiseless 16X digital zoom, with examples of 4.0x, 8.0x, and 16.0x magnification.
- Use the scroll wheel to zoom in (right) or zoom out (left).
4.4 Shooting Modes and Filters
The camera offers 8 shooting modes and 17 creative filters.
- Beauty Mode: Automatically retouches skin blemishes while preserving texture.
- Portrait Mode: Optimized for capturing individuals.
- Landscape Mode: Ideal for wide scenic shots.
- Other modes include Night Scene, Sport, Beach, and more.
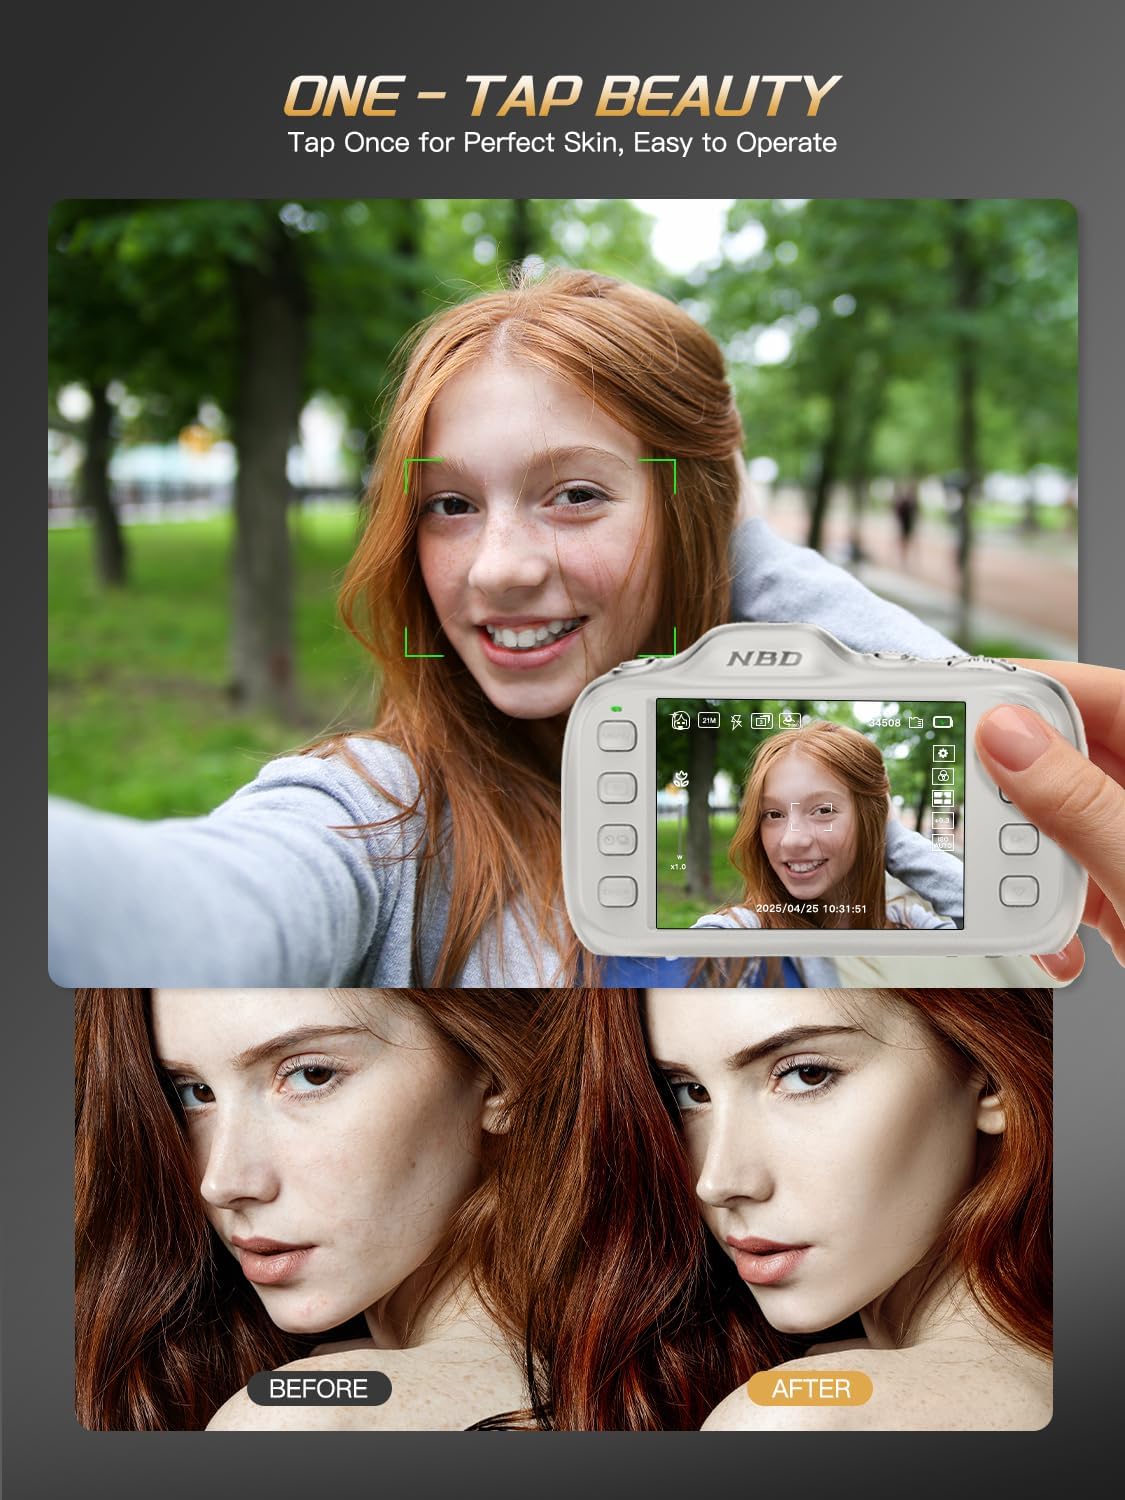
Image: A demonstration of the camera's 'One-Tap Beauty' feature, showing a before and after comparison of a portrait with subtle skin retouching.

Image: A display of the camera's 17 creative filters, including Normal, Vivid, Japanese Style, Cream, Retro, B&W, Warm, and Cool, applied to various photos.
4.5 Self-Timer and Continuous Shooting
- Self-Timer: Set a delay of 3s, 5s, 7s, or 10s before a photo is taken.
- Continuous Shooting: Capture multiple photos in quick succession.

Image: Four images of a child smiling, each indicating a different self-timer setting: 3 seconds, 5 seconds, 7 seconds, and 10 seconds.

Image: A sequence of images demonstrating the continuous shooting feature, capturing a skateboarder in motion.
4.6 Image Stabilization
The camera features digital image stabilization to reduce blur.

Image: A side-by-side comparison showing a blurry image with image stabilization off and a clear image with image stabilization on, featuring a person on a mountain bike.
4.7 Exposure Control
Adjust exposure compensation for varying lighting conditions.

Image: A series of images demonstrating different exposure compensation levels from +3.0 EV to -3.0 EV, showing how brightness changes in a scene with people outdoors.
5. Advanced Features
5.1 Data Transfer
Transfer photos and videos quickly using the Type-C interface.

Image: The camera connected to a laptop via a Type-C USB cable for instant photo transfer, and also shown connected to a smartphone for sharing to social media platforms.
- Connect the camera to a computer or compatible device using the USB Type-C cable.
- The camera will appear as a removable drive, allowing you to access and transfer files.
5.2 Webcam Functionality
Use the K200 as a webcam for video calls or live streaming.
- Connect the camera to your PC via the USB cable.
- On the camera screen, select "PC Camera" mode.
- Your computer should recognize the camera as a webcam for use in video conferencing or streaming applications.
6. Maintenance
- Keep the camera clean using the provided cleaning cloth. Avoid abrasive materials.
- Store the camera in a dry, cool place away from direct sunlight and extreme temperatures.
- Ensure the memory card is properly ejected before removing it from the camera.
- Avoid dropping the camera or subjecting it to strong impacts.
7. Troubleshooting
| Problem | Possible Cause | Solution |
|---|---|---|
| Camera does not power on | Low battery; Battery not inserted correctly | Charge the battery; Reinsert battery correctly |
| Photos are blurry | Camera shake; Subject too close/far; Autofocus issue | Hold camera steady or use a tripod; Ensure subject is within focus range; Check autofocus settings |
| Cannot record video | Not in video mode; Memory card full or corrupted | Switch to video mode; Delete files or format memory card |
| Cannot transfer files to PC | Incorrect USB connection; Camera not in data transfer mode | Ensure cable is securely connected; Select "Mass Storage" or "Data Transfer" mode on camera |
8. Specifications
| Feature | Detail |
|---|---|
| Model Name | K200 |
| Effective Still Resolution | 64 MP |
| Video Resolution | 4K (4320p) at 30 fps |
| Digital Zoom | 16x |
| Image Stabilization | Digital |
| Autofocus | Yes (Face Detection) |
| Photo Sensor Technology | CMOS (1/2.5-inch) |
| Screen Size | 2.8 Inches (LCD) |
| Supported File Format | JPEG (Stills), MP4 (Video) |
| External Memory | 32 GB (included) |
| Connectivity | USB Type-C |
| Battery Type | Lithium Ion |
| Item Weight | 0.24 Kilograms (approx. 120g) |
| Material | Acrylonitrile Butadiene Styrene (ABS) |
9. Warranty and Support
9.1 Warranty Information
This NBDDIGITAL K200 camera comes with a 1-year limited warranty from the date of purchase. This warranty covers manufacturing defects and workmanship under normal use. It does not cover damage caused by misuse, accidents, unauthorized modifications, or improper maintenance.
9.2 Customer Support
For technical assistance, troubleshooting, or warranty claims, please contact NBDDIGITAL customer support through the retailer where the product was purchased or visit the official NBDDIGITAL website for contact information.