Important Safeguards
When using electrical appliances, basic safety precautions should always be followed, including the following:
- Read all instructions before operating the appliance.
- Do not immerse the motor base in water or other liquids. Clean with a damp cloth only.
- Close supervision is necessary when any appliance is used by or near children.
- Unplug from outlet when not in use, before assembling or disassembling parts, and before cleaning.
- Avoid contact with moving parts.
- Do not operate any appliance with a damaged cord or plug, or after the appliance malfunctions or has been dropped or damaged in any manner.
- The use of attachments not recommended or sold by the manufacturer may cause fire, electric shock, or injury.
- Do not use outdoors.
- Do not let cord hang over edge of table or counter, or touch hot surfaces.
- Do not place on or near a hot gas or electric burner, or in a heated oven.
- Always operate the appliance with the cover in place.
- Blades are sharp. Handle with care.
- Ensure the appliance is switched off before removing it from the stand.
- This appliance is intended for household use only.
Product Overview
The PowerPac PPBL906 is a versatile 3-in-1 food blender designed for various kitchen tasks. It includes a main blender jug, a grinder attachment, and a chopper attachment, all powered by a robust 600W motor.
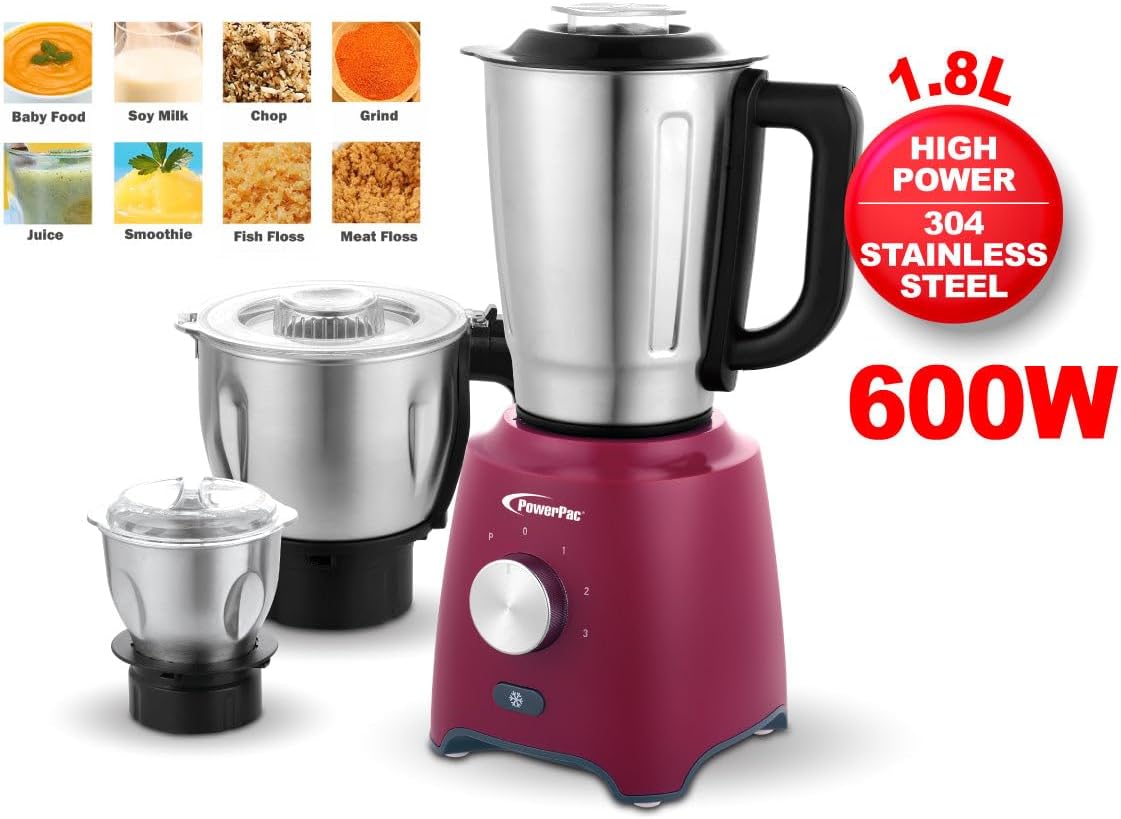
Image: The PowerPac PPBL906 3-in-1 Food Blender showing the main blender jug, the grinder attachment, and the chopper attachment, all connected to the motor base. The image highlights the 1.8L capacity, 600W power, and stainless steel construction.
Components:
- Motor Base: Contains the 600W motor and control knob.
- Blender Jug (1.8L): For blending liquids, smoothies, and sauces. Features a lid with a removable measuring cup.
- Grinder Attachment: For grinding dry ingredients like spices, coffee beans, and nuts.
- Chopper Attachment: For chopping vegetables, meat, and other ingredients.
- Stainless Steel Blades: Durable blades for all attachments.
- Control Knob: For selecting speed settings (0, 1, 2) and pulse function.
Setup
Before first use, wash all detachable parts (jug, lids, blades, attachments) in warm soapy water, rinse thoroughly, and dry. Wipe the motor base with a damp cloth.
Assembling the Blender:
- Place the motor base on a stable, flat surface.
- Ensure the control knob is set to "0" (off position).
- Attach the desired jug or attachment (blender, grinder, or chopper) onto the motor base. Align the locking tabs on the attachment with the slots on the motor base and twist clockwise until it locks securely into place.
- For the blender jug, ensure the lid is properly secured before operation.
- Plug the power cord into a suitable electrical outlet.
Operating Instructions
Always ensure the appliance is correctly assembled and locked before operation. Do not operate the blender empty.

Image: A collage demonstrating various food preparation tasks achievable with the PowerPac PPBL906, including making baby food, soy milk, chopping ingredients, grinding spices, preparing juices, smoothies, fish floss, and meat floss.
Using the Blender Jug:
- Place ingredients into the blender jug. Do not exceed the maximum fill line. For best results with solid ingredients, add some liquid.
- Secure the lid firmly onto the jug.
- Turn the control knob to speed setting "1" or "2" for continuous blending.
- For short bursts of power, turn the knob to the "P" (Pulse) setting and release. This is useful for crushing ice or achieving a coarse chop.
- Once blending is complete, turn the control knob back to "0" and unplug the appliance before removing the jug.
Using the Grinder Attachment:
- Place dry ingredients (e.g., coffee beans, spices) into the grinder cup. Do not overfill.
- Secure the grinder lid.
- Attach the grinder assembly onto the motor base and lock it.
- Turn the control knob to speed setting "1" or "2" for grinding. Use short bursts with the "P" (Pulse) setting for better control.
- After grinding, turn the knob to "0" and unplug before carefully removing the attachment.
Using the Chopper Attachment:
- Place ingredients into the chopper bowl. Ensure ingredients are cut into small pieces (approx. 2-3 cm) for optimal chopping. Do not overfill.
- Secure the chopper lid.
- Attach the chopper assembly onto the motor base and lock it.
- Turn the control knob to speed setting "1" or "2" for chopping. The "P" (Pulse) setting is highly recommended for chopping to achieve desired consistency and prevent over-processing.
- Once chopping is complete, turn the knob to "0" and unplug before carefully removing the attachment.
Note: Do not operate the appliance continuously for more than 1 minute. Allow a rest period of at least 2 minutes between cycles to prevent overheating.
Maintenance and Cleaning
Proper cleaning ensures the longevity and hygiene of your appliance. Always unplug the blender before cleaning.
Cleaning the Motor Base:
- Wipe the motor base with a soft, damp cloth.
- Do not immerse the motor base in water or any other liquid.
- Do not use abrasive cleaners or scouring pads, as they may scratch the surface.
Cleaning the Jugs and Attachments:
- For easy cleaning, rinse the jug/attachment immediately after use.
- Fill the blender jug halfway with warm water and a drop of dish soap. Secure the lid and run the blender on speed "1" for a few seconds. Rinse thoroughly.
- For grinder and chopper attachments, carefully remove the blades (handle with extreme caution as blades are sharp) and wash all parts in warm soapy water. Rinse and dry thoroughly.
- All detachable parts are generally dishwasher-safe on the top rack, but hand washing is recommended for longevity.
- Store the appliance in a dry place.
Troubleshooting
| Problem | Possible Cause | Solution |
|---|---|---|
| Appliance does not start. |
|
|
| Motor stops during operation. |
|
|
| Ingredients are not blending/chopping properly. |
|
|
| Leakage from the jug/attachment. |
|
|
Specifications

Image: Detailed dimensions of the PowerPac PPBL906 blender, grinder, and chopper attachments, including height and width measurements for each component and the base unit.
| Model | PPBL906 |
| Power | 600W |
| Voltage | 240 Volts |
| Material | Stainless Steel |
| Blender Jug Capacity | 1.8 Liters |
| Product Dimensions | 21.6D x 30.9W x 31.5H centimetres (overall) |
| Included Components | Motor Base, Blender Jug, Grinder Attachment, Chopper Attachment, Instruction Manual |
Customer Support
For any questions, technical assistance, or warranty claims regarding your PowerPac PPBL906 3-in-1 Food Blender, please contact PowerPac customer service.
- Manufacturer: PowerPacSG
- Refer to your purchase documentation or the PowerPac official website for the most current contact information and warranty details.

