1. Introduction
This manual provides detailed instructions for the installation, operation, and maintenance of your VEVOR Wireless Car Stereo Model 7090P. This portable 7-inch HD touch screen device offers seamless integration with Apple CarPlay and Android Auto, enhancing your driving experience with navigation, communication, and entertainment features. Please read this manual thoroughly before using the product to ensure proper function and safety.
2. Safety Information
Always prioritize safety while operating your vehicle. Distracted driving can lead to accidents. Ensure the device is securely mounted and does not obstruct your view or interfere with vehicle controls. Operate the device only when it is safe to do so, or use voice commands to minimize distraction. Do not attempt to service the unit yourself; refer all servicing to qualified personnel.
3. Package Contents
Verify that all items are present in the package before installation.
- 1x VEVOR Wireless Car Stereo (Model 7090P)
- 1x Adhesive Bracket
- 1x AUX Cable
- 1x Power Cable
- 1x Rear Camera Cable
- 1x Mount Rubber Pad
- 1x User Manual
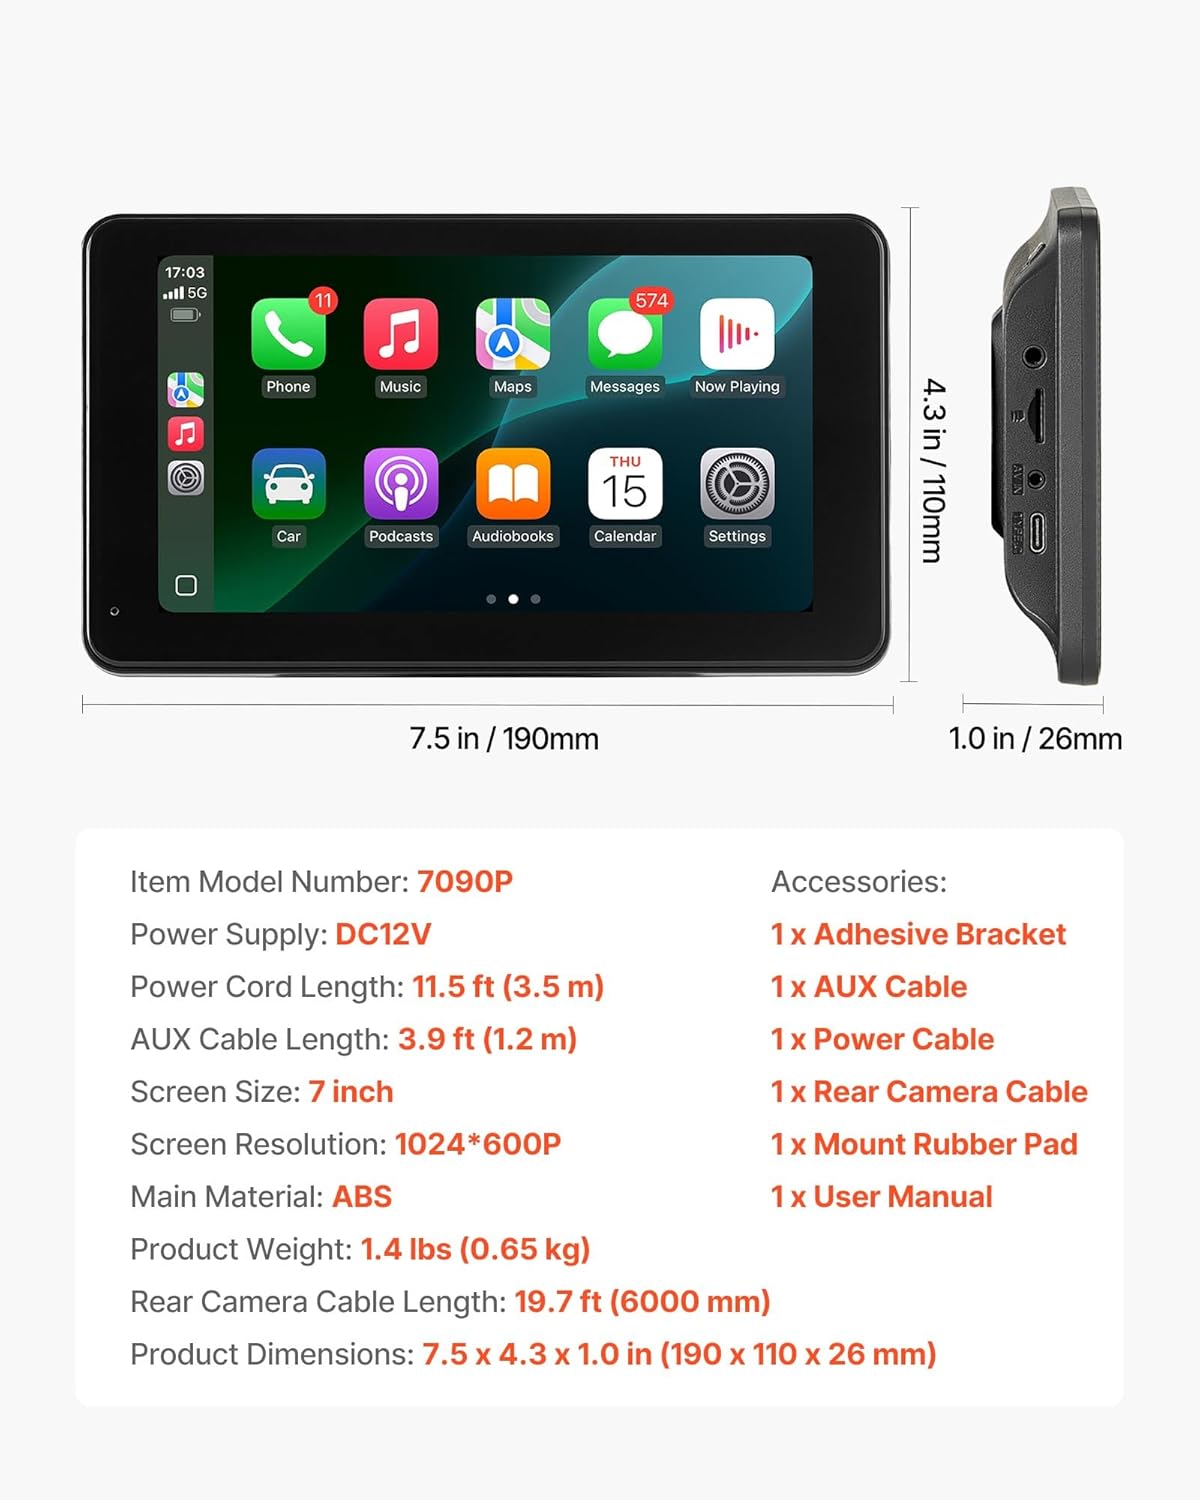
Image: The VEVOR Wireless Car Stereo 7090P unit with all included accessories, including the adhesive bracket, various cables, and the user manual.
4. Product Overview
The VEVOR 7090P is a portable 7-inch HD touchscreen designed to bring modern connectivity to your vehicle. Key features include:
- Wireless Apple CarPlay & Android Auto: Seamless smartphone integration for navigation, music, and communication.
- Real-Time GPS Navigation: Supports Apple Maps, Google Maps, and Waze.
- Immersive Audio & Visual Experience: 1024 x 600P anti-glare screen with Bluetooth music, AUX-in, FM radio, and built-in speaker.
- Backup Camera with Parking Assist: Waterproof rear camera with adjustable parking guidelines.
- Voice Control: Siri and Google Assistant compatibility for hands-free operation.
- Mirror Link: Display your phone screen directly on the unit.

Image: The VEVOR Wireless Car Stereo 7090P showing the main screen interface with various application icons.
5. Setup
5.1 Mounting the Device
The device attaches firmly to flat surfaces using the provided adhesive bracket. Choose a location on your dashboard that does not obstruct your view of the road or interfere with airbags and other vehicle controls.
- Clean the dashboard surface thoroughly where the bracket will be placed.
- Attach the mount rubber pad to the bottom of the adhesive bracket.
- Peel off the protective film from the adhesive on the bracket.
- Press the bracket firmly onto the chosen dashboard location for several seconds to ensure a secure bond.
- Attach the main unit to the bracket.

Image: Illustration of the adhesive bracket and pad, demonstrating how they securely bond to the dashboard surface for stable installation.
5.2 Power Connection
The unit is powered by DC 12V. Connect the provided power cable to the unit's power port and plug the other end into your vehicle's 12V power outlet (cigarette lighter socket).
5.3 Rear Camera Installation (Optional)
If using the backup camera, connect the rear camera cable to the designated port on the unit. Route the cable to the rear of your vehicle and install the waterproof camera according to its specific instructions, typically near the license plate. Ensure the camera is positioned to provide a clear view of the area behind your vehicle.

Image: Diagram illustrating the connection points for the rear camera, power cable, TF card slot, and AUX output on the side of the VEVOR car stereo unit.
6. Operating Instructions
6.1 Wireless Apple CarPlay / Android Auto
Connect your smartphone wirelessly for access to navigation, music, messages, and hands-free calls.
- On the car stereo screen, tap the "PhoneLink" icon.
- Select either "CarPlay" (for iPhone) or "Android Auto" (for Android phones).
- On your smartphone, enable Bluetooth and search for the device named "T86-XXXX". Pair your phone with this device.
- For Apple CarPlay, Wi-Fi will auto-activate for a direct link. For Android Auto, ensure 5GHz Wi-Fi is enabled on your phone.
- Confirm the connection on both devices.

Image: Step-by-step visual guide for connecting an iPhone to the VEVOR car stereo via wireless Apple CarPlay.

Image: Step-by-step visual guide for connecting an Android phone to the VEVOR car stereo via wireless Android Auto.
6.2 GPS Navigation
Once connected to Apple CarPlay or Android Auto, you can use your preferred navigation apps (Apple Maps, Google Maps, Waze) directly on the 7-inch screen. Voice commands are supported for destination input and route guidance.

Image: The VEVOR car stereo displaying GPS navigation with voice command prompts for Siri and Google Assistant.
6.3 Audio Outputs
The unit supports multiple audio output methods:
- Bluetooth: Stream audio wirelessly from your connected smartphone.
- AUX-in: Connect external audio devices using the provided AUX cable.
- FM Transmitter: Transmit audio to your car's FM radio by tuning both devices to the same frequency.
- Built-in Speaker: The unit has an integrated speaker for direct audio output.
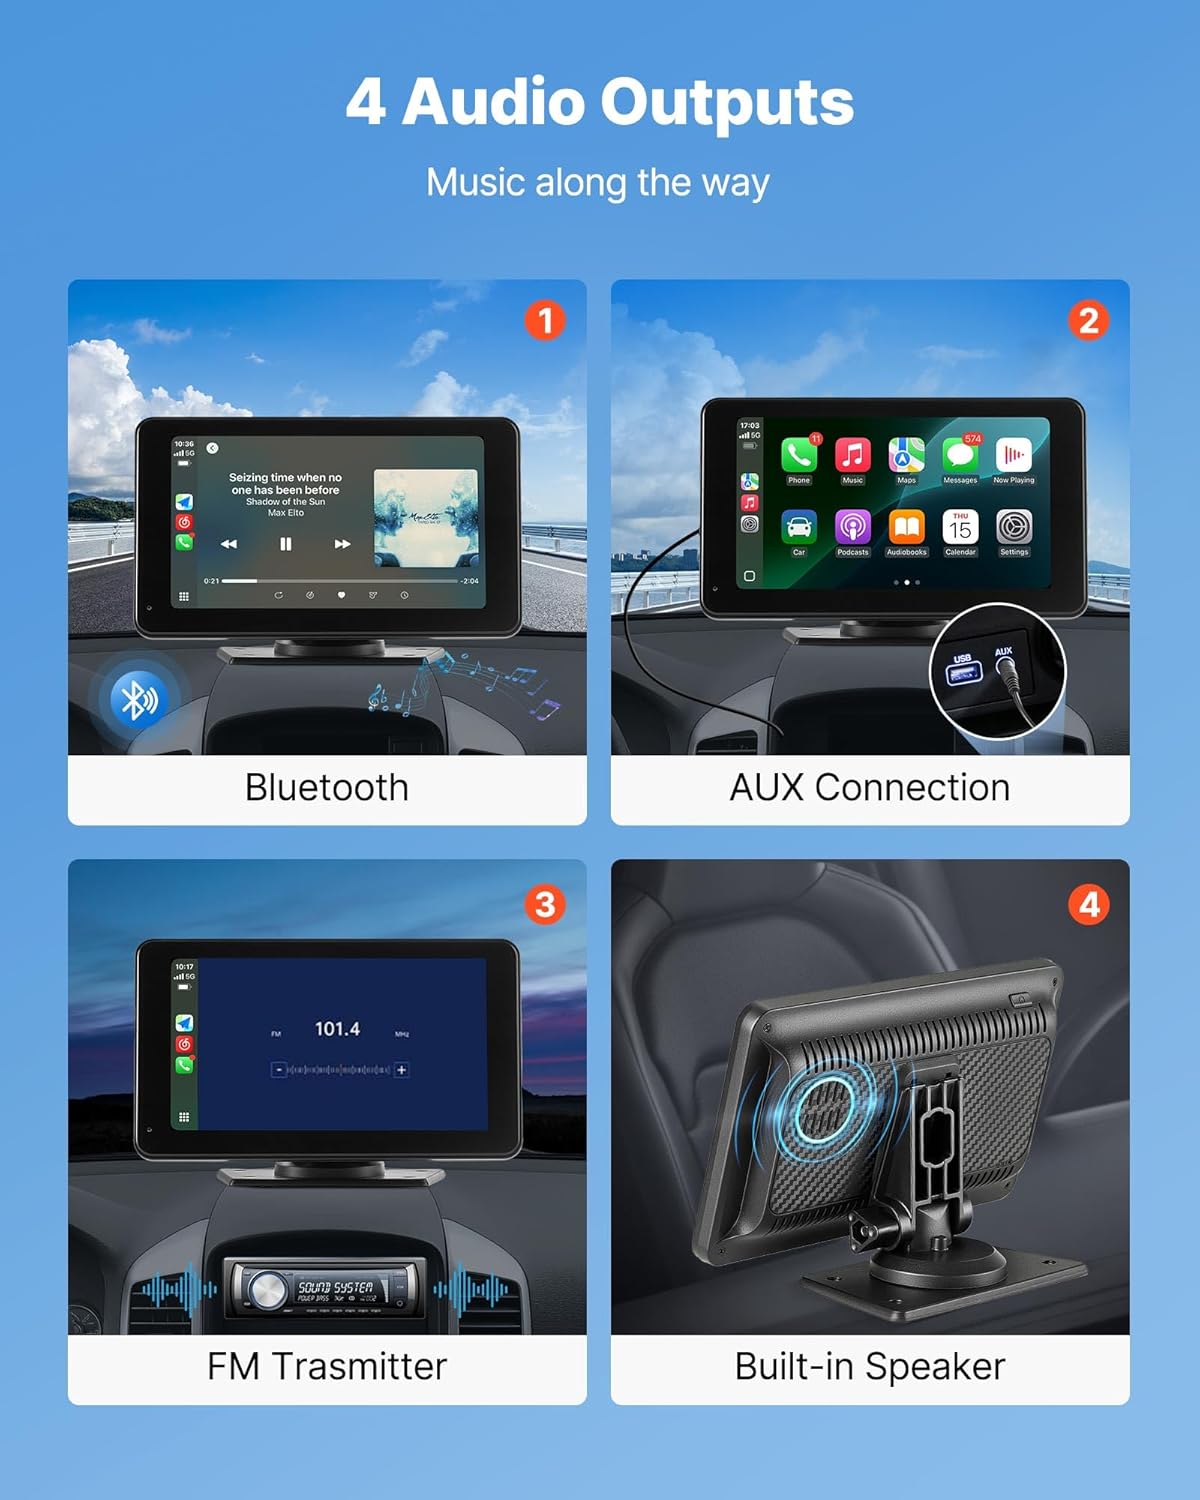
Image: Visual representation of the four audio output options: Bluetooth, AUX connection, FM transmitter, and the built-in speaker.
6.4 Voice Control
Utilize Siri or Google Assistant for hands-free control of navigation, calls, messages, and music. Activate voice control through your connected smartphone's interface on the car stereo.
6.5 Mirror Link
The Mirror Link function allows you to display your smartphone's screen directly onto the VEVOR unit. This is useful for viewing content not natively supported by CarPlay or Android Auto.

Image: A smartphone mirroring its display onto the VEVOR car stereo, showing a video playing on both screens.
6.6 Backup Camera Operation
When the vehicle is shifted into reverse, the connected backup camera will automatically activate and display a 30W pixel image on the screen. Adjustable parking guidelines assist in safer and easier parking maneuvers.

Image: Display showing the view from the rear camera with parking guidelines, highlighting broad-angled view, waterproof design, and night vision capabilities.
7. Maintenance
To ensure the longevity and optimal performance of your VEVOR Wireless Car Stereo, follow these maintenance guidelines:
- Cleaning: Use a soft, dry cloth to clean the screen and exterior. For stubborn smudges, slightly dampen the cloth with water or a screen-safe cleaner. Avoid abrasive materials or harsh chemicals.
- Temperature: Avoid exposing the device to extreme temperatures, both hot and cold, for extended periods.
- Moisture: Keep the unit dry. Although the backup camera is waterproof, the main unit is not designed for direct exposure to water.
- Cable Management: Ensure all cables are neatly routed and secured to prevent damage or interference with driving.
8. Troubleshooting
If you encounter issues with your VEVOR Wireless Car Stereo, refer to the following common problems and solutions:
- No Power:
- Check if the power cable is securely plugged into both the unit and the vehicle's 12V outlet.
- Ensure the vehicle's 12V outlet is functioning (test with another device).
- Check the vehicle's fuse for the 12V outlet.
- Cannot Connect to CarPlay/Android Auto:
- Ensure Bluetooth and Wi-Fi are enabled on your smartphone.
- Verify that your phone is paired with the correct device name ("T86-XXXX").
- Restart both the car stereo and your smartphone.
- Ensure your phone's operating system is up to date.
- No Sound:
- Check the volume levels on both the car stereo and your smartphone.
- If using FM transmitter, ensure the car stereo and vehicle radio are tuned to the same, clear FM frequency.
- If using AUX, ensure the AUX cable is fully inserted and functional.
- Backup Camera Not Displaying:
- Ensure the camera cable is securely connected to the unit.
- Verify the camera is receiving power (if applicable).
- Check if the vehicle is properly shifted into reverse.
- Touchscreen Unresponsive:
- Restart the unit by disconnecting and reconnecting power.
- Ensure the screen is clean and free of debris.
If problems persist, please contact VEVOR customer support.
9. Specifications
| Feature | Specification |
|---|---|
| Item Model Number | 7090P |
| Power Supply | DC 12V |
| Power Cord Length | 11.5 ft (3.5 m) |
| AUX Cable Length | 3.9 ft (1.2 m) |
| Screen Size | 7 inch |
| Screen Resolution | 1024*600P |
| Main Material | ABS |
| Product Weight | 1.4 lbs (0.65 kg) |
| Rear Camera Cable Length | 19.7 ft (6000 mm) |
| Product Dimensions (L x W x H) | 7.5 x 4.3 x 1.0 in (190 x 110 x 26 mm) |
| Connectivity Technologies | USB, Wireless |
| Compatible Phone Models | iPhone (CarPlay), Samsung Galaxy (Android Auto) and newer models |
| Total USB Ports | 1 |
| Wattage | 30 watts |
| Output Current | 2.5 Amps |
Image: Detailed diagram showing the dimensions of the VEVOR 7090P unit and a list of its key specifications and included accessories.
10. Warranty and Support
VEVOR products are designed for durability and performance. For specific warranty details, please refer to the warranty card included with your product or visit the official VEVOR website. If you require technical assistance, troubleshooting beyond this manual, or have questions about your product, please contact VEVOR customer support through their official channels.
Online Support: Visit www.vevor.com for FAQs, product registration, and contact information.