
1. Product Overview
The VANLINNY Robot Arm K3 is an interactive STEM project designed for children aged 8 and above. This robotic kit supports simple programming and offers a hands-on building experience, allowing users to explore the world of robotics and engineering principles. The assembled robot arm features multi-angle movement, free rise and fall capabilities, gripping functions, and cool simulation sound effects.
Constructed from durable ABS and aluminum alloys, the kit includes detailed instructions with numbered accessory packages to facilitate easy assembly. Its flexible 360° movement and robotic arm provide unlimited play possibilities, while its 4 motors ensure impressive speed and realistic sounds for an immersive experience.
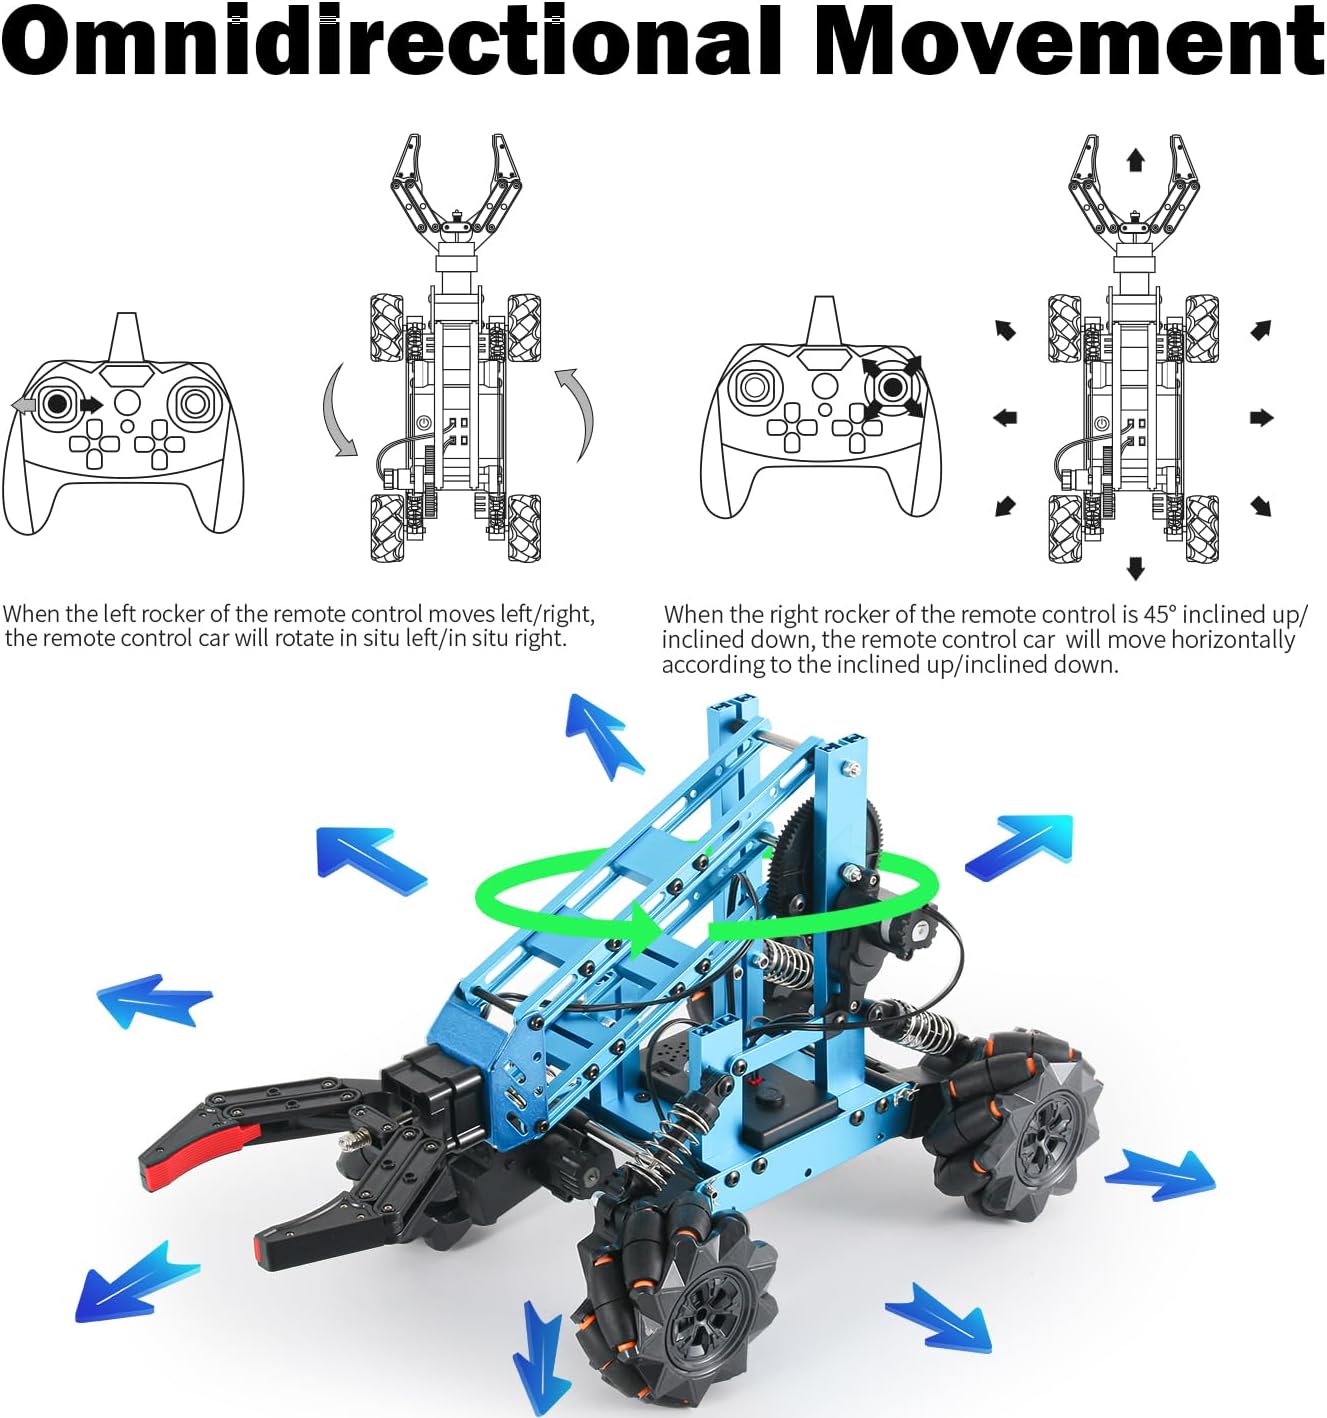
Figure 1: Fully assembled VANLINNY Robot Arm K3.
2. Setup and Assembly
The VANLINNY Robot Arm K3 kit includes 103 pieces and a comprehensive instruction manual to guide you through the assembly process. Each accessory package is numbered to correspond with the steps in the manual, ensuring a smooth building experience.
2.1 Unboxing and Component Check
Before beginning assembly, carefully unbox all components and verify that all parts listed in the manual are present. The kit is organized into foam trays for easy identification of motors, cables, gears, batteries, brackets, and assembly tools.
Video 1: Unboxing and initial component overview of the K3 Robot Arm, showing the instruction manual and various parts.
2.2 Assembly Steps
Follow the step-by-step visual instructions provided in the included manual. The manual details how to connect the various structural pieces, motors, and wiring. Pay close attention to the numbering on the accessory packages to match parts correctly.
- Base Assembly: Begin by constructing the robot's base, ensuring all connections are secure.
- Motor Integration: Install the six motors into their designated positions, connecting them with the provided cables.
- Arm Construction: Assemble the robotic arm and gripper mechanism.
- Wheel Attachment: Secure the omnidirectional wheels to the base.
- Wiring: Carefully route and connect all wires to the control box, using the provided covers to prevent snagging.

Figure 2: Hands-on assembly of the robot arm components.

Figure 3: Detailed layout of robot arm components for assembly.
2.3 Battery Installation
The robot arm itself is powered by two included rechargeable batteries. The remote control requires 3 AAA batteries (not included). Ensure batteries are installed with correct polarity.
3. Operating Instructions
The VANLINNY Robot Arm K3 is controlled via a 14-channel remote control, offering a variety of movements and functions.
3.1 Remote Control Pairing
- Turn on the robot. The power light will blink.
- Turn on the remote, and it will pair automatically with the robot. The light on both robot and remote will become solid when paired.
- You are now ready to play.
3.2 Movement and Functions
The remote control allows for precise manipulation of the robot arm and its movement. Refer to the remote control diagram in your manual for specific button assignments.
- Omnidirectional Movement: Use the joysticks to move the robot forward, backward, left, right, and perform 45° side drifts.
- Rotation: The robot can rotate 360° in place.
- Clamp Control: Open and close the robotic clamp to grip objects.
- Arm Expansion: Control the main arm to expand up and down, allowing for vertical movement.
- Programming: The robot supports simple programming functions for advanced maneuvers.

Figure 4: Demonstrating the robotic arm's movement and gripping.

Figure 5: Omnidirectional wheels and remote control for precise movement.
4. Maintenance
Proper maintenance ensures the longevity and optimal performance of your VANLINNY Robot Arm K3.
- Cleaning: Regularly wipe down the robot with a dry, soft cloth to remove dust and debris. Avoid using water or harsh chemicals.
- Battery Care: Recharge the robot's batteries as needed. For the remote control, replace AAA batteries when performance degrades. Remove batteries if the robot will not be used for an extended period.
- Connection Check: Periodically inspect all wired connections to ensure they are secure and free from damage.
- Gear Inspection: Check gears for any signs of wear or obstruction. Keep them free of hair or small particles.
5. Troubleshooting
If you encounter issues with your robot arm, refer to the following common troubleshooting steps:
- Robot Not Responding:
- Ensure both the robot and remote control are powered on.
- Check if the remote control batteries are fresh and correctly installed.
- Verify that the robot and remote are properly paired (refer to Section 3.1).
- Confirm the robot's main battery is charged.
- Limited Movement/Weak Gripper:
- Check for any physical obstructions in the gears or arm joints.
- Ensure all motor connections are secure.
- The robot arm is designed for light objects. Avoid attempting to lift excessively heavy items.
- Unusual Noises:
- Inspect gears for debris or misalignment.
- Ensure all screws and fasteners are tightened appropriately.
If problems persist, please contact VANLINNY customer support for assistance.
6. Specifications
| Feature | Detail |
|---|---|
| Product Dimensions | 16 x 8 x 14 inches |
| Item Weight | 3.72 pounds |
| Item Model Number | JK01 |
| Manufacturer Recommended Age | 8 - 12 years |
| Batteries | 1 Nonstandard Battery required (included for robot), 3 AAA batteries required (not included for remote) |
| Material | ABS and Aluminum Alloys |
| Control Type | 14 Channels Remote Control |
7. Warranty and Support
VANLINNY is committed to customer satisfaction. If anything happens to your item within the first 18 months of owning it, please contact us. We will do our best to provide the best solution.
For further assistance or inquiries, please refer to the contact information provided with your product packaging or visit the official VANLINNY store online.