TONGCAM 33Clcok
TONGCAM WiFi Hidden Camera Clock User Manual
Model: 33Clcok
Introduction
Thank you for choosing the TONGCAM WiFi Hidden Camera Clock. This device combines the functionality of a modern digital clock with a high-definition hidden camera, offering discreet indoor surveillance. It features WiFi connectivity for remote viewing, advanced motion detection, and night vision capabilities. This manual provides detailed instructions for setup, operation, and maintenance to ensure optimal performance and security.

Image: The TONGCAM WiFi Hidden Camera Clock, a sleek black device with a blue LED display, shown alongside a smartphone displaying its live camera feed and control options.
What's in the Box
Please verify that all components are present in the package:
- Clock Camera
- USB Cable
- User Manual
Product Overview
Familiarize yourself with the various parts of your TONGCAM Hidden Camera Clock:

Image: Detailed diagram illustrating the components of the hidden camera clock, including the lens, speaker, battery, LED indicators, camera, IR LEDs, USB port, ON/OFF switch, reset button, memory card slot, and back cover.
- Lens: The camera's optical component for capturing video.
- Speaker: For audio output (if applicable).
- Battery: Internal power source.
- LED Indicators: Status lights for power, charging, and connectivity.
- Camera: The hidden camera module.
- IR LED: Infrared LEDs for night vision.
- USB Port: For charging and data transfer.
- ON/OFF Switch: To power the device on or off.
- Reset Button: To restore factory settings.
- Memory Card Slot: For inserting a Micro SD card (up to 128GB) for local storage.
- Back Cover: Protects internal components.
Setup
1. Charging the Device
Before first use, fully charge the camera clock. Connect the supplied USB cable to the device's USB port and the other end to a 5V USB power adapter (not included) or a computer's USB port. The LED indicator will show charging status and turn off when fully charged.
2. Inserting a Micro SD Card
The device supports Micro SD cards up to 128GB for video storage. Locate the memory card slot and gently insert the Micro SD card with the gold contacts facing down until it clicks into place. Ensure the device is powered off before inserting or removing the card.
3. Powering On/Off
To power on the device, slide the ON/OFF switch to the 'ON' position. The LED display will illuminate, and indicator lights will activate. To power off, slide the switch to the 'OFF' position.
4. App Installation and WiFi Connection
To access live streaming and advanced features, download the dedicated mobile application. Refer to the QR code in the included quick start guide or search for the app name (e.g., "HDMini Camera" or similar as indicated in the app interface image) in your device's app store (App Store for iOS, Google Play Store for Android).
- Download and install the app.
- Open the app and follow the on-screen instructions to add your device. This typically involves connecting your smartphone to the camera's temporary WiFi hotspot (starts with "HDMini..." or similar) and then configuring the camera to connect to your home 2.4GHz WiFi network.
- Ensure your WiFi network is 2.4GHz, as 5GHz networks are not supported.

Image: A diagram illustrating the connectivity of the hidden camera clock to a 2.4GHz WiFi router, enabling remote monitoring via a smartphone app. Various scenarios like monitoring pets, children, or home security are depicted.
5. Setting the Time
Once connected to the app, the device's time will automatically synchronize with your smartphone's time. Manual time adjustment may be available through the app settings if needed.
Operating Instructions
1. Video Recording
The camera supports high-definition video recording. You can initiate recording manually via the mobile app or set it to record automatically based on motion detection.
- HD Video Quality: The camera records in 1080p or 720p resolution. You can select your preferred resolution within the app settings to balance video quality and storage space.
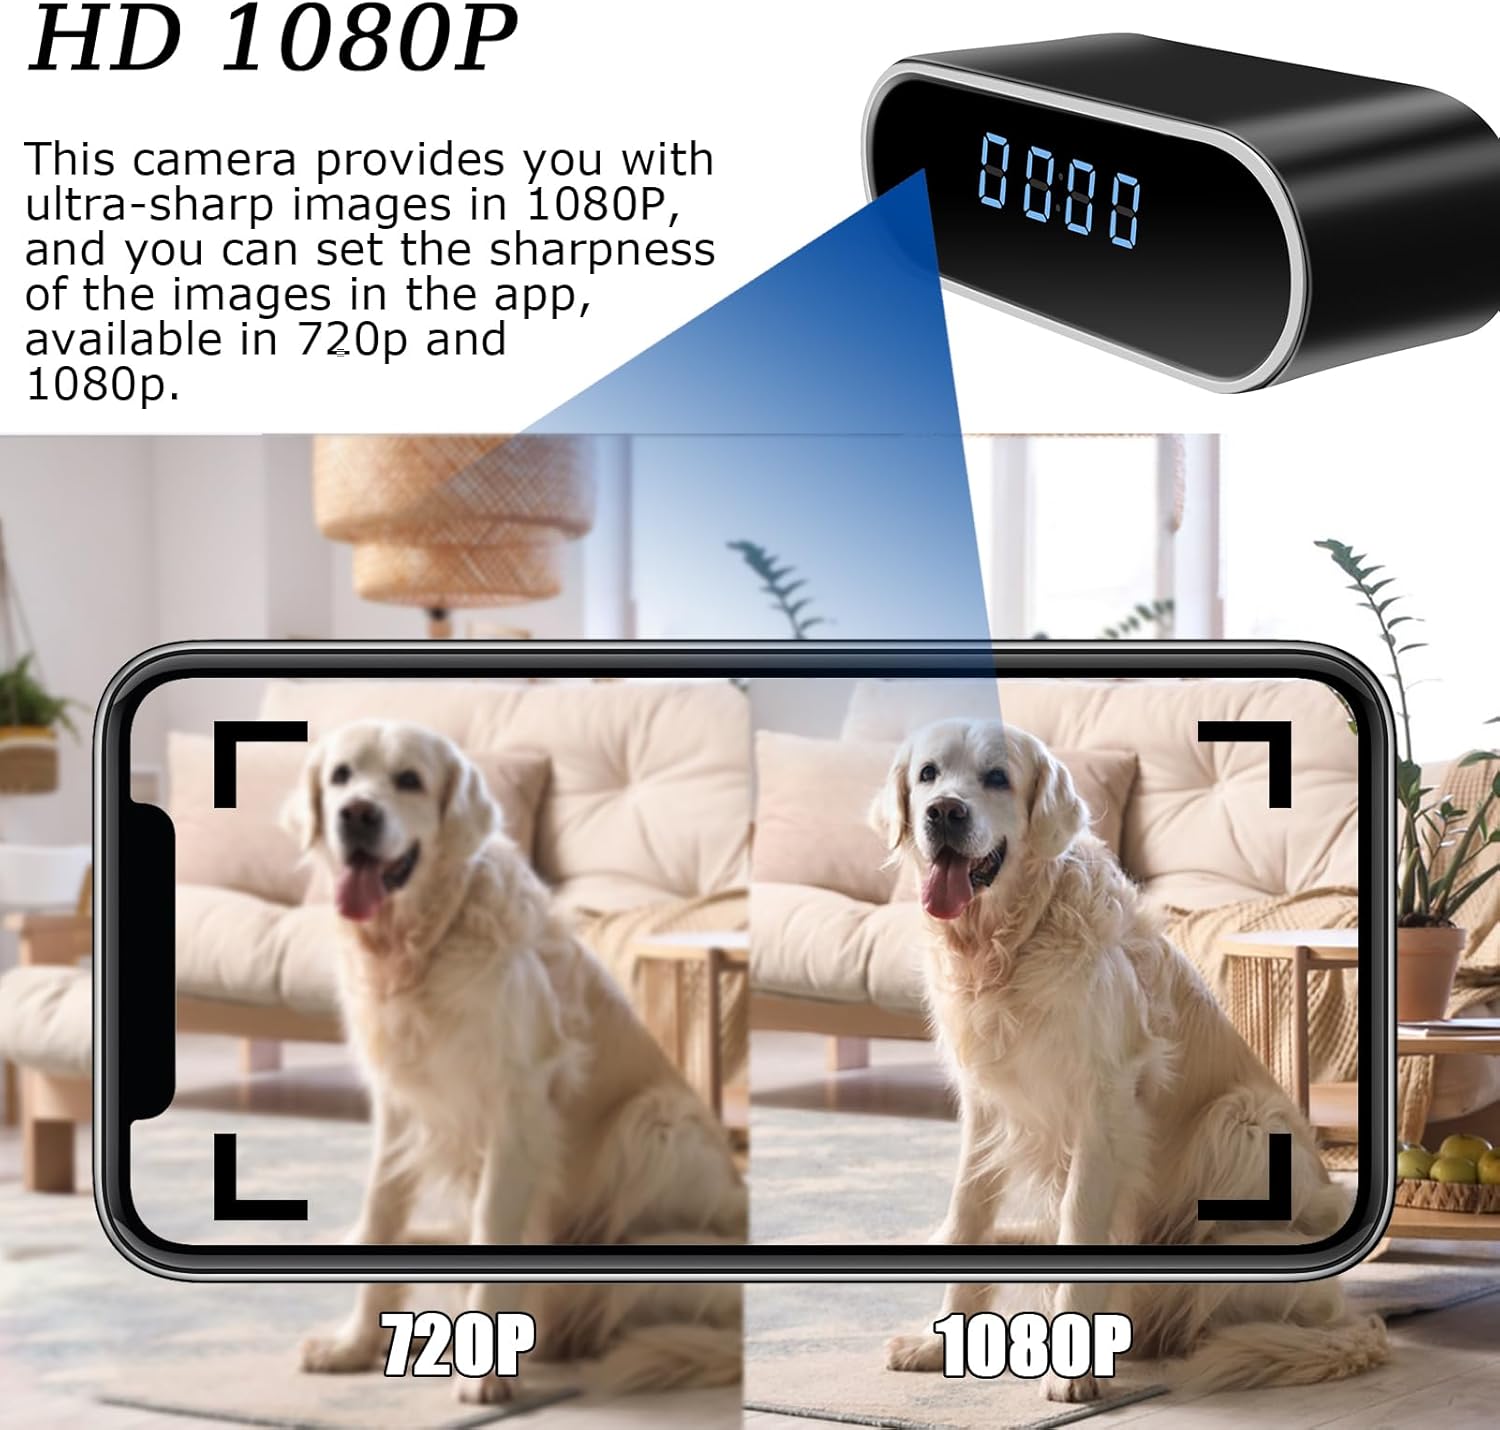
Image: A visual comparison demonstrating the difference in clarity between 720p and 1080p video resolutions captured by the hidden camera, highlighting the superior detail of 1080p.
2. Night Vision
The integrated infrared (IR) LEDs enable clear video recording even in complete darkness, providing 24/7 surveillance. Night vision activates automatically in low-light conditions.

Image: The hidden camera clock shown in a room setting, with icons indicating its ability to provide clear video both during the day and at night using its night vision feature.
3. Motion Detection and Alerts
The camera is equipped with smart motion detection sensors. When movement is detected within the camera's field of view, it will automatically begin recording and send real-time alert messages to your mobile device via the app.
- Enabling Motion Detection: Navigate to the settings within the mobile app to enable or disable motion detection.
- Sensitivity Adjustment: Adjust the motion detection sensitivity to minimize false alarms.
- Alerts: Ensure app notifications are enabled on your smartphone to receive timely alerts.

Image: A visual representation of the hidden camera clock's motion detection capability, showing it capturing an event and sending an alert to a smartphone.
4. Remote Viewing and Playback
With WiFi connectivity, you can stream live footage and review recorded videos from anywhere using your mobile device.
- Live View: Open the app and select your device to view the live camera feed.
- Playback: Access recorded videos stored on the Micro SD card or cloud storage (if subscribed) through the app's playback function.
Maintenance
- Cleaning: Use a soft, dry cloth to clean the exterior of the device. Do not use liquid cleaners or abrasive materials.
- Battery Care: To prolong battery life, avoid extreme temperatures and fully charge the device periodically if not in regular use.
- Storage: Store the device in a cool, dry place away from direct sunlight and moisture when not in use.
- Firmware Updates: Check the mobile app periodically for any available firmware updates to ensure optimal performance and security.
Troubleshooting
| Problem | Possible Cause / Solution |
|---|---|
| Device not powering on. | Ensure the battery is charged. Check the ON/OFF switch position. |
| Cannot connect to WiFi. |
|
| No video recording. |
|
| Poor video quality. |
|
| Motion detection alerts not received. |
|
Specifications
| Feature | Detail |
|---|---|
| Model Name | Hidden Clock Camera (33Clcok) |
| Video Capture Resolution | 1080p, 720p |
| Viewing Angle | 140 Degrees |
| Night Vision Range | 32 Feet |
| Connectivity Technology | Wi-Fi (IEEE 802.11b/g/n) |
| Compatible Devices | Smartphones, Tablets, Computers |
| Power Source | USB Powered |
| Storage | Micro SD (up to 128 GB) |
| Frame Rate | 30fps |
| Dimensions (L x W x H) | 5.5 x 6.5 x 2 inches |
| Weight | 12 ounces |
| Color | Black |
| Material | ABS Plastic, Glass |
| Batteries | 1 AA battery required (included) |
| Indoor/Outdoor Usage | Indoor |
Warranty and Support
For warranty information and technical support, please refer to the contact details provided on the product packaging or the official TONGCAM website. Keep your purchase receipt as proof of purchase for warranty claims.
For further assistance, you may also contact the seller directly through the platform where the product was purchased.
Ask a question about this manual
Ask about setup, troubleshooting, compatibility, parts, safety, or missing instructions. Manuals+ will review the question and use this page’s manual context to help answer it.