1. Introduction
The ACMER Ascarva 3S is a precision CNC router designed for engraving and milling various materials such as wood, metal, and acrylic. This manual provides essential information for the safe and efficient operation of your machine, including assembly, setup, operation, maintenance, and troubleshooting.

Image 1.1: The ACMER Ascarva 3S CNC Router is capable of cutting plastics, soft aluminum, woods, acrylics, PVCs, and PCBs, making it suitable for a wide range of projects and materials.
2. Safety Information
Operating a CNC router involves moving parts and sharp tools. Adhere to the following safety guidelines to prevent injury and damage to the machine:
- Eye Protection: Always wear safety glasses to protect your eyes from flying debris.
- Dust Mask: Use a dust mask, especially when working with wood or other materials that produce fine particles.
- Emergency Stop: Familiarize yourself with the location and function of the emergency stop switch. Activate it immediately in case of any malfunction or hazard.
- Clear Workspace: Keep your work area clean and free of obstructions.
- Secure Material: Ensure the material being worked on is securely clamped to prevent movement during operation.
- Unplug When Not in Use: Disconnect the power supply when performing maintenance or when the machine is not in use.
3. Package Contents
Verify that all components are present in the package before assembly:
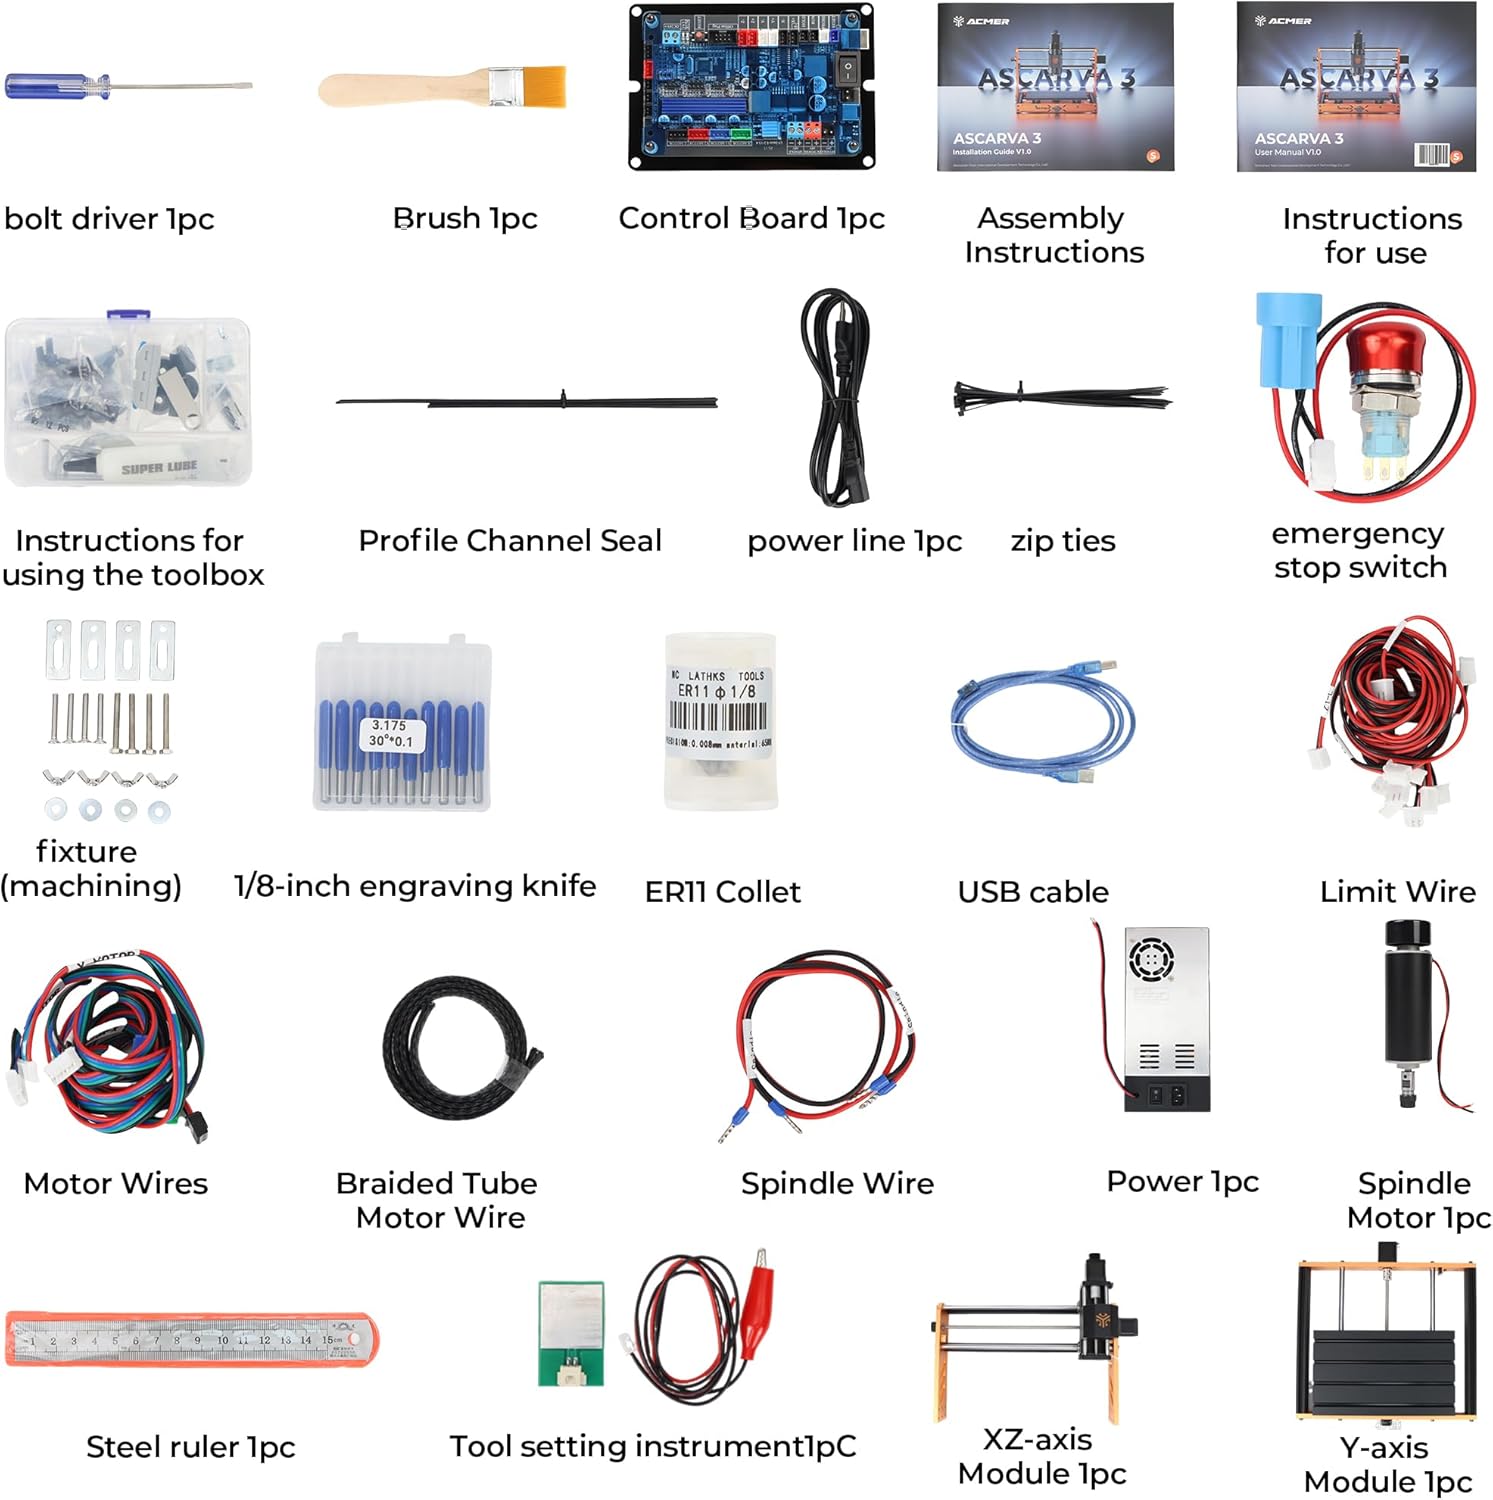
Image 3.1: All components included in the ACMER Ascarva 3S package.
- 1x Bolt Driver
- 1x Brush
- 1x Control Board
- 1x Assembly Instructions
- 1x Instructions for Use
- 1x Profile Channel Seal
- 1x Power Line
- Zip Ties
- 1x Emergency Stop Switch
- Fixtures (machining)
- 10x 1/8-inch Engraving Knives (Carbide Milling Cutters)
- 1x ER11 Collet
- 1x USB Cable
- Limit Wires
- Motor Wires
- Braided Tube Motor Wire
- Spindle Wire
- 1x Power Supply
- 1x Spindle Motor
- 1x Steel Ruler
- 1x Tool Setting Instrument
- 1x XZ-axis Module
- 1x Y-axis Module
4. Assembly
The ACMER Ascarva 3S features a modular design for straightforward assembly. Most parts are pre-built, requiring minimal effort to set up the machine.
- Attach the Upright Section: Secure the upright gantry section to the base using the provided machine screws.
- Connect Wiring: Connect all motor wires, limit switch wires, and the spindle wire to the control board as indicated in the assembly instructions.
- Install Emergency Stop: Mount and connect the emergency stop switch.
- Power Connection: Connect the power supply to the control board and plug it into a suitable power outlet.
Ensure all connections are firm and secure. The machine's robust full metal body structure provides stability and rigidity, which is crucial for precise operation.
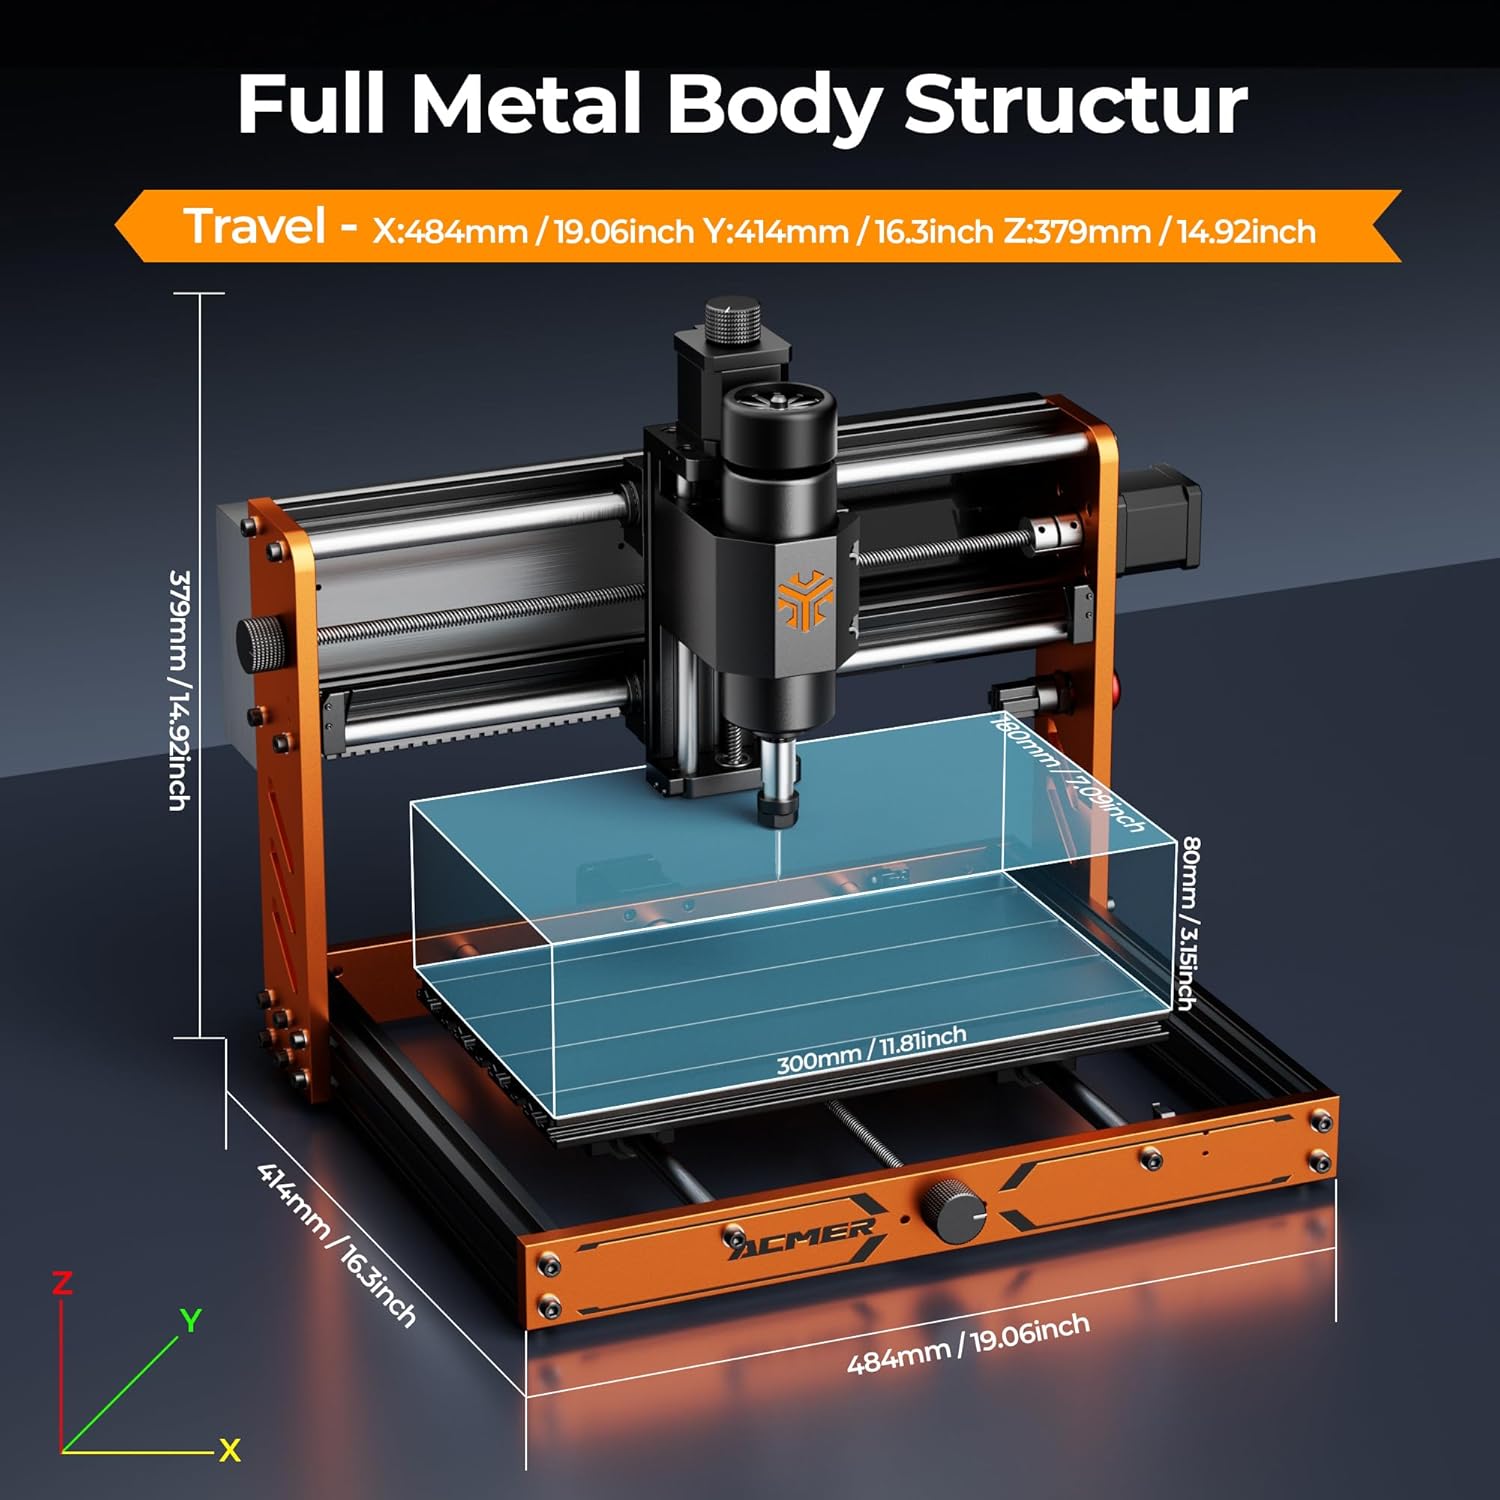
Image 4.1: Full metal body structure and dimensions of the ACMER Ascarva 3S.
5. Setup
The Ascarva 3S is designed for ease of use with cross-platform compatibility.
- Software Installation: The machine operates with GRBL-compatible software such as Candle, UGS (Universal Gcode Sender), or Easel. Install your preferred software on your computer (Windows, macOS, or Linux).
- USB Connection: Connect the CNC router to your computer via the provided USB cable. The machine is plug-and-play, requiring no complex setup for basic connectivity.
- Z-axis Calibration: Perform automatic Z-axis calibration to reduce setup time and ensure accurate depth control. Refer to your chosen software's instructions for this process.
- Tool Installation: Insert the desired engraving knife or milling bit into the ER11 collet and tighten it securely.

Image 5.1: The ACMER Ascarva 3S is compatible with GRBL control software on various operating systems.
6. Operating Instructions
The Ascarva 3S features a 500W high-torque spindle motor (0-12000 RPM) for efficient material removal.

Image 6.1: High accuracy and stability features including the 500W spindle motor.
- Material Preparation: Secure your material (e.g., wood, acrylic, soft metal) onto the workbed. The effective work area is 300 x 180 x 78 mm.
- Design and G-code Generation: Create your design using CAD/CAM software and generate the corresponding G-code file.
- Load G-code: Load the G-code file into your GRBL control software.
- Set Origin: Manually or automatically set the X, Y, and Z origin points for your job.
- Start Operation: Initiate the carving or milling process through the software. The machine supports engraving speeds up to 2000 mm/min and movement speeds up to 5000 mm/min.
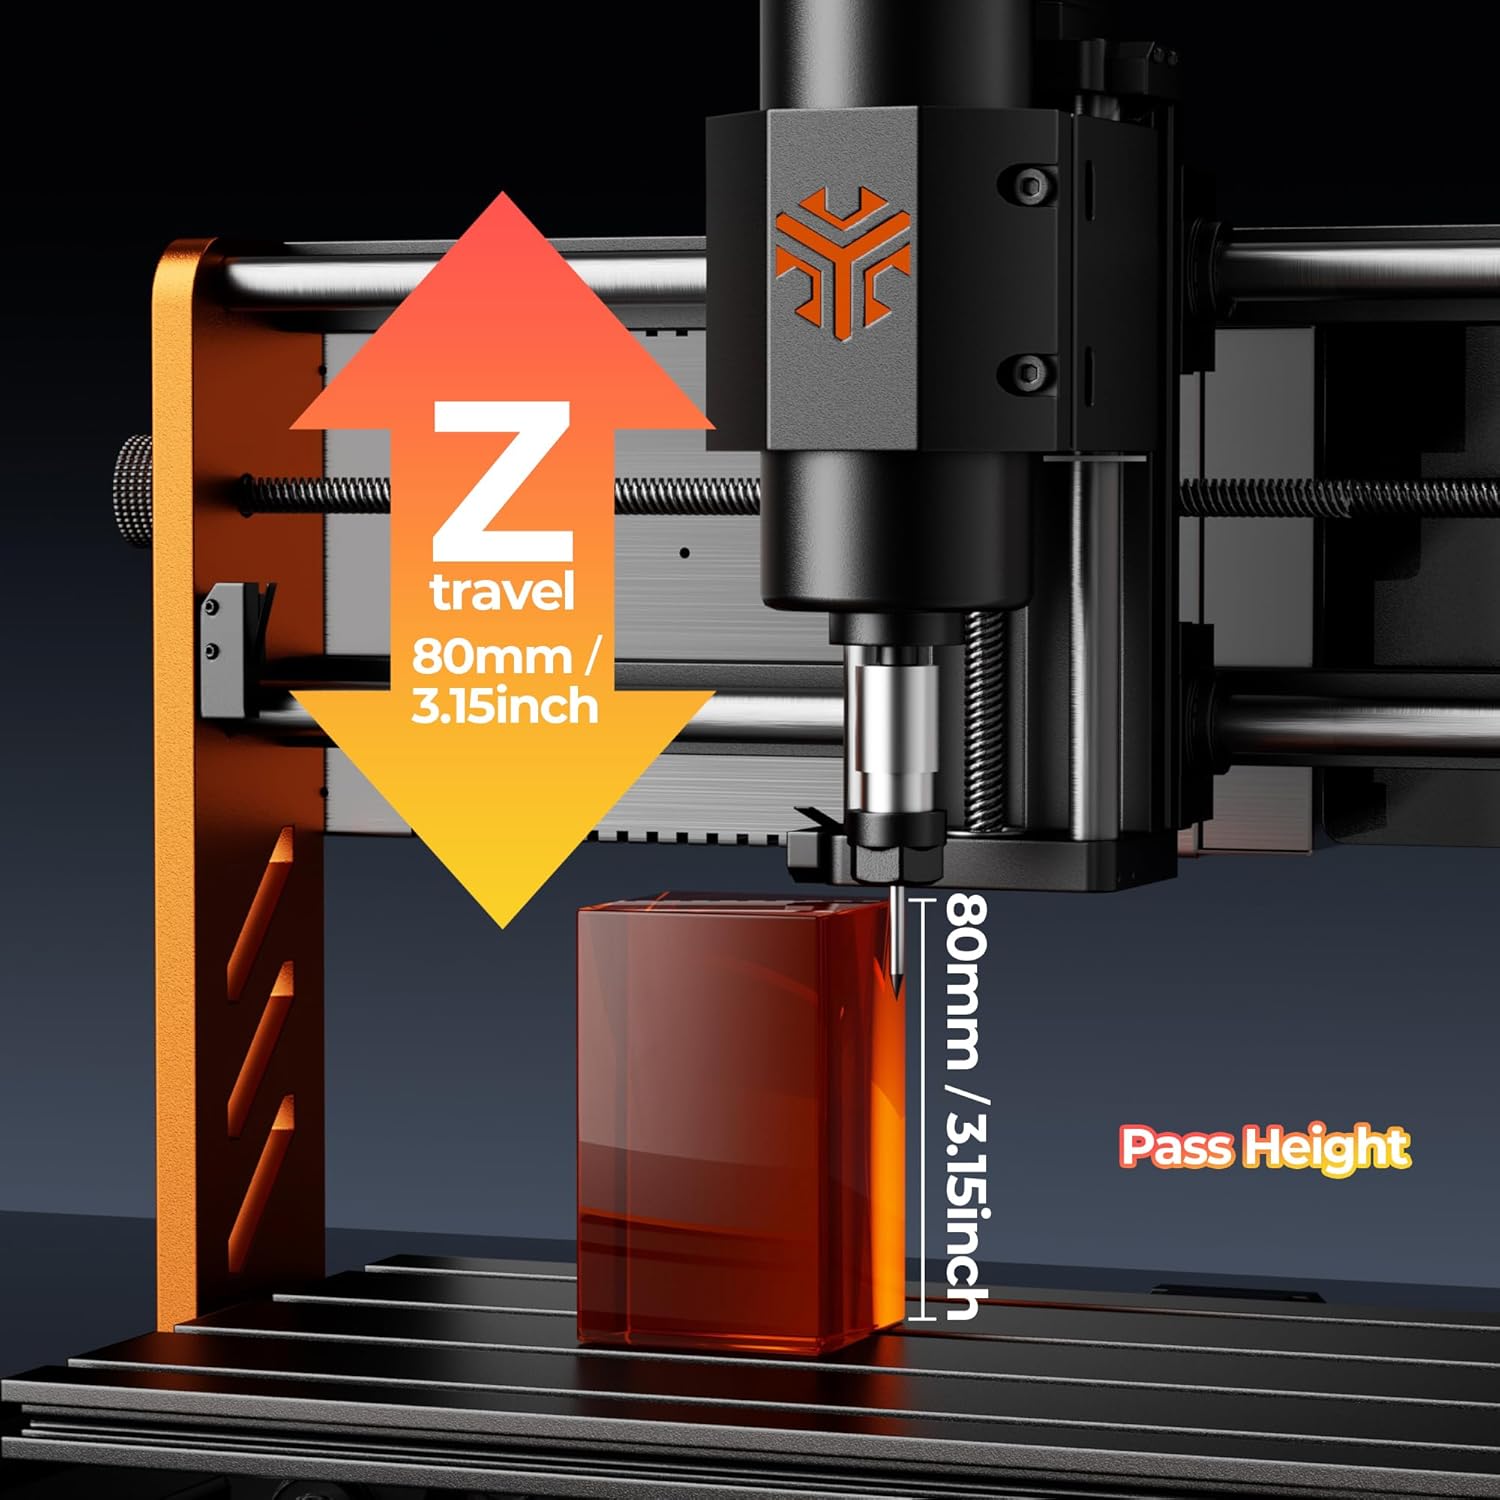
Image 6.2: Z-axis travel and pass height.
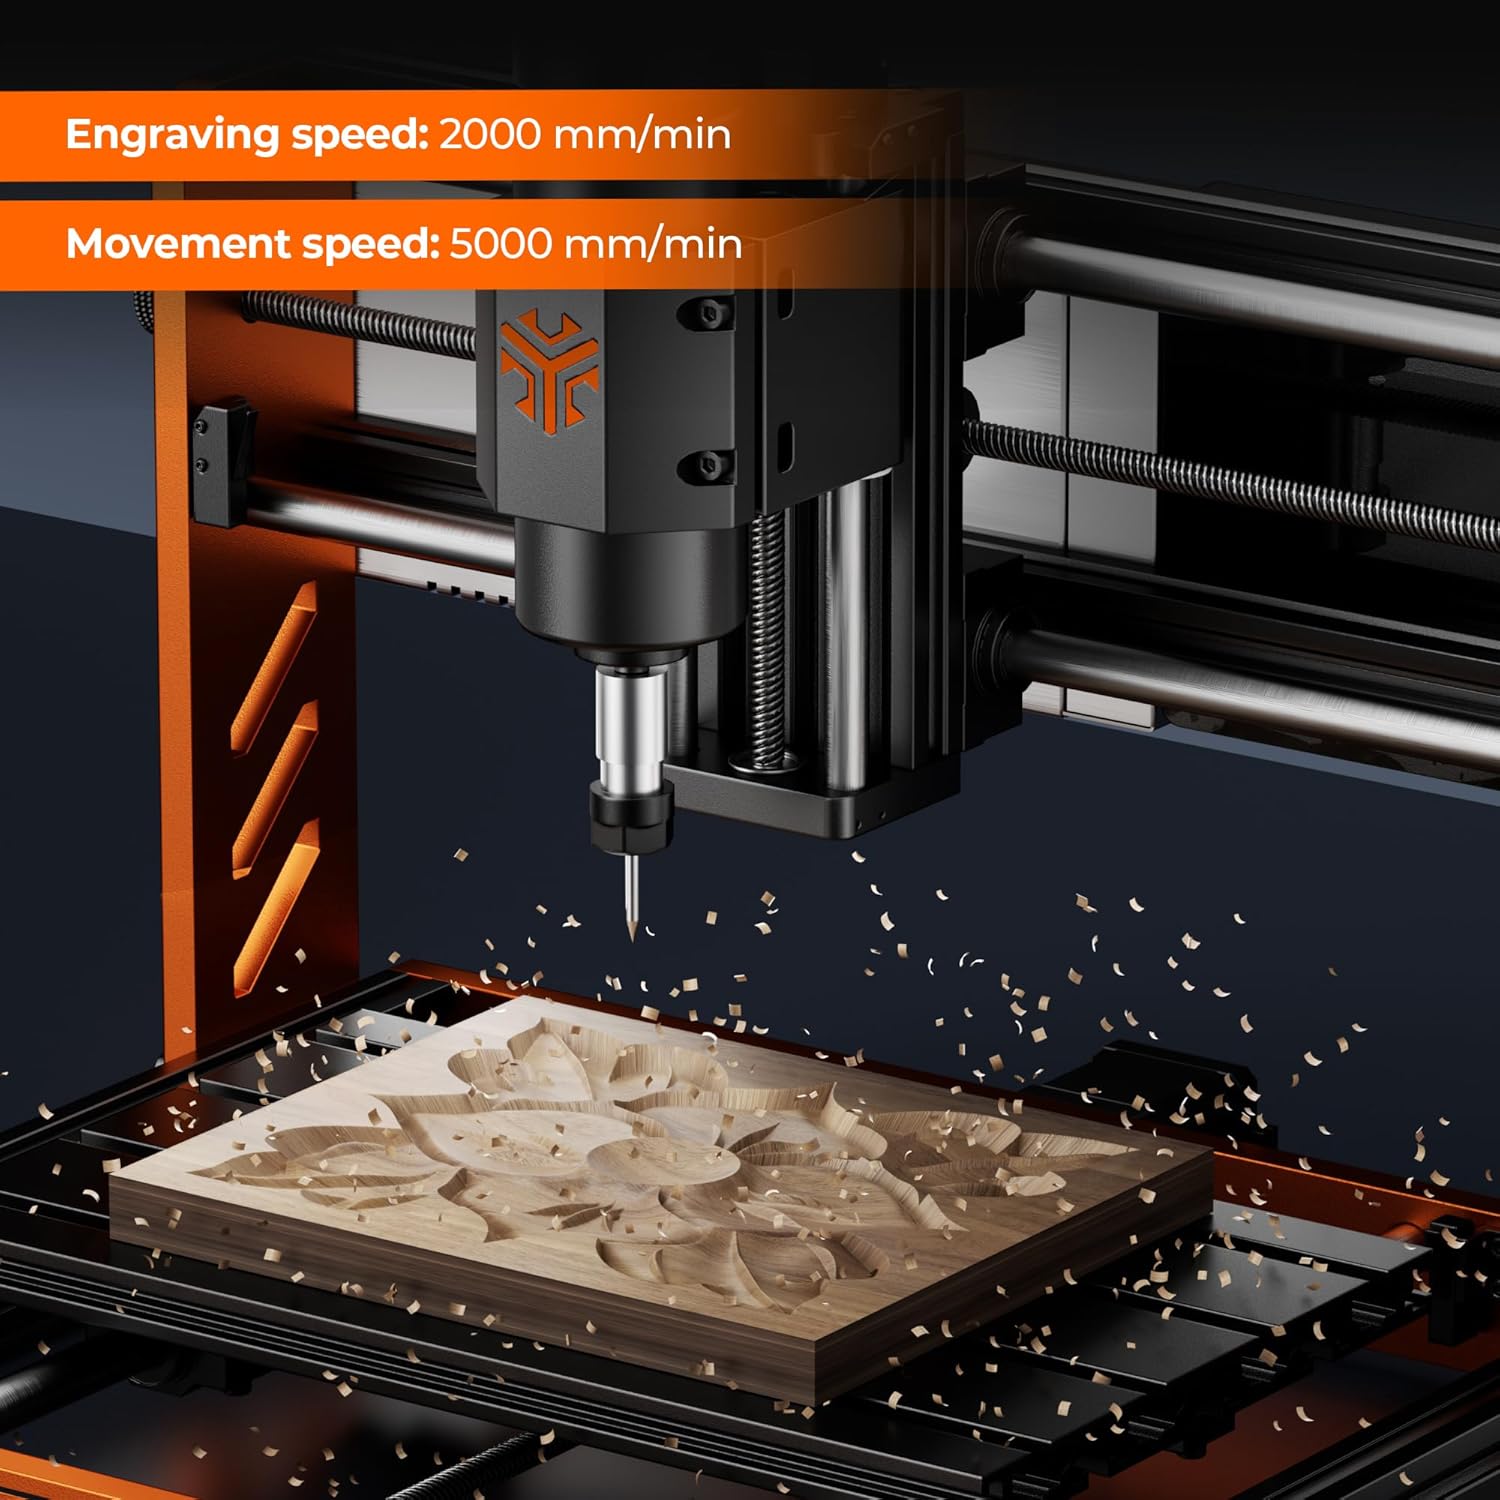
Image 6.3: Engraving in progress, demonstrating operational speeds.
6.1. Recommended Parameters
Refer to the following table for general sculpt and milling parameters. These are starting points and may require adjustment based on specific material properties and desired finish.
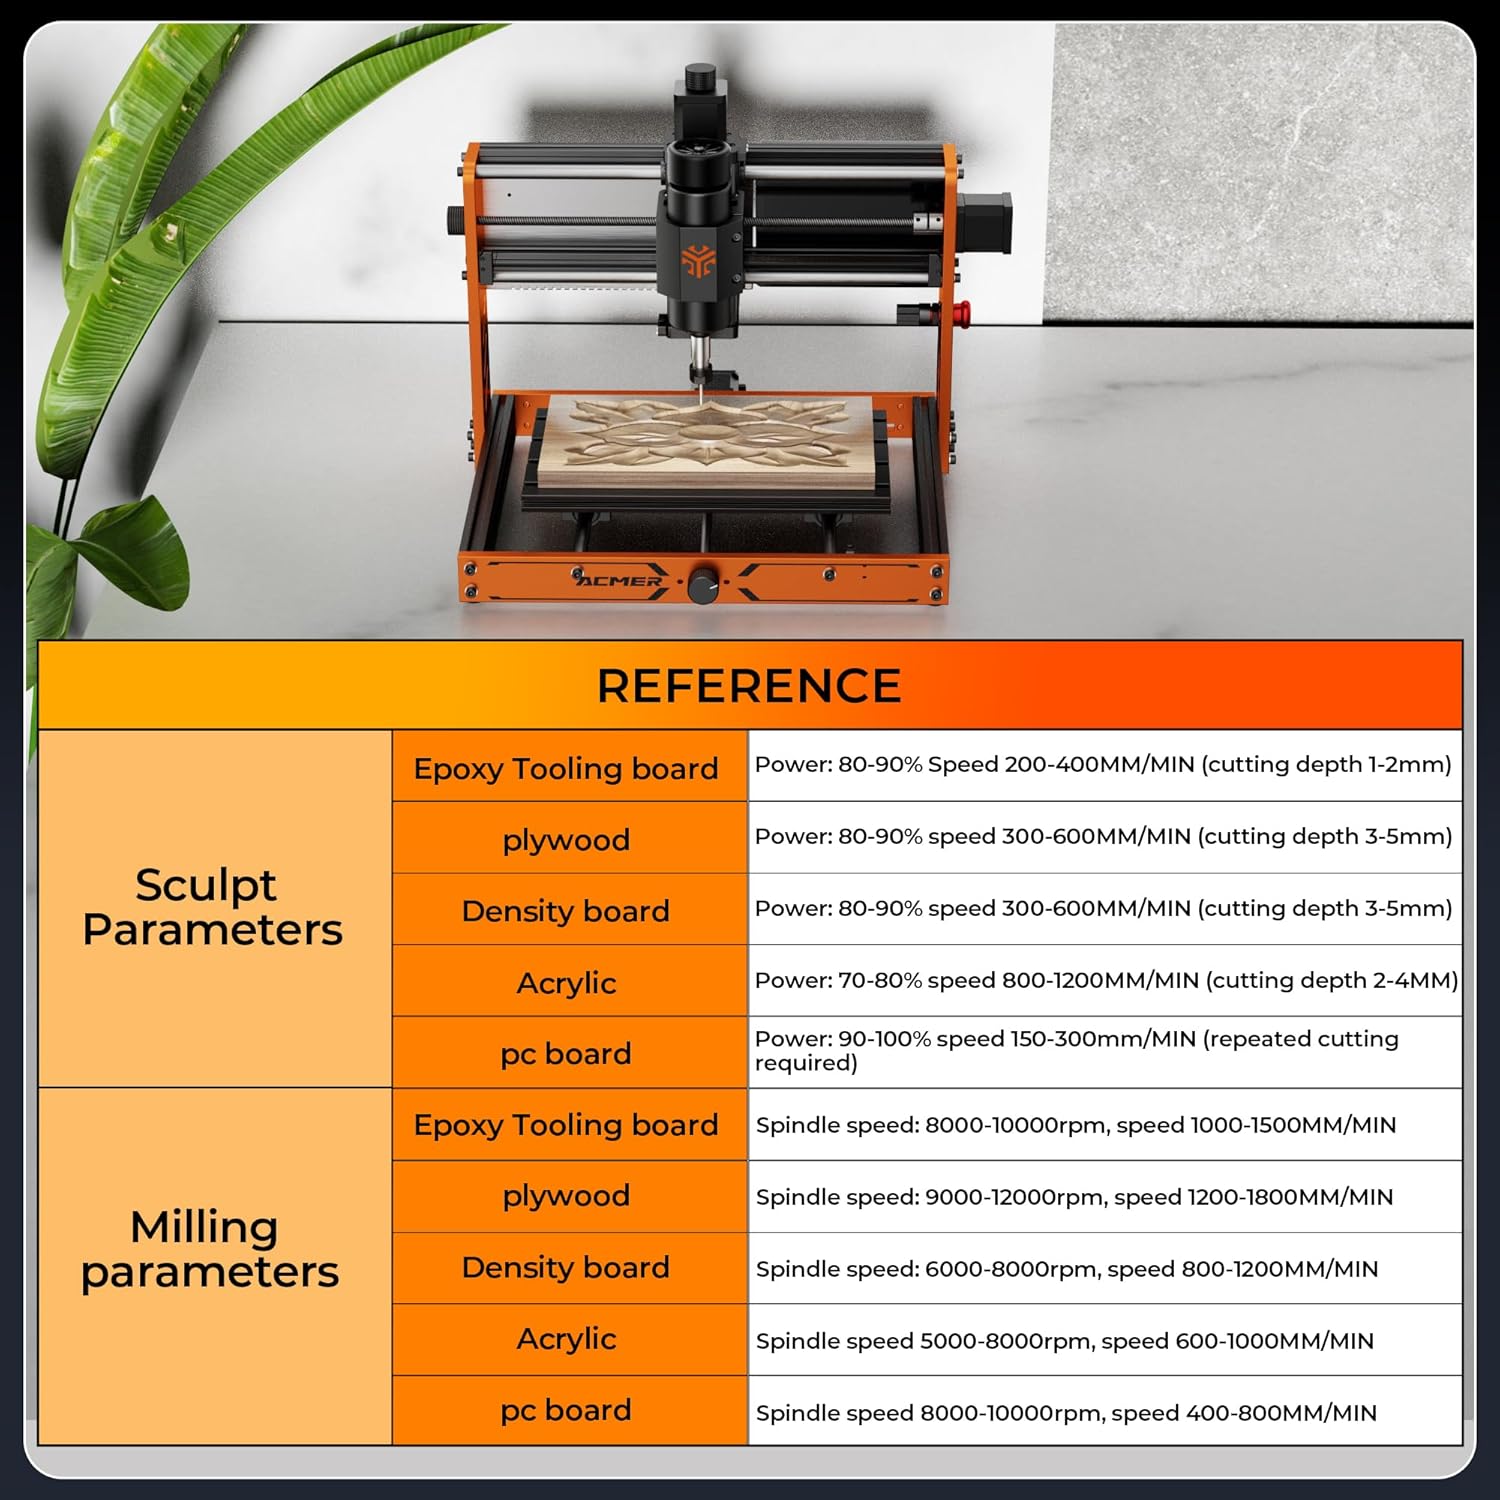
Image 6.4: Reference parameters for various materials.
7. Maintenance
Regular maintenance ensures the longevity and performance of your CNC router.
- Cleaning: After each use, clean the work area, lead screws, and guide rails to remove dust and debris. A brush is included for this purpose.
- Lubrication: Periodically apply a small amount of lubricant to the lead screws and linear bearings to ensure smooth movement.
- Tool Inspection: Regularly inspect engraving knives and milling bits for wear or damage. Replace dull or broken tools to maintain cut quality and prevent machine strain.
- Dust Management: Consider using an optional dust hood (sold separately) to minimize dust accumulation in your workspace and on machine components.
8. Troubleshooting
If you encounter issues, consider the following common troubleshooting steps:
- Machine Not Responding: Check all power connections and USB cable. Ensure the emergency stop button is not engaged. Verify that the correct COM port is selected in your control software.
- Poor Cut Quality: This can be due to dull tools, incorrect cutting parameters (speed, depth), or insufficient material clamping. Adjust parameters, replace tools, and ensure material is secure.
- Motor Stalling: Reduce cutting depth or feed rate. Ensure the spindle motor is running at an appropriate speed for the material.
- Software Connectivity Issues: Restart both the machine and your computer. Reinstall USB drivers if necessary. Ensure no other programs are interfering with the COM port.
- Unusual Noises: Stop the machine immediately. Inspect for loose components, debris on lead screws, or damaged bearings.
The ESP32 control and 6-axis limit switches are designed to enhance stability and safety. If problems persist, consult the ACMER Maker Hub for further assistance.
9. Specifications
| Feature | Specification |
|---|---|
| Manufacturer | ACMER |
| Model Number | CNC-3SLB |
| Product Dimensions | 300 x 300 x 7.8 cm |
| Product Weight | 12.9 kg |
| Material | High-strength aluminum alloy plate, High-strength aluminum profile |
| Power Source | AC_DC (Wired Electric) |
| Spindle Power | 500W |
| Spindle Speed | 0-12000 RPM |
| Work Area (X, Y, Z) | 300 x 180 x 78 mm (11.8 x 7 x 3.07 inches) |
| Engraving Precision | ±0.025 mm |
| Engraving Speed (Max) | 2000 mm/min |
| Movement Speed (Max) | 5000 mm/min |
| Control System | ESP32, GRBL compatible |
| Collet Type | ER11 |
| Operating Systems | Windows, macOS, Linux |
10. Warranty and Support
ACMER provides lifetime support for the Ascarva 3S CNC Router. For exclusive tutorials, firmware updates, and community engagement, join the ACMER Maker Hub. Additionally, a free material cutting database and LightBurn profiles are available to assist with your projects.


