1. Introduction
The RYOBI EXPAND-IT 8-inch Edger Attachment is designed to transform your attachment-capable string trimmer into a dedicated edger. This system allows for efficient and precise edging along sidewalks and driveways. It features a rear wheel for consistent operation and a blade indicator for accurate cuts. The depth of edging can be adjusted up to 2.25 inches. An open guard design helps prevent dirt and debris buildup, ensuring smooth operation. The attachment also includes a spindle lock for convenient blade changes. This edger is compatible with most gas and cordless attachment-capable systems.
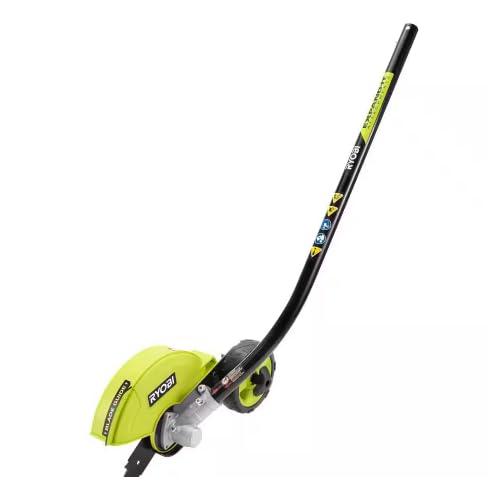
Image 1: The RYOBI Expand-It Universal Straight Shaft Edger Attachment.
2. Safety Information
Always read and understand all instructions before operating the edger attachment. Failure to follow all instructions may result in serious injury. Keep this manual for future reference.
- Wear Appropriate Personal Protective Equipment (PPE): Always wear safety glasses or goggles, hearing protection, heavy-duty gloves, long pants, and sturdy footwear when operating the edger.
- Clear Work Area: Before starting, inspect the work area for objects such as rocks, glass, wire, or other debris that could be thrown or entangled in the blade. Remove any such objects.
- Keep Bystanders Away: Ensure that all bystanders, children, and pets are at least 50 feet (15 meters) away from the operating area.
- Maintain Control: Always maintain a firm grip on the power head handles and keep proper footing and balance.
- Inspect Before Use: Before each use, check the edger attachment for loose fasteners, damaged parts, or worn blades. Do not operate if any damage is found.
- Disconnect Power: Always disconnect the power head from its power source (e.g., remove battery or spark plug wire) before performing any assembly, adjustments, or maintenance.
3. Package Contents
Verify that all items are present and in good condition upon unpacking. If any items are missing or damaged, contact customer service.
- RYOBI Expand-It 8-inch Edger Attachment
- Edger Blade (pre-installed or separate)
- Operator's Manual
4. Setup
4.1 Attaching the Edger to a Power Head
- Ensure the power head is turned off and disconnected from its power source.
- Align the shaft of the edger attachment with the coupler on your power head.
- Push the attachment shaft into the coupler until the locking button on the attachment shaft engages the hole in the coupler.
- Tighten the coupler knob securely to prevent the attachment from rotating during operation.

Image 2: Diagram highlighting key features such as durable steel shaft, depth adjustment, blade indicator, open guard design, rear wheel, and spindle lock.
4.2 Adjusting Edging Depth
The edging depth can be adjusted up to 2.25 inches. Locate the depth adjustment mechanism on the edger head. Loosen the adjustment knob or lever, set the desired depth, and then securely tighten the knob or lever.
5. Operating Instructions
5.1 Starting the Power Head
Refer to your power head's instruction manual for specific starting procedures. Ensure the edger attachment is securely connected before starting.
5.2 Edging Technique
- Position the edger so the blade is aligned with the edge you wish to cut (e.g., sidewalk, driveway). The rear wheel should rest on the hard surface.
- Start the power head and allow it to reach full operating speed.
- Slowly guide the edger along the desired edge. The blade indicator helps maintain accuracy.
- Avoid forcing the edger. Let the blade do the work. If the blade bogs down, reduce your pace.
- Maintain a consistent depth and speed for a clean, precise edge.

Image 3: The RYOBI edger attachment in use, demonstrating its ability to create clean edges along hard surfaces.

Image 4: A close-up view of the edger blade precisely cutting along a lawn edge, highlighting the clean result.
6. Maintenance
Regular maintenance ensures optimal performance and extends the life of your edger attachment. Always disconnect the power head before performing maintenance.
- Cleaning: After each use, clean the edger head, blade, and guard to remove grass clippings, dirt, and debris. The open guard design facilitates this.
- Blade Inspection: Regularly inspect the edger blade for wear, cracks, or damage. A dull or damaged blade can affect performance and safety.
- Blade Replacement: To replace the blade, engage the spindle lock to prevent the blade from turning. Use an appropriate wrench to remove the retaining nut and old blade. Install the new blade, ensuring it is oriented correctly, and tighten the retaining nut securely.
- Storage: Store the edger attachment in a clean, dry area, out of reach of children.
7. Troubleshooting
If you encounter issues with your edger attachment, refer to the following common problems and solutions:
| Problem | Possible Cause | Solution |
|---|---|---|
| Edger not cutting cleanly | Dull or damaged blade; incorrect depth setting; moving too fast | Replace blade; adjust depth; slow down pace |
| Excessive vibration | Damaged or unbalanced blade; loose attachment | Inspect/replace blade; ensure attachment is securely tightened |
| Blade bogs down easily | Cutting too deep; moving too fast; thick material | Reduce depth; slow down; make multiple passes on thick material |
8. Specifications
- Model: RYEDG
- Blade Diameter: 8 inches
- Maximum Edging Depth: 2.25 inches
- Product Dimensions: 22 x 8 x 12 inches
- Item Weight: 5.94 pounds
- Compatibility: Most gas & cordless attachment-capable systems
9. Warranty and Support
For warranty information, please refer to the warranty card included with your product or visit the official RYOBI website. For technical support, replacement parts, or service inquiries, please contact RYOBI customer service through their official channels.
Online Support: www.ryobitools.com


