Feelrogast WHD-WT040
Feelrogast 4 Gallon Electric Tank Water Heater User Manual
Model: WHD-WT040
Brand: Feelrogast
1. Introduction
This manual provides essential information for the safe and efficient installation, operation, and maintenance of your Feelrogast 4 Gallon Electric Tank Water Heater. Please read all instructions carefully before installation and use. Retain this manual for future reference.
The Feelrogast 4 Gallon Electric Tank Water Heater is designed to provide instant hot water for various applications, including kitchens, bathrooms, RVs, campers, and food trucks. Its compact design allows for flexible installation under sinks, counters, or cabinets, or mounted on a wall or floor.
2. Product Overview
Key Features:
- Instant Hot Water: Provides hot water on demand, minimizing your wait time.
- Adjustable Temperature: Modern control panel for manual temperature adjustment from 86-167°F (30-75°C).
- Compact Design: Suitable for under-sink, counter, cabinet, wall, or floor mounting.
- Durable Construction: Features double-layer enamel coating, 0.07-inch medical-grade 316 stainless steel, integrated PU foam insulation, and an impact-resistant outer shell for longevity and thermal efficiency.
- Safety Certified: CE, ROHS, and FCC certified, with high water pressure protection, overheat protection, pressure release valve, and temperature lock.
Package Contents:

Image: Feelrogast 4 Gallon Electric Tank Water Heater and its included accessories, such as the instruction manual, three-way valve, expansion bolts, metal hose, plastic hose, mounting bracket, and safety valve.
- Instruction Manual
- Three-Way Valve
- Expansion Bolts
- Metal Hose
- 1-Meter Plastic Hose (Drain Pipe)
- Mounting Bracket
- Safety Valve
3. Specifications
| Brand | Feelrogast |
| Model Number | WHD-WT040 |
| Capacity | 4 Gallons |
| Voltage | 120 Volts |
| Wattage | 1500 watts |
| Maximum Temperature | 167°F (75°C) |
| Water Connectors | 1/2" NPT |
| Power Cord Length | 44 inches |
| Recommended Breaker | 20-amp |
| Material | Stainless Steel (316 medical-grade) with double-layer enamel coating |
| Certifications | CE, ROHS, FCC |
| Dimensions (4 Gallon) | 13.39" × 11.84" × 14.17" |
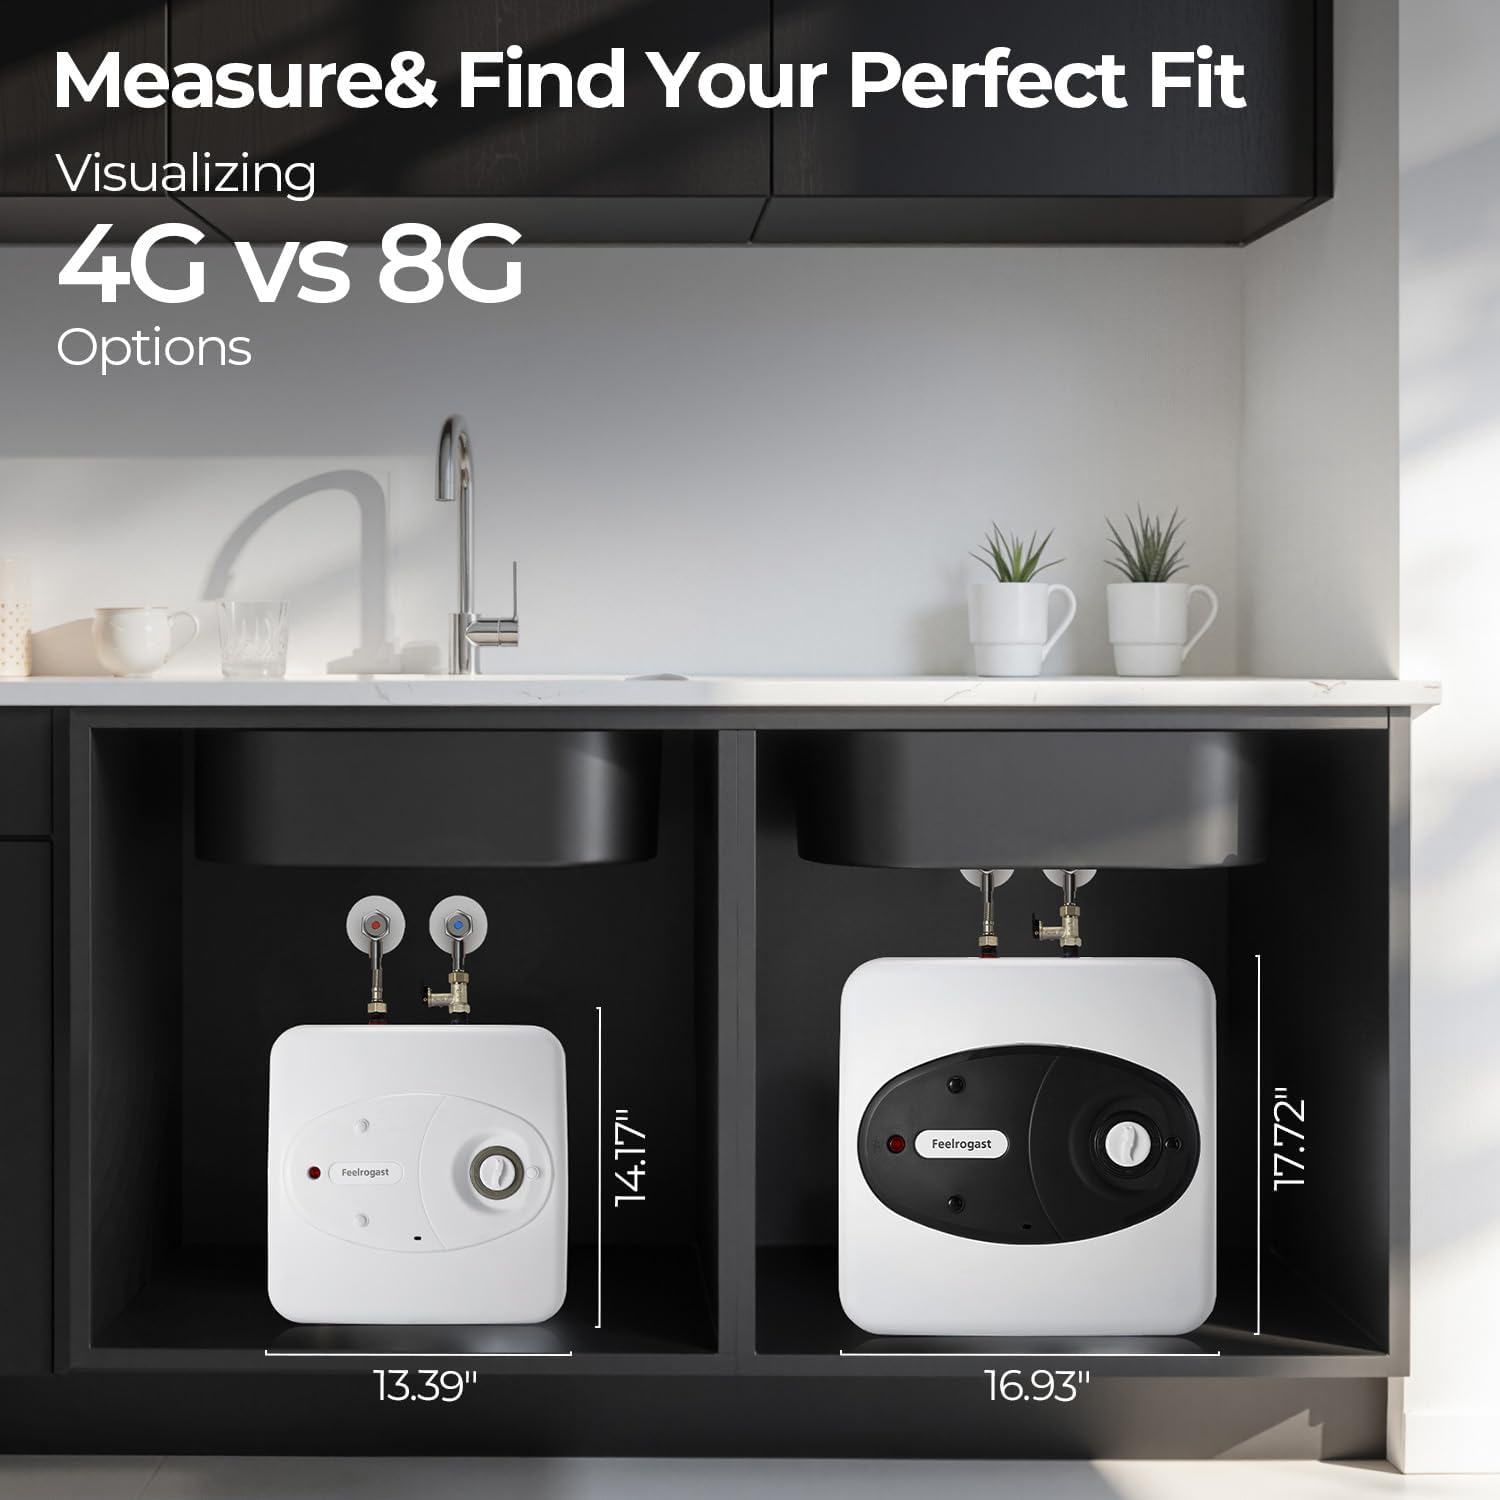
Image: Visual comparison of the 4-gallon and 8-gallon Feelrogast water heater models, showing their respective dimensions for installation planning.
4. Safety Information
Always adhere to local plumbing and electrical codes. Improper installation or maintenance can lead to property damage, injury, or death. If you are unsure about any part of the installation or operation, consult a qualified professional.
Important Safety Precautions:
- Ensure the water heater is completely filled with water before turning on the power to prevent damage to heating elements.
- Install the provided safety valve to prevent excessive pressure buildup. Connect the drain pipe from the safety valve to a suitable drainage point.
- Use a dedicated 20-amp circuit breaker for electrical safety.
- Do not invert, tilt, or lay the unit flat during operation to avoid damage.
- Maintain at least 5 inches of clear space around the unit for proper ventilation and maintenance access.
- Avoid using ordinary patch cords for power connections; use appropriate wiring as per electrical standards.

Image: A family using the sink with the Feelrogast water heater, highlighting its multi-protection features like overheat, leakage, burn dry, pressure release, IPX4 waterproof, and grounding protection.
5. Installation
Mounting Options:
The Feelrogast water heater can be mounted in various locations:
- Under Sink/Counter/Cabinet: Ideal for discreet placement.
- Wall Mounted: Use the provided mounting bracket and expansion bolts. Ensure the wall is load-bearing.
- Floor Mounted: Can be placed directly on the floor in a suitable location.

Image: Examples of the Feelrogast water heater installed in different settings: under a sink, on the floor, and mounted on a wall, demonstrating its versatile placement options.
Plumbing Connections:
- Connect Safety Valve: Twist off the cap from the hot water outlet (red ring). Tighten the provided safety valve onto the hot water outlet.
- Connect Drain Pipe: Insert the clear plastic drain pipe onto the side port of the safety valve. Route this pipe to a suitable drain to relieve pressure and prevent leaks.
- Connect Flexible Conduits: Secure the flexible metal hoses to the water heater's inlet (blue ring) and outlet (red ring, on top of safety valve).
- Connect to Water Supply: Connect the other ends of the flexible hoses to your cold water supply line and the hot water faucet line. The three-way valve can be used for mixing or diverting water if needed.
- Fill Tank: Before plugging in the unit, open the hot water faucet and allow water to flow through the heater until a steady stream comes out of the faucet. This ensures the tank is completely filled and prevents damage to the heating element.
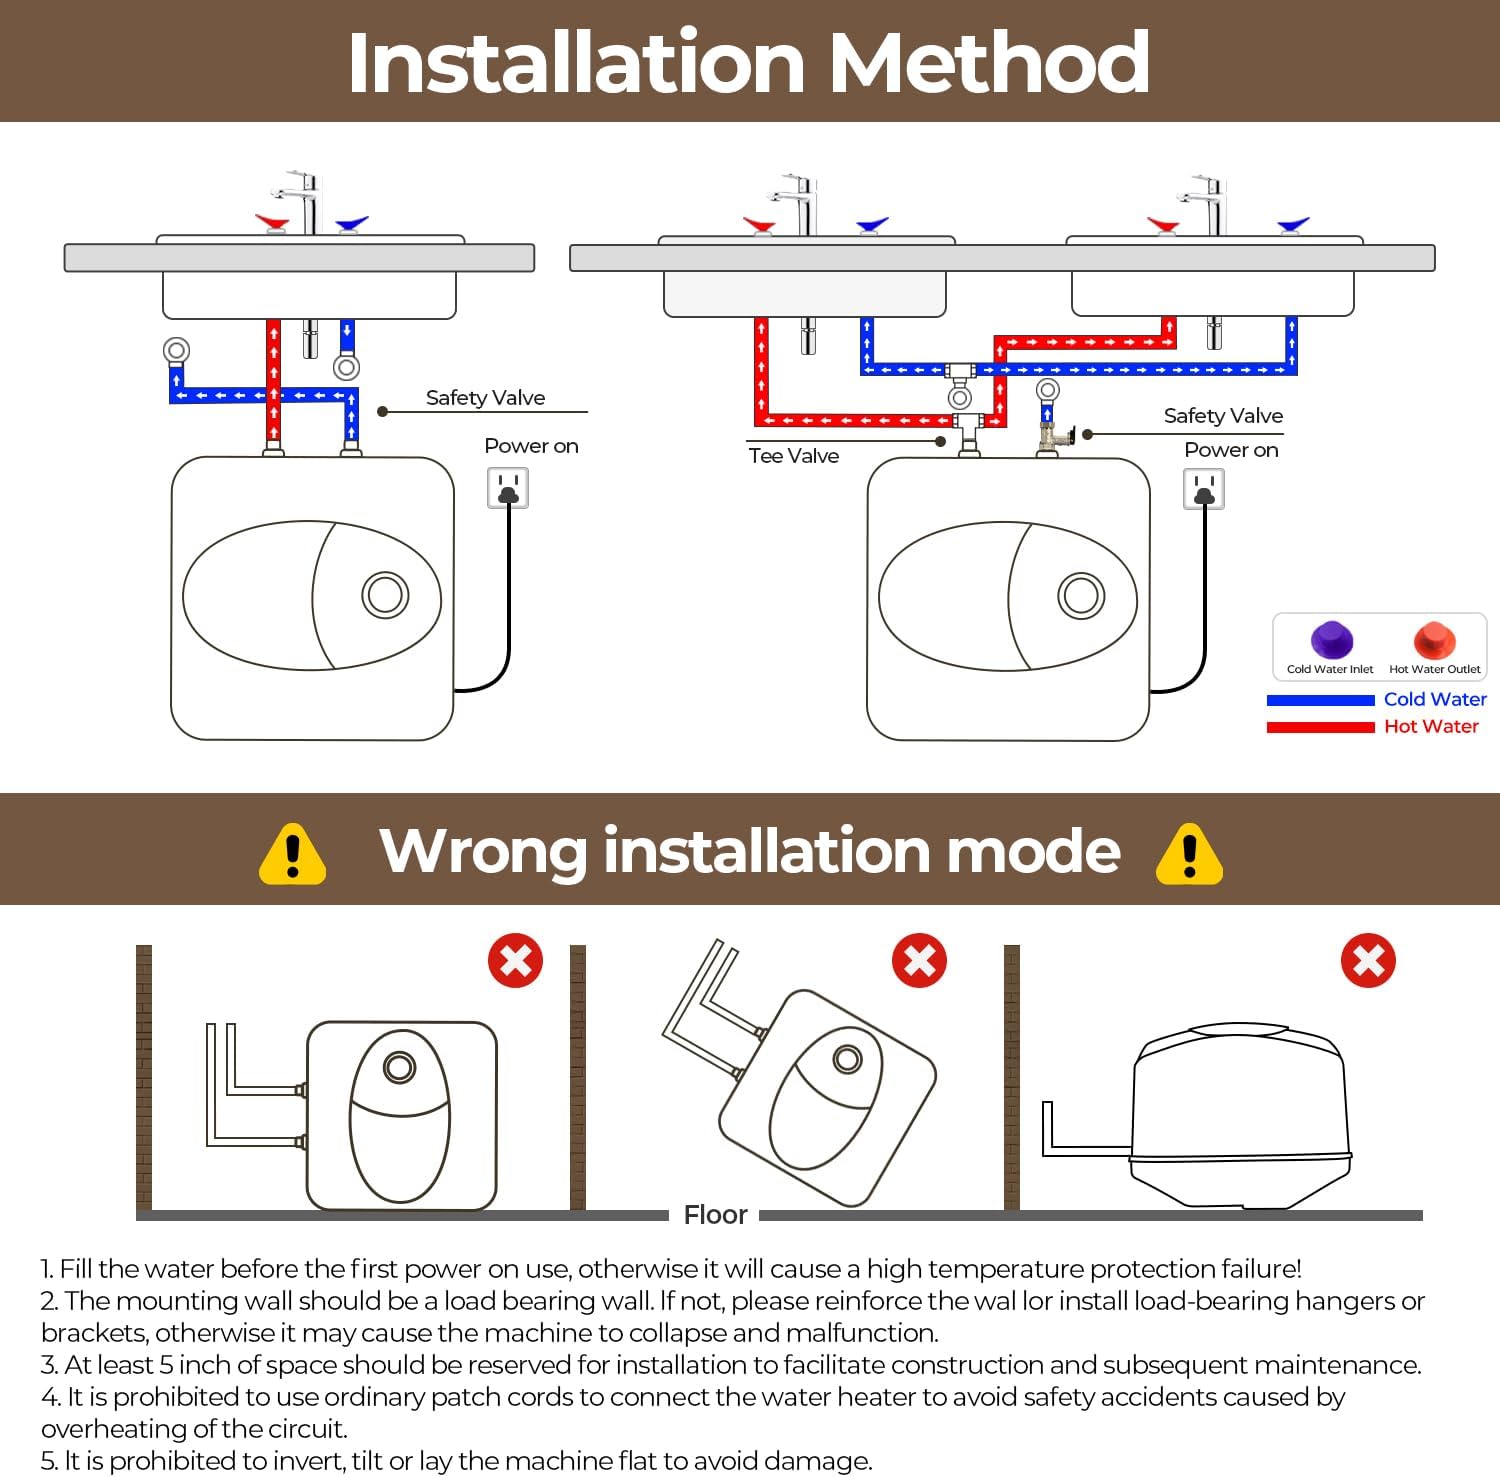
Image: A diagram illustrating correct plumbing connections for the water heater, including the safety valve and drain pipe, along with warnings against incorrect mounting orientations.
Electrical Connection:
- Once the tank is full of water, plug the 44-inch power cord into a standard 110V-120V outlet. Ensure the circuit is protected by a 20-amp breaker.
Video: Official Feelrogast video demonstrating the installation process of the mini tank water heater, including connecting hoses, the safety valve, and plugging in the unit.
6. Operating Instructions
Temperature Adjustment:
The water heater features an intuitive control panel with a knob for temperature adjustment. Rotate the knob to select your desired water temperature, ranging from 86°F to 167°F (30°C to 75°C).

Image: The Feelrogast water heater installed under a kitchen sink, illustrating its ability to maintain a constant water temperature within a narrow fluctuation range.
Indicator Light:
A red indicator light on the unit illuminates when the water heater is actively heating water. It will turn off once the set temperature is reached.
7. Maintenance
Regular Cleaning:
- Periodically wipe the exterior of the unit with a soft, damp cloth. Do not use abrasive cleaners or solvents.
Draining the Tank:
- If the unit will be unused for an extended period or if there is a risk of freezing, drain the tank. Turn off the power, close the cold water supply valve, and open the hot water faucet to relieve pressure. Then, open the drain valve on the safety valve to empty the tank.
8. Troubleshooting
| Problem | Possible Cause | Solution |
|---|---|---|
| No hot water | No power; heating element failure; thermostat issue | Check power connection and circuit breaker. Ensure tank is full. Contact customer support if issues persist. |
| Water not hot enough | Temperature setting too low; excessive hot water demand | Adjust thermostat to a higher setting. Allow time for water to heat. Reduce simultaneous hot water usage. |
| Water leaking from safety valve | Normal pressure relief; excessive water pressure | A small amount of dripping is normal during heating. If excessive, check incoming water pressure or consult a plumber. |
| Unit not turning on | No power; unit not filled with water | Verify power connection and ensure the tank is completely filled with water before plugging in. |
9. Warranty and Support
For specific warranty details and customer support, please refer to the warranty card included with your product or visit the official Feelrogast website. Keep your purchase receipt as proof of purchase.
Contact Information:
- Brand Store: Feelrogast Official Store
Ask a question about this manual
Ask about setup, troubleshooting, compatibility, parts, safety, or missing instructions. Manuals+ will review the question and use this page’s manual context to help answer it.