Introduction
This instruction manual provides detailed guidance for the safe and correct assembly, operation, and maintenance of your WACASA 12x10 FT Heavy-Duty Metal Shed. Please read all instructions carefully before beginning assembly and retain this manual for future reference. This shed is designed for robust outdoor storage, featuring a military-grade 20-gauge reinforced frame and 30-gauge panels, rated for 50 PSF snow load and 120+ MPH winds when properly anchored.
Safety Information
WARNING: Failure to follow these safety instructions may result in serious injury or property damage.
- Anchoring is Critical: To achieve the rated 120 MPH wind resistance, this shed must be permanently anchored. Use the included bolts for concrete foundations, deck screws for wooden decks, or 30-36 inch auger anchors (not included) for soft ground (dirt, soil, gravel). Proper anchoring to a solid base is essential to prevent storm damage.
- Wear Protective Gear: Metal components can have sharp edges. Always wear appropriate protective gloves during assembly to prevent cuts and injuries.
- Foundation Requirements: For maximum stability, a concrete foundation is strongly recommended. If installing on soft ground, heavy-duty auger anchors (30-36 inches recommended) are required to ensure a firm and secure hold below the frost line.
- Team Assembly: Assembly requires 3-4 adults and is estimated to take 5-8 hours. Do not attempt to assemble alone.
- Check for Level Surface: Ensure the foundation is perfectly level before starting assembly. An unlevel base can lead to alignment issues and structural instability.
- Do Not Overtighten Screws Prematurely: During initial assembly steps, do not fully tighten all screws until instructed. This allows for minor adjustments to ensure proper alignment of panels and frame components.
Package Contents
Your WACASA Metal Shed is delivered in 3 separate heavy boxes, which may arrive on different days. Please verify all boxes have been received before beginning assembly.
- Multiple Boxes: The shed components are distributed across three distinct packages.
- Individual Parts Lists: Each box contains its own parts list. Refer to these lists to identify components within each package.
- Assembly Instructions: A comprehensive manual and step-by-step video guide are provided.
- Hardware: All necessary hardware, including screws and washers, is included. Gloves are also provided for safety during assembly.
Note: It is crucial to keep the parts list from each box to ensure you know which components are in which package.
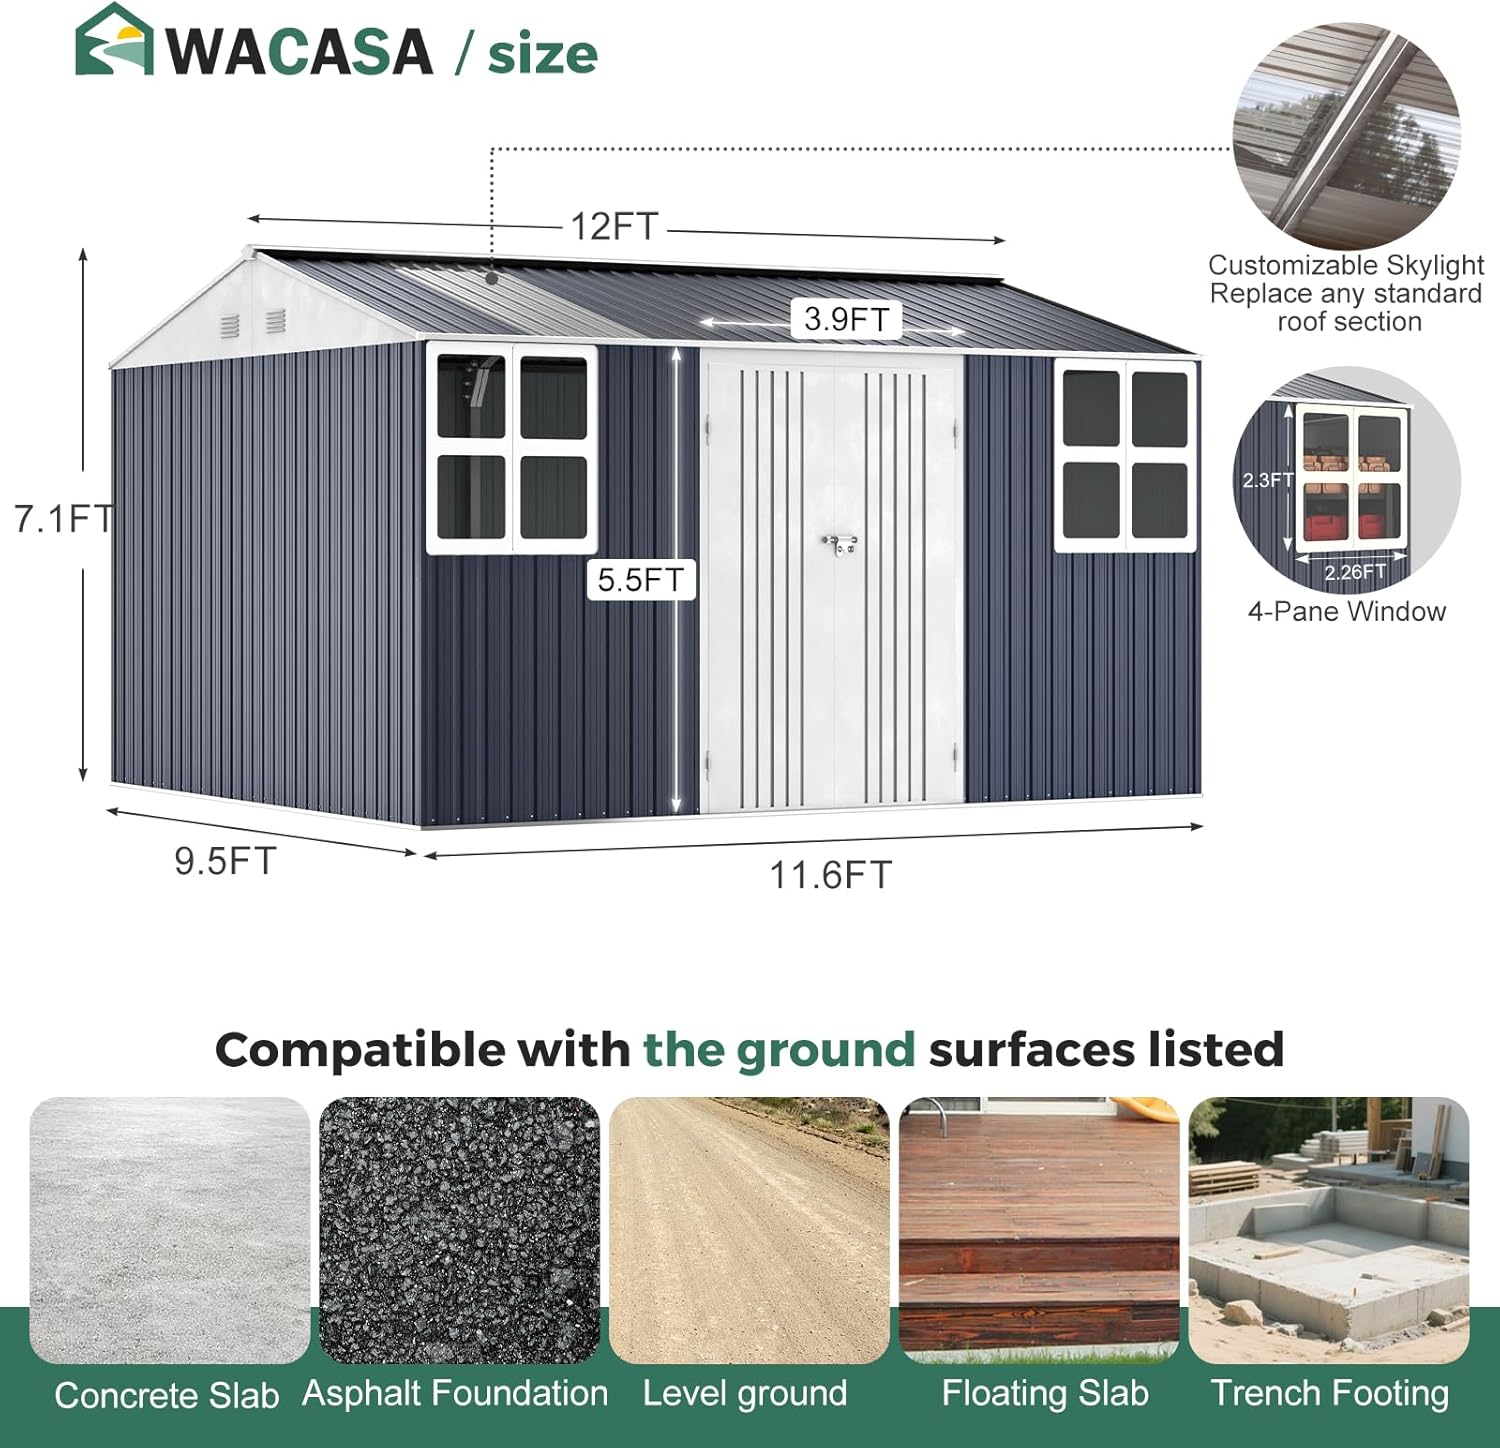
Image: The WACASA 12x10 FT Metal Shed is shipped in three separate boxes.
Setup and Assembly
The assembly of your WACASA Metal Shed is designed as a team DIY project, ideally requiring 3-4 adults and an estimated 5-8 hours. Follow the steps below and refer to the provided videos for visual guidance.
1. Foundation Preparation
A level and stable foundation is crucial for the shed's structural integrity and longevity. Ensure your chosen site is clear of debris and perfectly level. For maximum stability, a concrete slab is recommended. If using a soft ground surface, ensure proper anchoring with heavy-duty auger anchors (not included).
Image: Shed dimensions and recommended foundation types.
For detailed floor installation, refer to the "3D Floor Step-by-Step Install Demo (Universal)" video.
Video: A 3D animated guide demonstrating the step-by-step installation of the shed floor frame. This video is universal for various shed sizes.
2. Base Frame Assembly
- Unpack all components for the base frame. Refer to the parts list in Box 1.
- Lay out the base rails (e.g., A1, A2, A3, A4, A5, A6, A7, J1) on your prepared level surface according to the manual's diagram.
- Connect the corner pieces (J4) to form the rectangular base. Secure with H1 screws and T1 washers, but do not fully tighten yet.
- Measure the diagonals (d1 and d2) to ensure the base is perfectly square (d1 = d2). Adjust as needed before tightening all screws.
Video: A detailed assembly instruction video for a 10x12ft metal shed, demonstrating various steps including base frame construction.
3. Wall Panel Installation
- Begin attaching the lower wall panels (E, E1, E2) to the base frame. Ensure the panels are correctly oriented as per the manual.
- Secure panels using H1 screws and T1 washers. Do not tighten the outermost two screws at this step to allow for panel adjustments.
- Install the horizontal support bars (F3, F4, F5, F6) between the wall panels.
- Continue adding upper wall panels (E2, E3) and secure them.
- Install the vertical corner supports (S4, S5) and secure them to the panels and base.
- Once all wall panels are in place, ensure they are aligned and then fully tighten all screws.

Image: Interior view highlighting the reinforced frame structure.

Image: Close-up of enhanced corner and frame structures.
4. Roof Assembly
- Assemble the triangular panels (K1, K2, K3, K4, K5, K6, K7, B1, B2, G) for the front and rear gables, including the vents.
- Attach the triangular panels to the top frame of the shed.
- Install the middle beams (L1) and side rails (L2, L3) for the roof structure. Ensure all mounting holes face upward.
- Place the roof panels (Q1, Q2, Q3) onto the frame, starting from one side and overlapping correctly. Secure with H1 screws and T1 washers.
- Install the ridge caps (N1, N2, N3) and corner trims (M1, M2, M3, M4) to complete the roof.
Video: A product video showcasing the 12x10 FT shed, including interior views and roof details.
Video: A 3D display video of a 10x12 metal shed, illustrating the assembly process for the roof and other components.
5. Door Installation
- Assemble the door panels (D1, D2, D3, D4) and attach the internal cross braces (D7).
- Install the door hinges (R1) to the door frame and the shed structure using H4 screws.
- Attach the door latch (R2, R3) and the internal spring bolt (R4) mechanisms to the doors.
- Hang the assembled doors onto the hinges, ensuring smooth operation.

Image: The shed with wide-opening double doors.
Operating Instructions
Door Access
The shed features wide, lockable double doors for easy access. To open, disengage the latch mechanism. To secure, close both doors and engage the latch. A padlock (not included) can be added for enhanced security.
Ventilation
Dual integrated vents are located at the top of the front and rear gables. These vents are designed to actively reduce heat and moisture buildup inside the shed, promoting air circulation and protecting stored items.
Natural Lighting
The shed includes shatter-resistant acrylic windows and customizable skylight panels in the roof. These features allow ample natural light into the interior, reducing the need for artificial lighting during the day.
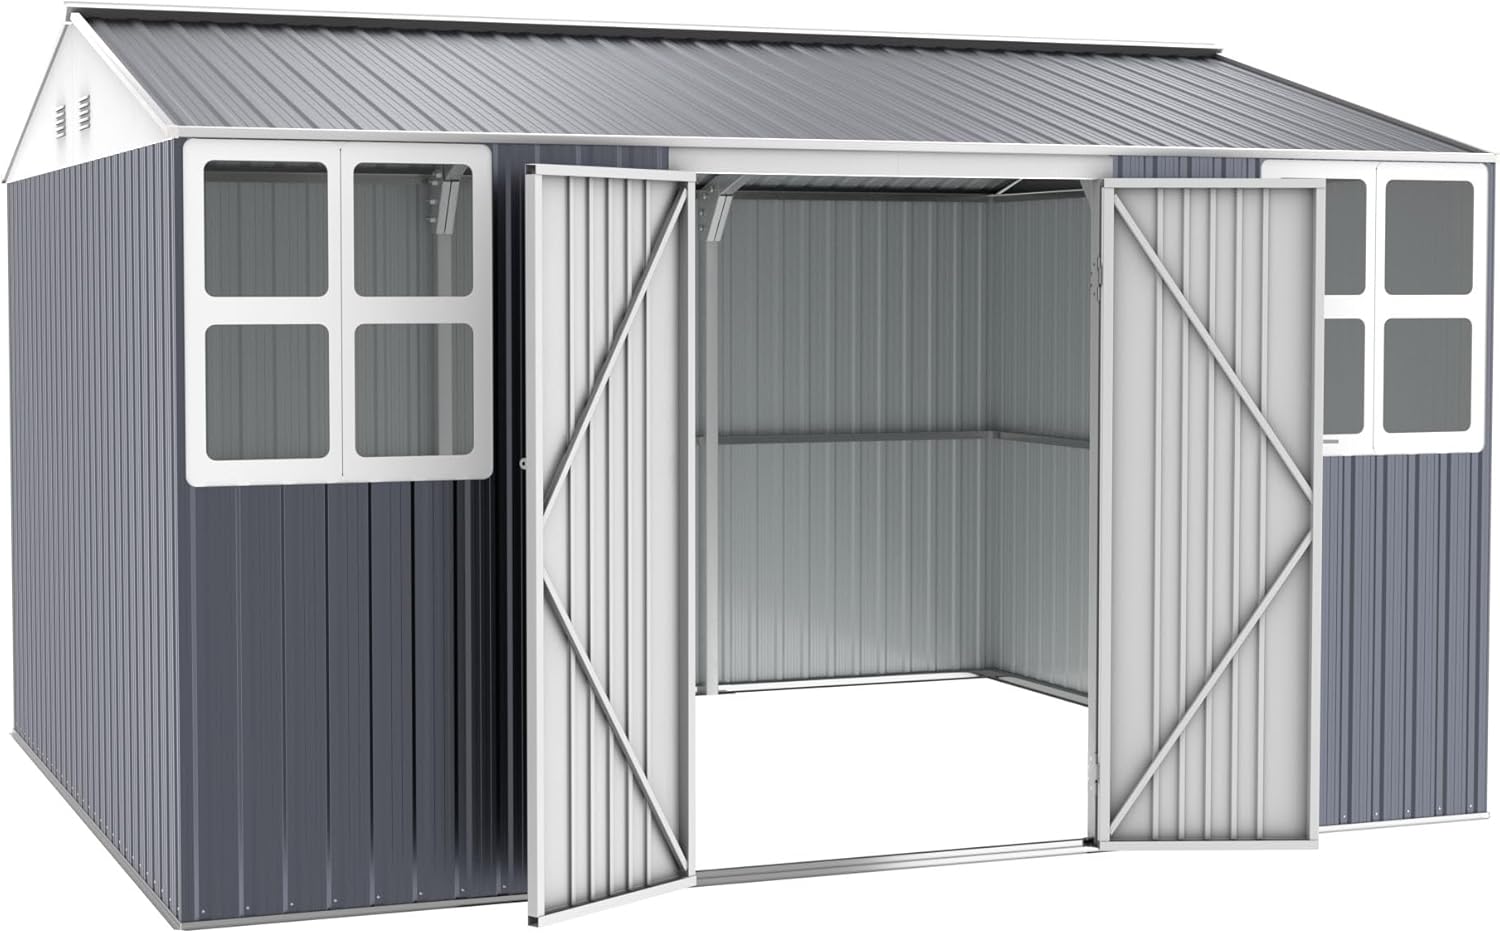
Image: Interior view of the shed with natural light from windows and skylights.
Maintenance
Rust Protection
The shed's multi-layer powder-coated frame provides an impenetrable shield against salt spray, acid rain, and scratches, extending its rust-free life to 5-10 years. Regularly inspect the shed for any signs of damage to the coating and touch up as needed to maintain protection.
General Cleaning
Clean the exterior of the shed periodically with mild soap and water. Avoid abrasive cleaners or harsh chemicals that could damage the finish. Ensure vents are clear of debris to maintain proper airflow.
Anchoring Inspection
Periodically check the anchoring points to ensure they remain secure, especially after severe weather conditions. Re-tighten or reinforce anchors if any loosening is detected.