1. Introduction
This manual provides detailed instructions for the installation, operation, and maintenance of your CREECHWA Smart 3/4" Ball Water Valve. Please read this manual thoroughly before installation and use to ensure proper function and safety. Keep this manual for future reference.
2. Safety Information
- Ensure the power supply is disconnected before any installation or maintenance.
- This device is designed for use with water systems. Do not use with other liquids or gases without consulting a professional.
- The product is not waterproof. When installing outdoors, ensure it is protected from direct exposure to water and harsh weather conditions.
- Installation should be performed by a qualified individual if you are unsure about plumbing or electrical connections.
- Only use the provided power adapter.
3. Package Contents
Verify that all items are present in the package:
- CREECHWA Smart Ball Water Valve (DN20-3/4")
- Power Adapter
- User Manual (this document)
4. Product Features
- Smart App Control: Manage water flow remotely via a dedicated mobile application.
- 4 Customizable Timer Modes: Automate water supply with preset modes for various applications (e.g., irrigation, home use).
- 2.4 GHz Wi-Fi Connectivity: Stable wireless control. Note: 5 GHz Wi-Fi is not supported.
- High-Quality Brass Construction: Ensures durability, corrosion resistance, and long-lasting performance.
- Energy-Efficient: Designed for optimal water flow control with minimal energy consumption.
- Easy Installation and Setup: User-friendly design for quick and hassle-free installation.
5. Product Diagram and Components
Familiarize yourself with the components of your Smart Water Valve.

Figure 1: Overview of the Smart Water Valve, including the control unit, brass valve body, power cable, and a representation of the mobile app interface.

Figure 2: Detailed views highlighting the pure brass inlet, pure brass outlet, and the electric ball valve mechanism, which closes and opens in approximately 4 seconds.
6. Installation Guide
6.1 Pre-installation Checks
- Wi-Fi Network: Ensure you have a stable 2.4 GHz Wi-Fi network available at the installation location. The device does not support 5 GHz Wi-Fi.
- Pipe Diameter: Verify your pipe diameter matches the valve size (DN20-3/4").
- Power Outlet: A standard power outlet must be accessible near the installation point for the power adapter.
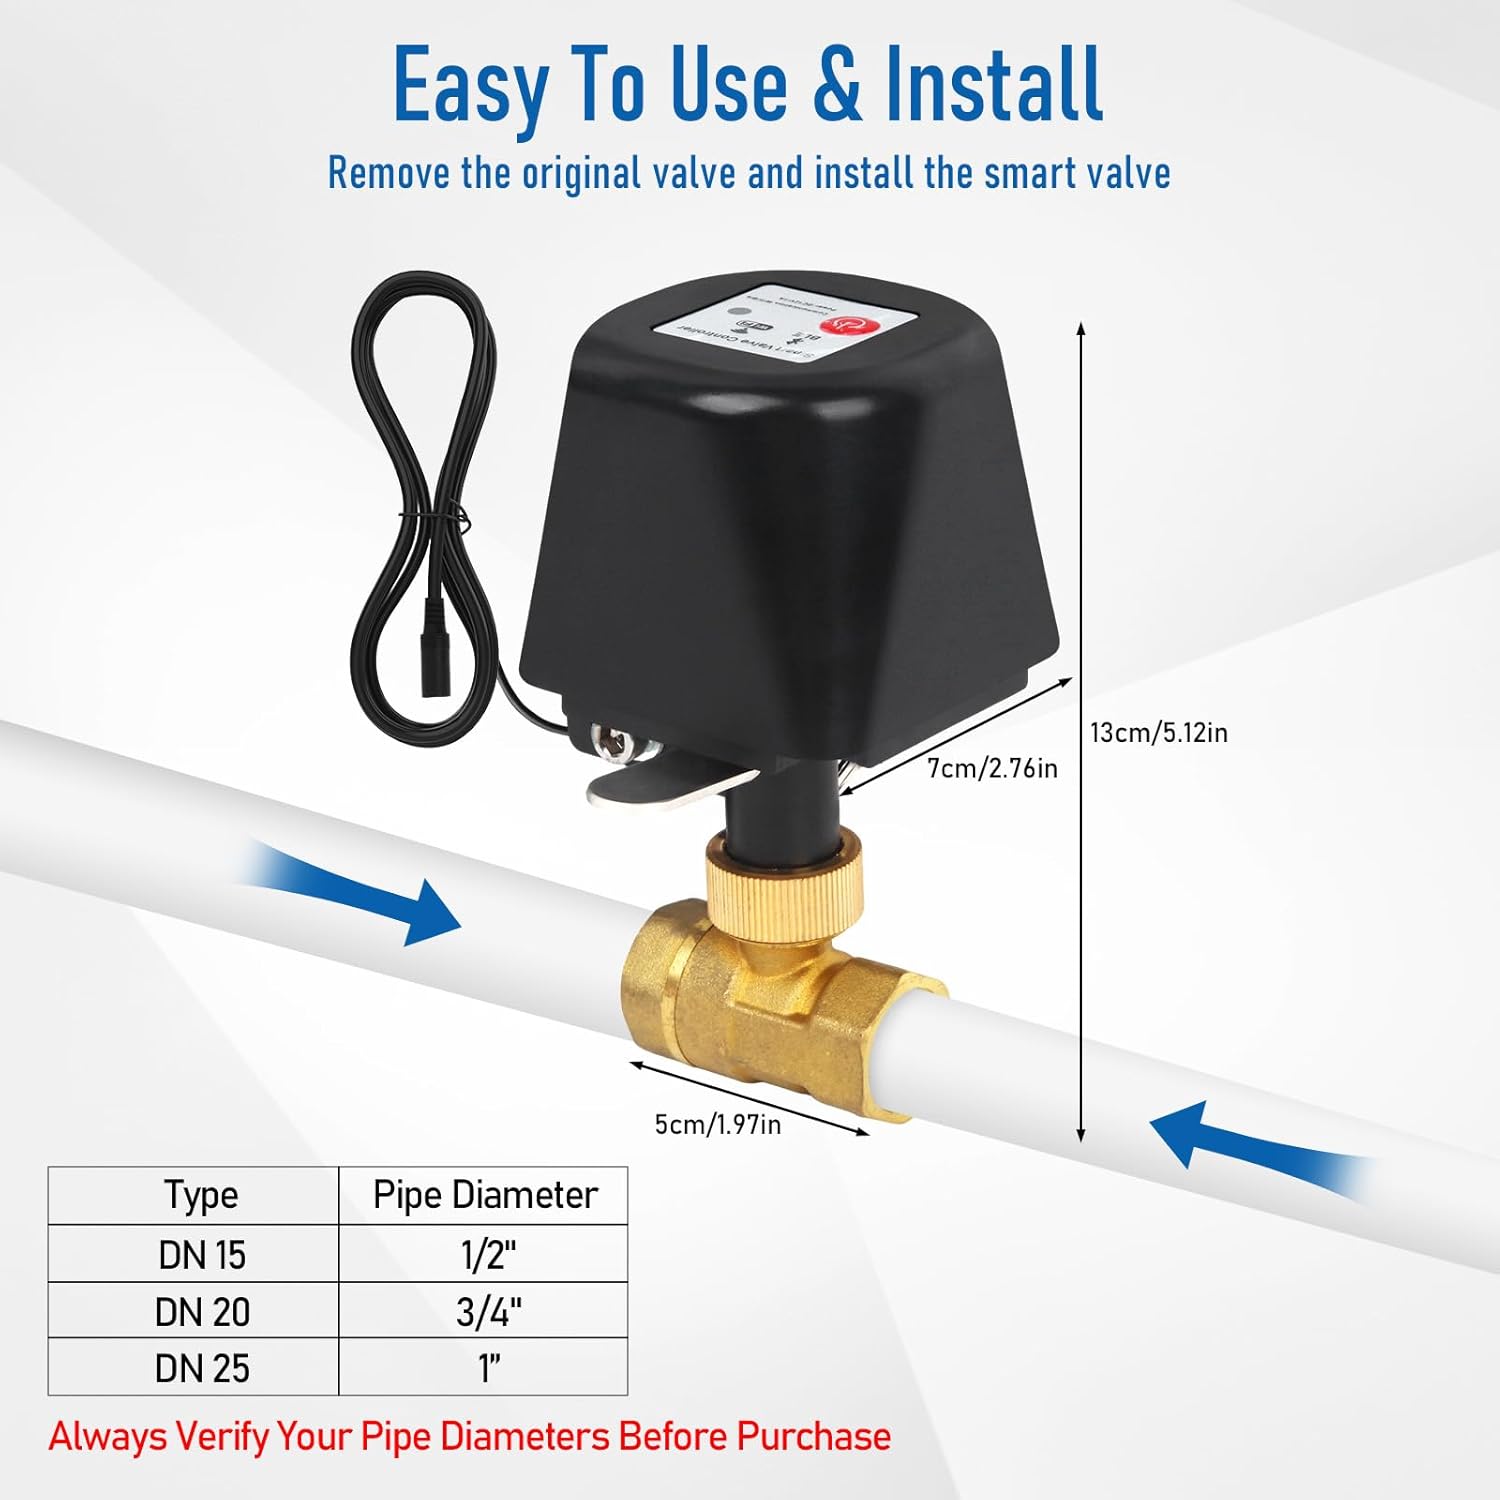
Figure 3: Valve dimensions and a compatibility chart for different pipe diameters. Always confirm your pipe size before installation.
6.2 Mechanical Installation
- Turn off the main water supply to prevent leaks during installation.
- Drain any remaining water from the pipes.
- Remove the existing valve (if applicable) or prepare the pipe section where the smart valve will be installed.
- Apply plumber's tape or sealant to the threads of the pipe connections.
- Carefully screw the Smart Water Valve onto the pipes, ensuring a tight, leak-free seal. Do not overtighten.
- Ensure the valve is installed in a location protected from direct water exposure if used outdoors.
6.3 Electrical Connection
- Connect the power adapter to the valve's power input port.
- Plug the power adapter into a standard electrical outlet.
- Once powered, the valve will enter pairing mode (indicated by a flashing LED).
7. App Setup and Pairing
The CREECHWA Smart Water Valve uses the Smart Life or Tuya Smart app for remote control and automation.
- Download the App: Search for "Smart Life" or "Tuya Smart" in your smartphone's app store (iOS or Android) and install it.
- Register/Log In: Open the app and register for a new account or log in if you already have one.
- Add Device: Tap the "+" icon in the top right corner of the app to add a new device.
- Select Device Type: Choose "Water Valve" or search for it in the device list.
- Confirm Pairing Mode: Ensure the valve's LED indicator is flashing rapidly. If not, press and hold the manual control button on the valve for 5 seconds until it flashes.
- Connect to Wi-Fi: Enter your 2.4 GHz Wi-Fi network name and password when prompted by the app.
- Pairing: The app will search for and connect to the valve. Once connected, you can rename the device for easy identification.

Figure 4: The mobile application interface for controlling the smart valve, demonstrating remote access.
8. Operating the Smart Valve
8.1 Remote App Control
Once paired, you can control the valve from anywhere using the Smart Life/Tuya Smart app.
- Open the app and select your Smart Water Valve.
- Tap the "Open" or "Close" button to control the water flow.

Figure 5: Remote control functionality, illustrating how the valve can be managed from any location via the app, provided a 2.4 GHz Wi-Fi connection is available.
8.2 Customizable Timer Modes
The app offers four timer modes for automated water management:
- Countdown: Set a specific duration for the valve to remain open or closed.
- Schedule: Program specific times and days for the valve to open or close automatically.
- Circulate: Set repeating cycles of open and close durations.
- Random: Introduce randomness to scheduled operations for security or specific irrigation needs.

Figure 6: The app's timer and scheduling interface, allowing users to automate valve operations.
8.3 Manual Control
The valve can also be operated manually:
- Press the physical button on the top of the valve's control unit to toggle its state (open/close).
- An emergency release ring underneath the control unit allows for manual operation if needed.
8.4 Voice Control
Integrate your Smart Water Valve with voice assistants like Amazon Alexa or Google Home for convenient voice commands.
- Follow the instructions within the Smart Life/Tuya Smart app to link your account with Alexa or Google Home.
- Once linked, you can use commands such as "Alexa, turn on the water valve" or "Hey Google, close the water valve."
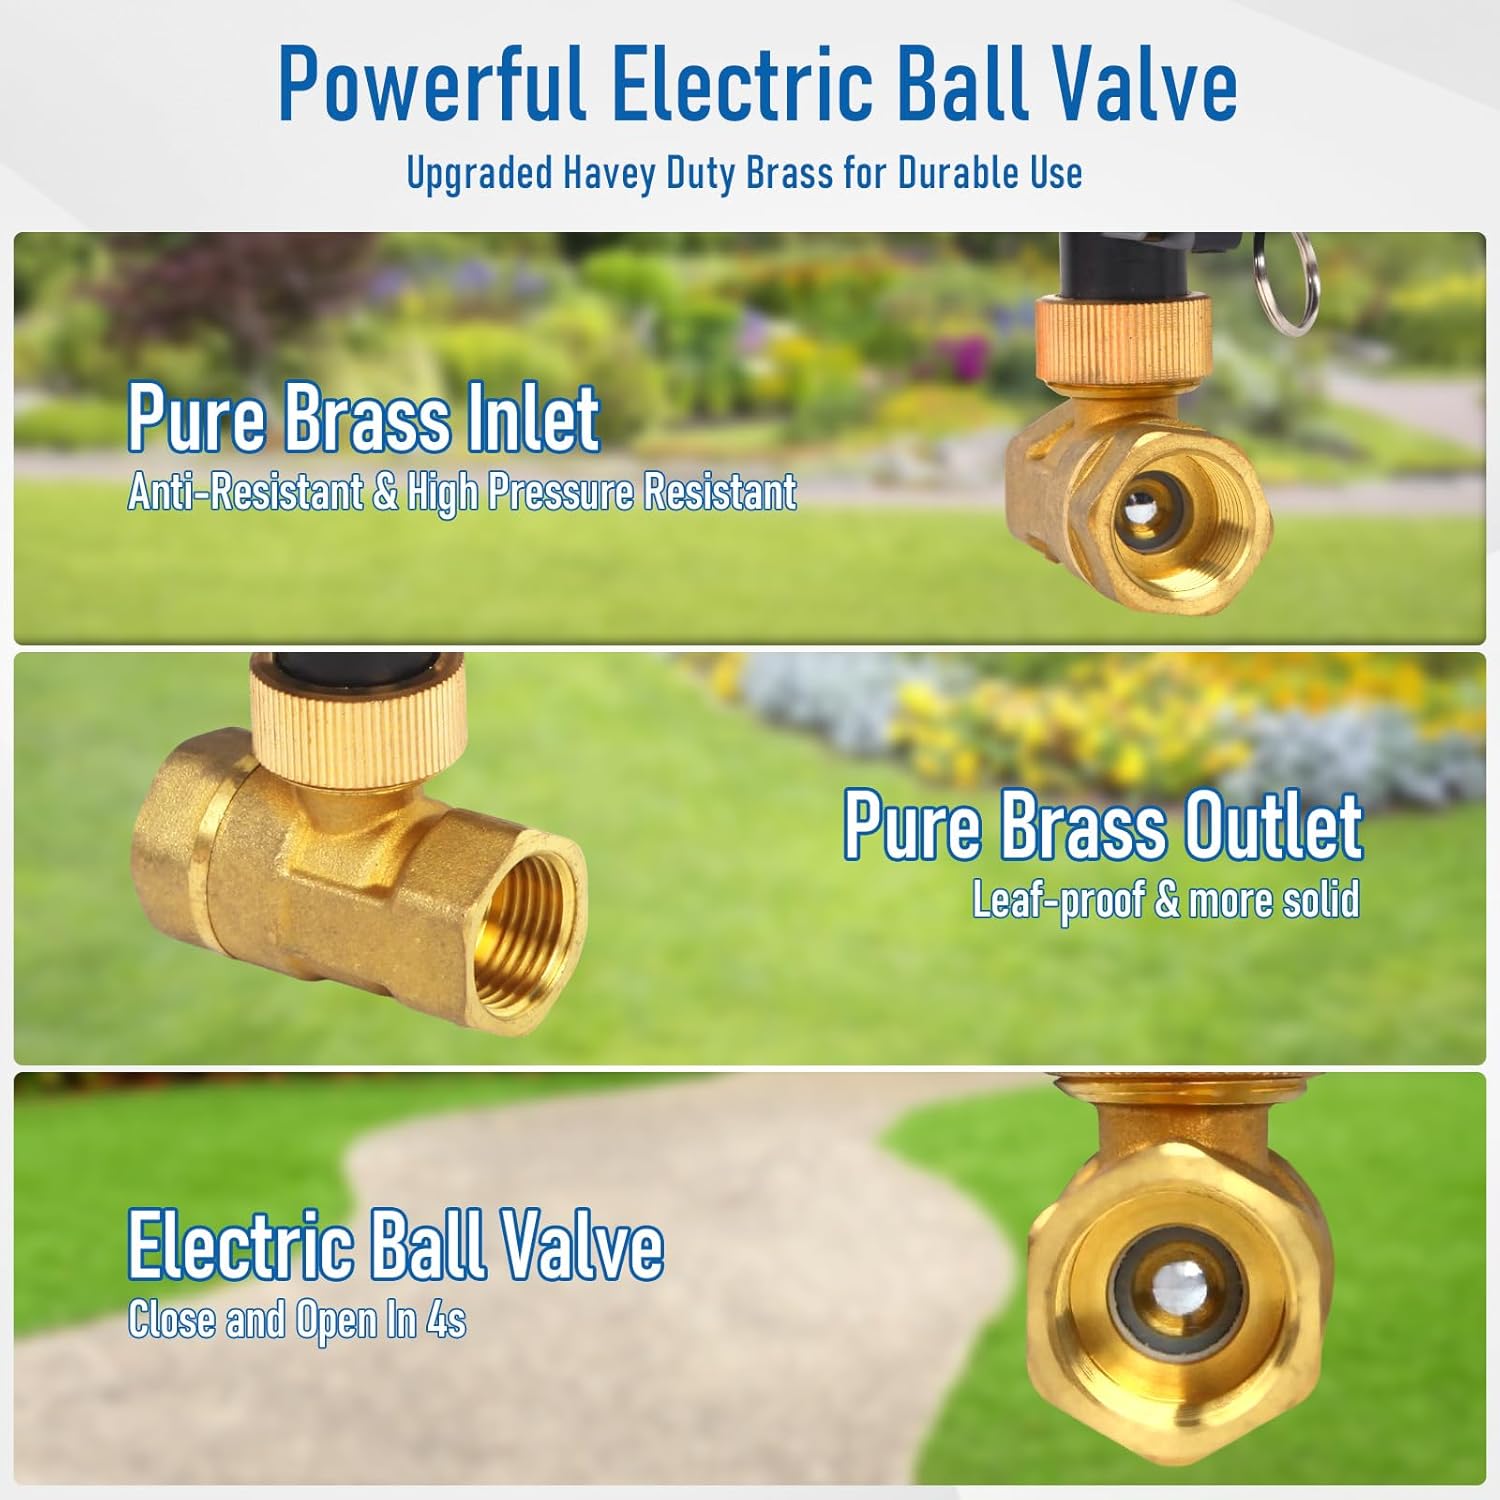
Figure 7: Voice control integration with popular smart home platforms.
9. Maintenance
- Regularly inspect the valve and pipe connections for any signs of leaks.
- Keep the control unit clean and free from dust and debris. Use a dry cloth for cleaning.
- Ensure the power adapter and cable are not damaged.
10. Troubleshooting
10.1 Valve Not Responding
- Check Power: Ensure the valve is properly connected to power and the outlet is functional.
- Wi-Fi Connection: Verify your Wi-Fi network is active and the valve is within range of your 2.4 GHz router.
- App Status: Check the app to see if the device is online. Try restarting the app.
- Manual Operation: Attempt to operate the valve manually using the button on the control unit.
10.2 Unable to Connect to Wi-Fi
- 2.4 GHz Only: Confirm your router is broadcasting a 2.4 GHz Wi-Fi signal and your phone is connected to it during pairing. The valve does not support 5 GHz networks.
- Wi-Fi Password: Double-check that you are entering the correct Wi-Fi password.
- Router Distance: Move the valve closer to your Wi-Fi router during the initial pairing process.
- Reset Valve: If the LED is not flashing rapidly, press and hold the manual control button for 5 seconds to enter pairing mode.
10.3 Leaks at Connections
- Tighten Connections: Gently tighten the pipe connections. Do not overtighten.
- Plumber's Tape/Sealant: Ensure sufficient plumber's tape or thread sealant was applied during installation. Reapply if necessary.
11. Specifications
| Brand | CREECHWA |
| Model Number | AH (DN20-3/4") |
| Material | Brass |
| Dimensions (L x W x H) | 2.76 x 2.76 x 5.12 inches |
| Item Weight | 1.59 pounds |
| Inlet Connection Size | 3/4 Inches |
| Outlet Connection Size | 3/4 Inches |
| Inlet Connection Type | Female Iron Pipe |
| Outlet Connection Type | G Connector |
| Number of Ports | 2 |
| Wi-Fi Compatibility | 2.4 GHz Only |
| Batteries Required | No |
12. Warranty and Support
For warranty information and technical support, please refer to the official CREECHWA website or contact their customer service directly. Keep your purchase receipt as proof of purchase.