1. Introduction and Safety Information
This manual provides instructions for the safe assembly, operation, and maintenance of your Merax Upholstered Twin Size Daybed with Pop-Up Trundle. Please read all instructions carefully before assembly and use. Keep this manual for future reference.
Important Safety Warnings:
- Charging Port Use: The integrated USB and Type-C charging ports are designed for low-power devices only, such as phones and tablets. Avoid using high-wattage chargers or connecting high-power devices to prevent damage to the port or connected devices.
- Weight Limit: The daybed has a maximum weight capacity of 500 lbs. The pop-up trundle has a maximum weight capacity of 250 lbs. Ensure weight is evenly distributed. Exceeding these limits may result in damage to the product or personal injury.
- Mattress Compatibility: The trundle accommodates a twin-size mattress with a maximum thickness of 6 inches. Using a thicker mattress may prevent proper trundle storage or operation.
- Assembly: Assembly is required. Ensure all parts are present and all fasteners are securely tightened before use. Do not use power tools for assembly as this may overtighten and damage components.

Figure 1: Overall view of the Merax Upholstered Twin Size Daybed.
2. Setup and Assembly
Before beginning assembly, ensure you have all components and tools. Tools required for assembly are included with the product. It is recommended to assemble the daybed with two people.
Included Components:
- Daybed Frame (Headboard, Armrests, Side Rails)
- Pop-Up Trundle Frame
- Slats (22 pieces)
- Hardware Pack (bolts, washers, nuts, Allen wrench)
Assembly Steps (General Overview):
- Unpack all components and verify against the parts list.
- Attach the side rails to the headboard and armrests using the provided hardware.
- Assemble the pop-up trundle frame according to the separate trundle instructions (if provided).
- Install the slats onto both the main daybed frame and the trundle frame. Ensure slats are evenly spaced and securely fastened.
- Place the assembled trundle unit under the main daybed frame.
- Ensure all connections are tight and the daybed is stable before placing mattresses.
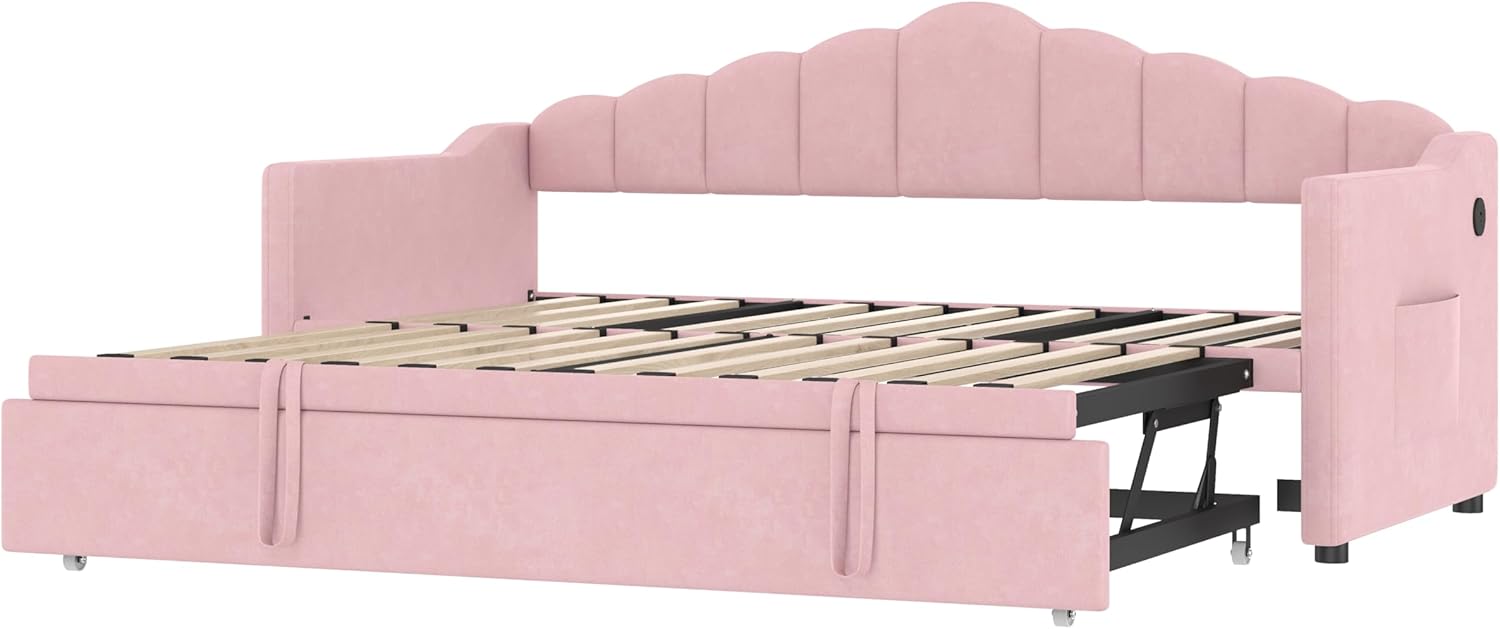
Figure 2: View of the daybed frame with slats installed.

Figure 3: View of the daybed frame with the trundle mechanism partially extended.

Figure 4: Dimensional diagram of the daybed and trundle.
3. Operating Instructions
3.1 Pop-Up Trundle Operation
The daybed features a pop-up trundle that can be used in two configurations: stored beneath the daybed or raised to align with the daybed for an expanded sleeping surface.
- To Extend: Gently pull the trundle unit out from under the main daybed frame.
- To Raise: Once extended, locate the lifting mechanism on the trundle frame. Carefully lift the trundle frame until it locks into the raised position. Ensure both sides are securely locked.
- To Lower: Release the locking mechanism (refer to specific trundle mechanism instructions if provided) and gently lower the trundle frame.
- To Store: Once lowered, push the trundle unit back under the main daybed frame until it is fully concealed.
3.2 USB and Type-C Charging Port
A built-in USB and Type-C charging port is located on the left side of the daybed for convenient device charging.
- Connect your device's charging cable to the appropriate USB or Type-C port.
- Ensure the daybed is connected to a power source for the charging ports to function.
- Warning: Only use for low-power devices like smartphones and tablets. Do not connect high-wattage appliances or chargers.
3.3 Side Pockets
Two side pockets are integrated into the design for convenient storage of small items such as books, remote controls, or personal accessories.

Figure 5: Daybed configured as a sofa (top) and as a bed with the trundle extended (bottom).

Figure 6: Close-up views of the side pocket, built-in charging station, and the trundle pull-out mechanism.
4. Maintenance
Proper care and maintenance will extend the life and appearance of your daybed.
4.1 Upholstery Care (Velvet)
- Regular Cleaning: Vacuum the velvet upholstery regularly using a soft brush attachment to remove dust and debris.
- Spot Cleaning: For spills, blot immediately with a clean, dry cloth. Do not rub, as this can spread the stain and damage the fabric pile. For stubborn stains, use a mild upholstery cleaner specifically designed for velvet, testing on an inconspicuous area first. Follow the cleaner's instructions carefully.
- Avoid Direct Sunlight: Prolonged exposure to direct sunlight can cause fading. Position the daybed away from direct sunlight or use curtains/blinds.
4.2 Frame and Hardware
- Check Fasteners: Periodically check all bolts and screws to ensure they remain tight. Retighten as necessary to maintain stability.
- Clean Frame: Wipe the non-upholstered parts of the frame with a soft, damp cloth. Avoid harsh chemicals.
5. Troubleshooting
If you encounter issues with your daybed, refer to the following common problems and solutions.
5.1 Trundle Not Moving Smoothly
- Check for Obstructions: Ensure there are no objects (e.g., bedding, toys) blocking the trundle's path or wheels.
- Inspect Wheels: Verify that the trundle wheels are clean and free of debris.
- Verify Assembly: Confirm that the trundle frame was assembled correctly and all fasteners are tight.
5.2 Charging Port Not Working
- Power Connection: Ensure the daybed's power cord (if applicable) is securely plugged into a functional wall outlet.
- Device Compatibility: Confirm that the device you are trying to charge is a low-power device (phone/tablet) and not a high-wattage appliance.
- Cable Check: Try a different charging cable to rule out a faulty cable.
- Port Check: Inspect the port for any visible damage or debris.
5.3 Daybed Feels Unstable or Wobbly
- Retighten Hardware: Systematically check and retighten all bolts and screws on both the main daybed frame and the trundle.
- Level Surface: Ensure the daybed is placed on a flat, level surface. Adjust any leveling feet if present.
- Verify Assembly: Review the assembly instructions to ensure all components were installed correctly.
6. Specifications
| Feature | Specification |
|---|---|
| Model Number | B0FDB111YL |
| Brand | Merax |
| Size | Twin |
| Color | Pink |
| Product Dimensions (L x W x H) | 82.7" x 40.9" x 39.8" |
| Item Weight | 115 Pounds |
| Frame Material | Eucalyptus Wood + Iron |
| Upholstery Material | Velvet |
| Daybed Weight Capacity | 500 lbs |
| Trundle Weight Capacity | 250 lbs |
| Recommended Trundle Mattress Thickness | Max. 6 inches |
| Box Spring Required | No |
| Special Features | Upholstered, Pop-Up Trundle, Adjustable Height, USB Type-C Charging Port, 2 Side Pockets |
| Included Components | Slats |
| Manufacturer | JD Homedeco |
7. Warranty and Support
7.1 Warranty Information
This Merax daybed comes with a Limited Warranty. Details regarding the specific terms, conditions, and duration of this warranty are typically provided with your purchase documentation or can be obtained by contacting the manufacturer directly. Please retain your proof of purchase for warranty claims.
7.2 Customer Support
For further assistance, missing parts, or to report any issues not covered in this manual, please contact the manufacturer or your retailer. Have your model number (B0FDB111YL) and purchase information ready when contacting support.