1. Introduction
This manual provides detailed instructions for the CHENGDAO Wireless Controller, designed for use with various gaming platforms. It features advanced Hall Effect joysticks and triggers for enhanced precision and durability, multi-platform compatibility, customizable Turbo and Macro functions, a 6-axis gyro sensor, and adjustable dual vibration for an immersive gaming experience.

Image 1.1: Front view of the CHENGDAO Wireless Controller and its USB adapter.
2. Safety Information
- Do not expose the controller to extreme temperatures, humidity, or direct sunlight.
- Avoid dropping or subjecting the controller to strong impacts.
- Keep the controller away from liquids and small children.
- Do not attempt to disassemble or modify the controller. This will void the warranty.
- Use only the provided charging cable or a certified USB-C cable for charging.
3. Package Contents
- CHENGDAO Wireless Controller
- USB 2.4G Adapter
- USB-C Charging Cable
- User Manual (this document)
4. Controller Layout
Familiarize yourself with the buttons and features of your CHENGDAO Wireless Controller.
Image 4.1: Overview of the controller's buttons and layout.
- Left Analog Stick: For movement and camera control. Features Hall Effect technology for precision.
- D-Pad: Directional input.
- Right Analog Stick: For camera control and aiming. Features Hall Effect technology for precision.
- A/B/X/Y Buttons: Action buttons.
- L/R Buttons: Shoulder buttons.
- ZL/ZR Triggers: Analog triggers. Features Hall Effect technology for precise linear response.
- HOME Button: System menu access.
- Screenshot Button: Capture screenshots.
- Turbo Button: Activates/deactivates turbo function.
- +/- Buttons: Plus and Minus buttons for in-game menus.
- M1/M2 Buttons: Programmable Macro buttons on the underside.
- USB-C Port: For charging and wired connection.
- Indicator Lights: Display connection status and battery level.
5. Setup
5.1 Charging the Controller
Before first use, fully charge the controller. Connect the provided USB-C cable to the controller's USB-C port and the other end to a USB power source (e.g., console, PC, or USB wall adapter).

Image 5.1: The controller's back, highlighting the 800mAh battery capacity and USB-C charging port.
- The indicator lights will show charging status.
- A full charge typically provides 8-10 hours of gameplay.
5.2 Connecting the Controller
The controller supports multiple connection methods:
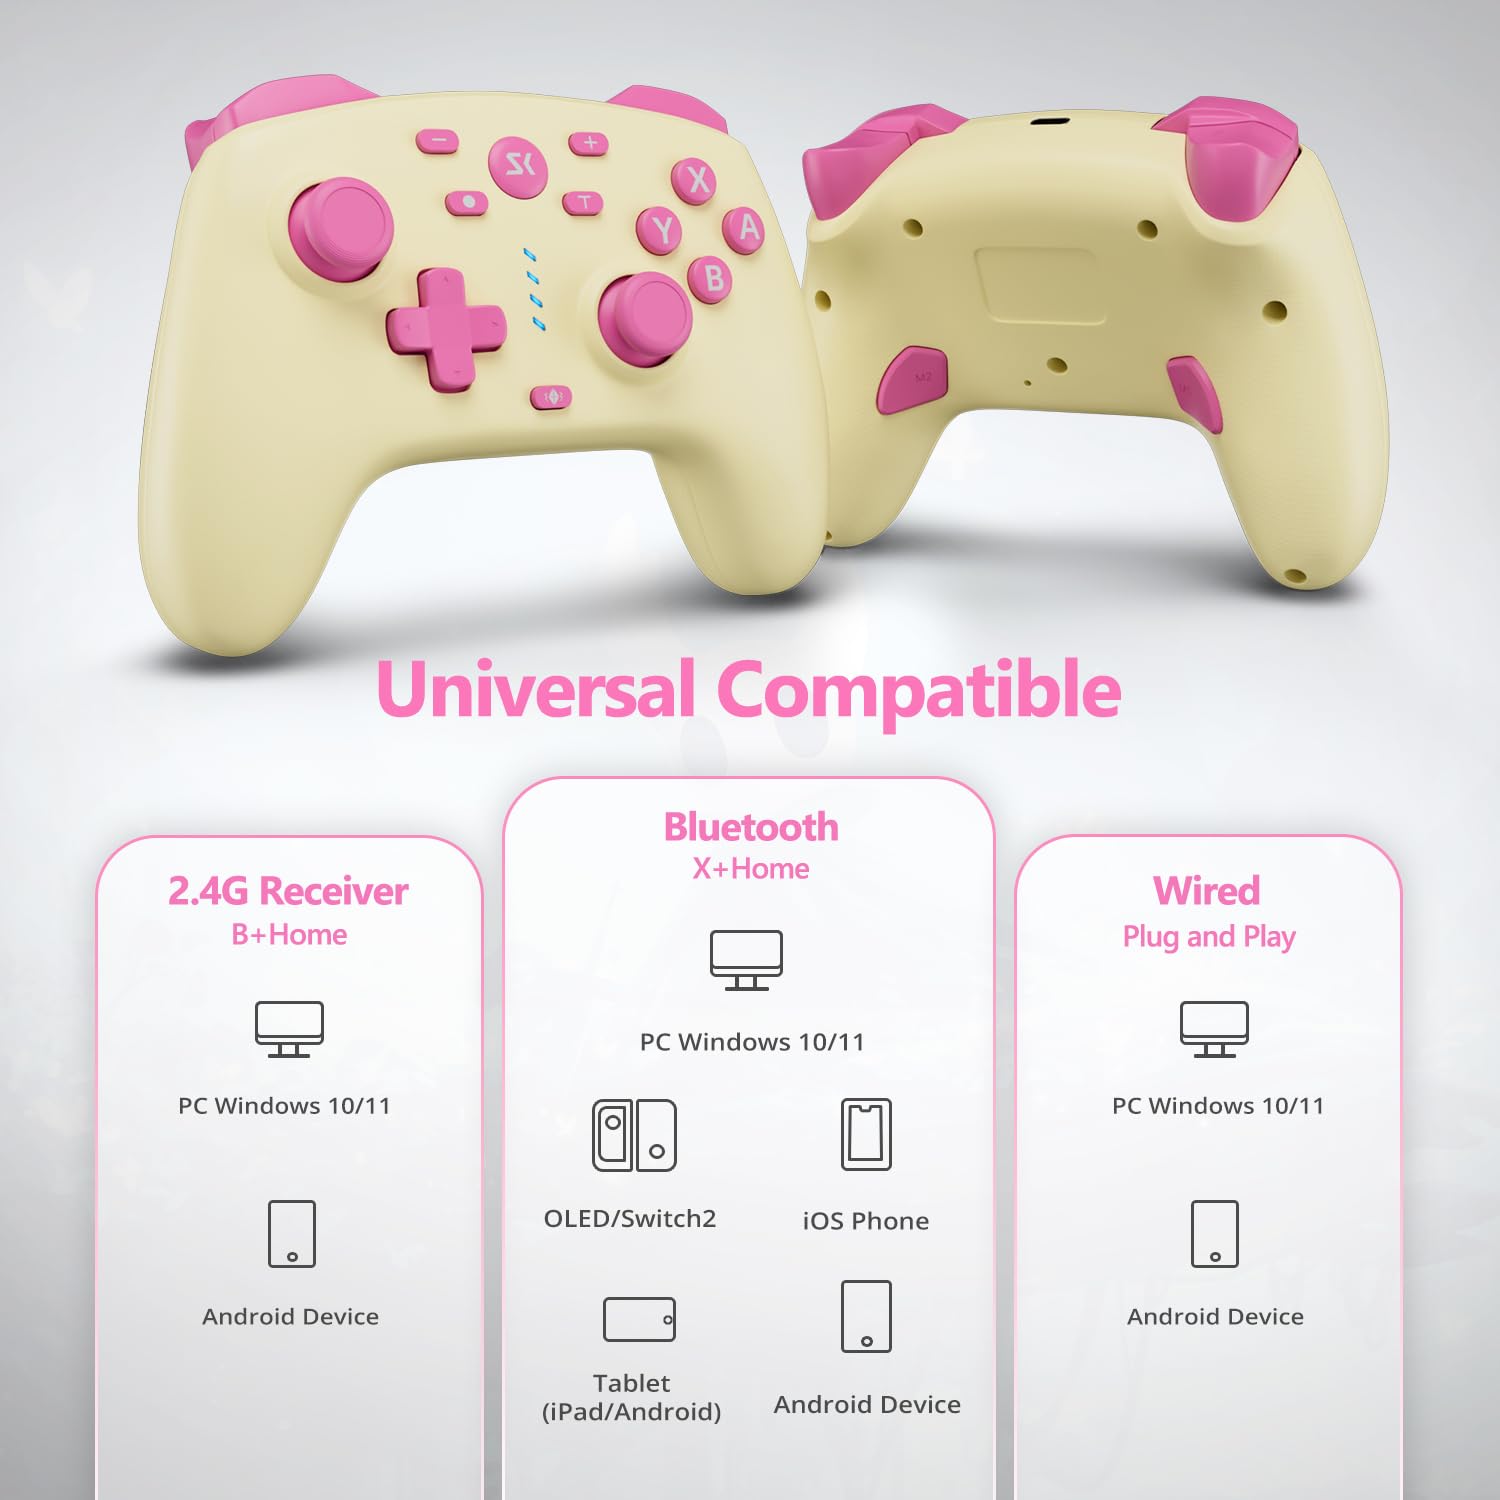
Image 5.2: Universal compatibility diagram for various devices and connection types.
5.2.1 Bluetooth Connection (Switch/OLED/Lite/Switch 2, iOS/Android/macOS, PC)
- On your device, navigate to the Bluetooth settings.
- On the controller, press and hold the X + HOME buttons simultaneously for 2 seconds until the indicator lights flash rapidly.
- Select the controller from the list of available Bluetooth devices on your device.
- Once connected, the indicator light(s) will remain solid.
5.2.2 2.4G Wireless Connection (PC Windows 10/11, Android Device)
- Insert the 2.4G USB adapter into an available USB port on your PC or Android device.
- On the controller, press and hold the B + HOME buttons simultaneously for 2 seconds until the indicator lights flash rapidly.
- The controller will automatically pair with the adapter. Once connected, the indicator light(s) will remain solid.
5.2.3 Wired Connection (PC Windows 10/11, Android Device)
- Connect the controller to your PC or Android device using the provided USB-C cable.
- The controller will be recognized automatically.
6. Operating Instructions
6.1 Wake-Up Function
When the controller is in sleep mode, press the HOME button to wake it up. It will attempt to reconnect to the last paired device.
6.2 Turbo Function
The Turbo function allows for rapid, repeated input of a button press. It offers 3 adjustable speeds: 5, 10, or 20 shots per second.
- To activate Turbo: Press and hold the Turbo button, then press the desired action button (A/B/X/Y/LB/LT/RB/RT). The button will now continuously repeat input when held.
- To adjust Turbo speed: With Turbo active, press and hold the Turbo button, then move the Right Analog Stick Up or Down to cycle through speeds.
- To deactivate Turbo: Press and hold the Turbo button, then press the same action button again.
6.3 Macro Buttons (M1/M2)
The M1 and M2 buttons on the underside of the controller can be programmed to execute a sequence of button presses or a single button input.

Image 6.1: Location of the M1 and M2 programmable macro buttons.
- To program a Macro: Press and hold the Macro button (usually a small button near M1/M2), then press the desired M1 or M2 button. The indicator lights will flash. Now input the sequence of buttons you wish to record (e.g., A, B, X). Press the Macro button again to save.
- To clear a Macro: Press and hold the Macro button, then press the M1 or M2 button you wish to clear. Press the Macro button again.
6.4 ABXY Key Quick Swap
This feature allows you to quickly switch the button layout between different input modes (e.g., Nintendo Switch layout, PC Steam layout, Android layout).
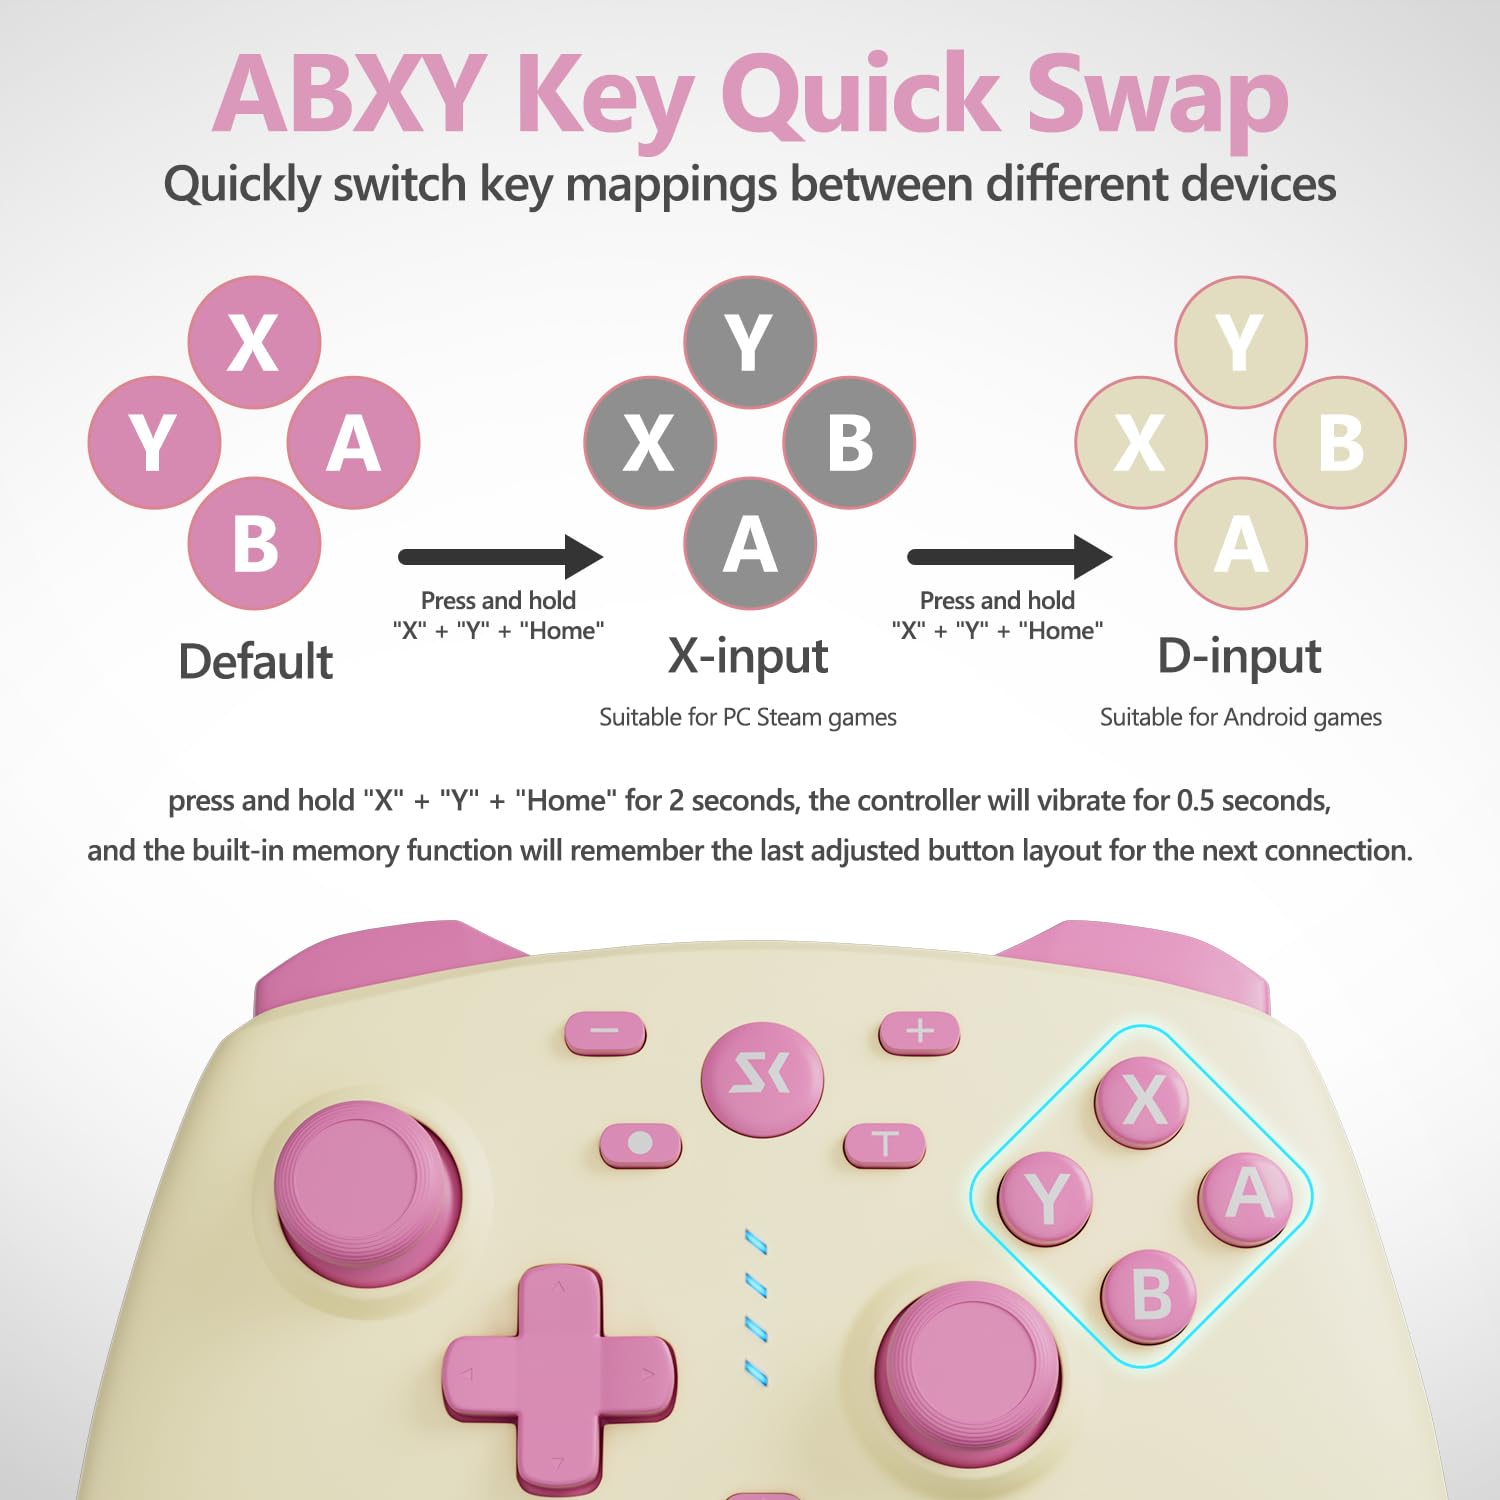
Image 6.2: Visual representation of ABXY button layout changes.
To switch layouts, press and hold X + Y + HOME buttons for 2 seconds. The controller will vibrate briefly to confirm the change. The last adjusted button layout is automatically saved for future connections.
6.5 Gyro Sensor
The controller includes a 6-axis gyro sensor for motion control, detecting tilts and twists for in-game reactions.

Image 6.3: Illustration of the 6-axis motion sensor's capabilities.
6.6 Dual Vibration
The controller features dual vibration motors for haptic feedback, enhancing immersion during gameplay.

Image 6.4: Visual explanation of adjustable dual vibration.
The vibration intensity can be adjusted to 0%, 25%, 50%, 75%, or 100%. To adjust, press and hold the Vibration button (if present, otherwise refer to specific model instructions) + D-Pad Up/Down.
7. Maintenance
- Cleaning: Use a soft, dry cloth to clean the controller. Do not use harsh chemicals or abrasive materials.
- Storage: Store the controller in a cool, dry place away from direct sunlight and extreme temperatures.
- Battery Care: To prolong battery life, avoid fully discharging the controller frequently. If storing for an extended period, charge the battery to approximately 50%.
8. Troubleshooting
- Controller not connecting:
- Ensure the controller is charged.
- Verify the correct pairing mode (Bluetooth, 2.4G) is activated on the controller.
- Check your device's Bluetooth settings or USB connection.
- Try restarting both the controller and the device.
- Input lag or disconnection:
- Ensure there are no strong wireless interferences nearby.
- Move closer to the connected device.
- For 2.4G, ensure the adapter is in a clear line of sight.
- Joystick drift:
- This controller features Hall Effect joysticks, which are designed to prevent drift. If you experience drift, ensure the controller's firmware is up to date (check manufacturer's website) or try recalibrating the joysticks through your device's settings if available.
- Buttons not responding:
- Ensure the controller is properly connected.
- Test the buttons in a different game or system menu.
- Reset the controller (refer to manufacturer's website for specific reset instructions if needed).
9. Specifications
| Feature | Detail |
|---|---|
| Model Number | B0FD9WZJDM |
| Connectivity | Bluetooth, 2.4G Wireless (with adapter), Wired (USB-C) |
| Compatibility | Nintendo Switch/OLED/Lite/Switch 2, Windows PC, Steam Deck, Luna, iOS/Android/macOS, Tablet & Laptop |
| Joystick/Trigger Technology | Hall Effect |
| Battery Capacity | 800mAh Lithium Polymer |
| Battery Life | 8-10 hours (approx.) |
| Charging Port | USB-C |
| Special Features | Wake-Up Function, Turbo (3 speeds), 2 Macro Buttons (M1/M2), 6-Axis Gyro Sensor, Adjustable Dual Vibration, ABXY Key Quick Swap |
| Dimensions | 6.57 x 4.76 x 2.72 inches |
| Weight | 10.8 ounces |
10. Warranty and Support
CHENGDAO products are designed for quality and performance. For warranty information, technical support, or further assistance, please refer to the official CHENGDAO website or contact customer service through your retailer. Please retain your proof of purchase for warranty claims.