Introduction
This manual provides detailed instructions for the installation, operation, and maintenance of your Avylet 4K/2.5K+1080P Dash Cam (Model A2). Please read this manual thoroughly before use to ensure proper functionality and to maximize your device's performance. Keep this manual for future reference.
What's in the Box
- Dashcam x1
- Rear Camera with 23ft cable x1
- Car Charger with 12.8ft cable x1
- User Manual x1
- Suction Cup Mount x1
- Adhesive Tape x2 for Rear Camera
- Electrostatic Film x1
- Trim Removal Tool x1
- Cable Clips x5
A 64GB memory card is pre-installed for immediate use.
Product Overview
The Avylet A2 Dash Cam offers dual-channel recording with 4K (front) or 2.5K+1080P (front and rear) resolution. It features built-in Wi-Fi for app control, ADAS lane assist, 24/7 parking monitoring, superior night vision, loop recording, G-sensor, and a super capacitor for durability in extreme temperatures.
Key Features
- Dual-Channel Recording: Records in 4K (front only) or 2.5K front + 1080P rear simultaneously.
- Built-in Wi-Fi & App Control: Connects to your smartphone via the Avylet app for live viewing, playback, settings adjustment, and firmware updates.
- ADAS (Advanced Driver-Assistance System): Provides warnings for lane departure, forward collisions, and nearby pedestrians. (Requires external GPS module and 2.5K+1080P resolution).
- 24/7 Parking Monitor: Offers motion detection or time-lapse recording when parked. (Requires optional hardwire kit).
- Superior Night Vision: Features F1.6 aperture, 6-layer glass lens, and WDR technology for clear low-light footage.
- G-Sensor & Loop Recording: Automatically locks footage during impacts and overwrites oldest files for continuous recording.
- Super Capacitor: Ensures reliable operation in temperatures from -4°F to 158°F.

Figure 1: Avylet Dash Cam highlighting its main features.
Setup & Installation
Follow these steps to properly install your Avylet Dash Cam in your vehicle.
Installation Steps
- Clean Windshield: Thoroughly clean the area on your windshield where the dash cam will be mounted.
- Apply Electrostatic Film: Apply the provided electrostatic film to the cleaned area on the front windshield. This helps in easy removal and prevents residue.
- Attach Front Camera: Remove the protective film from the adhesive on the suction cup mount. Attach the front dash cam to the electrostatic film on the windshield. Ensure it is securely fixed and adjust the angle for optimal road view. The mount allows for a 270° rotation angle.
- Install Rear Camera: Remove the protective film from the adhesive on the rear camera mount. Install the rear camera on the rear windshield. The lens is 360° rotatable for flexible positioning.
- Route Cables: Use the trim removal tool to route the power cable and rear camera cable along the edges of your windshield and interior trim. Hide any excess cables in the gaps for a neat installation.
- Connect Power: Plug the car charger into your vehicle's cigarette lighter socket. Connect the USB-C power cable from the car charger to the main dash cam unit. The rear camera cable connects to the AV-IN port on the main dash cam.
- Adjust Camera Angle: Start your car. The dash cam will power on automatically. Adjust the front camera's angle to ensure it captures the desired view of the road.
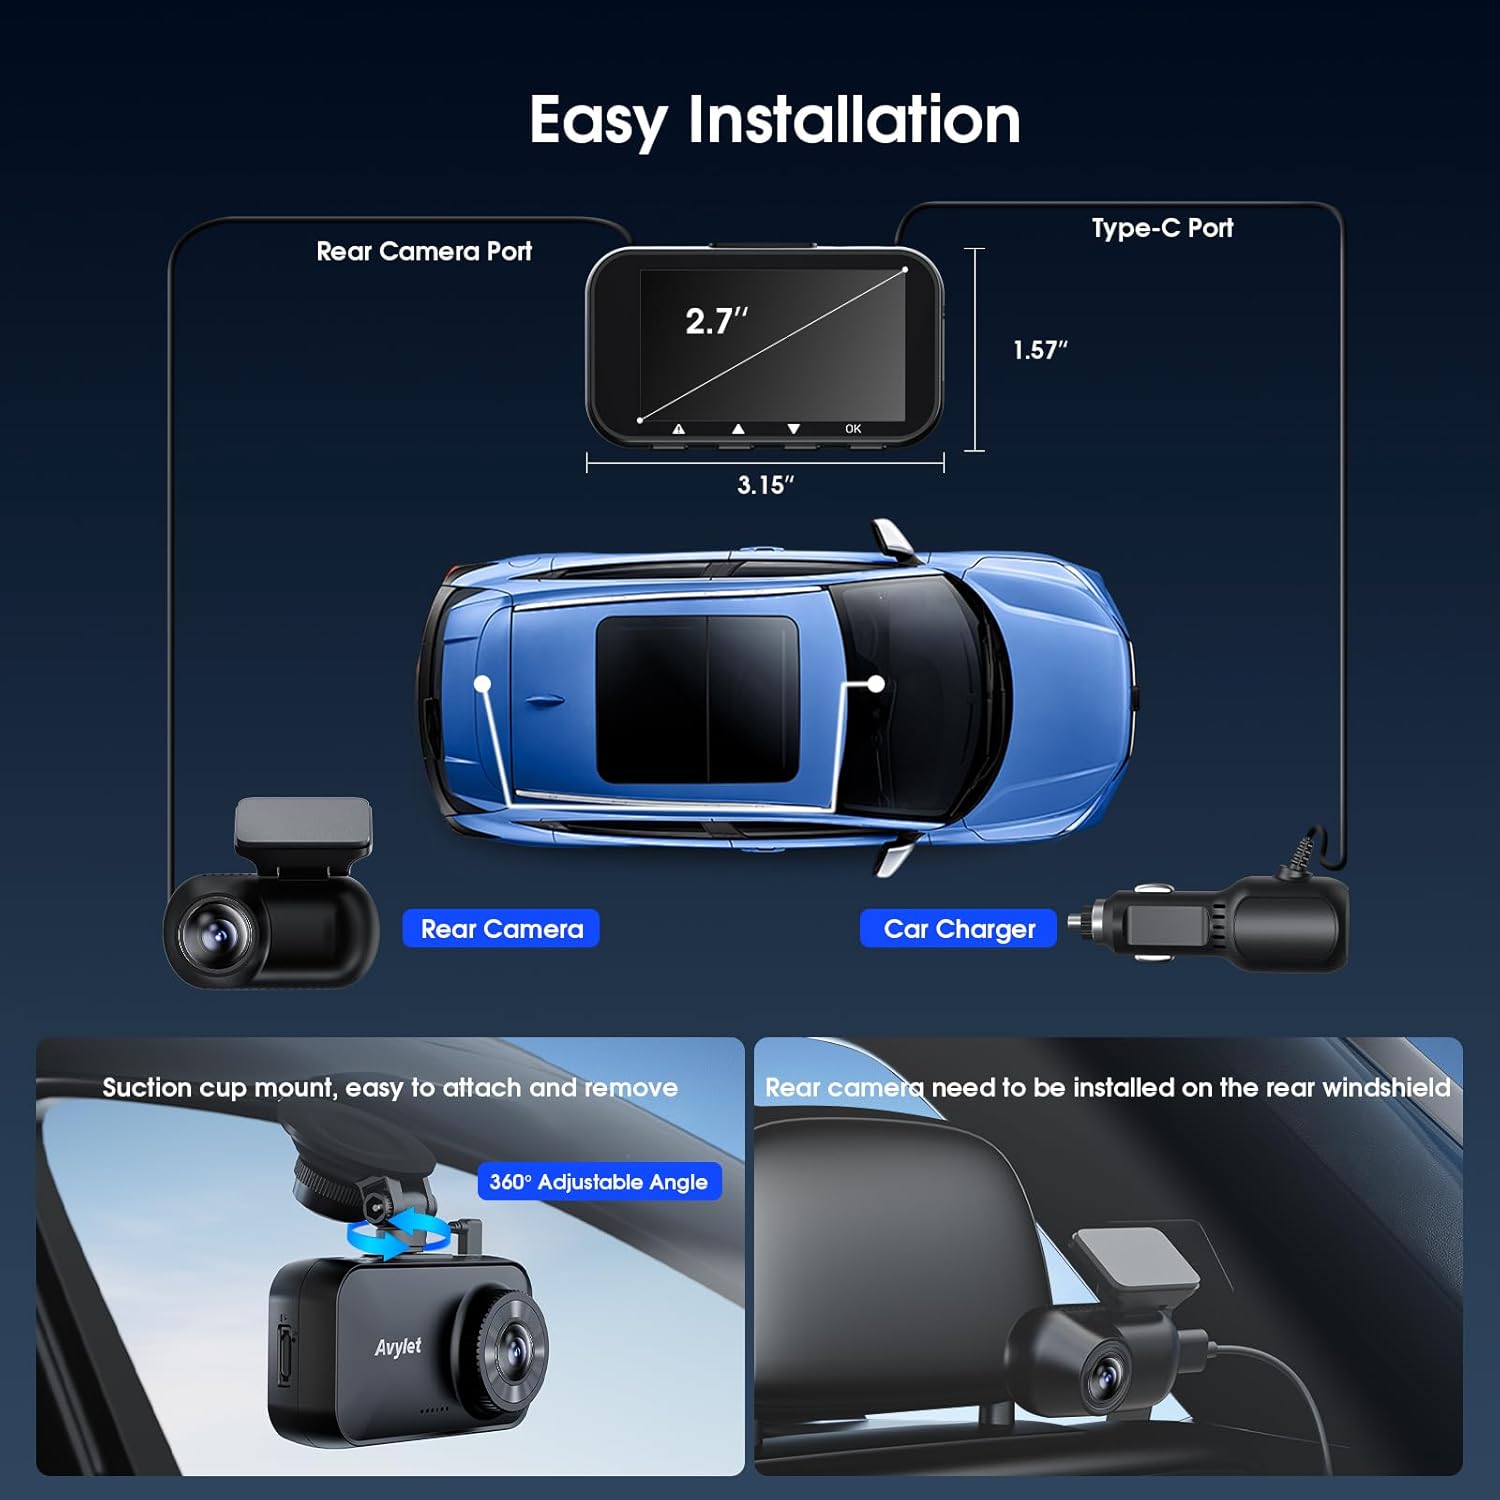
Figure 2: Overview of dash cam and rear camera installation with cable connections.
Installation Video Guide
Video 1: Step-by-step guide on how to install the Avylet Dash Cam.
Operating Instructions
Basic Operation
- Power On/Off: The dash cam automatically powers on and off with your vehicle's ignition when connected to the car charger.
- Recording: Once powered on, the dash cam automatically begins loop recording. A red indicator light or icon on the screen confirms recording status.
- Screen Display: The 2.7-inch IPS screen displays live footage. You can switch between front, rear, or split-screen views using the menu buttons.

Figure 3: Smart Display Modes for safer driving, including screen-off mode and clock screensaver.
Wi-Fi & App Control
Download the free Avylet app from your smartphone's app store. Connect your smartphone to the dash cam's Wi-Fi network (SSID and password usually displayed on the dash cam screen). Through the app, you can:
- View live footage.
- Play back recorded videos.
- Download videos to your phone.
- Adjust dash cam settings.
- Perform OTA firmware updates.
Note: Only one Wi-Fi connection is allowed at a time. The dash cam Wi-Fi cannot be used with CarPlay simultaneously.

Figure 4: Wi-Fi App Control features for the Avylet Dash Cam.
ADAS (Advanced Driver-Assistance System)
The ADAS system provides alerts to enhance driving safety. These features include:
- Lane Departure Warning.
- Forward Collision Warning.
- Front Vehicle Start Alert.
- Pedestrian Collision Warning.
Important: ADAS features require an external GPS module (not included) and calibration for optimal performance. These features are not available in 4K front camera mode; switch to 2.5K+1080P resolution to enable them.

Figure 5: Visual representation of ADAS warnings.
24/7 Parking Monitor
To enable 24/7 parking monitoring, an optional hardwire kit (sold separately, ASIN: B0FJLV1YJ9) is required. Once installed, the dash cam will automatically enter Parking Mode when the engine is off. You can choose between:
- Motion Detection Mode: Records a 30-second clip when movement is detected within the camera's field of view.
- Time-Lapse Mode: Continuously records frames at set intervals (1, 2, 5, or 10 frames per second) and compiles them into a fast-forward video.

Figure 6: 24/7 Parking Monitor modes and hardwire kit requirement.
Loop Recording & G-Sensor
- Loop Recording: The dash cam records continuously. When the memory card is full, it automatically overwrites the oldest unlocked footage.
- G-Sensor: In the event of a sudden impact or collision, the built-in G-sensor detects the event and automatically locks the current video segment, preventing it from being overwritten.

Figure 7: G-Sensor functionality for automatic crash footage saving.
Memory Card Usage
The dash cam supports a U3 memory card (64-256GB). A 64GB card is included. For best performance:
- Format the memory card before first use.
- Insert the card while the dash cam is off.
- Always connect power with the original car charger.
- Avoid oversized cards to prevent freezing.
- Wait 1-2 minutes before removing the card to avoid overheating.

Figure 8: Memory card slot and supported capacity.
Maintenance
General Care
- Keep the dash cam clean and free from dust. Use a soft, dry cloth for cleaning.
- Avoid exposing the device to extreme temperatures outside its operating range (-4°F to 158°F).
- Ensure cables are securely connected and not obstructing driving view.
Memory Card Maintenance
- Regularly format the memory card (e.g., once a month) to maintain optimal performance and prevent data corruption.
- Use a high-quality U3 memory card from a reputable brand.
Troubleshooting
Common Issues & Solutions
- Unable to connect to the App:
- Download the correct dashcam app from the official store.
- Ensure Wi-Fi is connected to the dash cam's Wi-Fi (Note: Dashcam Wi-Fi disconnects other networks and can't be used with CarPlay).
- Quick Reset: Toggle Wi-Fi off/on and disable mobile data, then reconnect.
- Memory Card Issues:
- Use a U3 Memory Card (64-256GB) for best performance.
- Format before first use.
- Insert while off and use the original car charger.
- Oversized cards may cause freezing.
- Wait 1-2 minutes before removing card to avoid overheating.
- ADAS Features Not Working: Ensure an external GPS module is installed and calibrated. ADAS is not available in 4K front camera mode; switch to 2.5K+1080P resolution.
- Parking Monitor Not Activating: Verify that the optional hardwire kit is correctly installed and connected.
If you encounter any product issues, please contact customer support via the details in the user manual or visit Avylet.com.
Specifications
| Feature | Detail |
|---|---|
| Product Dimensions | 1.69 x 3.07 x 1.1 inches |
| Item Weight | 2.24 ounces |
| Model Name | A2 |
| Connectivity Technology | Wi-Fi |
| Video Capture Resolution | Dual Channel 2.5K Front +1080P Rear, Single Front 4K |
| Mounting Type | Suction Cup Mount |
| Field Of View | 170 Degrees |
| Special Features | 4K Front & 2.5K+1080P Front and Rear Recording; Wi-Fi & Free APP & OTA Upgrade; 64GB Card included; ADAS Lane Assist; External GPS (service@avylet.com); 2.7'' IPS Screen; F1.6 Aperture; G-Sensor; Night Vision; Loop Recording; Parking Monitor; Super Capacitor |
Warranty & Support
Your Avylet Dash Cam is backed by a 2-year warranty and lifelong technical support. For assistance, please contact us directly or visit our website at Avylet.com. We aim to respond to all inquiries within 12 hours.