1. Introduction
Thank you for choosing the ReliPrint 160Pro Hand Jet Printer. This device is designed for efficient and precise coding and printing on various surfaces, including wood, board, metal pipes, and other materials. Its portable design and advanced inkjet technology make it suitable for a wide range of industrial and commercial applications. This manual provides essential information for the safe and effective operation, maintenance, and troubleshooting of your printer.
2. Safety Information
Please read and understand all safety instructions before operating the printer. Failure to follow these instructions may result in injury or damage to the device.
- Ink Handling: Always handle ink cartridges with care. Avoid direct contact with skin and eyes. In case of contact, rinse immediately with plenty of water and seek medical attention if irritation persists.
- Power Supply: Use only the specified power adapter and charging cable. Do not operate the printer with damaged cables or power sources.
- Environment: Operate the printer in a well-ventilated area. Keep it away from flammable materials, excessive moisture, and extreme temperatures.
- Maintenance: Disconnect the power supply before performing any maintenance or cleaning. Do not attempt to disassemble or repair the printer yourself. Contact qualified service personnel for assistance.
- Children and Pets: Keep the printer and its accessories out of reach of children and pets.
3. Package Contents
Upon unpacking, please verify that all items listed below are present and in good condition:
- ReliPrint 160Pro Hand Jet Printer
- Protective Carrying Case
- Ink Cartridge (pre-installed or separate)
- Power Adapter and Charging Cable
- USB Cable (for data transfer, if applicable)
- User Manual (this document)

Image: The ReliPrint 160Pro Hand Jet Printer, along with its essential accessories, securely stored within its custom-fitted protective carrying case, ready for transport or storage.
4. Product Overview
Familiarize yourself with the main components of your ReliPrint 160Pro printer:
- Print Head: The component responsible for ejecting ink onto the surface.
- Ink Cartridge Slot: Where the ink cartridge is inserted.
- Display Screen: For navigating menus, viewing print content, and adjusting settings.
- Trigger/Print Button: Activates the printing process.
- Handle: Ergonomically designed for comfortable grip during manual operation.
- Power Port: For connecting the power adapter.
- USB Port: For data transfer or firmware updates (if applicable).
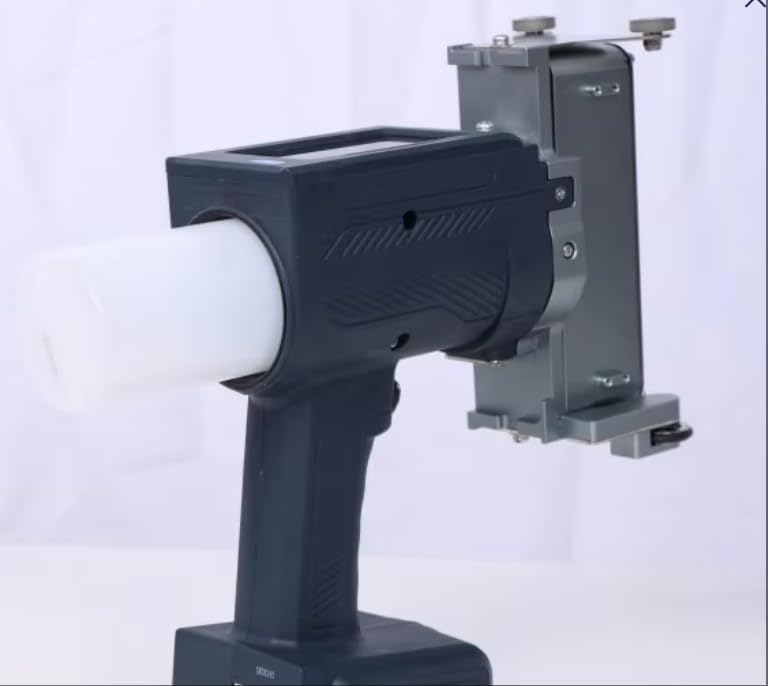
Image: A detailed side view of the ReliPrint 160Pro Hand Jet Printer, highlighting its robust print head assembly and the ergonomic handle designed for manual operation.
5. Setup
5.1. Unpacking
- Carefully open the protective carrying case.
- Remove the printer and all accessories from their packaging.
- Inspect all components for any signs of damage. If any damage is found, contact customer support immediately.
5.2. Ink Cartridge Installation
- Ensure the printer is powered off.
- Locate the ink cartridge slot, usually protected by a cover. Open the cover.
- Carefully remove the protective cap or tape from the new ink cartridge.
- Insert the ink cartridge into the slot, ensuring it clicks firmly into place. Do not force the cartridge.
- Close the cartridge slot cover.
5.3. Battery Charging/Power Connection
- Connect the power adapter to the printer's power port.
- Plug the power adapter into a suitable electrical outlet.
- Allow the printer to charge fully before first use. The display screen will typically indicate charging status.
5.4. Initial Power On
- Press and hold the power button until the display screen illuminates.
- Follow any on-screen prompts for initial setup, such as language selection or date/time settings.
6. Operating Instructions
6.1. User Interface Navigation
The printer features an intuitive display screen. Use the directional buttons or touchscreen (if applicable) to navigate through menus and select options. Common menu items include:
- Edit: To create or modify print content.
- Settings: To adjust printer parameters.
- File: To save or load print templates.
- Print: To initiate the printing process.
6.2. Text Input and Editing
- Select 'Edit' from the main menu.
- Use the on-screen keyboard to input text, numbers, or symbols.
- Adjust font size, style, and other text attributes as needed.
- Save your message as a template for future use.
6.3. Printing Parameters
Before printing, ensure the following settings are correctly configured:
- Print Speed: Adjust according to the material and desired print quality.
- Print Resolution: Higher resolution for finer details.
- Material Type: Select the appropriate setting for wood, metal, plastic, etc., to optimize ink adhesion and drying.
- Print Direction: Set if printing left-to-right or right-to-left.
6.4. Printing Process
- Ensure the print content is loaded and parameters are set.
- Position the printer's print head gently against the surface of the material to be printed.
- Press and hold the trigger/print button.
- Smoothly move the printer across the surface at a consistent speed. Maintain even pressure.
- Release the trigger button once printing is complete.
- Allow the ink to dry. The 'Quick Dry' feature of this printer minimizes drying time.
7. Maintenance
Regular maintenance ensures optimal performance and extends the lifespan of your printer.
7.1. Cleaning the Print Head
The print head should be cleaned regularly, especially if print quality degrades or after extended periods of non-use.
- Power off the printer.
- Gently wipe the print head nozzle plate with a lint-free cloth lightly dampened with a recommended cleaning solution or distilled water. Do not use abrasive materials.
- Ensure the print head is completely dry before powering on the printer.
7.2. Ink Cartridge Replacement
Replace the ink cartridge when the ink level is low or print quality deteriorates significantly.
- Power off the printer.
- Open the ink cartridge slot cover.
- Carefully remove the empty cartridge.
- Insert a new, compatible ReliPrint ink cartridge as described in Section 5.2.
- Close the cover and power on the printer.
7.3. Storage
When not in use for extended periods, store the printer in its protective carrying case in a cool, dry place, away from direct sunlight and extreme temperatures. Ensure the ink cartridge is properly sealed or stored according to its instructions to prevent drying.
7.4. Battery Care
To prolong battery life, avoid fully discharging the battery frequently. Charge the printer regularly, even if not in constant use, to maintain battery health.
8. Troubleshooting
This section addresses common issues you might encounter with your ReliPrint 160Pro printer.
| Problem | Possible Cause | Solution |
|---|---|---|
| Printer does not power on | Low battery; Power adapter not connected; Faulty power button. | Charge the battery; Check power connections; Contact support. |
| Poor print quality (faded, streaky) | Low ink; Clogged print head; Incorrect print settings; Expired ink cartridge. | Replace ink cartridge; Clean print head (Section 7.1); Adjust print settings; Replace cartridge. |
| Ink does not dry quickly | Incorrect material type setting; Environmental humidity; Old ink. | Verify material type in settings; Ensure proper ventilation; Replace ink cartridge. |
| Printer not recognized by computer | Faulty USB cable; Driver issues; Printer not in data transfer mode. | Try a different USB cable; Install/update drivers; Check printer settings for USB mode. |
| Error message on screen | Specific internal issue. | Note the error code/message and refer to the digital manual or contact customer support. |
9. Specifications
Technical specifications for the ReliPrint 160Pro Hand Jet Printer:
- Model Number: U160Pro
- Brand: ReliPrint
- Product Dimensions: 14 x 10 x 7 inches
- Item Weight: 4.4 pounds (2 kg)
- Color: BLACK
- Special Feature: Quick Dry Ink
- Compatible Devices: Designed for various surfaces including Wood, Board, Metal Pipe
- Page Yield: Approximately 10 (referring to specific ink cartridge capacity or test pages)
- Manufacturer: Printer Spare Parts
- UPC: 704543717448
10. Warranty and Support
The ReliPrint 160Pro Hand Jet Printer comes with a standard manufacturer's warranty. Please refer to the warranty card included with your product or visit the official ReliPrint website for detailed warranty terms and conditions.
For technical support, service, or inquiries regarding your product, please contact ReliPrint customer service through the contact information provided on our official website or your purchase documentation. When contacting support, please have your model number (U160Pro) and purchase date ready.