1. Introduction
This manual provides detailed instructions for the SUNGOOYUE Digital DC Regulator, a versatile 585W variable power supply. Designed for a wide range of applications, including use as a mobile power supply or LED driver, this device offers precise control over output voltage and current. Its compact design and digital display make it suitable for various environments, including laboratory settings.
Key features include:
- Variable output: 0-65 V DC output voltage, up to 9 A current, and 585 W power.
- Digital display: Shows output voltage, current, temperature, power, operating time, and more.
- Data memory: Stores up to 10 sets of parameters for quick recall.
- MPPT function: Supports solar charging.
- Intelligent design: Features soft start and buzzer functions.
2. Safety Information
Please read and understand all safety instructions before operating the device. Failure to follow these instructions may result in electric shock, fire, or serious injury.
- Power Source: Ensure the input voltage is within the specified range of 12.00-72.00 V DC.
- Ventilation: Ensure adequate ventilation around the device to prevent overheating. Do not block cooling vents.
- Environment: Operate the device in a dry environment, away from moisture, dust, and corrosive gases.
- Connections: Always ensure all connections are secure and correct before applying power. Incorrect wiring can damage the device or connected equipment.
- Handling: Handle the device with care. Avoid dropping or subjecting it to strong impacts.
- Maintenance: Do not attempt to disassemble or repair the device yourself. Refer all servicing to qualified personnel.
3. Product Overview
The SUNGOOYUE Digital DC Regulator features a clear digital display and intuitive controls for easy operation.
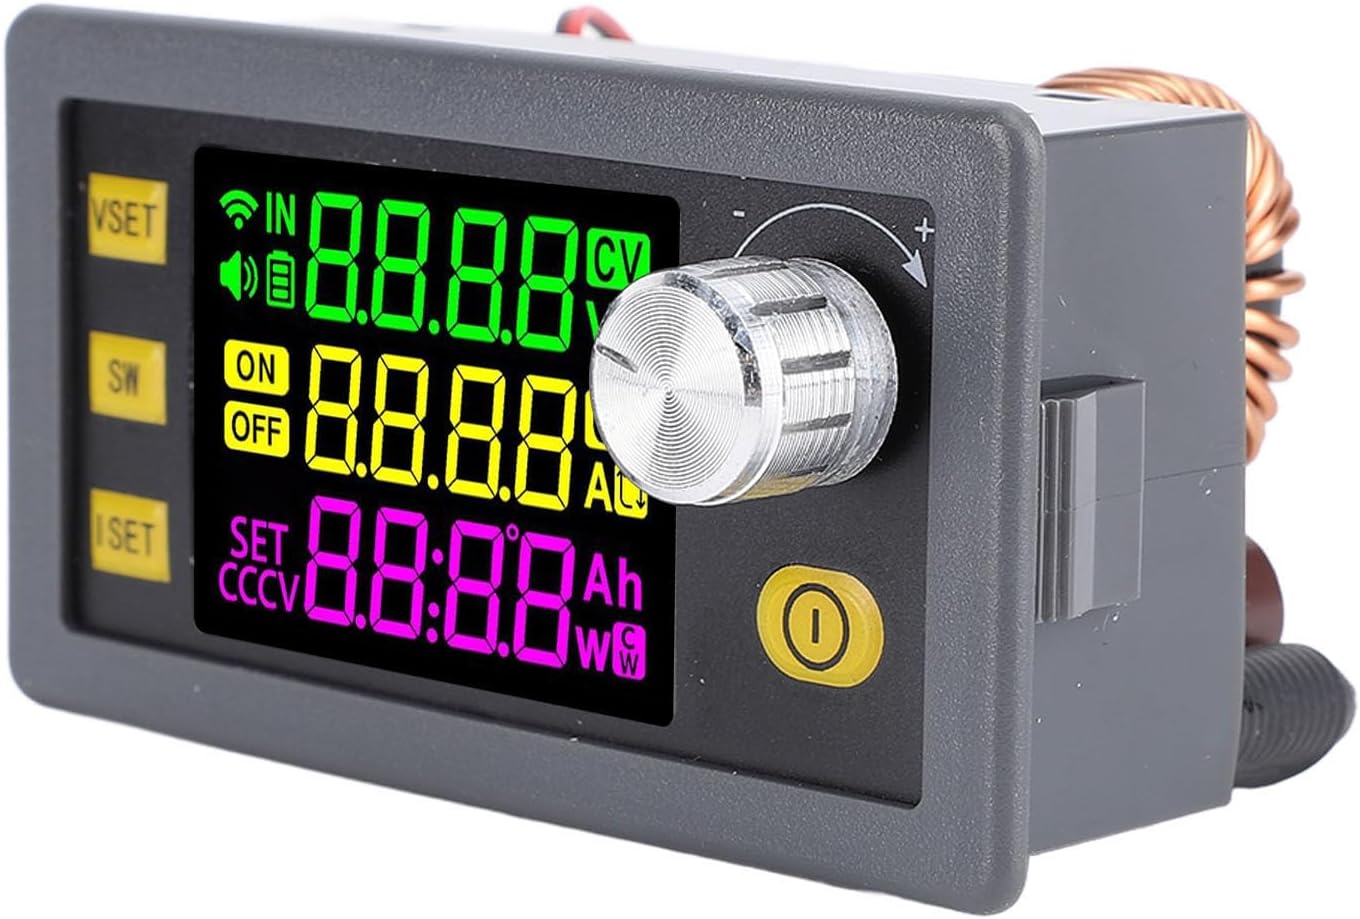
Figure 3.1: Front View of the Digital DC Regulator. This image shows the front panel of the SUNGOOYUE Digital DC Regulator, highlighting its vibrant multi-color digital display, control knob, and three function buttons (VSET, SW, ISET). The display shows input voltage (IN), output voltage (V), output current (A), power (W), and other status indicators.
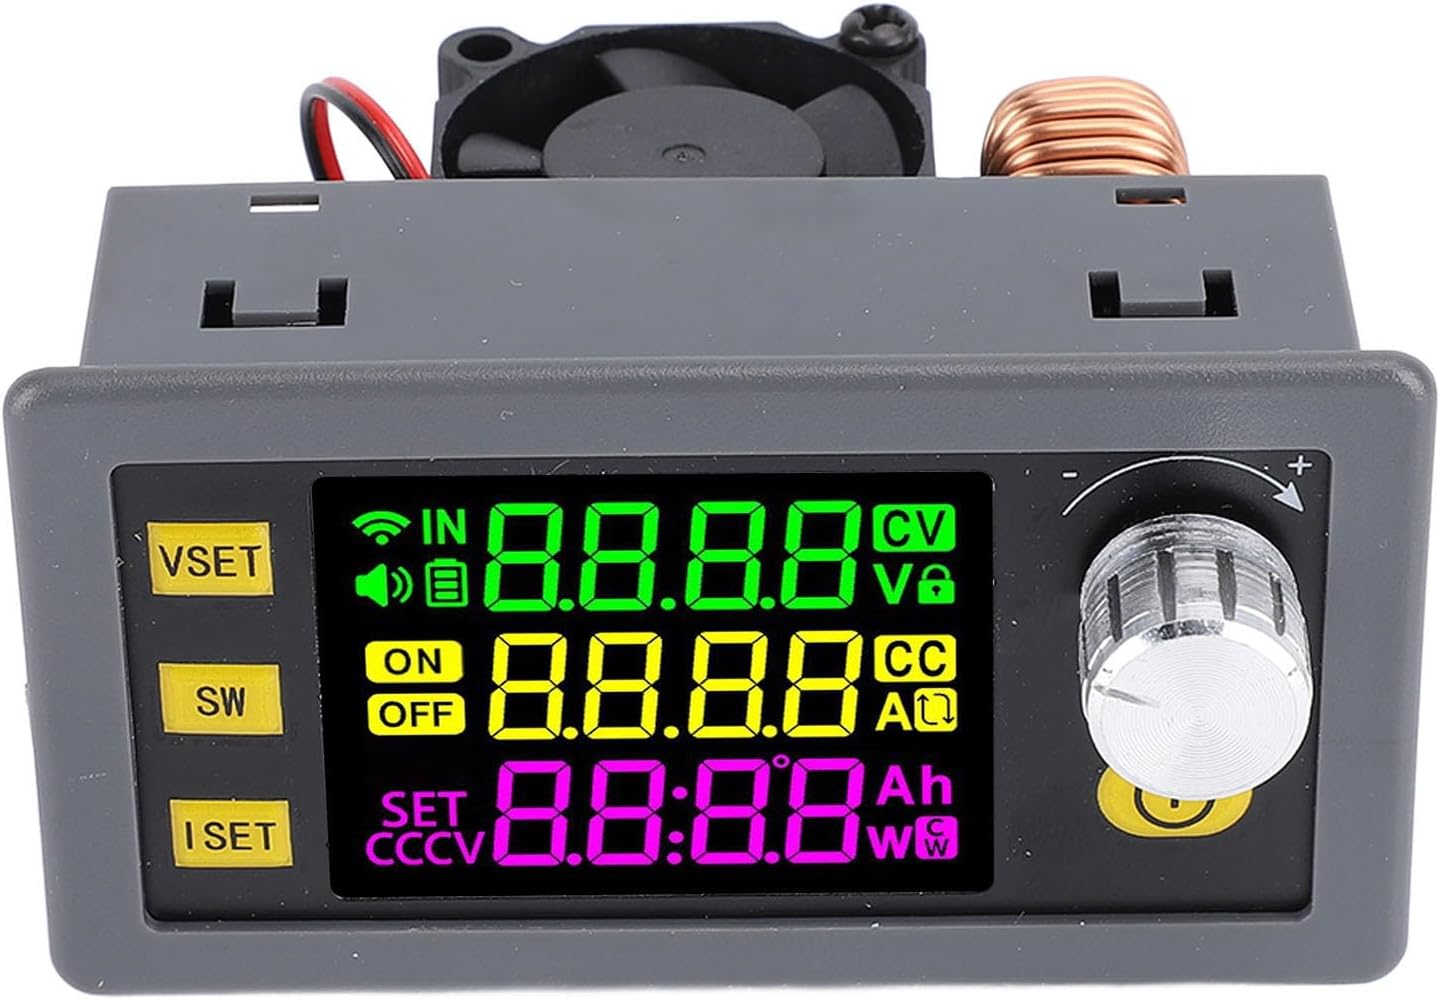
Figure 3.2: Top-Down View with Cooling Fan. This image provides a top-down perspective of the regulator, revealing the integrated cooling fan and the large inductor coil, which are crucial components for efficient power conversion and heat dissipation.
Components:
- Digital Display: Shows various operational parameters.
- Control Knob: Used for adjusting voltage, current, and navigating menus.
- VSET Button: Voltage Set button.
- SW Button: Switch/Menu navigation button.
- ISET Button: Current Set button.
- Input/Output Terminals: For connecting power source and load.
- Cooling Fan: Ensures optimal operating temperature.
4. Specifications
Detailed technical specifications for the SUNGOOYUE Digital DC Regulator.
| Parameter | Value |
|---|---|
| Model | SUNGOOYUE28hek07svd |
| Input Voltage | 12.00-72.00 V DC |
| Output Voltage | 0-65.00 V DC |
| Output Current | 0-9.000 A |
| Output Power (Max) | 585 W |
| Voltage Accuracy | ± 0.5% + 1 digit |
| Current Accuracy | ± 0.5% + 3 digits |
| Voltage Resolution | 0.01 V |
| Current Resolution | 0.001 A |
| Data Memory | 10 Sets |
| Number of Buttons | 5 |
| Screen Size | Approx. 38 x 29 mm (1.5 x 1.1 inches) |
| Buzzer | Yes |
| Conversion Efficiency | Approx. 95% |
| Soft Start | Yes |
| MPPT Function | Supported (Solar Charging) |
| Output Ripple (Typical) | VPP-150MV |
| Item Weight | 4.9 ounces |
| Package Dimensions | 3.94 x 2.76 x 1.97 inches |

Figure 4.1: Dimensional Diagram. This image illustrates the physical dimensions of the SUNGOOYUE Digital DC Regulator, showing its length, width, and height in both millimeters and inches for precise integration into various setups.
5. Setup
The SUNGOOYUE Digital DC Regulator is designed for straightforward setup.
- Unpacking: Carefully remove the power supply from its packaging. Inspect for any signs of damage.
- Input Power Connection: Connect your DC power source (12.00-72.00 V) to the input terminals labeled "IN" on the device. Ensure correct polarity (+ to + and - to -).
- Output Load Connection: Connect your load to the output terminals labeled "OUT". Again, observe correct polarity.
- Mounting (Optional): If desired, integrate the module into an enclosure or panel using its mounting points. Refer to the dimensional diagram in Section 4 for precise measurements.
- Initial Power On: Once all connections are secure, apply power to the input. The digital display should illuminate.

Figure 5.1: Side View with Terminals. This image displays a side view of the regulator, clearly showing the input and output screw terminals for connecting the power source and the load.
6. Operating Instructions
The device features a digital display and five buttons for operation.
6.1. Display Overview
The multi-color digital display provides real-time information:
- IN: Input Voltage
- V: Output Voltage
- A: Output Current
- W: Output Power
- Ah: Accumulated Amp-hours
- Wh: Accumulated Watt-hours
- CV/CC: Constant Voltage / Constant Current mode indicator
- ON/OFF: Output status indicator
- SET: Parameter setting indicator
- Temperature: Internal temperature (if displayed)
- Operating Time: Duration of operation
6.2. Button Functions
- VSET (Voltage Set): Press to enter voltage setting mode. Rotate the control knob to adjust the desired output voltage. Press again to confirm or exit.
- ISET (Current Set): Press to enter current limit setting mode. Rotate the control knob to adjust the maximum output current. Press again to confirm or exit.
- SW (Switch/Menu):
- Short Press: Toggles between different display parameters (e.g., voltage/current curves, power supply parameters).
- Long Press: Enters or exits advanced menu settings (e.g., data storage, system settings).
- Control Knob (Rotary Encoder):
- Rotate: Adjusts values when in setting mode (VSET, ISET). Navigates menus.
- Press: Confirms selection or toggles output ON/OFF (if configured).
- Output ON/OFF Button (Yellow Button): Press to toggle the output power ON or OFF.
6.3. Setting Output Voltage and Current
- Set Voltage: Press the VSET button. The voltage display will blink. Rotate the control knob to set the desired output voltage. Press VSET again or the control knob to confirm.
- Set Current Limit: Press the ISET button. The current display will blink. Rotate the control knob to set the maximum output current. Press ISET again or the control knob to confirm.
- Enable Output: Press the yellow ON/OFF button to enable the power output. The "ON" indicator will illuminate.
7. Data Storage and Recall
The device supports storing up to 10 sets of voltage and current parameters for quick recall.
- Saving Parameters:
- Set the desired voltage and current using the VSET and ISET buttons.
- Long press the SW button to enter the advanced menu.
- Navigate to the "Save" or "Memory" option using the control knob.
- Select a memory slot (e.g., M1-M10) and press the control knob to save the current settings.
- Recalling Parameters:
- Long press the SW button to enter the advanced menu.
- Navigate to the "Recall" or "Load" option.
- Select the desired memory slot (e.g., M1-M10) and press the control knob to load the saved settings.
8. MPPT Function (Solar Charging)
The SUNGOOYUE Digital DC Regulator supports Maximum Power Point Tracking (MPPT) for efficient solar charging applications.
- When connecting a solar panel as the input source, the MPPT function automatically adjusts the operating point to extract the maximum possible power from the solar panel.
- Ensure your solar panel's open-circuit voltage is within the device's input voltage range (12.00-72.00 V DC).
- Set the output voltage and current limit according to the requirements of the battery or load you are charging.
9. Maintenance
Proper maintenance ensures the longevity and reliable operation of your power supply.
- Cleaning: Use a soft, dry cloth to clean the exterior of the device. Do not use abrasive cleaners or solvents.
- Ventilation: Periodically check that the cooling fan and vents are free from dust and obstructions. Use compressed air to gently clear any blockages.
- Storage: When not in use for extended periods, store the device in a cool, dry place, away from direct sunlight and extreme temperatures.
- Inspection: Regularly inspect input and output terminals for loose connections or signs of wear.
10. Troubleshooting
If you encounter issues with your SUNGOOYUE Digital DC Regulator, refer to the following common problems and solutions.
| Problem | Possible Cause | Solution |
|---|---|---|
| Device does not power on. | No input power or incorrect input voltage. | Check input power source and ensure it is within 12-72V DC. Verify connections. |
| No output voltage/current. | Output is OFF, or output current limit is set too low. | Press the yellow ON/OFF button to enable output. Increase the current limit using the ISET button. |
| Output voltage/current is unstable. | Loose connections, or load is too demanding. | Check all input and output connections. Ensure the load does not exceed the device's maximum power (585W) or current (9A). |
| Device overheats. | Poor ventilation or excessive load. | Ensure cooling fan and vents are clear. Reduce the load if operating near maximum capacity. |
| Display shows error message. | Internal fault or protection triggered. | Power off the device, wait a few minutes, then power on again. If the error persists, contact support. |
11. Warranty and Support
For warranty information and technical support, please refer to the documentation provided with your purchase or contact SUNGOOYUE customer service.
Manufacturer: SUNGOOYUE
Model Number: SUNGOOYUE28hek07svd