1. Introduction
The EnGenius ECW510 is a high-performance Wi-Fi 7 Indoor Access Point designed to deliver blazing-fast and reliable wireless connectivity for small to medium-sized business environments. This dual-band access point supports advanced features for enhanced network efficiency and security. This manual provides essential information for the proper installation, configuration, and operation of your ECW510 device.
2. What's in the Box
Verify that all items are present in your package:
- ECW510 Access Point
- Ceiling Mount Base (9/16” T-Rail)
- Ceiling Mount Base (15/16” T-Rail)
- Ceiling and Wall Mount Screw Kits
3. Product Overview
The EnGenius ECW510 features a sleek, low-profile design suitable for various indoor installations. Understanding its physical components is crucial for proper setup and operation.
3.1 Front View

Image Description: A top-down view of the white, square-shaped EnGenius ECW510 Access Point. The EnGenius logo is visible in the center, and a subtle LED indicator strip is present at the top edge.
3.2 Rear View and Ports
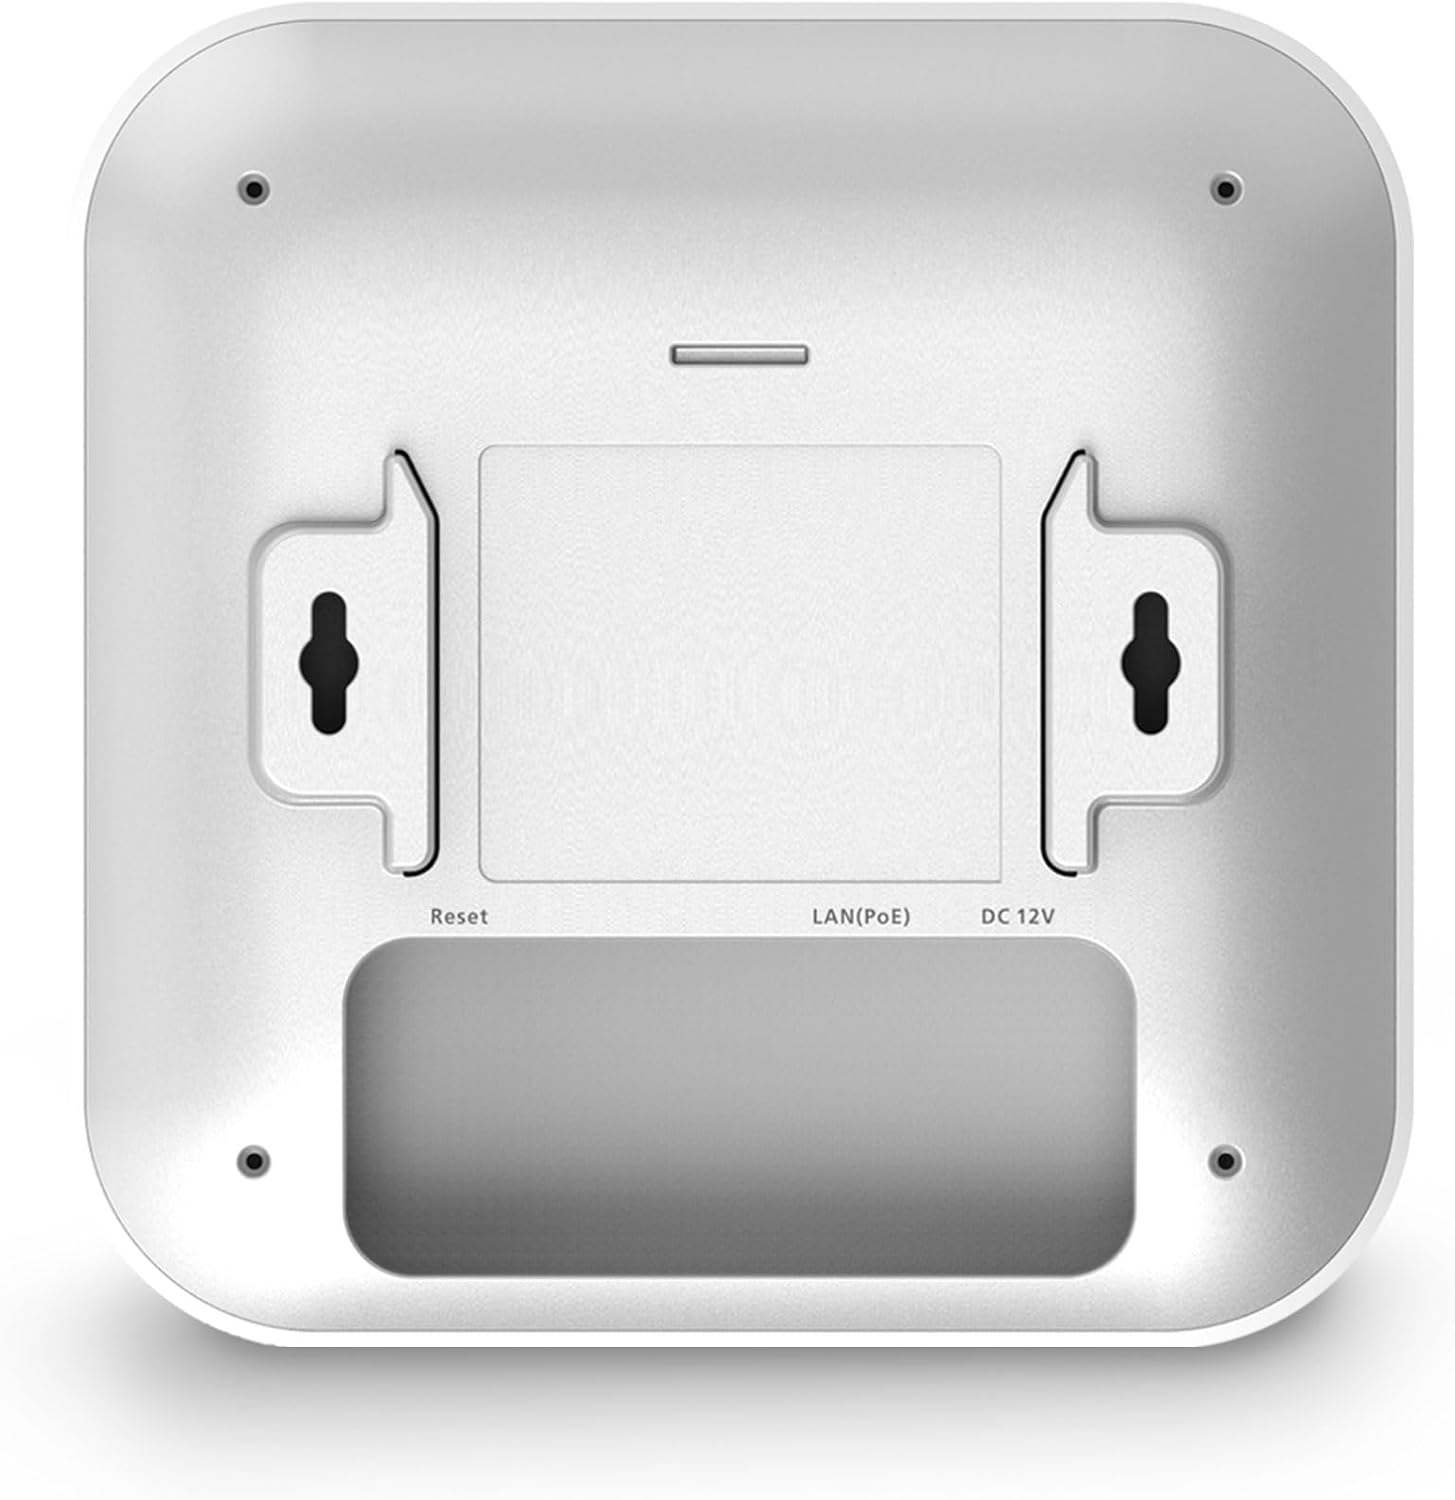
Image Description: A rear view of the EnGenius ECW510 Access Point, showing the mounting brackets, a Reset button, a LAN (PoE) port, and a DC 12V power input port. The LAN port is an RJ45 connector, and the DC input is a circular barrel jack.
- LAN (PoE) Port: This 2.5 Gigabit Ethernet port supports Power over Ethernet (PoE+ 802.3at/af) for both data and power delivery.
- DC 12V Input: Alternative power input for situations where PoE is not available.
- Reset Button: Used to reset the device to factory default settings.
- Mounting Brackets: Integrated brackets for ceiling or wall mounting.
4. Setup & Installation
Follow these steps to install and power your EnGenius ECW510 Access Point.
4.1 Powering the Device
The ECW510 can be powered using either Power over Ethernet (PoE+) or a 12V DC power adapter (sold separately).
- Using PoE+: Connect an Ethernet cable from a PoE+ enabled switch or PoE injector to the LAN (PoE) port on the back of the ECW510. This will provide both data connectivity and power.
- Using DC 12V Adapter: If PoE+ is not available, connect a 12V DC power adapter (not included) to the DC 12V input port and plug the adapter into a power outlet. Then, connect an Ethernet cable from your network to the LAN (PoE) port for data.
Once powered, the LED indicator on the front of the device will illuminate, indicating that the device is booting up.
4.2 Mounting the Access Point
The ECW510 can be mounted on a ceiling or wall using the provided mounting bases and screw kits.
- Select the appropriate mounting base (9/16” or 15/16” T-Rail for ceiling, or use screws for wall mounting).
- Secure the chosen mounting base to your desired location using the provided screws.
- Align the ECW510 Access Point with the mounting base and slide it into place until it clicks securely.

Image Description: A diagram showing the top and bottom views of the ECW510. The top view highlights the multi-color LED. The bottom view clearly labels the Reset button, 2.5GbE LAN (PoE 802.3af/at) port, and Power Connector.
5. Configuration & App Usage
The EnGenius ECW510 is cloud-managed, allowing for easy setup and monitoring via the EnGenius Cloud To-Go mobile app or a web browser.
5.1 Initial Setup with EnGenius Cloud To-Go App
For initial setup and management, download the "EnGenius Cloud To-Go" app from your mobile device's app store. You will need to create an account and register your device by scanning the QR code located on the back of the access point or by manually entering the serial number.
Video Description: An official EnGenius video demonstrating the unboxing, physical setup, and initial configuration of an EnGenius Wireless Access Point using the EnGenius Cloud To-Go mobile application. It covers connecting the device, powering it via PoE, and registering it within the app to manage network settings.
The app allows you to:
- Create and manage Wi-Fi networks (SSIDs).
- Set passwords and security protocols (WPA3 Enterprise).
- Configure guest networks with bandwidth limits.
- Monitor network activity and connected clients.
- View device status and perform firmware upgrades.
5.2 Web Browser Configuration
For advanced settings and detailed network management, you can access the ECW510's web interface via a browser. You will need the device's IP address, which can typically be found through your router's connected devices list or the EnGenius Cloud To-Go app.
- Open a web browser and enter the IP address of your ECW510.
- Log in using the default credentials (User:
admin, Pass:admin). It is highly recommended to change these default credentials immediately for security purposes. - From the web interface, you can configure various settings including network modes, VLANs, firmware upgrades, and more.
6. Key Features
The EnGenius ECW510 is equipped with cutting-edge technology to provide a superior wireless experience:
- Wi-Fi 7 (802.11be) Standard: Delivers ultra-fast speeds up to 4300 Mbps on 5GHz and 700 Mbps on 2.4GHz, ideal for high-bandwidth applications.
- Dual-Band 2x2 MU-MIMO: Enhances network efficiency by allowing the access point to communicate with multiple devices simultaneously, reducing latency and improving throughput.
- Multi-Link Operation (MLO): Optimizes data transmission by utilizing multiple frequency bands concurrently, ensuring stable and fast connections.
- 4096-QAM & Multi-RU Puncturing: Advanced modulation and resource unit allocation techniques for higher data rates and reduced interference.
- 2.5GbE PoE+ Port: Provides flexible deployment options with high-speed data and power delivery over a single Ethernet cable.
- WPA3 Enterprise Security: Offers robust, enterprise-grade security protocols to protect sensitive data and user access.
- Cloud Managed: Centralized management via the EnGenius Cloud platform for easy monitoring, configuration, and troubleshooting from anywhere.
Video Description: An official EnGenius video highlighting the features and benefits of the EnGenius Fit Wireless Dual Band Access Point Wi-Fi 6. It showcases the device's capabilities for business solutions, including high-speed connectivity, advanced management, and PoE support.
7. Specifications
| Attribute | Detail |
|---|---|
| Brand | EnGenius |
| Model Name | ECW510 |
| Wi-Fi Generation | Wi-Fi 7 |
| Frequency Band Class | Dual-Band (2.4 GHz, 5 GHz) |
| Wireless Communication Standard | 802.11be (Wi-Fi 7) |
| Data Transfer Rate | 4300 Mbps (5GHz) + 700 Mbps (2.4GHz) |
| LAN Port Bandwidth | 2.5 Gbps (2500000000 bps) |
| Number of Ports | 1 (2.5GbE PoE+) |
| Security Protocol | WPA3 |
| Coverage | Up to 1,000 sq. ft. |
| Supported Devices | Up to 400 |
| Recommended Uses | Business, High-Density Environments |
8. Troubleshooting
If you encounter issues with your EnGenius ECW510 Access Point, consider the following common troubleshooting steps:
- No Power/LED Off: Ensure the Ethernet cable is securely connected to the LAN (PoE) port and that your PoE+ switch/injector is powered on. If using a DC adapter, confirm it's properly connected and plugged into a working outlet.
- No Internet Connectivity: Verify that the Ethernet cable from the ECW510 is connected to a network with internet access. Check your router or modem for internet connectivity.
- Poor Wi-Fi Performance:
- Check for physical obstructions (walls, large metal objects) that might interfere with the signal.
- Ensure the access point is centrally located for optimal coverage.
- Use the EnGenius Cloud To-Go app to monitor channel utilization and adjust Wi-Fi channels if interference is detected.
- Confirm client devices are connecting to the appropriate 5GHz band for higher speeds, if supported.
- Cannot Access Web Interface/App: Ensure your device is on the same network as the ECW510. Double-check the IP address and login credentials. If issues persist, try resetting the device to factory defaults using the Reset button (a paperclip may be needed).
- Firmware Issues: Regularly check for and apply firmware updates via the EnGenius Cloud To-Go app or web interface to ensure optimal performance and security.
9. Warranty & Support
The EnGenius ECW510 Access Point comes with a manufacturer's warranty. For specific warranty details, please refer to the documentation included with your product or visit the official EnGenius website.
For technical support, product registration, and additional resources, please visit the EnGenius Store on Amazon or the official EnGenius support portal.