1. Introduction
This manual provides essential information for the safe and effective operation of your Creality Falcon A1 10W Laser Engraver. Please read this manual thoroughly before operating the device to ensure proper usage, prevent damage, and maintain safety. The Creality Falcon A1 is an enclosed laser engraving and cutting machine designed for precision work on various materials.

Image: The Creality Falcon A1 10W Laser Engraver, an enclosed unit, displayed alongside its honeycomb working bed and examples of engraved items such as a wooden art piece, cutting board, wine bottle, and mug.
2. Safety Information
The Creality Falcon A1 is a Class 1 safety laser product. Adherence to safety guidelines is paramount.
- Class 1 Safety Certification: The device features two protective covers that filter 99% of laser light, eliminating the need for external safety goggles during operation.
- Enclosed Design: The fully enclosed structure helps contain smoke and reduce operational noise, contributing to a more comfortable and secure working environment.
- Smoke Exhaust: An internal fan facilitates smoke removal. It is crucial to connect the exhaust system to an outdoor vent or an appropriate air purifier to ensure proper ventilation and prevent smoke accumulation.
- Emergency Stop: An emergency stop button is integrated for immediate shutdown in critical situations.
- Lid-Open Stop Feature: The machine is equipped with a safety mechanism that halts operation if the lid is opened during use.

Image: Overview of Creality Falcon A1 features, highlighting SGS Class 1 Safety Laser certification, pre-assembled status, high-definition camera, compressed laser spot size, and cutting capabilities for acrylic and wood.
3. Product Features
- Precision Engraving: Equipped with a 10W (10000mW) laser and an ultra-fine 0.06 x 0.08 mm spot, enabling precise, photo-realistic engravings.
- Cutting Capabilities: Capable of cutting 6mm wood board or 10mm acrylic board in a single pass. Can also be used with a roller for curved surface engraving.
- User-Friendly Software: Compatible with Creality Falcon Design Space, LightBurn, and LaserGRBL. Features pre-tested material parameter settings for ease of use.
- HD Camera for Positioning: A high-definition panoramic camera (requires computer connection) assists in accurate pattern placement, reducing material waste and improving efficiency.
- Large Working Area: The laser honeycomb bed and aluminum plate measure 18.1 x 13.6 x 0.6 inches (460 x 346 x 15mm), supporting a maximum working area of 430 x 316mm.
- Efficient Heat Dissipation: An 8mm large aperture honeycomb design promotes faster heat dissipation and smoke exhaustion, which helps prevent fire and material yellowing.

Image: Illustration of the Creality Falcon A1's ability to process various materials including wood, acrylic, stainless steel, leather, rock, glass, cork, silicon, gold, acrylic, silver, platinum, aluminum, titanium, brass, and plastic. It also shows cutting depths for 9.6mm acrylic and 6mm wood.

Image: Detailed dimensions of the Creality Falcon A1's honeycomb working bed, showing a size of 18.1 inches (460mm) by 13.6 inches (346mm) and a thickness of 0.6 inches (15mm).

Image: Diagram illustrating the "Better Heat Dissipation" feature of the 8mm large aperture honeycomb design, showing airflow arrows indicating efficient heat and smoke exhaustion to prevent fire and material yellowing.
4. Setup
The Creality Falcon A1 is designed for quick deployment, arriving largely pre-assembled.
- Unboxing: Carefully remove the laser engraver and all components from the packaging.
- Placement: Position the machine on a stable, level surface in a well-ventilated area, away from flammable materials.
- Exhaust Connection: Connect the exhaust hose to the designated port on the machine and route it outdoors or to a compatible air filtration system.
- Power Connection: Connect the power adapter to the machine and then to a suitable power outlet.
- Software Installation: Install the Creality Falcon Design Space software or your preferred compatible software (LightBurn, LaserGRBL) on your computer.

Image: A visual guide showing the Creality Falcon A1 as "Pre-assembled" and ready to use. It illustrates the operational steps: 1. Choose a design, 2. Materials auto recognized, and 3. Push and done, demonstrating the ease of use.
5. Operating Instructions
Follow these steps for typical engraving and cutting operations.
- Prepare Material: Place your chosen material securely on the honeycomb working bed.
- Connect to Computer: Ensure the engraver is connected to your computer via USB.
- Launch Software: Open Creality Falcon Design Space or your preferred compatible software.
- Load/Create Design: Import or create your desired engraving/cutting pattern within the software.
- Utilize HD Camera (if applicable): If using the camera, ensure your computer is connected. The camera will display the material and allow for precise positioning of your design. This feature is particularly useful for aligning patterns and batch engraving.
- Select Material & Parameters: Choose the material type from the software's library. The software often provides pre-tested optimal parameter settings. Adjust as necessary for specific results.
- Preview & Start: Use the preview function to verify the design placement. Once satisfied, initiate the engraving or cutting process.
- Monitor Operation: Observe the machine during operation. The enclosed design and safety features minimize direct exposure, but remain vigilant.
- Post-Processing: Once complete, carefully remove the engraved or cut material.

Image: This image illustrates the benefit of the "Smarter Camera, Easier Operations" feature. It compares the precise alignment achieved with the integrated camera ("Get What U See") versus the less precise alignment without it ("Get What U Guess"), emphasizing improved accuracy for engraving and cutting.
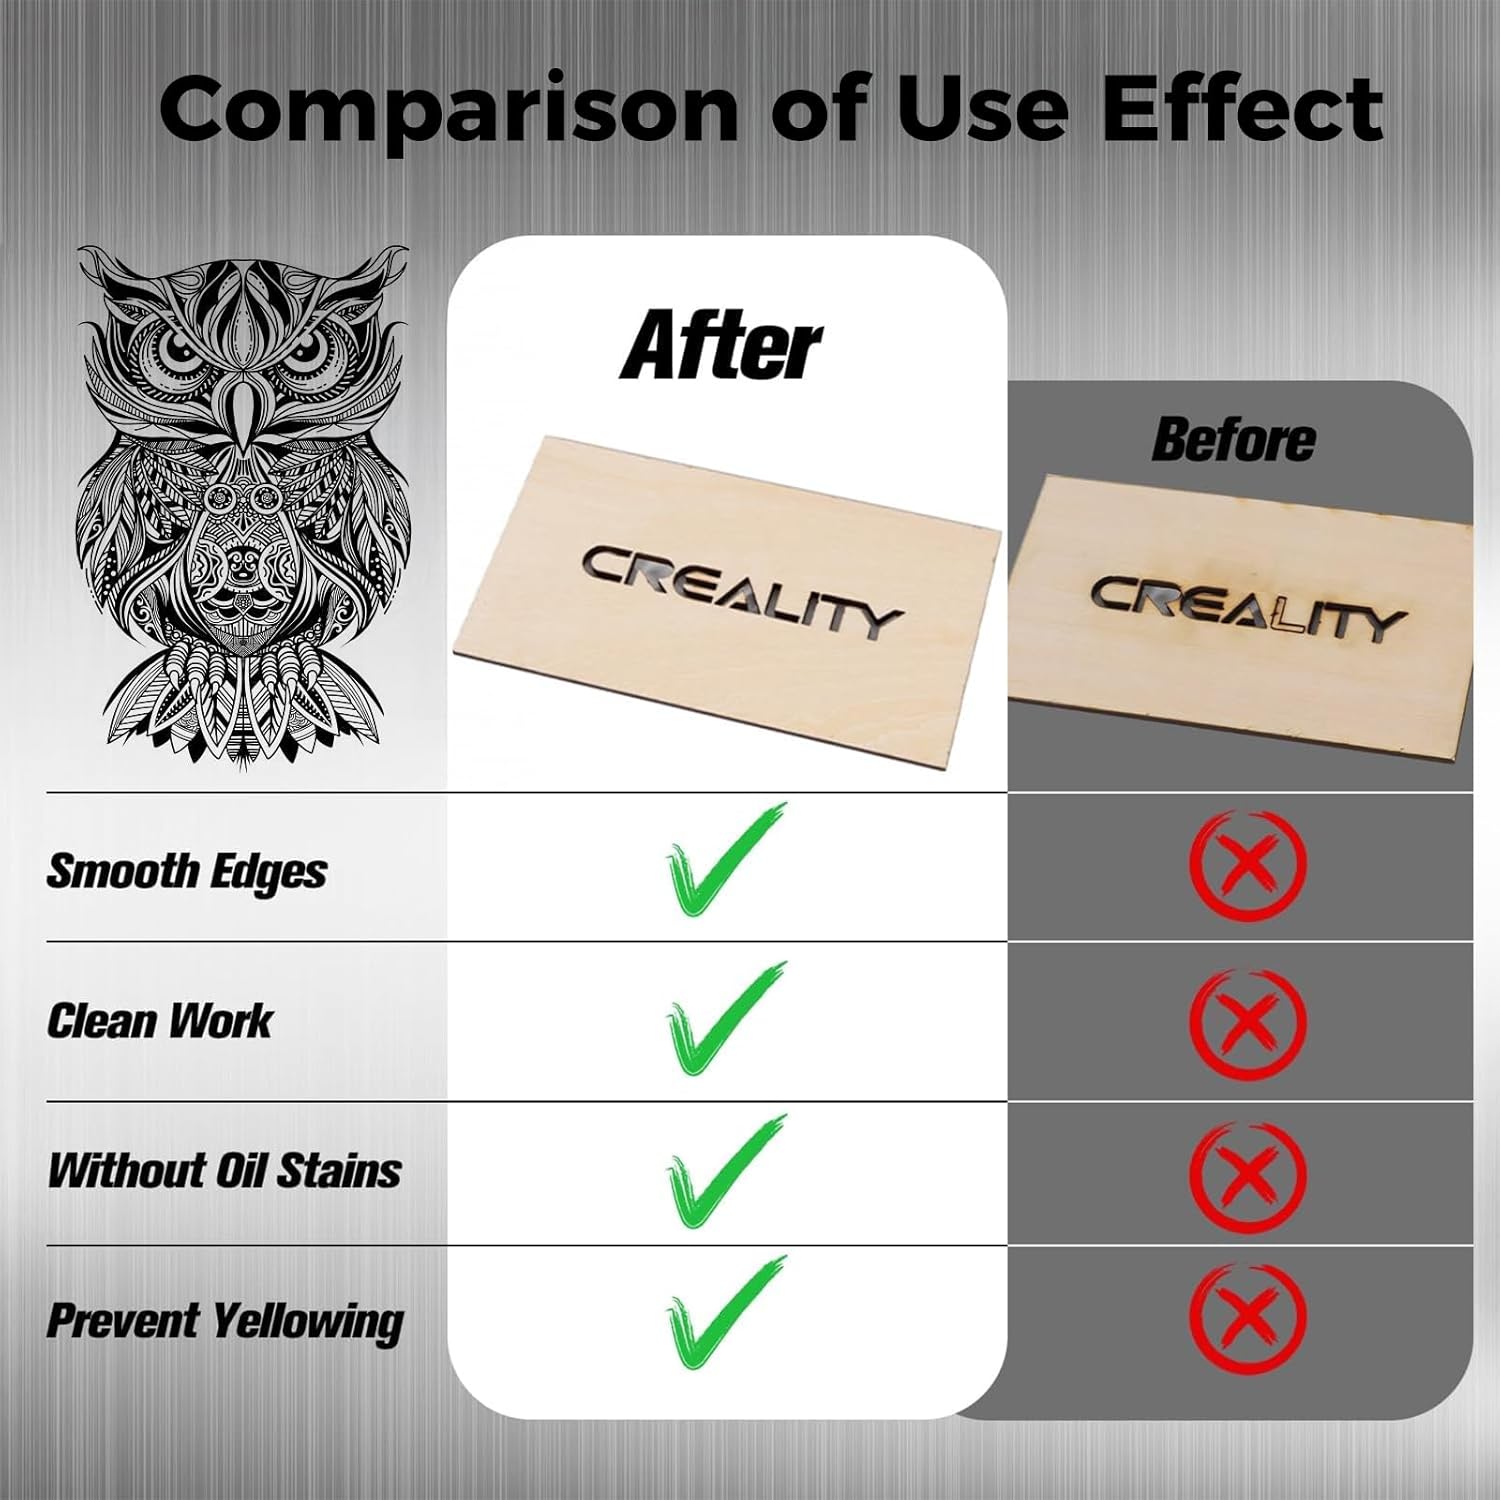
Image: A "Comparison of Use Effect" showing a wooden plaque engraved with "CREALITY". The "After" image displays smooth edges, clean work, no oil stains, and no yellowing, contrasting with the "Before" image which lacks these qualities, demonstrating the high-quality output of the Falcon A1.
6. Maintenance
Regular maintenance ensures optimal performance and extends the lifespan of your laser engraver.
- Cleaning the Lens: Periodically clean the laser lens with a specialized lens cleaning solution and cloth to maintain laser beam quality.
- Cleaning the Working Bed: Remove debris and residue from the honeycomb working bed after each use to prevent buildup and ensure proper material placement.
- Exhaust System: Check the exhaust hose and fan for blockages and clean as needed to ensure efficient smoke removal.
- General Cleaning: Keep the exterior of the machine clean and free of dust.
- Component Inspection: Regularly inspect cables, belts, and moving parts for any signs of wear or damage.
7. Troubleshooting
This section addresses common issues you might encounter.
| Problem | Possible Cause | Solution |
|---|---|---|
| Laser not firing | Power issue, software error, lid not closed properly, emergency stop engaged. | Check power connection, restart software, ensure lid is fully closed, disengage emergency stop button. |
| Poor engraving/cutting quality | Incorrect material settings, dirty lens, material not flat, laser focus issue. | Adjust power/speed settings, clean laser lens, ensure material is flat on bed, check laser focus. |
| Machine not connecting to computer | USB cable issue, driver not installed, software conflict. | Try a different USB port/cable, reinstall drivers, restart computer and software. |
| Excessive smoke/odor | Exhaust system blockage, inadequate ventilation. | Check and clear exhaust hose/fan, ensure proper connection to outdoor vent or air purifier. |
If you encounter issues not listed here or if solutions do not resolve the problem, please contact Creality customer support.
8. Specifications
- Model: Falcon A1
- Laser Power: 10W (10000mW)
- Laser Spot Size: 0.06 x 0.08 mm
- Working Area: 430 x 316 mm (Max)
- Honeycomb Bed Dimensions: 18.1 x 13.6 x 0.6 inches (460 x 346 x 15mm)
- Cutting Depth (Wood): Up to 6mm (single pass)
- Cutting Depth (Acrylic): Up to 10mm (single pass)
- Safety Class: Class 1 Laser Product
- Software Compatibility: Creality Falcon Design Space, LightBurn, LaserGRBL
- Connectivity: USB
9. Warranty and Support
Creality products are backed by a manufacturer's warranty. For specific warranty terms and conditions, please refer to the documentation included with your product or visit the official Creality website.
For technical support, troubleshooting assistance, or spare parts, please contact Creality customer service through their official website or the contact information provided in your product packaging. When contacting support, please have your product model (Falcon A1) and purchase details readily available.
Online Resources:
- Creality Official Store on Amazon
- Creality Official Website (for general support and product information)