1. Introduction
Thank you for choosing the Gochanmi M10 Professional 10-Channel Audio Mixer. This mixer is designed to provide high-quality audio mixing, recording, and playback capabilities for various applications, including live performances, studio recording, and broadcasting. It features 99 DSP effects, Bluetooth connectivity, USB audio interface functionality, and individual +48V phantom power for each microphone input.
Please read this manual thoroughly before operating the device to ensure proper usage and to maximize its performance and longevity.
2. Safety Information
- Power Supply: Use only the provided power adapter. Ensure the voltage matches your local power supply.
- Ventilation: Do not block ventilation openings. Place the mixer on a stable, flat surface with adequate airflow.
- Moisture: Keep the device away from water, rain, and high humidity. Do not operate with wet hands.
- Heat: Avoid placing the mixer near heat sources or in direct sunlight.
- Cleaning: Disconnect power before cleaning. Use a soft, dry cloth. Do not use liquid cleaners.
- Servicing: Do not attempt to service the unit yourself. Refer all servicing to qualified personnel.
3. Product Overview
Key Features:
- 10-channel professional audio mixer.
- Dual 99 DSP digital reverb effects.
- Ultra-low noise discrete microphone preamplifiers.
- Individual +48V phantom power for each microphone input.
- Bluetooth connectivity for mobile devices.
- USB audio interface function for PC recording and playback.
- USB port for U-disk recording and MP3 playback.
- 3-band equalizer on each mono input channel.
- Built-in 5-band stereo equalizer.
- Auxiliary output and headphone monitor output.
Component Identification:
Familiarize yourself with the mixer's controls and connections. Refer to the images below for detailed button and interface descriptions.
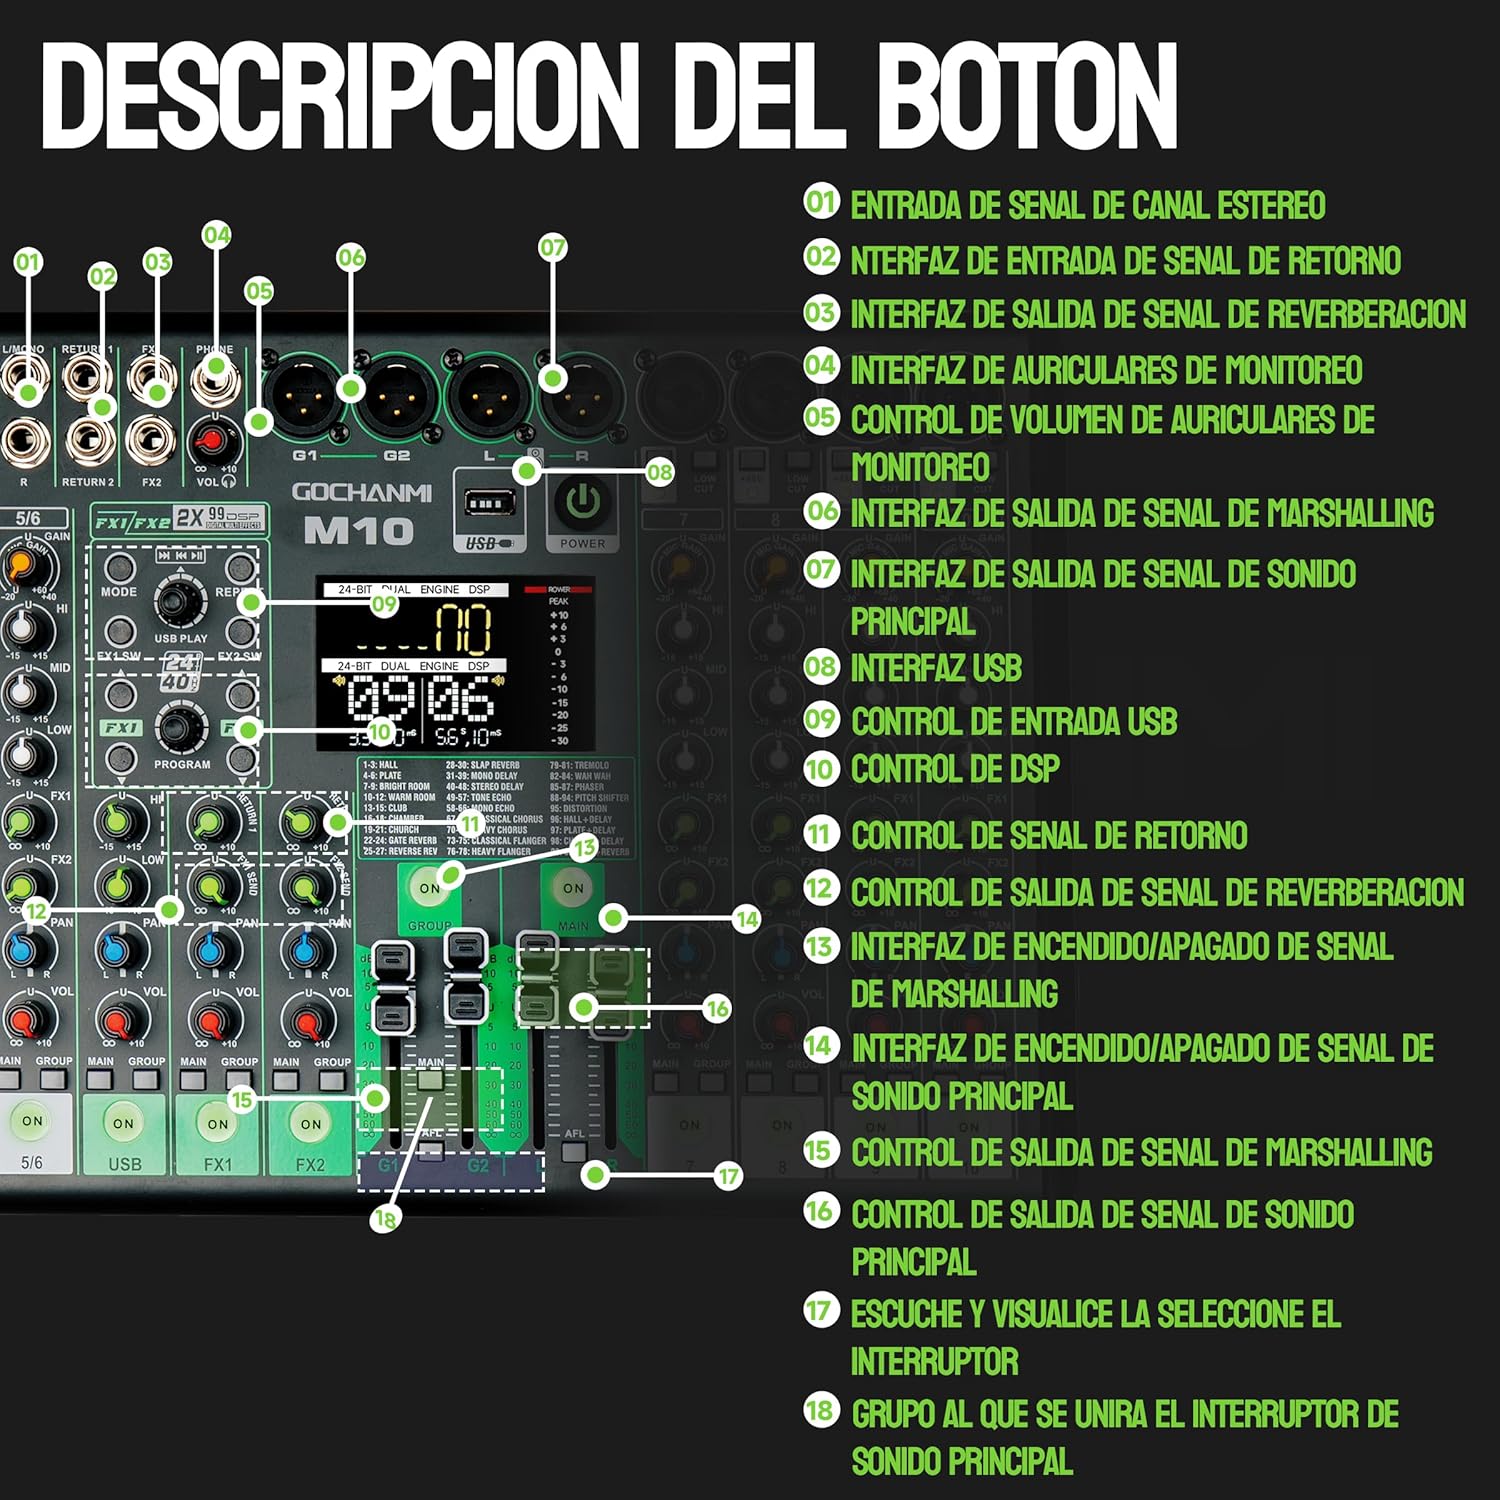
Image: Gochanmi M10 Mixer Top Panel Controls. This image displays the various knobs, faders, and buttons on the top panel of the M10 mixer, including input channels, master section, and digital MP3 player controls.

Image: Gochanmi M10 Mixer Channel Controls. This image provides a close-up view of a single channel strip, detailing the gain, EQ (HI, MID, LOW), effect send, pan, mute, and volume controls, along with the +48V phantom power switch and low-cut filter.
- Multifunction Input Port: Universal interface compatible with XLR and 6.35mm connectors.
- +48V Phantom Power Switch: Each channel has its own +48V switch to provide phantom power to condenser microphones as needed.
- Gain Control: Adjusts the input sensitivity of the channel. Turn right to increase, left to decrease.
- Treble Adjustment (HI): Adjusts the high-frequency range of the input channel.
- Mid-Range Control (MID): Adjusts the mid-frequency range of the input channel.
- Bass Control (LOW): Adjusts the low-frequency range of the input channel.
- Effect Send Control (FX1/FX2): Adjusts the amount of signal sent to the internal effects processor.
- Pan Control (PAN): Adjusts the stereo positioning of the sound source in the channel.
- Mute Button: Mutes all sounds from the corresponding channel.
- Channel Signal Volume Control: Adjusts the output level of the individual channel.
- Channel Main Output Assignment Switch (MAIN): Assigns the channel signal to the main stereo output.
- Channel Group Assignment Switch (GROUP): Assigns the channel signal to a specific group output.
- Low Cut Switch: Activates the low-cut filter for the channel, reducing unwanted low-frequency noise.
- Stereo Channel Signal Input: Inputs for stereo line-level signals.
- Return Signal Input Interface: Inputs for returning processed signals from external effects units.
- Reverb Signal Output Interface: Outputs for sending signals to external reverb units.
- Monitor Headphone Interface: Output for connecting headphones for monitoring.
- Monitor Headphone Volume Control: Adjusts the volume of the connected headphones.
- Auxiliary Send Output Interface (SEND): Output for sending signals to external processors or monitor systems.
- Main Sound Signal Output Interface (MAIN OUT): Main stereo outputs of the mixer.
- USB Interface: Port for connecting to a computer or USB flash drive.
- USB Input Control: Controls for USB audio input/playback.
- DSP Control: Controls for selecting and adjusting the internal DSP effects.
- Return Signal Control: Adjusts the level of the returned signal.
- Reverb Signal Output Control: Adjusts the level of the reverb output signal.
- Auxiliary Send On/Off Switch: Activates or deactivates the auxiliary send.
- Main Output On/Off Switch: Activates or deactivates the main stereo output.
- Auxiliary Send Output Control: Adjusts the output level of the auxiliary send.
- Main Sound Signal Output Control: Adjusts the overall main stereo output level.
- PFL/AFL Monitoring Switch: Pre-Fader Listen / After-Fader Listen switch for monitoring individual channels or groups.
- Channel Group Assignment Switch: Assigns channels to specific groups.
4. Setup
4.1 Power Connection
Connect the provided power adapter to the mixer's power input and then to a suitable power outlet (AC220V, 50Hz or 120V, 60Hz). Ensure the mixer's power switch is in the OFF position before connecting.
4.2 Audio Connections
The Gochanmi M10 mixer offers versatile connectivity for various audio sources and outputs. Refer to the connection diagram below for a visual guide.

Image: Gochanmi M10 Mixer Connection Demonstration. This diagram illustrates how to connect various audio equipment such as wireless microphones, guitars, amplifiers, powered speakers, condenser microphones, dynamic microphones, computers (Windows/MacBook), mobile devices (Android/iPhone/iPad), headphones, and monitoring systems to the M10 mixer.
- Microphones: Connect dynamic microphones using XLR or 6.35mm cables to the multifunction input ports. For condenser microphones, connect via XLR and activate the individual +48V phantom power switch for the respective channel.
- Instruments: Connect instruments like guitars to the 6.35mm line inputs.
- Speakers/Amplifiers: Connect your powered speakers or amplifiers to the MAIN OUT (XLR or 6.35mm) or other output interfaces as required.
- Headphones: Insert headphones into the MONITOR HEADPHONE interface for personal monitoring. The headphone volume can be adjusted separately.

Image: Gochanmi M10 Mixer Phantom Power and Low Cut. This image highlights the independent +48V phantom power buttons for each channel and the low-cut filter switches, essential for connecting condenser microphones and managing low-frequency noise.
4.3 Digital Connections (USB & Bluetooth)
The M10 mixer offers versatile digital connectivity for recording and playback.

Image: Gochanmi M10 Mixer Multifunctional USB Connection. This diagram illustrates how to connect the mixer to a computer as a sound card, pair with a mobile phone via Bluetooth, and connect a USB flash drive for music playback and audio recording.
- USB to Computer (Sound Card Function): Use a dual-head USB cable to connect the mixer to your computer. This allows for simultaneous power supply and data transfer, enabling the mixer to function as an external sound card for recording and playback.
- Bluetooth with Mobile Phone: Activate Bluetooth on your mobile phone and search for "BT-Speaker". Pair with the device. You can then play music from your phone through the mixer and apply equalization.
- USB Flash Drive: Insert a USB flash drive into the USB interface. The mixer can play music stored on the drive or record audio directly to it.
5. Operating Instructions
5.1 Channel Control
- Gain Adjustment: Use the GAIN knob to set the input level for each channel. Adjust until the signal is strong but does not clip (peak LED should not light up constantly).
- Equalization (EQ): Each mono channel features a 3-band EQ (HI, MID, LOW) to shape the tone of your audio.

Image: Gochanmi M10 Mixer EQ Controls. This image details the HI (treble), MID (mid-range), and LOW (bass) adjustment knobs for each channel, allowing precise tonal shaping of your audio.
- Effect Send (FX1/FX2): Use the FX knobs to send a portion of the channel's signal to the internal DSP effects processor.
- Pan Control: Adjust the PAN knob to position the channel's sound within the stereo field (left or right).
- Mute: Press the MUTE button to silence a channel.
- Channel Volume: Use the channel fader or knob to adjust the individual channel's volume.
- Low Cut: Engage the LOW CUT switch to filter out unwanted low frequencies (e.g., rumble from microphones).
5.2 DSP Effects
The M10 mixer includes dual 99 DSP effects for enhancing your audio.

Image: Gochanmi M10 Mixer DSP Effects Adjustment. This image shows the digital display and controls for selecting and adjusting the 99 built-in DSP effects, which can be used independently on two channels.
- Selecting Effects: Use the DSP control knob and display to browse and select from the 99 available effects.
- Adjusting Effects: Once an effect is selected, use the dedicated controls to adjust its parameters (e.g., decay time for reverb, delay time for echo).
- Applying Effects: Use the FX send knobs on individual channels to send signal to the effects processor.
5.3 Main Output and Monitoring
- Main Output: Adjust the MAIN SOUND SIGNAL OUTPUT CONTROL to set the overall volume of the mixer's main stereo output.
- Headphone Monitoring: Use the MONITOR HEADPHONE VOLUME CONTROL to adjust the volume for your headphones. The PFL/AFL switch allows you to listen to individual channels or the main mix before or after the fader.
6. Maintenance
- Cleaning: Regularly wipe the mixer's surface with a soft, dry, lint-free cloth. Avoid abrasive cleaners or solvents.
- Storage: When not in use, store the mixer in a clean, dry environment, away from extreme temperatures and direct sunlight.
- Cable Management: Ensure cables are not tangled or stressed, which can lead to damage.
7. Troubleshooting
- No Sound Output:
- Check all cable connections (inputs, outputs, power).
- Ensure the mixer is powered on.
- Verify channel and main volume levels are up.
- Check if any MUTE buttons are engaged.
- If using phantom power, ensure it's activated for condenser microphones.
- Distorted Sound:
- Reduce the GAIN on input channels to prevent clipping (peak LEDs should not be constantly red).
- Lower the main output volume.
- Check cables for damage.
- Bluetooth Connection Issues:
- Ensure Bluetooth is enabled on both the mixer and your mobile device.
- Make sure the mixer is in Bluetooth mode.
- Unpair and re-pair the device.
- Ensure no other devices are connected to the mixer via Bluetooth.
- USB Recording/Playback Not Working:
- Ensure the USB flash drive is properly inserted and formatted (FAT32 recommended).
- Check if the mixer is in the correct USB mode (playback or recording).
- If connecting to a PC, ensure the correct audio driver is installed and selected in your computer's sound settings.
8. Specifications
| Parameter | Value |
|---|---|
| Input Channels | 10 (10 XLR & 6.5mm interfaces) |
| Line Input | 10 individual mono plug interfaces |
| EQ (Mono Channel) | High: ±15dB, 12KHz; Mid: ±12dB, 2.5KHz; Low: ±15dB, 80Hz |
| EQ (Parametric) | HI: ±15dB / 10KHz; MID: ±15dB / 250Hz-6KHz; LOW: ±15dB / 60Hz |
| Built-in Stereo EQ | 5-band |
| DSP Effects | 99 types (24-bit dual engine) |
| Phantom Power | +48V (switchable per channel) |
| Frequency Response | 20Hz-20kHz, ±3dB |
| Distortion (T.H.D) | 0.003% (A-weighted) |
| Signal-to-Noise Ratio | -80dB |
| Max Output Level | 20dBu |
| Connectivity | 6.35mm, Bluetooth, USB, XLR |
| Output Connectors | Aux, RCA, USB, XLR |
| Dimensions (D x W x H) | 45 x 30 x 10 cm |
| Weight | 2 kg |
| Power Supply | AC18V, 1A (AC 230-240V 50-60Hz or 120V, 60Hz) |
9. Warranty & Support
This product comes with a 30-day seller warranty. For any technical support or warranty claims, please contact your retailer or the manufacturer directly. Keep your purchase receipt as proof of purchase.
10. Usage Scenarios
The Gochanmi M10 mixer is suitable for a wide range of applications:

Image: Gochanmi M10 Mixer Usage Scenarios. This image visually demonstrates the versatility of the M10 mixer, showing its application in concerts, speeches, meetings, various activities, church services, and classrooms.
- Live Events: Control vocals, music, and record performances with condenser microphones.
- Home Studio: Record and control multiple audio tracks.
- Parties: Control tracks, adjust volume, and mix audio.
- Karaoke: Apply vocal effects and control speaker volume.
- Public Speaking: Ideal for speeches, meetings, and presentations.
- Educational Settings: Suitable for classrooms and other educational activities.