DWVO MADWVj9UFE
DWVO Makeup Vanity with Stool Instruction Manual
Model: MADWVj9UFE
Introduction
Thank you for purchasing the DWVO Makeup Vanity with Stool. This manual provides essential information for the safe assembly, operation, and maintenance of your new vanity desk. Please read this manual thoroughly before beginning assembly or use, and retain it for future reference.
This modern vanity desk features app-controlled LED lighting, a built-in power strip, and ample storage solutions including drawers, a side hook, and a fabric pocket. It is designed to be versatile, serving as a makeup station, computer desk, or a stylish accent piece in your home.
Safety Information
- Always follow assembly instructions carefully.
- Ensure all screws and fasteners are securely tightened before use.
- Do not overload drawers or shelves.
- Keep electrical components (LED lights, power strip) away from water.
- Use the included anti-tip hardware kit to secure the vanity to a wall, especially if children or pets are present. This prevents accidental tipping.
- Do not stand or sit on the vanity desk itself. The included stool is designed for seating.
- Unplug the power strip when not in use or during cleaning.
Package Contents
Before assembly, verify that all components listed in the packing list are present and undamaged. If any parts are missing or damaged, contact customer support immediately.
- Vanity Desk Components (Engineered Wood panels, Iron Frame parts)
- Padded Stool Components
- LED Light Strip with Remote Control
- Built-in Power Strip (2 AC outlets, 1 USB, 1 Type-C)
- Hardware Kit (screws, bolts, anti-tip kit)
- Side Hook
- Fabric Pocket
- Assembly Instructions Manual
Setup and Assembly
Assembly is required for this product. It is recommended to assemble the vanity with two people. Clear a spacious area and lay out all components before starting.
Assembly Steps:
- Unpack and Identify Parts: Carefully remove all components from the packaging. Refer to the included parts list and diagrams to identify each piece.
- Assemble the Frame: Begin by assembling the iron frame according to the diagrams in the separate assembly instructions. Ensure all connections are secure but do not fully tighten screws until the entire frame is assembled.
- Attach Wood Panels: Secure the engineered wood panels to the assembled frame. This includes the tabletop, drawer sections, and any side panels.
- Install Drawers: Assemble the two drawers and install them into their designated slots. Ensure they slide smoothly.
- Install Power Strip and LED Lights: Carefully place the built-in power strip into its recess. Attach the LED light strip to the designated area, typically along the underside of the upper shelf or back panel. Connect the LED lights to the power source.
- Attach Side Accessories: Install the interchangeable side hook and fabric pocket as desired.
- Assemble the Stool: Follow the separate instructions to assemble the padded stool.
- Final Tightening: Once all components are in place, systematically tighten all screws and fasteners. Do not overtighten.
- Secure with Anti-Tip Kit: Attach the anti-tip hardware to the back of the vanity and to a wall stud, following the kit's instructions. This is a crucial safety step.
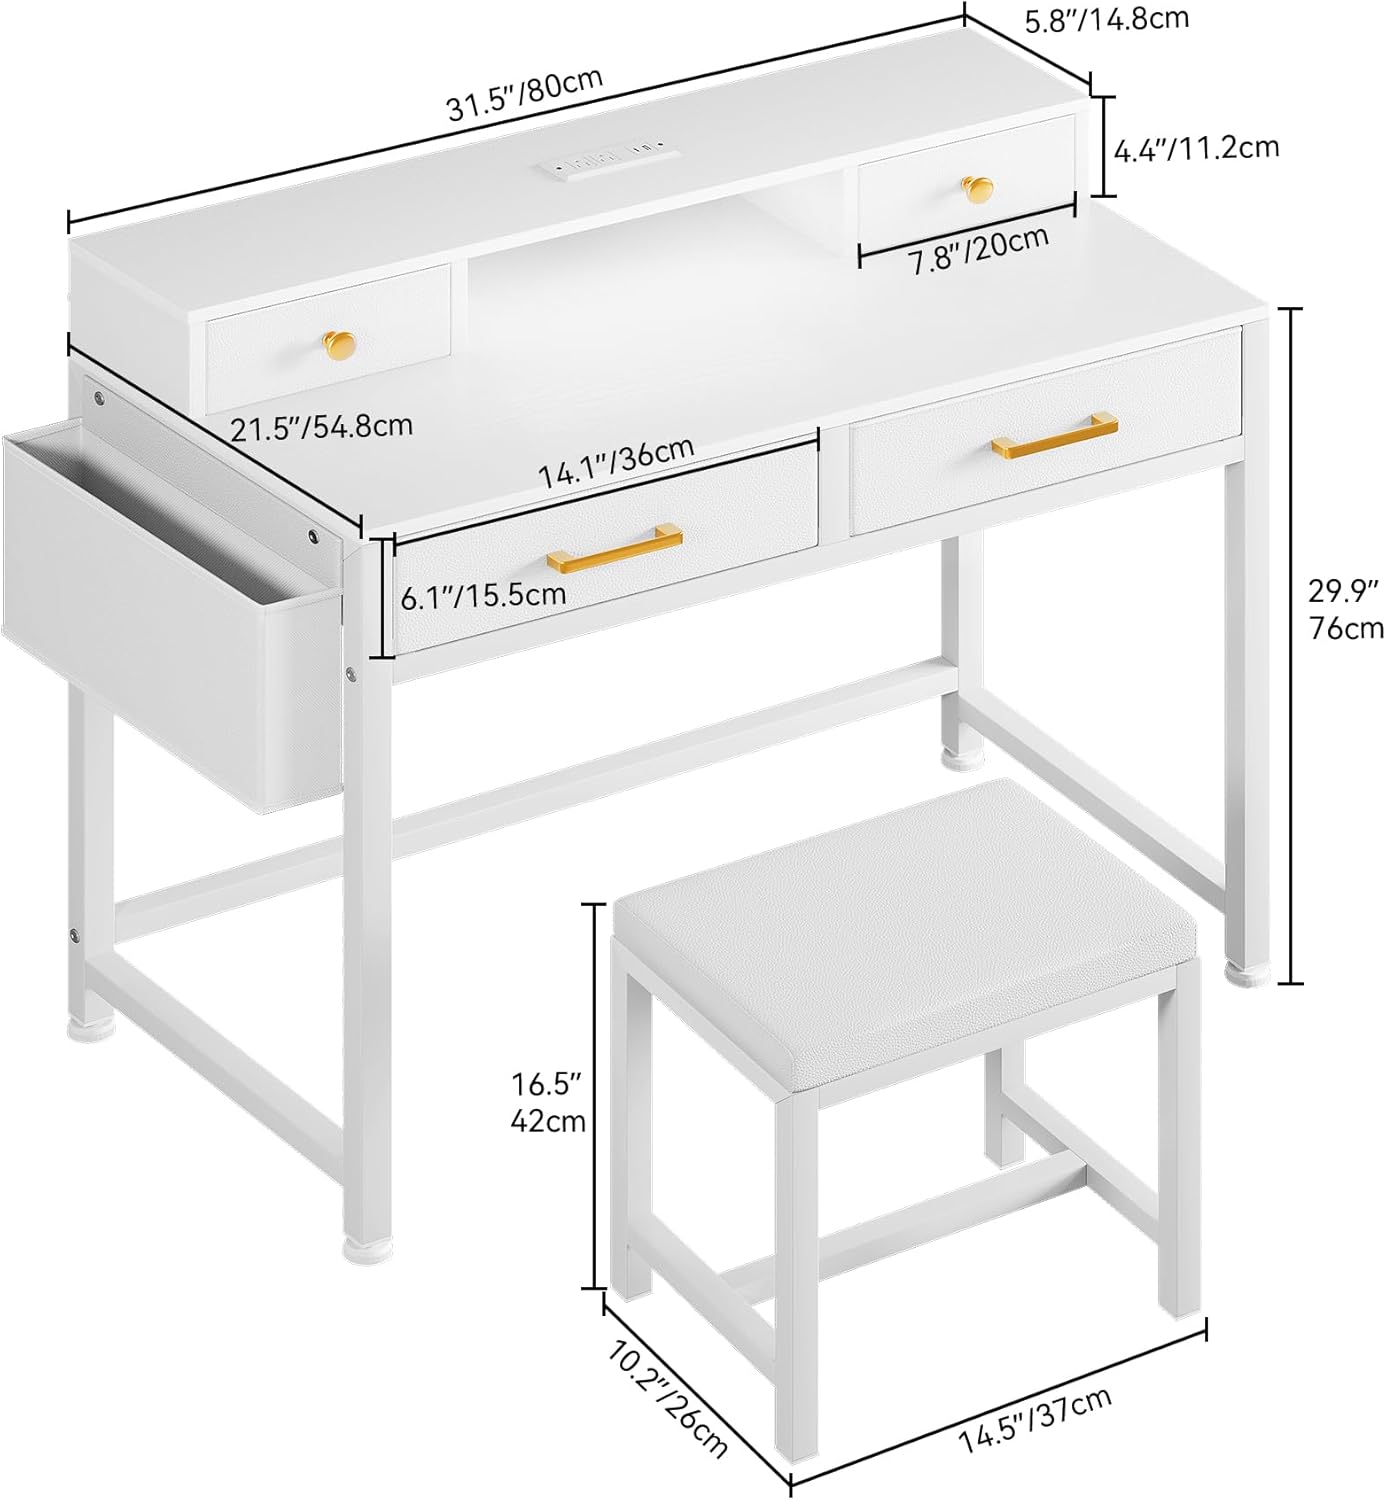
Figure 1: Product Dimensions. This diagram illustrates the overall dimensions of the vanity desk and the accompanying stool, providing measurements in both inches and centimeters for planning your space.
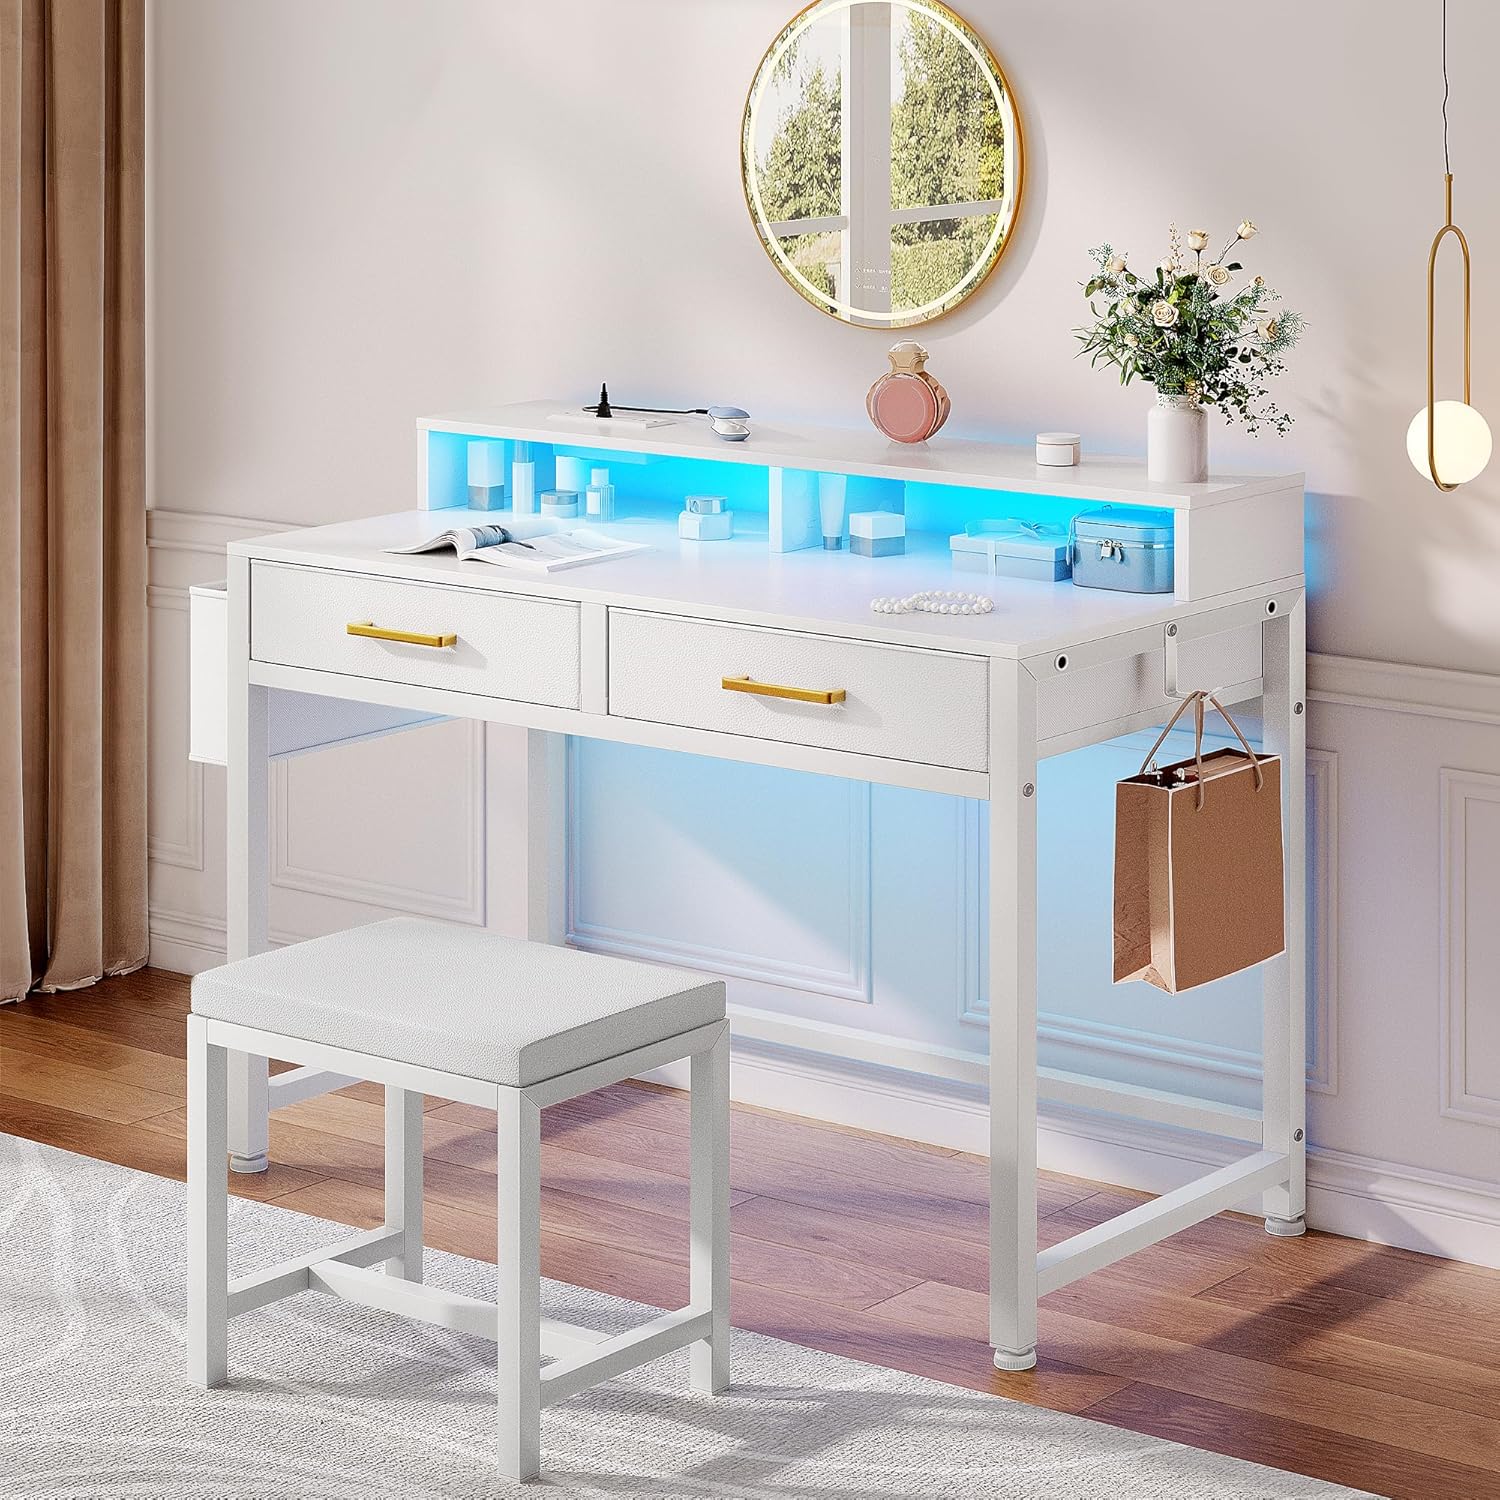
Figure 2: Assembled Vanity Desk. A complete view of the vanity desk and stool after assembly, showcasing its design and features.
Operating Instructions
LED Lighting System:
The vanity features an integrated LED light strip that can be controlled via a remote or a dedicated mobile application.
- Remote Control: Use the provided remote to turn the lights on/off, change colors (over 60,000 options), adjust brightness, set timing functions, and select dynamic modes.
- Mobile App Control: Download the specified mobile application (refer to the LED light manual for QR code or app name). Connect the LED lights via Bluetooth or Wi-Fi as instructed in the app. The app allows for advanced control, including music synchronization and custom lighting scenes.
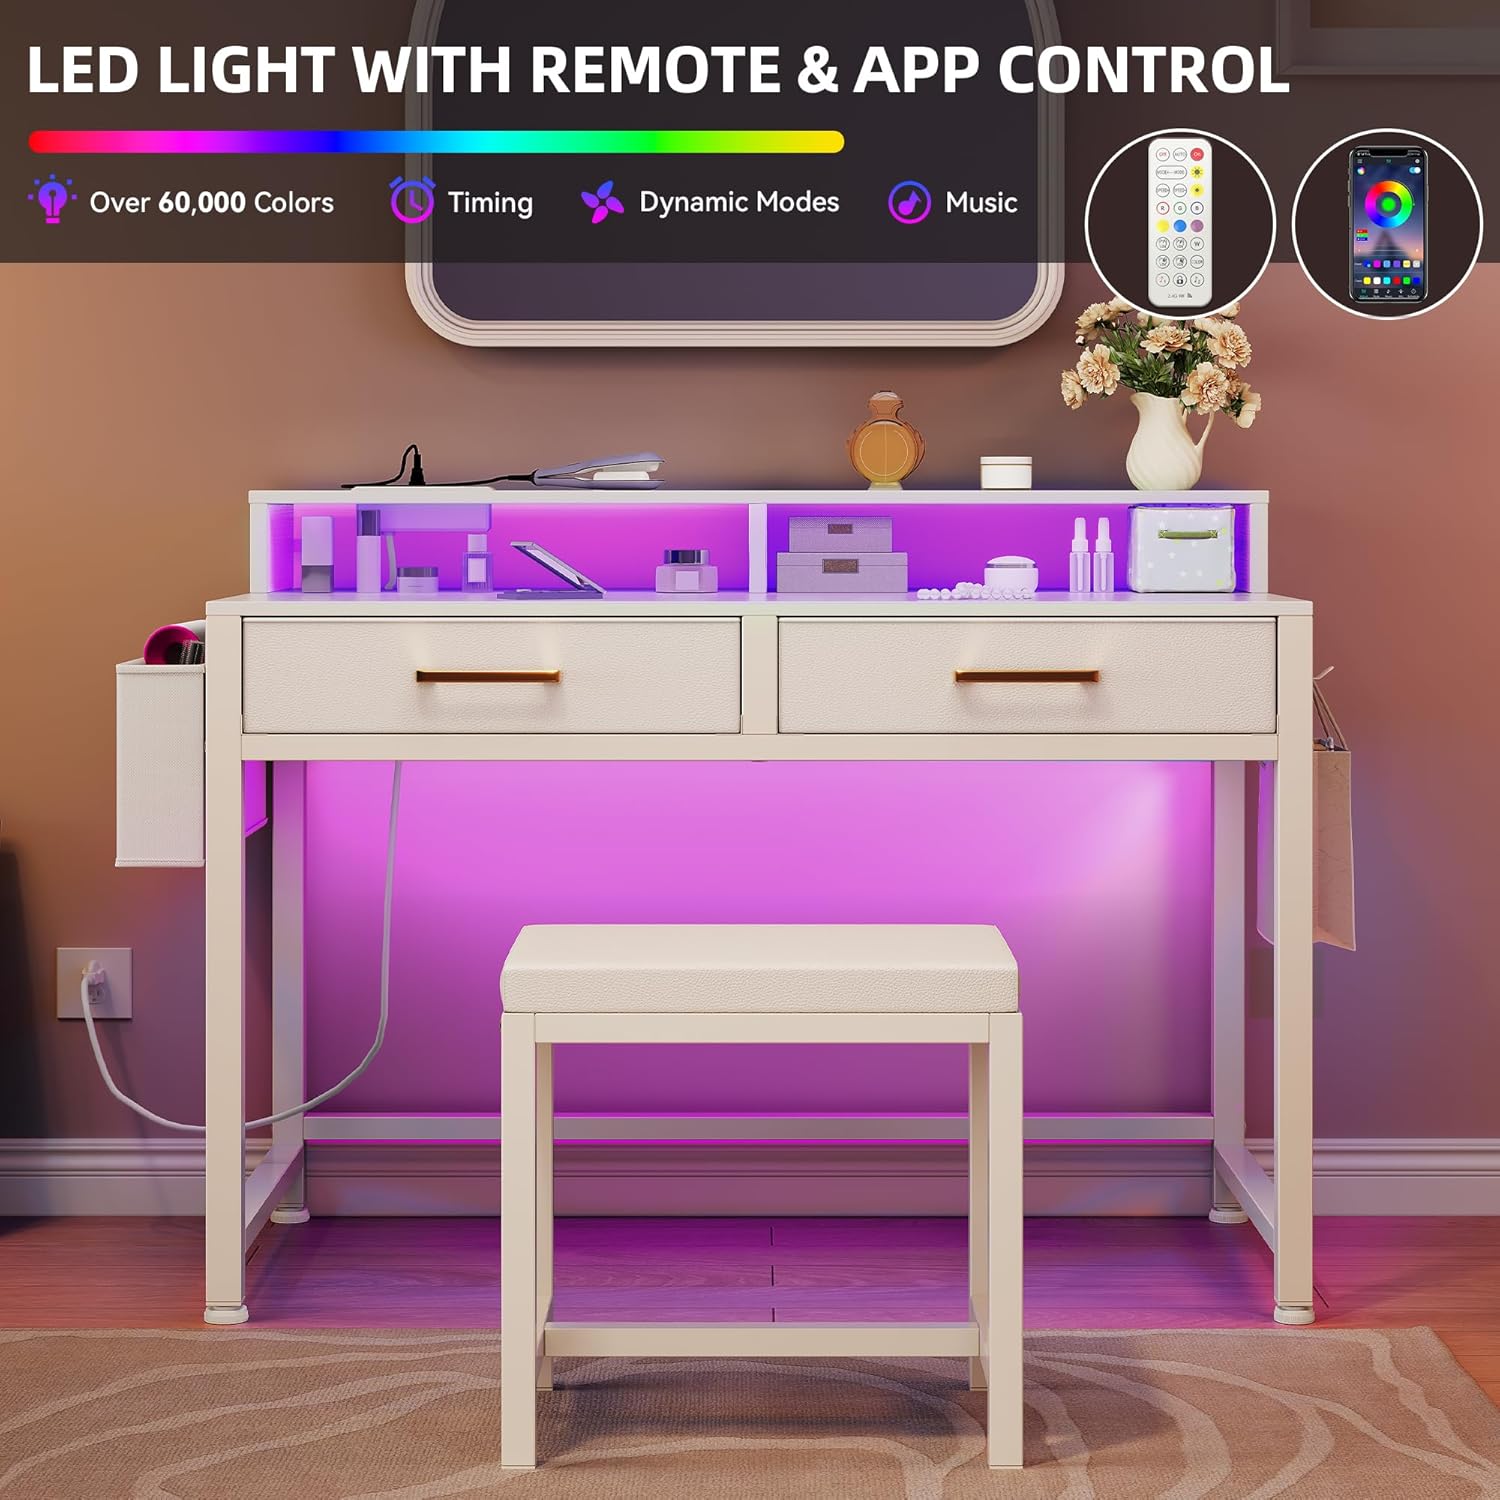
Figure 3: LED Light Control. This image highlights the various control options for the LED lighting, including remote and mobile application capabilities for color, timing, dynamic modes, and music synchronization.
Built-in Power Strip:
The vanity includes a convenient power strip with multiple outlets for your electronic devices.
- AC Outlets: Two 120V/12A AC outlets are available for plugging in hair dryers, curling irons, or other small appliances.
- USB & Type-C Ports: One 5V/2A USB port and one Type-C port are provided for charging smartphones, tablets, and other USB-powered devices.
- Power Cord: The power strip is connected via a 6.6-foot power cord. Plug this cord into a standard wall outlet.

Figure 4: Built-in Power Outlets. A detailed view of the integrated power strip, showing the AC outlets, USB port, and Type-C port, along with the power cord length.
Storage Features:
Utilize the various storage options to keep your items organized.
- Drawers: The two spacious drawers are ideal for storing makeup, accessories, and other personal items.
- Side Hook: The interchangeable side hook can be used for hanging bags, headphones, or other items.
- Fabric Pocket: The fabric pocket provides additional storage for brushes, palettes, or smaller items.

Figure 5: Smart Storage. This image demonstrates the vanity's storage capabilities, including the two main drawers and the convenient side fabric pocket, designed for efficient organization.

Figure 6: Organized Storage. An overhead perspective showing the vanity with its drawers open, illustrating the ample space available for organizing various beauty and personal items.
Maintenance and Care
- Cleaning: Wipe surfaces with a soft, damp cloth. Avoid harsh chemicals or abrasive cleaners, which can damage the finish.
- Dusting: Regularly dust the vanity and stool with a dry, soft cloth.
- Spills: Clean up spills immediately to prevent staining or damage to the engineered wood.
- Fasteners: Periodically check all screws and fasteners to ensure they remain tight. Retighten if necessary.
- LED Lights: The LED lights are designed for long life and typically do not require replacement. If issues arise, consult the troubleshooting section.
- Power Strip: Ensure the power strip is kept dry and free of debris. Do not attempt to repair or modify the power strip.
Troubleshooting
| Problem | Possible Cause | Solution |
|---|---|---|
| LED lights not turning on. |
|
|
| Power outlets not working. |
|
|
| Drawers are stiff or not sliding smoothly. |
|
|
| Vanity feels wobbly. |
|
|
Specifications
| Feature | Detail |
|---|---|
| Brand | DWVO |
| Model Number | MADWVj9UFE |
| Product Dimensions (Vanity) | 31.5" W x 21.5" D x 34.3" H (80cm W x 54.8cm D x 87.1cm H) |
| Stool Dimensions | 14.5" W x 10.2" D x 16.5" H (37cm W x 26cm D x 42cm H) |
| Item Weight | 26.9 pounds (12.2 kg) |
| Frame Material | Engineered Wood, Iron Frame |
| Color | Snow White |
| Power Strip | 2 AC Outlets (120V/12A), 1 USB Port (5V/2A), 1 Type-C Port (5V/2A) |
| Power Cord Length | 6.6 feet |
| LED Lighting | Remote and App Controlled, Over 60,000 Colors, Dynamic Modes, Music Sync |
| Assembly Required | Yes |
| Included Components | Vanity Desk, Stool, LED Light Strip, Power Strip, Hardware Kit, Anti-tip Kit |
Warranty and Support
DWVO stands behind the quality of its products. For specific warranty details, please refer to the warranty card included with your purchase or visit the official DWVO website. Keep your purchase receipt as proof of purchase.
For technical assistance, missing parts, or any questions regarding your DWVO Makeup Vanity, please contact DWVO Customer Support:
- Online Support: Visit the DWVO Store on Amazon for FAQs and contact information.
- Email: [Refer to product packaging or official website for email address]
- Phone: [Refer to product packaging or official website for phone number]
When contacting support, please have your model number (MADWVj9UFE) and purchase date ready.
Ask a question about this manual
Ask about setup, troubleshooting, compatibility, parts, safety, or missing instructions. Manuals+ will review the question and use this page’s manual context to help answer it.