1. Product Overview
This manual provides detailed instructions for the safe and effective use of your Arokimi 1/2 Inch 26-Piece Letter Wood Burning Set. This kit is designed for branding letters onto various materials such as wood, leather, and certain food items. Please read this manual thoroughly before first use.
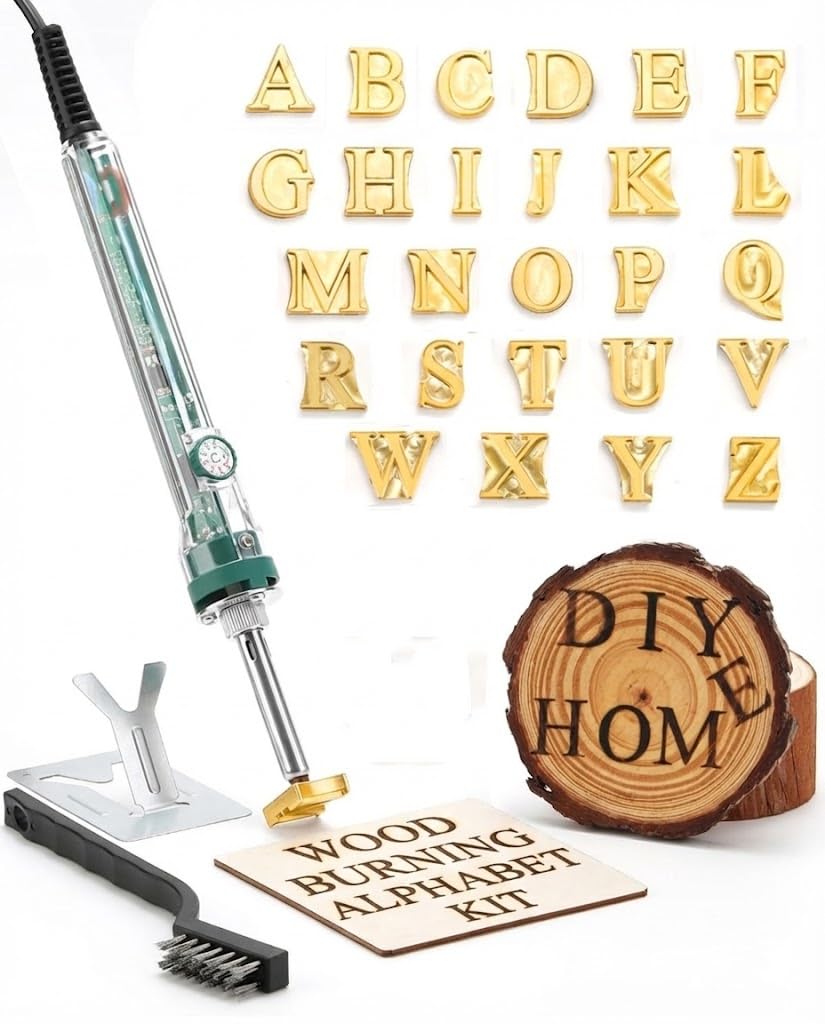
Image 1.1: Complete Arokimi Wood Burning Letter Set, showing the electric branding iron, a set of 26 brass letter stamps, a cleaning brush, and a metal stand.
Package Contents:
- Electric Branding Iron (80W)
- 26 Brass Letter Stamps (1/2 inch)
- Metal Stand
- Cleaning Brush
2. Safety Instructions
WARNING: This tool operates at high temperatures. Failure to follow safety instructions may result in burns, fire, or other injuries.
- Always wear heat-resistant gloves when handling the branding iron and hot letter stamps.
- Ensure adequate ventilation in your workspace to avoid inhaling fumes from burning materials.
- Keep the branding iron and hot stamps away from flammable materials.
- Do not touch the metal parts of the branding iron or the letter stamps when hot.
- Place the branding iron on its metal stand when not in use to prevent accidental contact with surfaces or skin.
- Keep out of reach of children and pets.
- Do not immerse the electric branding iron in water or any other liquid.
- Unplug the tool when not in use and allow it to cool completely before cleaning or storing.
- Use only in a dry environment.
3. Setup
- Attach Letter Stamp: Select the desired brass letter stamp. Carefully screw the chosen letter stamp onto the threaded tip of the electric branding iron. Ensure it is securely fastened but do not overtighten.
- Position Stand: Place the metal stand on a stable, heat-resistant surface.
- Connect Power: Plug the electric branding iron into a suitable power outlet.

Image 3.1: Illustration of attaching a letter stamp and the branding iron heating process.
4. Operating Instructions
- Preheat: Allow the branding iron to heat up for approximately 5 minutes. The metal head will change color as it reaches operating temperature.
- Test Branding: Before branding your final piece, test the heated stamp on a scrap piece of the same material to determine the optimal pressure and duration.
- Apply Brand: Position the heated letter stamp evenly on the desired surface. Apply firm, even pressure for 3-5 seconds. The exact duration may vary depending on the material and desired depth of the brand.
- Cool Down: After branding, immediately place the hot iron back on its metal stand. Allow the iron and stamp to cool completely before attempting to change stamps or clean the tool.
Suitable Materials:
- Wood (e.g., cutting boards, wooden crafts, furniture)
- Leather (e.g., wallets, belts, saddles)
- Food items (e.g., bread, hamburgers, steaks)
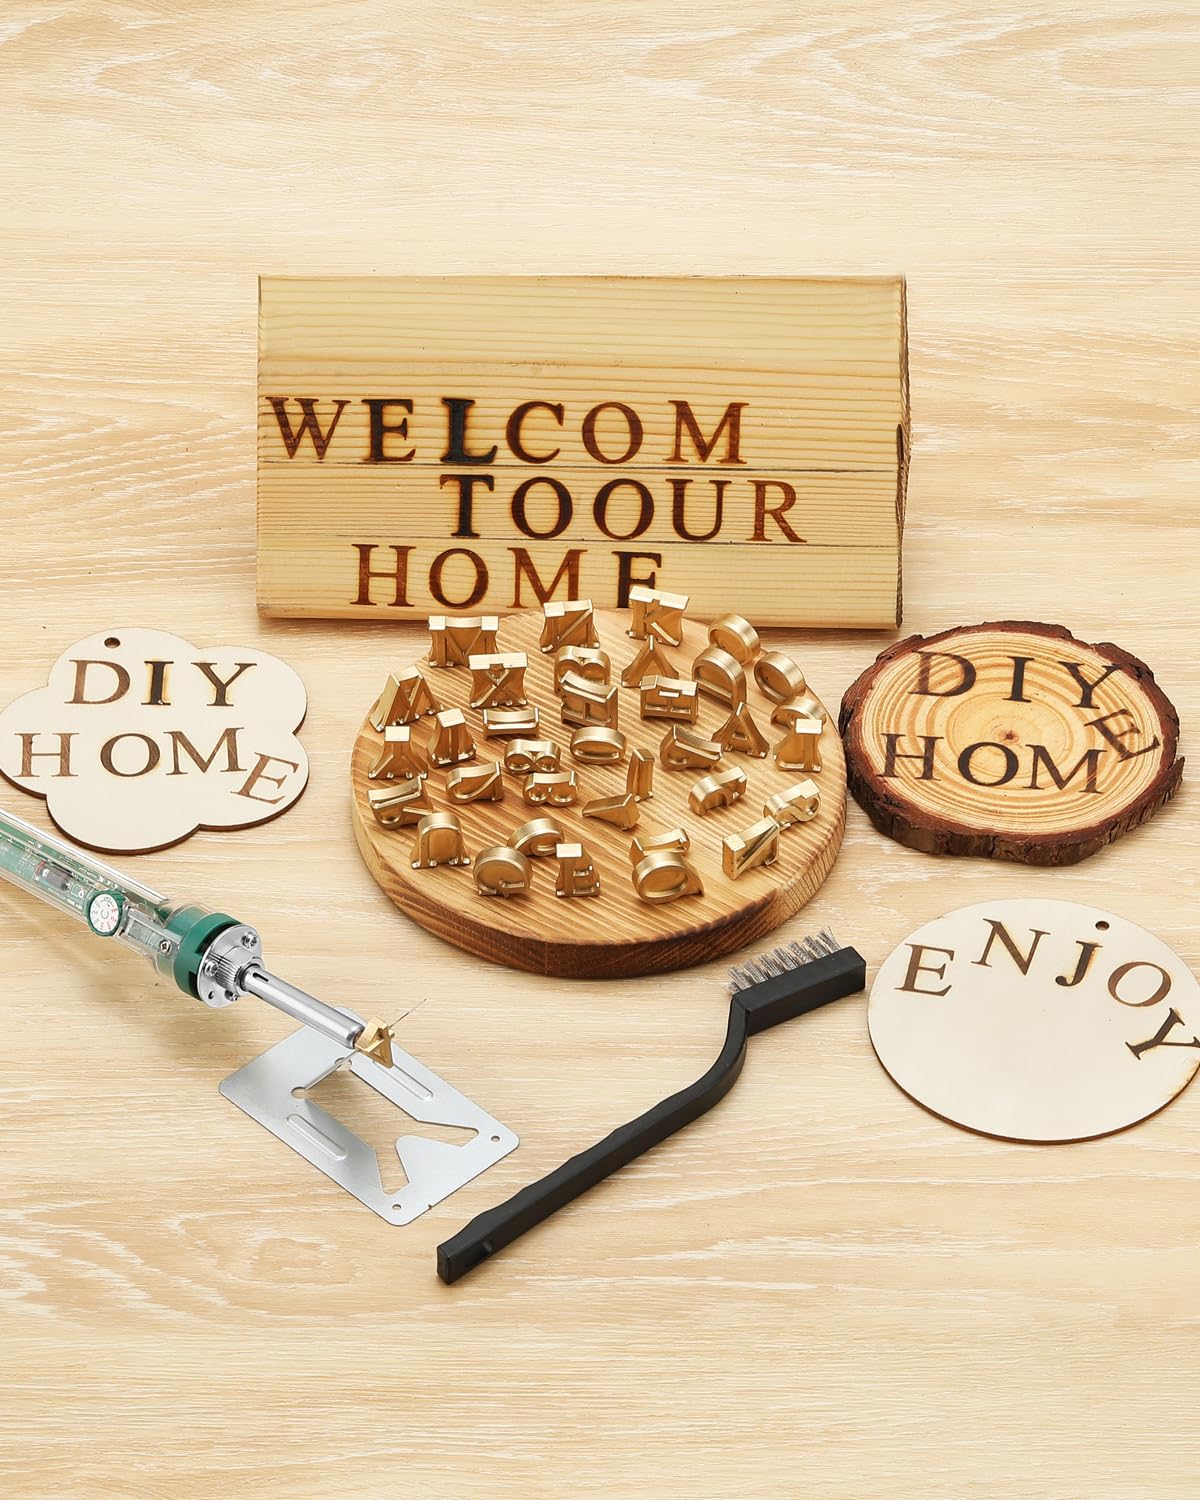
Image 4.1: Examples of creative applications on wood.

Image 4.2: Diverse branding projects on wood and leather.
5. Maintenance
- Cleaning Letter Stamps: After the iron has completely cooled, use the provided cleaning brush to gently remove any residue from the brass letter stamps. For stubborn residue, a soft cloth and mild abrasive cleaner (e.g., brass cleaner) can be used, ensuring the stamp is completely dry before re-use or storage.
- Storage: Store the branding iron and letter stamps in a dry, safe place, away from moisture and extreme temperatures.
- Inspection: Periodically inspect the power cord for any signs of damage. Do not use the tool if the cord is damaged.
6. Troubleshooting
| Problem | Possible Cause | Solution |
|---|---|---|
| Branding iron does not heat up. | Not plugged in, power outlet issue, or damaged cord. | Ensure the iron is securely plugged into a working outlet. Check the power cord for visible damage. If damaged, discontinue use. |
| Brand marks are faint or uneven. | Insufficient preheating time, uneven pressure, or incorrect duration. | Allow the iron to preheat for the full 5 minutes. Apply firm, even pressure across the entire letter stamp. Increase branding duration slightly if needed, testing on scrap material first. |
| Smoke or strong odor during branding. | Normal for wood/leather burning, but excessive smoke indicates poor ventilation or burning too deeply. | Ensure adequate ventilation. Reduce branding duration or pressure. |
7. Specifications

Image 7.1: Detailed dimensions of the 1/2 inch letter stamps.
| Feature | Detail |
|---|---|
| Model Number | Arokimi-letter |
| Power Source | Corded Electric |
| Power Output | 80 Watts |
| Letter Stamp Material | Brass |
| Letter Stamp Size | 1/2 Inch (approx. 1.27 cm) |
| Handle Material | Iron |
| Product Dimensions | 1.52 x 1.52 x 0.25 cm (individual letter stamp) |
| Total Weight | 340 grams (approx.) |
| Included Components | Wood Burning Letter Stamps, Branding Iron Heads, Electric Branding Iron, Brush, Stand |
8. Warranty Information
No specific warranty information is provided in the product details. Please refer to the retailer's return policy or contact the manufacturer directly for warranty inquiries.
9. Customer Support
For any questions, concerns, or assistance with your Arokimi Wood Burning Letter Set, please contact your point of purchase or visit the Arokimi brand page on Amazon.sa.
Arokimi Brand Page: Arokimi on Amazon.sa