1. Introduction
This manual provides essential information for the safe and effective operation of your VEVOR Multi-Powered Electric Fence Charger, Model TT-P6. Please read these instructions thoroughly before installation and use to ensure proper function and safety. This device is designed to manage livestock and deter wildlife by delivering controlled electrical pulses to a fence line.
2. Safety Instructions
- Always disconnect the power supply before performing any maintenance or adjustments to the fence charger or fence line.
- Do not install the electric fence energizer in hazardous areas such as barns or stables where flammable materials may be present.
- To prevent lightning damage, the fence lead into any building must be fitted with a lightning arrester/spark gap on a lightning arrester, which must be connected to earth.
- The discomfort caused by this device does not cause injury. However, it is crucial to train animals to understand the limits of the perimeter. Children and individuals with disabilities should not touch the fence system.
- Ensure proper grounding. Place the grounding stake on moist ground for optimal conductivity. Recommended depth for copper/iron stakes is 31.5-39.37 inches (80-100 cm).
- Keep the device away from water sources unless specifically designed for submersible use. This model has an IP65 waterproof rating, suitable for outdoor weather conditions, but direct submersion is not recommended.
3. Package Contents
The VEVOR Multi-Powered Electric Fence Charger package includes the following items:
- VEVOR Electric Fence Charger (Model TT-P6)
- AC Power Adapter
- DC Battery Connection Cables (Alligator Clips)
- Remote Control
- Alarm Horn
- Mounting Screws
- Warning Sign
- User Manual
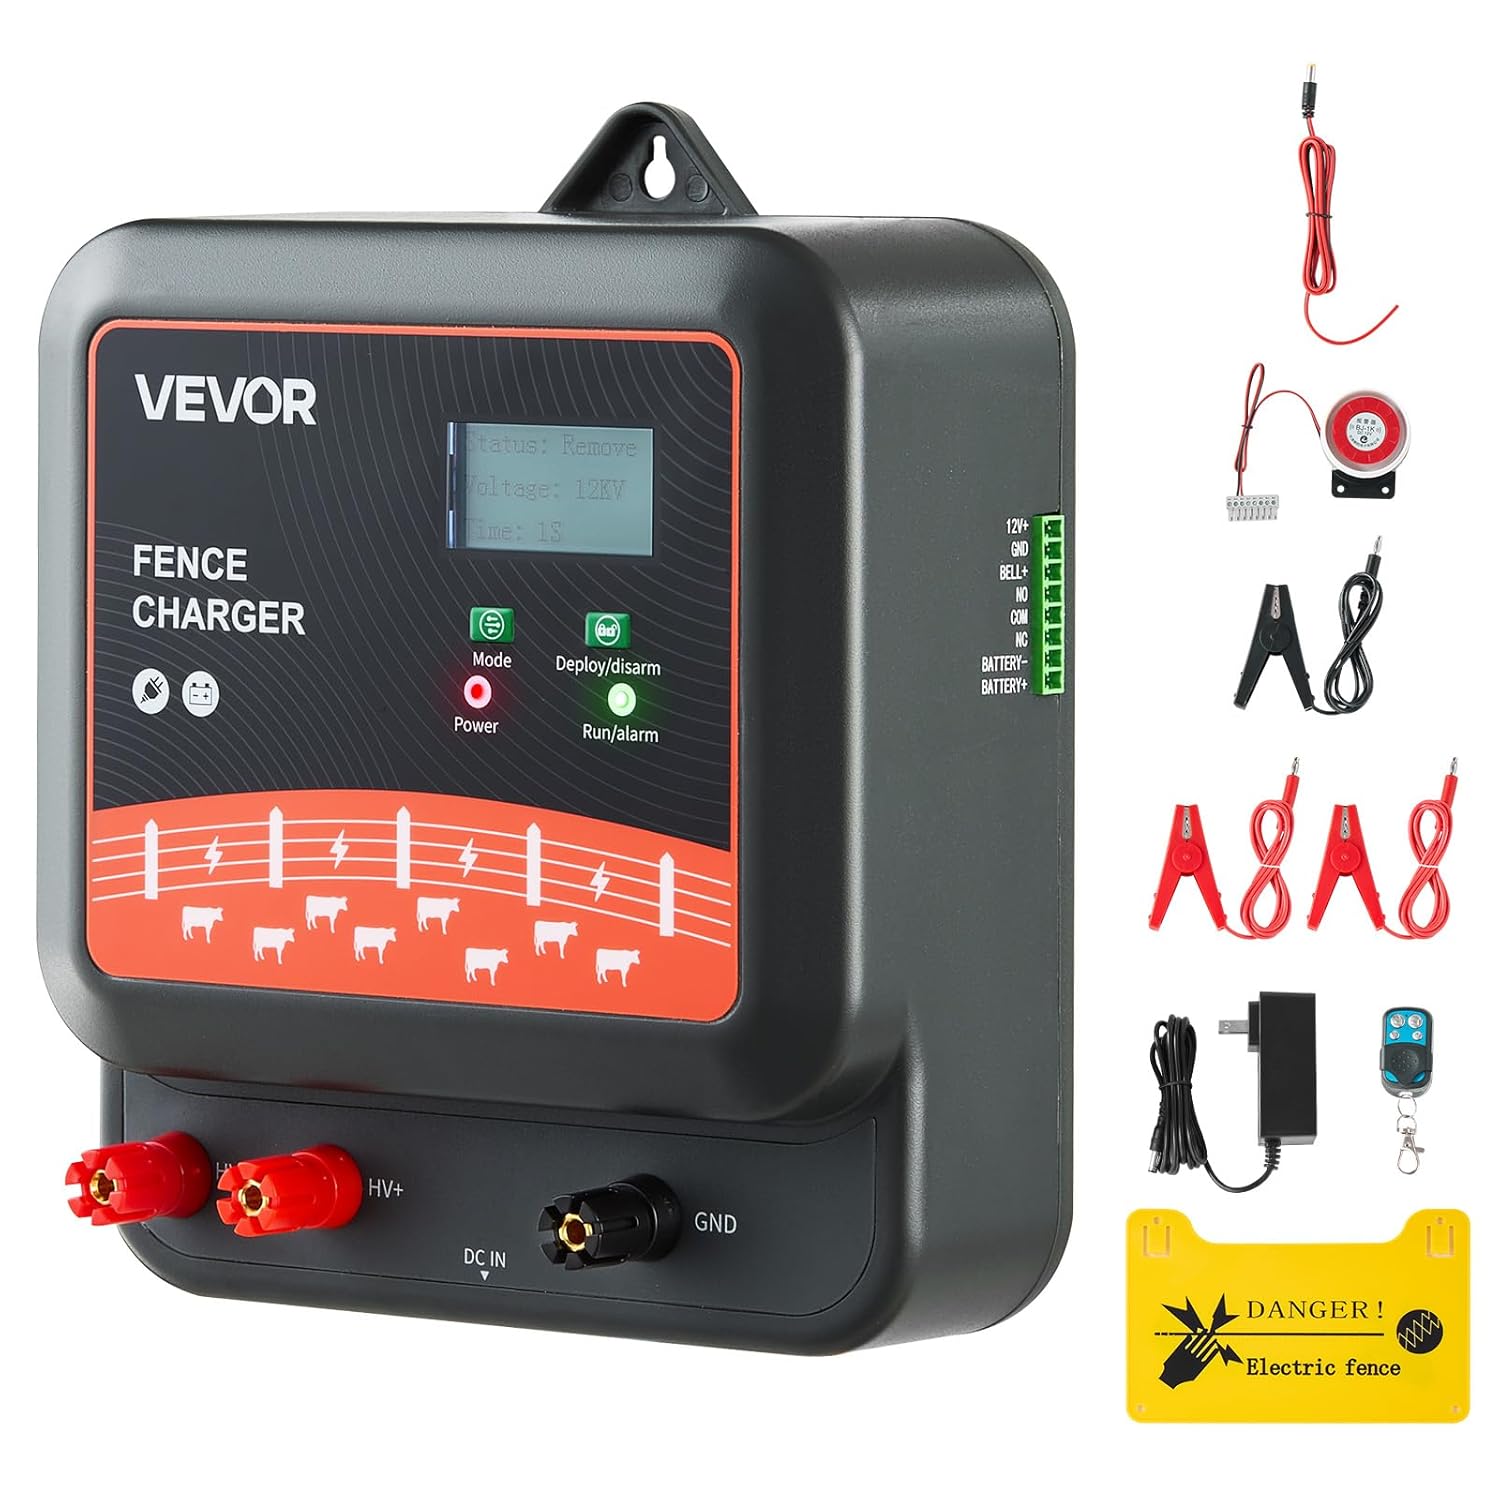
Figure 3.1: VEVOR Multi-Powered Electric Fence Charger with included accessories.
4. Product Features
- Three Voltage Settings: Offers 8kV, 10kV, and 12kV voltage options with output energy of 2.0J, 3.0J, and 5.0J. This allows for adjustment based on animal type and environmental requirements, providing precise protection for various animals from small poultry to large wildlife.
- Real-Time Monitoring: Features a built-in LED display screen that shows current voltage, operational status, and discharge intervals. The Mode button allows for easy adjustment of voltage settings and monitoring of system performance.
- Alarm System: Equipped with an alarm that activates immediately upon fence fault, power interruption, or animal intrusion. The alarm system outputs through a passive switch and horn, ensuring prompt response to maintain fence security.
- Exceptional Durability: Boasts an IP65 waterproof rating, ensuring reliable operation in harsh weather conditions. It functions effectively in temperatures ranging from -40°F to 131°F (-40°C to +55°C). The power adapter is safety-tested for consistent electrical performance.
- Flexible Installation & Wide Application: Comes with a complete installation kit for quick setup. Effective range of 3-10 km, suitable for home farms or agricultural use to prevent wildlife intrusion.

Figure 4.1: Real-time LED display for monitoring fence status.

Figure 4.2: Alarm system for line breaks and animal intrusion.
5. Setup
Follow these steps to set up your VEVOR Electric Fence Charger:
- Choose an Installation Location: The energizer can be installed indoors or outdoors. For outdoor installation, place the unit inside a waterproof box to protect it from direct exposure to elements, despite its IP65 rating.
- Mount the Energizer: Securely mount the energizer using the provided screws. Ensure it is easily accessible for monitoring and adjustments.
- Install Grounding Stake: Drive a copper or iron grounding stake into moist ground to a recommended depth of 31.5-39.37 inches (80-100 cm). Good grounding is critical for effective fence operation.
- Connect Power Supply: The energizer supports multiple power options:
- AC Power: Connect the provided AC adapter to the 'DC IN' port on the energizer and plug it into a standard wall outlet.
- DC Battery: Use the provided alligator clips to connect to a 12V lead-acid battery or other compatible battery (battery not included). Ensure correct polarity (red to positive, black to negative).
- Solar Power: The unit can be connected to a 20-60 Watt solar panel (solar panel not included) for continuous charging.
- Connect to Fence Line: Connect the 'HV+' terminal (red) to your electric fence wire. Connect the 'GND' terminal (black) to your grounding stake.
- Connect Alarm System (Optional): If using the alarm feature, connect the alarm horn to the designated alarm interface on the unit.

Figure 5.1: Power supply options for the VEVOR Electric Fence Charger.

Figure 5.2: Indoor and outdoor installation methods.
6. Operating Instructions
- Power On: Once all connections are secure, press the 'Power' button to turn on the energizer. The LED display will illuminate.
- Monitor Status: Observe the real-time LED display for current voltage, operational status, and discharge intervals. A consistent pulse indicates normal operation.
- Adjust Voltage: Use the 'Mode' button to cycle through the available voltage options (8kV, 10kV, 12kV) and corresponding output energy (2.0J, 3.0J, 5.0J) to suit your specific needs.
- Deploy/Disarm: Use the 'Deploy/Disarm' key to activate or deactivate the fence. A short press adjusts the pulse time, while a long press toggles between deploy and disarm modes.
- Alarm Function: The alarm system will automatically alert you to any fence faults or intrusions. Respond promptly to maintain security.
7. Maintenance
- Regularly inspect the fence line for breaks, shorts, or vegetation growth that could reduce effectiveness.
- Check the grounding stake connection periodically to ensure it remains secure and in moist soil.
- Keep the energizer clean and free from dust and debris. For outdoor units, ensure the waterproof enclosure is intact.
- Test the fence voltage regularly using a fence tester to ensure it is operating at the desired level.
- If using a battery, monitor its charge level and recharge as necessary to prevent deep discharge.
8. Troubleshooting
| Problem | Possible Cause | Solution |
|---|---|---|
| No power/display | Loose power connection, discharged battery, faulty adapter | Check all power connections. Recharge or replace battery. Test AC adapter. |
| Low fence voltage | Poor grounding, fence shorts (vegetation, broken insulators), insufficient power output | Improve grounding. Clear vegetation, repair shorts. Increase energizer voltage setting. |
| Alarm constantly active | Fence fault, power interruption, animal intrusion | Inspect fence line for issues. Check power supply. Investigate potential animal activity. |
| No shock on fence | Incorrect wiring, no power, severe fence short | Verify fence and ground connections. Ensure energizer is powered on. Eliminate all fence shorts. |
9. Specifications
| Feature | Specification |
|---|---|
| Model Number | TT-P6 |
| Brand | VEVOR |
| Voltage Output | 8kV / 10kV / 12kV (Adjustable) |
| Output Energy | 2.0J / 3.0J / 5.0J (Adjustable) |
| Recommended Effective Range | 3-10 kilometers (approx. 1.86-6.2 miles) |
| Discharge Interval | 1 second per pulse |
| Waterproof Rating | IP65 (Outdoor Waterproof) |
| Temperature Range | -40°F to 131°F (-40°C to +55°C) |
| Power Supply Options | AC (adapter included), DC 12V Battery (not included), Solar Panel (20-60W, not included) |
| Product Dimensions | 8.66 x 7.09 x 3.35 inches (220 x 180 x 85 mm) |
| Product Net Weight | 3.44 lbs / 1.56 kg |
| Main Material | ABS |

Figure 9.1: Product dimensions and specifications.
10. Official Product Videos (General Setup Examples)
The following videos provide general guidance on electric fence energizer setup. While they may not feature the exact VEVOR TT-P6 model, the principles of connection and operation are similar.
High Joules Electric Fence Charger Overview
This video demonstrates the general features and components of a high joules electric fence charger, including its display and connection points. It provides a visual overview of what to expect from a similar device.
Electric Fence Charger Setup Example
This video illustrates the basic setup process for an electric fence energizer, showing how to connect power, ground, and fence lines. It can serve as a helpful visual aid for understanding the installation steps.