1. Product Overview
The YIDPU CL-001 is a versatile digital alarm clock designed for modern bedrooms. It combines a clear time display with a 15W fast wireless charging pad, an RGB nightlight, and multiple alarm functions. This manual provides detailed instructions for its proper use and maintenance.

Figure 1: The YIDPU CL-001 alarm clock features a 15W wireless charging pad on its top surface, allowing compatible smartphones to charge by simply placing them on the device.
2. Package Contents
- YIDPU CL-001 Digital Alarm Clock
- Type-C Charging Cable
- Instruction Manual
- Power Adapter (provided)
3. Setup
3.1 Initial Power-Up
- Connect the provided Type-C cable to the clock's Type-C interface (refer to Figure 4 for location).
- Plug the other end of the cable into the power adapter, and then into a wall outlet.
- The display will illuminate, indicating the clock is powered on.
3.2 Battery Backup
The clock uses a CR2032 button battery (not included) for time and setting memory backup during power outages. To install or replace the battery:
- Locate the battery cover on the bottom of the unit.
- Use a small screwdriver to turn the battery cover slot to the left and remove the cover.
- Insert one CR2032 battery with the positive (+) side facing up.
- Replace the battery cover and turn the slot to the right to secure it.

Figure 4: This image provides a closer look at the clock's design elements, including the textured top, the Type-C power input, and the discreetly placed control buttons for various functions.
4. Operating Instructions
4.1 Time Setting
In normal display mode:
- Short press the "S" key (located on the bottom) to enter time setting mode. The hour display will flash.
- Use the "^" (Up) and "V" (Down) keys (located on the bottom) to adjust the hour.
- Short press "S" again to move to minute setting. Adjust minutes using "^" and "V".
- Continue pressing "S" to cycle through year, month, and day settings, adjusting each with "^" and "V".
- After setting the date, short press "S" to exit, or wait 60 seconds for automatic exit.
4.2 Alarm Setting
The clock features 8 alarm tones and a customizable snooze duration.
- In normal display mode, long press the "M" key (located on the bottom) to enter alarm clock setting mode.
- Short press "M" to cycle through hour, minute, snooze time, alarm tone, and alarm activation/deactivation.
- Use the "^" and "V" keys to adjust each parameter.
- The snooze time is adjustable from 1 to 60 minutes (default is 5 minutes).
- After setting, short press "M" to exit, or wait 60 seconds for automatic exit.
4.3 Snooze Function
When the alarm sounds, press the large "SNOOZE" button on top of the clock to activate snooze. The alarm will temporarily pause and sound again after the set snooze duration.
4.4 15W Fast Wireless Charging
The top surface of the clock features a 15W Qi-compatible wireless charging pad.
- Place your Qi-compatible smartphone or earbuds on the center of the charging pad.
- A green indicator light will illuminate for 1 second when charging begins.
- A red indicator light will remain on during charging, turning green when fully charged.
Figure 5: The integrated 15W wireless charging pad provides convenient power for compatible devices, eliminating cable clutter.
4.5 RGB Nightlight Function
The clock features an RGB nightlight with multiple color modes.
- Short press the light icon button (located on the top left) to turn on the color light and cycle through modes: Solid Color, Gradient Flow, Dynamic Chase.
- Long press the light icon button to turn off the color light.
- The night light and the color light cannot be active simultaneously.
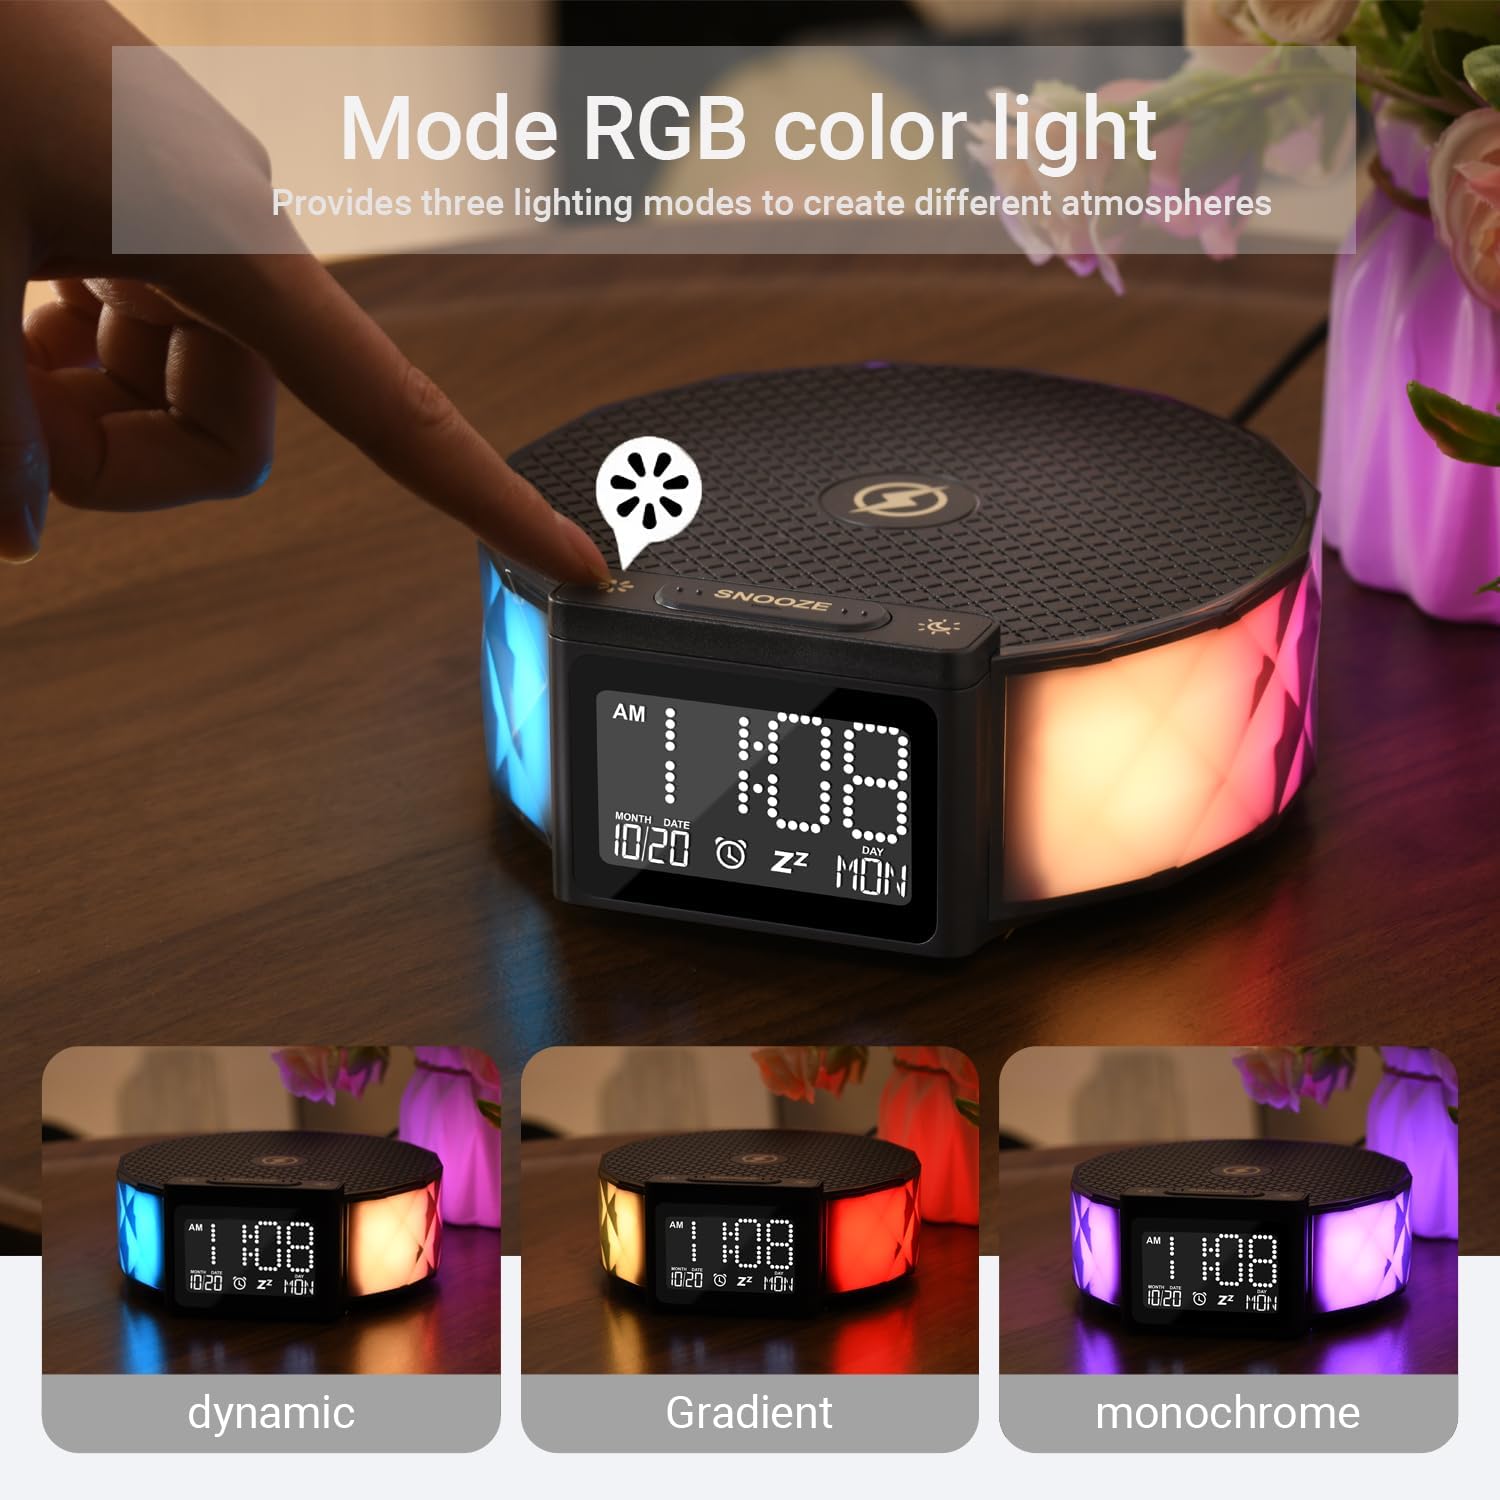
Figure 6: The clock's RGB lighting can be controlled via touch, offering three distinct modes: Solid Color, Gradient Flow, and Dynamic Chase, to suit various preferences.
4.6 Display Brightness Adjustment
The display brightness can be adjusted to suit your preference.
- In normal running state, short press the "SNOOZE" button (located on top) to cycle through the backlight modes: High brightness, Medium brightness, Off.

Figure 7: The digital display offers three adjustable brightness levels (High, Medium, Off) to ensure optimal visibility day or night without causing disturbance.
5. Maintenance
- Cleaning: Use a soft, dry cloth to clean the surface of the clock. Avoid using abrasive cleaners or solvents.
- Placement: Place the clock on a stable, flat surface. Avoid direct sunlight, high temperatures, or humid environments.
- Handling: Do not disassemble or attempt to repair the device yourself. Refer to qualified service personnel for any issues.
6. Troubleshooting
- Clock not turning on: Ensure the Type-C cable is securely connected to both the clock and the power adapter, and the adapter is plugged into a working power outlet. Check if the battery backup is installed correctly.
- Wireless charging not working: Verify that your device is Qi-compatible and properly centered on the charging pad. Remove any thick phone cases that might interfere with charging. Ensure the clock is powered on.
- Display too dim/bright: Adjust the display brightness using the "SNOOZE" button as described in Section 4.6.
- Alarm not sounding: Check that the alarm is set correctly and activated in the alarm settings (Section 4.2). Ensure the volume is not set to minimum.
7. Specifications
| Feature | Detail |
|---|---|
| Brand | YIDPU |
| Model Number | CL-001 |
| Color | Black |
| Display Type | Digital |
| Special Feature | Alarm, 15W Wireless Charging, RGB Nightlight |
| Product Dimensions | 4.6"W x 6.4"H |
| Power Source | Corded Electric |
| Room Type | Bedroom |
| Indoor/Outdoor Usage | Indoor |
| Frame Material | Plastic |
| Batteries Included | No (CR2032 for backup, not included) |
| Item Weight | 13.28 ounces |
8. Warranty and Support
For warranty information or technical support, please refer to the product packaging or contact YIDPU customer service directly. Keep your purchase receipt for warranty claims.