1. Product Overview
The YITAHOME Under Counter Ice Maker Machine is designed for high-efficiency ice production, suitable for home, cafe, bar, and restaurant use. It features a robust stainless steel construction, advanced intelligent controls, and energy-saving operation.
- High Efficiency: Produces up to 100 lbs of ice per 24 hours with a 33 lbs storage bin.
- Adjustable Ice Thickness: Ice cube thickness can be adjusted by changing the ice making time.
- Certifications: ETL & DOE certified for safety and quality.
- Energy Saving & Quiet: CFC-free upgraded compressor saves up to 35% electricity and operates quietly.
- Extended Cooling Time: 20% thicker cyclopentane insulation layer extends ice holding time from 6 to 8 hours.
- Smart LCD Control Panel: Features one-key cleaning, 24-hour reservation, defrosting, and various reminders.

Figure 1.1: Front view of the YITAHOME Under Counter Ice Maker Machine.
2. Safety Instructions
Please read all instructions carefully before operating the ice maker to ensure safe and proper use. Keep this manual for future reference.
- Electrical Safety: Ensure the power outlet matches the voltage requirements of the appliance. Do not use extension cords. Always unplug the unit before cleaning or maintenance.
- Placement: Place the ice maker on a stable, level surface. Ensure adequate ventilation around the unit. Do not block air vents.
- Water Connection: Connect the unit to a potable water supply only. Ensure all water connections are secure to prevent leaks.
- Children and Pets: Keep children and pets away from the appliance during operation.
- Maintenance: Only perform maintenance as described in this manual. For complex repairs, contact qualified service personnel.
- Protective Film: Remove all protective film from the unit before first use.
3. Setup
3.1 Unpacking and Initial Inspection
Carefully remove the ice maker from its packaging. Inspect the unit for any shipping damage. Before use, remove the protective film from the stainless steel surfaces of the ice maker.

Figure 3.1: Illustration of removing the protective film from the ice maker's surface.
3.2 Placement
The YITAHOME ice maker is designed for both freestanding and under-counter installation. Ensure the chosen location has sufficient space for ventilation and is on a stable, level surface. Allow the unit to stand upright for at least 24 hours before plugging it in to allow refrigerants to settle.

Figure 3.2: Example of the ice maker placed under a counter in a kitchen setting.
3.3 Water Connection
Connect the ice maker to a potable water supply using the provided water inlet hose and filter. The included water filter helps to purify tap water, ensuring clear ice cubes. Ensure all connections are tight to prevent leaks.

Figure 3.3: Diagram showing the water inlet, filter, and waterspout connections at the back of the ice maker.
Video 3.1: Demonstrates the unboxing, components, and water connection process for the ice maker.
Video 3.2: Provides a detailed overview of the ice maker's features, including setup and operation.
3.4 Power Connection
Once the unit has settled and water connections are secure, plug the ice maker into a grounded electrical outlet. The control panel will illuminate, indicating the unit is ready for operation.
4. Operating Instructions
4.1 Control Panel Overview
The smart LCD control panel allows for easy operation and monitoring of the ice maker. Key functions include On/Off, Light control, Clean cycle, Timer, and Ice Thickness adjustment.

Figure 4.1: Detailed view of the intuitive touch controls on the ice maker's panel, showing buttons for On/Off, Light, Clean, Timer, and ice thickness adjustment.
4.2 Ice Production
To begin ice production, press the "On/Off" button. The unit will automatically start the ice-making cycle. Each cycle produces 36 clear ice cubes in approximately 10-20 minutes. The ice maker can produce up to 100 lbs of ice per day.
- Adjusting Ice Thickness: Use the '+' and '-' buttons on the control panel to adjust the thickness of the ice cubes. Thinner ice takes 8-10 minutes, medium 11-15 minutes, and thick 16-20 minutes.
- Blue Light: The built-in blue light improves ice maintenance time and provides clearer vision when scooping ice.

Figure 4.2: Visual representation of the ice maker's 33 lbs ice bucket and 100 lbs/24h production capacity, highlighting energy efficiency.
Video 4.1: Shows the ice maker in operation, demonstrating ice production and the blue light feature.
4.3 24-Hour Reservation Function
The ice maker features a 24-hour reservation function, allowing you to set a timer for when you want ice production to start. This feature helps improve operational efficiency and can reduce energy costs.
5. Maintenance
5.1 Automatic Cleaning System
The ice maker is equipped with an automatic cleaning function. To activate, press the "Clean" button on the control panel. This function helps to effectively keep the ice-making components clean and hygienic.

Figure 5.1: The ice maker's automatic cleaning cycle in action, showing water circulation within the unit.
5.2 Water Filter Maintenance
The included water filter helps maintain ice clarity and quality. Periodically check and replace the filter as needed to ensure optimal performance. Refer to the filter's instructions for specific replacement intervals.
5.3 General Cleaning
Regularly wipe down the exterior of the unit with a soft, damp cloth. For the interior, after draining any remaining water, wipe surfaces with a mild detergent solution and rinse thoroughly. Ensure the unit is completely dry before resuming operation.
6. Troubleshooting
This section provides solutions to common issues you might encounter with your YITAHOME ice maker. If the problem persists, please contact customer support.
| Problem | Possible Cause | Solution |
|---|---|---|
| Ice maker not producing ice. | No water supply; power issue; unit not turned on. | Check water connection and supply; ensure unit is plugged in and turned on. |
| Ice cubes are too thin/thick. | Ice thickness setting needs adjustment. | Adjust ice thickness using the control panel buttons. |
| "Ice Full" indicator is on, but bin is not full. | Ice sensor is blocked or dirty. | Clean the ice sensor area. |
| Unit is noisy. | Normal operation sounds; unit not level. | Ensure unit is on a level surface. Some operational sounds are normal. |
7. Specifications
| Feature | Detail |
|---|---|
| Brand | YITAHOME |
| Model Name | Commmercial Ice Machine |
| Item Model Number | MAYIHl7UmA |
| Product Dimensions | 15.67"D x 18.11"W x 29.72"H |
| Ice Making Capacity | 100 lbs/24h |
| Ice Storage Capacity | 33 lbs |
| Voltage | 110 Volts |
| Refrigerant | R290 |
| Insulation Foaming | Polyurethane |
| Country of Origin | China |
8. What's in the Box
- Ice scoop
- Water Inlet Hose
- PP Cotton Filter
- Drain Hose
- Adjustable Stand Legs (4)
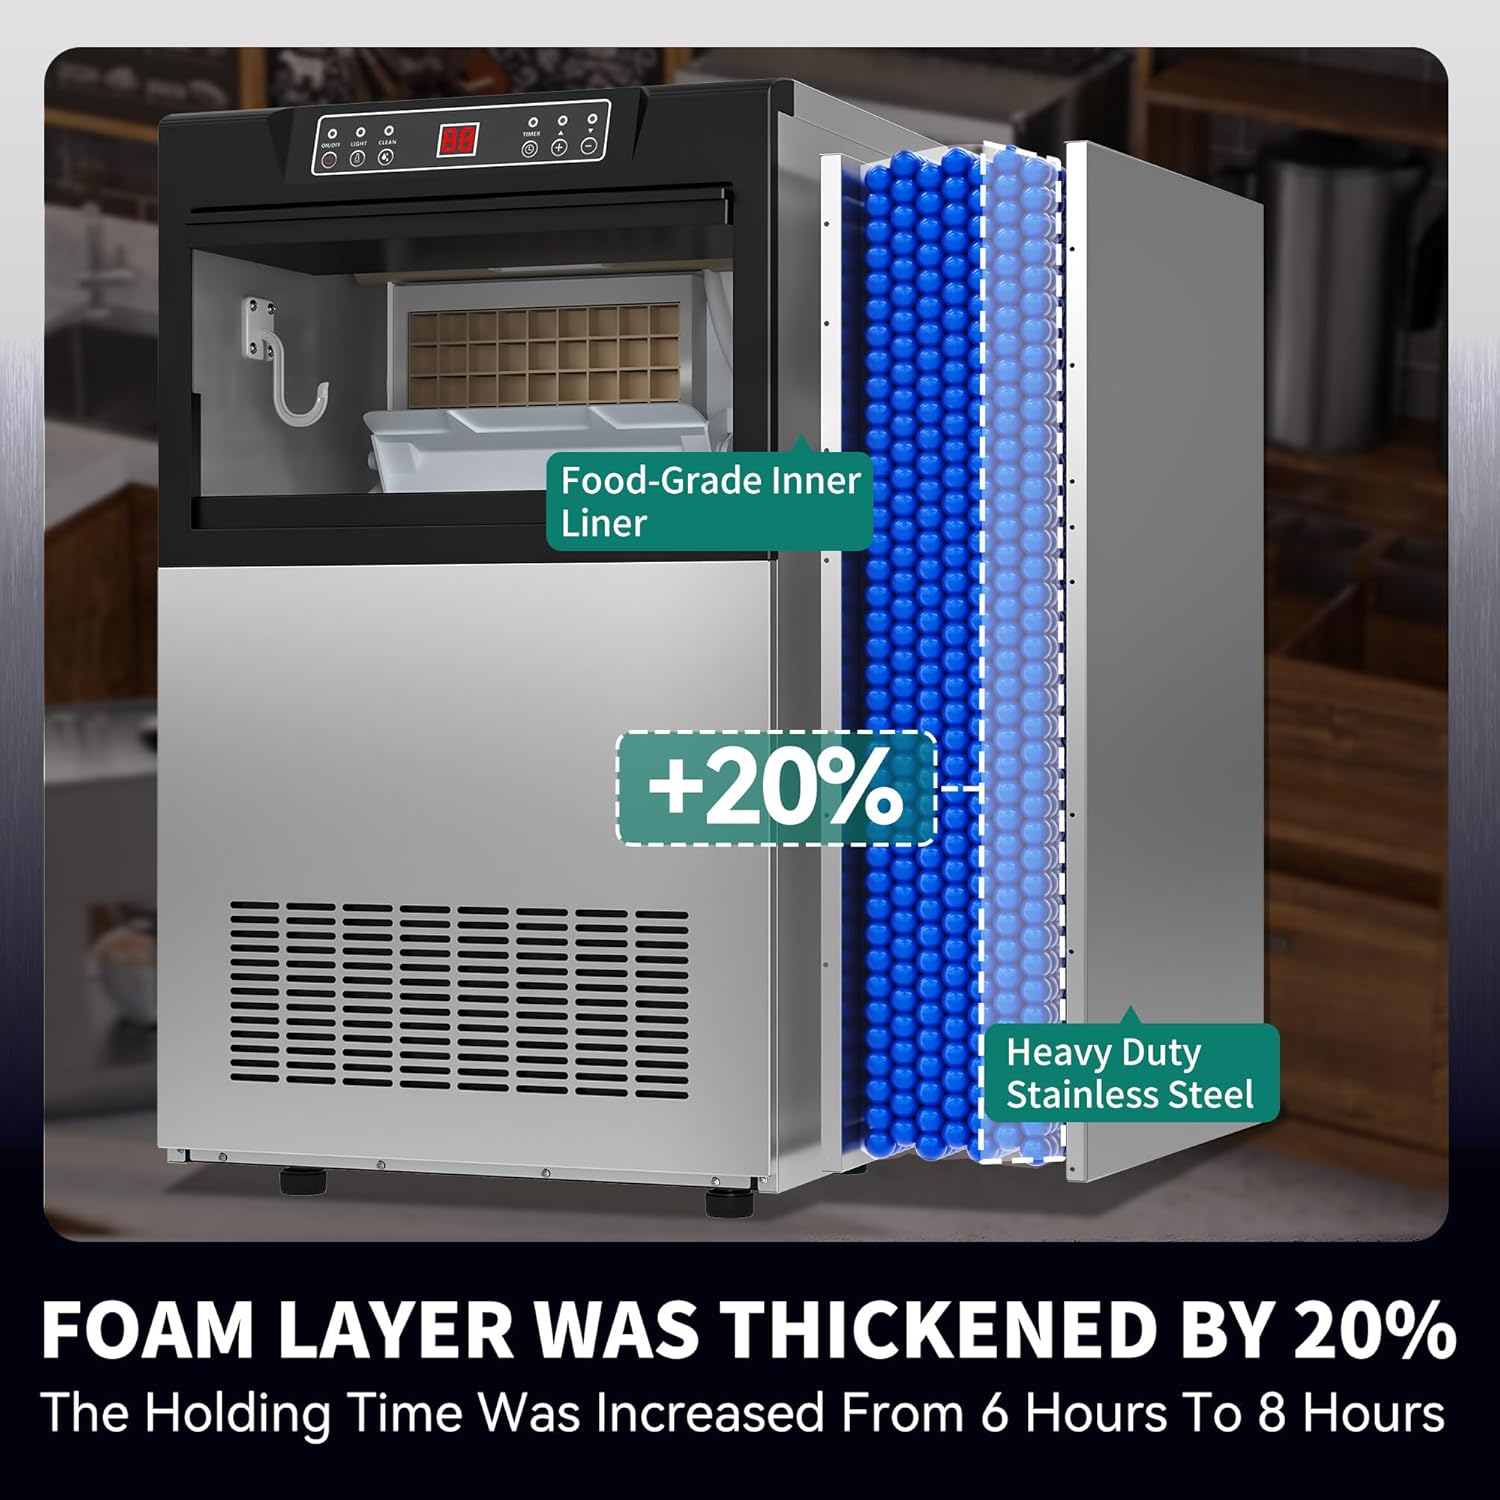
Figure 8.1: Overview of included accessories: stainless steel ice shovel, drain hose, water filter, and adjustable feet.
9. Warranty and Support
For warranty information, technical support, or any inquiries regarding your YITAHOME ice maker, please refer to the contact information provided with your purchase or visit the official YITAHOME website. Customer support is available to assist with any issues.
You can also visit the YITAHOME Store on Amazon for more information and support resources.