Tenpmas MT53B-64GB-US5
Tenpmas Motorcycle CarPlay Screen User Manual
Model: MT53B-64GB-US5
1. Product Overview
The Tenpmas Motorcycle CarPlay Screen is an advanced 7-inch display system designed for motorcycles, integrating a dash cam, navigation, and smartphone connectivity. It features a robust, waterproof design suitable for various riding conditions.

Figure 1.1: Tenpmas Motorcycle CarPlay Screen and Included Components.
Key Features:
- Motorcycle DVR with 4K+1080P Dual Cameras: UHD 4K front camera and HD 1080P rear camera with 150° wide-angle, supporting split-screen display and loop recording.
- CarPlay & Android Auto & Wired Controller: Wireless smartphone connectivity via Bluetooth for navigation, music, and apps. Includes a wired controller for hands-free operation.
- 7" HD Display & Brightness Adjustment & IP67 Waterproof: Anti-glare, rugged IP67 waterproof touchscreen for clear visibility in all weather conditions.
- BT Audio: Seamless Bluetooth audio connectivity for calls and music through headphones or helmet.
- Hassle-Free Installation: Designed for easy setup with included bracket kit and tools.
- Built-in WiFi: Allows real-time viewing, playback, and downloading of recorded files.
2. What's in the Box
Verify that all components listed below are included in your package:

Figure 2.1: Package Contents.
- 7-inch Motorcycle CarPlay Screen (Monitor)
- Front Camera (4K)
- Rear Camera (1080P)
- Wired Controller
- GPS Module
- 64GB TF Card (pre-installed or included separately)
- Power Cable
- Mounting Bracket Kit (Handlebar and Rearview Mirror options)
- User Manual (this document)
3. Setup and Installation
The system is designed for straightforward installation. Please follow these steps carefully.
3.1 Mounting the Display
Two mounting options are provided: Handlebar Bracket and Rearview Mirror Bracket.
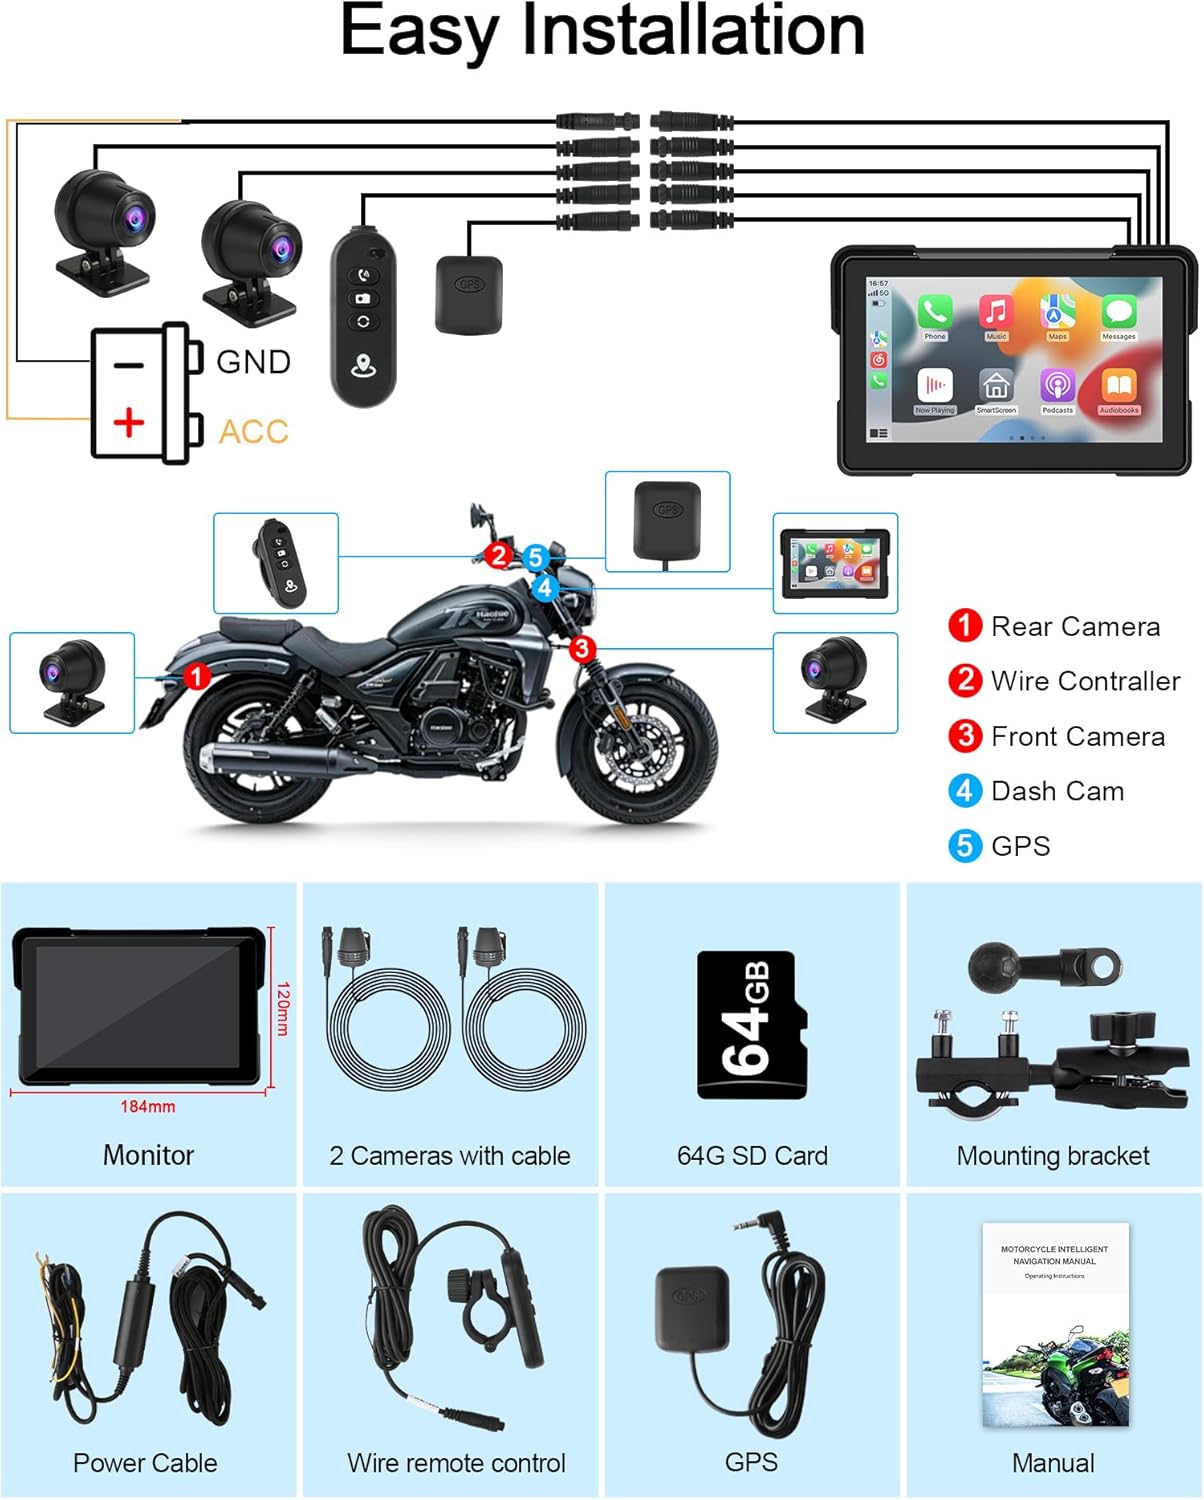
Figure 3.1: Display Mounting Options.
- Handlebar Bracket: Securely attach the handlebar bracket to your motorcycle's handlebars. Adjust the angle for optimal viewing.
- Rearview Mirror Bracket: Remove your motorcycle's rearview mirror, install the rearview mirror bracket, then reattach the mirror. Adjust the bracket for optimal display positioning.
- Once the bracket is secure, attach the 7-inch display to the bracket. Ensure it is firmly in place.
3.2 Camera and Wiring Installation
Proper wiring is crucial for optimal performance. All cables are labeled for easy identification.
Figure 3.2: Wiring Diagram.
- Front Camera: Mount the 4K front camera in a position that provides a clear, unobstructed view of the road ahead. Connect its cable to the designated port on the main unit.
- Rear Camera: Mount the 1080P rear camera at the back of your motorcycle, ensuring a clear view. Connect its cable to the designated port.
- Wired Controller: Install the wired controller in an easily accessible location on your handlebars. Connect its cable to the main unit.
- GPS Module: Connect the GPS module to the main unit. Position the module with a clear view of the sky for optimal signal reception.
- Power Connection: Connect the power cable to your motorcycle's power source. Ensure the positive terminal (ACC) is connected correctly to prevent the unit from not shutting down normally when the motorcycle is turned off. The GND (ground) wire should be securely connected to the motorcycle chassis.
- Cable Management: Secure all cables using cable ties to prevent them from dangling or interfering with motorcycle operation. Ensure all connections are watertight.
4. Operating Instructions
4.1 Powering On/Off
The device typically powers on automatically when the motorcycle's ignition is turned on, and powers off when the ignition is turned off, provided the ACC wire is correctly connected.
4.2 Wireless CarPlay & Android Auto
Connect your smartphone wirelessly to access navigation, music, and other apps.

Figure 4.1: Wireless CarPlay and Android Auto Interface.
- Ensure your smartphone supports wireless CarPlay or wireless Android Auto.
- On the CarPlay screen, select either "CarPlay" or "Android Auto".
- Enable Bluetooth on your smartphone and pair it with the CarPlay screen.
- Follow the on-screen prompts to complete the connection.
- Once connected, your phone's compatible apps will be displayed on the screen.
4.3 Dash Cam (DVR) Functionality
The integrated dual cameras record your journey in high definition.

Figure 4.2: Dual Camera System Features.
- Simultaneous Recording: Both front (4K) and rear (1080P) cameras record simultaneously.
- Split-Screen Display: The screen can display feeds from both cameras concurrently.
- Loop Recording: The system automatically overwrites the oldest footage when the SD card is full.
- Collision Sensors: In case of an impact, the system automatically locks the current recording to prevent it from being overwritten.
- Viewing and Sharing: Use the built-in WiFi to connect to a smartphone app for real-time viewing, playback, and downloading of recorded files.
4.4 Wired Controller Operation
The wired controller provides convenient access to key functions while riding.
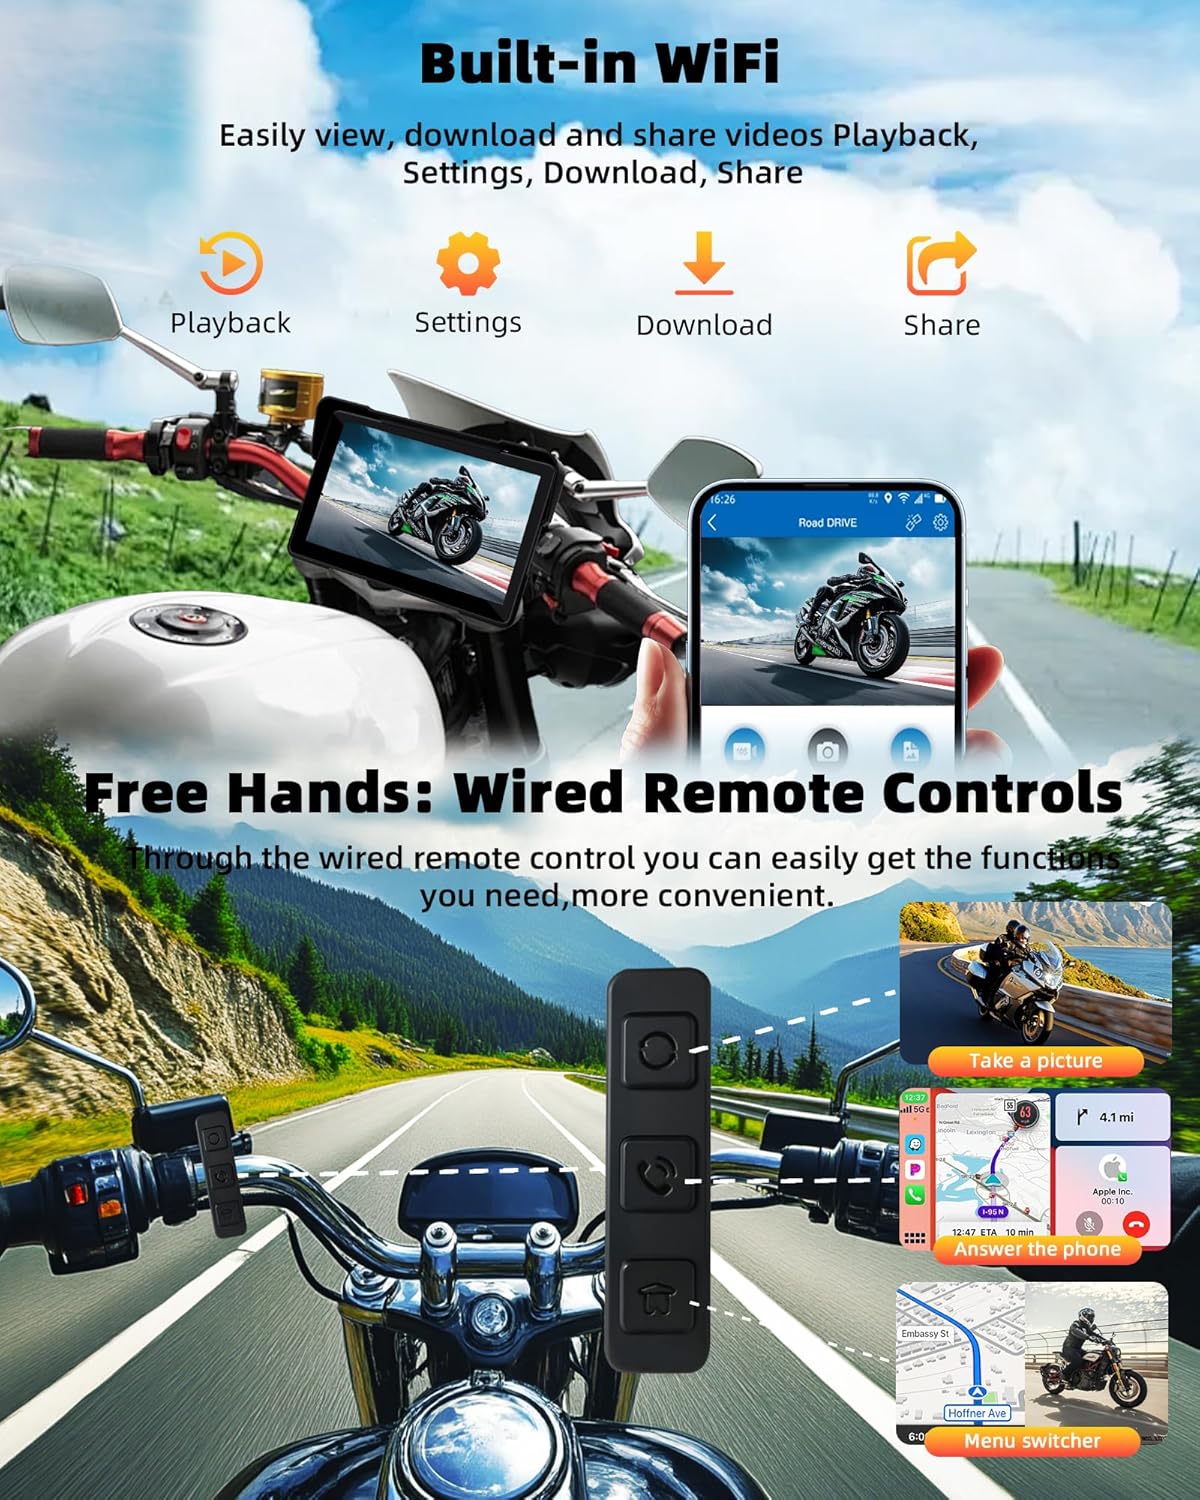
Figure 4.3: Wired Remote Control Functions.
- Take a Picture: Press the designated button to capture still images.
- Switch Displays: Toggle between different display modes (e.g., front camera, rear camera, split-screen, CarPlay/Android Auto).
- Answer/Reject Calls: Manage incoming calls without touching the screen.
- Menu Switcher: Navigate through menus and options.
4.5 Bluetooth Audio Connectivity
Connect your Bluetooth-enabled headphones or helmet for audio output.

Figure 4.4: Bluetooth Audio Connectivity.
- Ensure your Bluetooth audio device (helmet, earphones) is in pairing mode.
- On the CarPlay screen, navigate to Bluetooth settings.
- Select your device from the list and pair.
- Once connected, audio from the CarPlay screen (music, navigation prompts, calls) will be routed to your Bluetooth device.
4.6 Display Settings
Adjust screen brightness and mode for optimal visibility.

Figure 4.5: Display Features and Adjustment.
- Anti-Glare Design: The screen is designed to reduce glare in bright sunlight.
- Day & Night Mode: The system features a light sensor that automatically adjusts screen brightness based on ambient light. You can also manually adjust this setting for preferred visibility.
5. Maintenance
To ensure the longevity and optimal performance of your Tenpmas Motorcycle CarPlay Screen, follow these maintenance guidelines:
- Cleaning: Use a soft, damp cloth to clean the screen and exterior. Avoid abrasive cleaners or solvents that could damage the display or waterproof seals.
- Waterproofing: The device is IP67 waterproof. While designed for use in rain and snow, avoid submerging it in water for extended periods. Ensure all cable connections are securely tightened to maintain water resistance.
- Storage: When not in use for extended periods, store the device in a cool, dry place, away from direct sunlight and extreme temperatures.
- Cable Inspection: Periodically inspect all cables and connections for signs of wear, fraying, or corrosion. Replace any damaged cables immediately.
- Software Updates: Check the manufacturer's website periodically for any available firmware updates to ensure optimal performance and new features.
6. Troubleshooting
If you encounter issues with your device, please refer to the following common problems and solutions:
| Problem | Possible Cause | Solution |
|---|---|---|
| Unit turns off after 3 seconds or does not shut down normally. | Incorrect power wiring, specifically the ACC (positive) terminal. | Verify the power cable connections, especially the ACC wire, according to the wiring diagram (Figure 3.2). Ensure it is connected to a switched power source that turns off with the ignition. |
| Cannot connect to Wireless CarPlay or Android Auto. | Smartphone incompatibility or incorrect pairing process. | Ensure your smartphone supports wireless CarPlay or Android Auto. Restart both the phone and the CarPlay screen. Re-attempt the Bluetooth pairing process as described in Section 4.2. |
| No camera display or recording. | Loose camera connection or faulty camera. | Check that both front and rear camera cables are securely connected to the main unit. Ensure the cameras are not obstructed. |
| GPS signal is weak or inaccurate. | GPS module obstruction or poor placement. | Ensure the GPS module is mounted in a location with a clear, unobstructed view of the sky. Avoid placing it under metal objects. |
| Screen is difficult to read in bright sunlight. | Brightness settings or extreme glare. | Adjust the screen brightness settings (Section 4.6). The anti-glare design helps, but direct, intense sunlight can still affect visibility. Ensure the sun visor is properly positioned. |
If the problem persists after attempting these solutions, please contact customer support.
7. Specifications
| Feature | Detail |
|---|---|
| Model Number | MT53B-64GB-US5 |
| Display Size | 7 inches |
| Front Camera Resolution | 4K UHD |
| Rear Camera Resolution | 1080P HD |
| Waterproof Rating | IP67 |
| Connectivity | Wireless CarPlay, Android Auto, Bluetooth, WiFi |
| Included Storage | 64GB TF Card |
| Item Weight | 3.3 pounds (approx. 1.5 kg) |
| Package Dimensions | 9.5 x 6 x 4.5 inches (approx. 24.1 x 15.2 x 11.4 cm) |
| Operating Temperature | -4°F to 158°F (-20°C to 70°C) |
| Batteries | 1 Lithium Polymer battery (included) |
8. Warranty and Support
Your Tenpmas Motorcycle CarPlay Screen comes with comprehensive warranty and support.
- Manufacturer Warranty: A 1-year manufacturer warranty covers defects in materials and workmanship from the date of purchase.
- After-Sales Service: We provide 12 months of after-sales service. If you encounter any problems or have questions, please contact us. We aim to provide a 100% satisfactory solution within 24 hours.
For support, please refer to the contact information provided with your product packaging or visit the official Tenpmas website.
Ask a question about this manual
Ask about setup, troubleshooting, compatibility, parts, safety, or missing instructions. Manuals+ will review the question and use this page’s manual context to help answer it.