1. Introduction
Thank you for choosing the Raynic CR1026A Remote Control. This remote is specifically designed to provide convenient and direct control over your Raynic 10.1 Inches Digital Calendar Clock CR1026. It allows for easy adjustment of settings, including time, screen display, and alarm functions, without needing to physically interact with the clock itself. This manual will guide you through the product's features, setup, operation, and maintenance.
2. Safety Information
WARNING: CHOKING HAZARD - This product contains a button or coin cell battery. A swallowed button or coin battery can cause Internal Chemical Burns in as little as 2 hours and can lead to death or serious injury if ingested. Keep new and used batteries away from children. If the battery compartment does not close securely, stop using the product and keep it away from children. If you think batteries might have been swallowed or placed inside any part of the body, seek immediate medical attention.
- Do not expose the remote control to direct sunlight, heat sources, or extreme temperatures.
- Avoid dropping the remote control or subjecting it to strong impacts.
- Do not attempt to disassemble or modify the remote control.
- Keep the remote control away from water and other liquids.
3. Product Overview
3.1 Remote Control Layout
The Raynic CR1026A remote control features a simple and intuitive button layout for easy operation of your digital calendar clock.
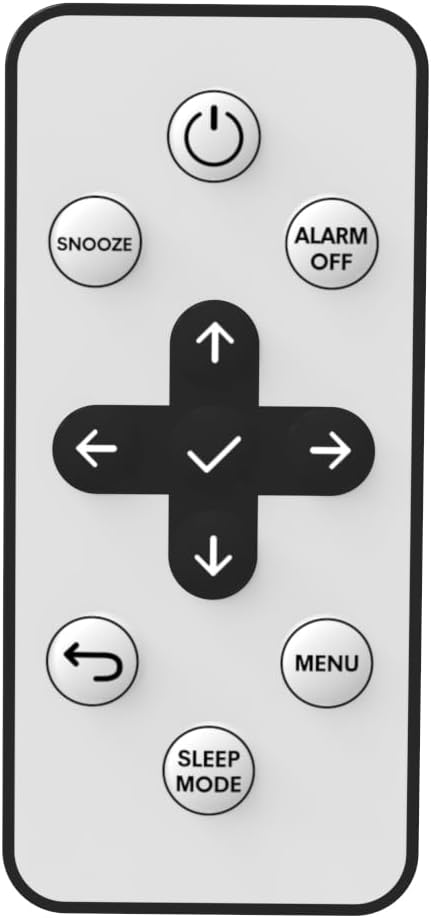
Figure 1: Front view of the Raynic CR1026A Remote Control. Buttons include Power, Snooze, Alarm Off, Navigation (Up, Down, Left, Right, OK/Confirm), Back, Menu, and Sleep Mode.
3.2 Battery Compartment
The battery compartment is located on the back of the remote control. It houses the required button cell battery.

Figure 2: Back view of the Raynic CR1026A Remote Control, illustrating the battery compartment with a slide-out tray and a warning label regarding button cell batteries.
4. Setup
4.1 Battery Installation
- Locate the battery compartment on the back of the remote control (refer to Figure 2).
- Slide the battery tray out in the direction indicated by the arrow.
- Remove the protective battery sheet if present.
- Insert one CR2025 3V Nonstandard Battery into the tray with the positive (+) side facing up.
- Gently slide the battery tray back into the remote control until it clicks securely into place.
4.2 Initial Use (No Pairing Required)
The Raynic CR1026A remote control is designed for direct use with the Raynic 10.1 Inches Digital Calendar Clock CR1026. No pairing or complex programming is required. Once the battery is correctly installed, the remote is ready to control your CR1026 calendar clock immediately.
5. Operating Instructions
Point the remote control directly at your Raynic CR1026 Digital Calendar Clock to ensure proper signal transmission.
- Power Button: Press to turn the clock display on or off.
- Snooze Button: Activates the snooze function when an alarm is sounding.
- Alarm Off Button: Disables the active alarm.
- Navigation Buttons (Up, Down, Left, Right): Use these arrows to navigate through menus and adjust settings on the clock's display.
- OK/Confirm Button (Center of Navigation): Confirms selections or enters sub-menus.
- Back Button: Returns to the previous menu or screen.
- Menu Button: Accesses the main settings menu of the clock.
- Sleep Mode Button: Activates or deactivates the clock's sleep mode.
5.1 Common Operations
- Setting Time: Press the Menu button, navigate to the time settings using the Navigation Buttons, and use the OK/Confirm button to enter. Adjust values with Up/Down and confirm with OK/Confirm.
- Turning Off Screen: Press the Power button to toggle the screen display.
- Turning Off Alarm: When an alarm sounds, press the Alarm Off button to silence it.
- Using as Wall Clock: The remote allows you to control the CR1026 calendar clock even when it is hung on a wall, eliminating the need to take it down for adjustments.
6. Maintenance
6.1 Battery Replacement
When the remote control's responsiveness decreases or it stops functioning, it is likely time to replace the battery. Follow the battery installation steps in Section 4.1 to replace the CR2025 3V battery.
6.2 Cleaning
To clean the remote control, gently wipe its surface with a soft, dry cloth. Do not use abrasive cleaners, solvents, or immerse the remote in water.
7. Troubleshooting
- Remote not responding:
- Ensure the remote is pointed directly at the CR1026 clock.
- Check if the battery is correctly installed and has sufficient power. Replace the battery if necessary.
- Ensure there are no obstructions between the remote and the clock.
- Buttons not working:
- Clean the remote's surface to ensure no debris is obstructing the buttons.
- If individual buttons are unresponsive, the remote may be damaged.
- Remote is damaged:
If the remote control is physically damaged or ceases to function after troubleshooting, it may need to be replaced. Multiple spare remote controls are compatible with the CR1026 calendar clock.
8. Specifications
| Model Number | CR1026A |
| Compatible Device | Raynic 10.1 Inches Digital Calendar Clock CR1026 |
| Power Source | 1 x CR2025 3V Nonstandard Battery (included) |
| Color | Black |
| Dimensions (L x W x H) | 2.36 x 1.18 x 0.39 inches (approx.) |
| Item Weight | 2.46 ounces (approx.) |
| Special Feature | No Programming Required |
9. Warranty and Support
For information regarding the warranty of your Raynic CR1026A Remote Control, please refer to the documentation provided with your original purchase of the Raynic 10.1 Inches Digital Calendar Clock CR1026, or contact the seller/manufacturer directly. Raynic Electronic is the manufacturer of this product.
For further assistance or technical support, please visit the official Raynic website or contact their customer service department. Ensure you have your product model number (CR1026A) and details of your issue ready when seeking support.