1. Product Overview
The Cooler Master Elite 490 is a compact mATX computer case designed for high-performance builds. It features a 270° tempered glass panel for showcasing components, efficient cooling options, and modern connectivity.
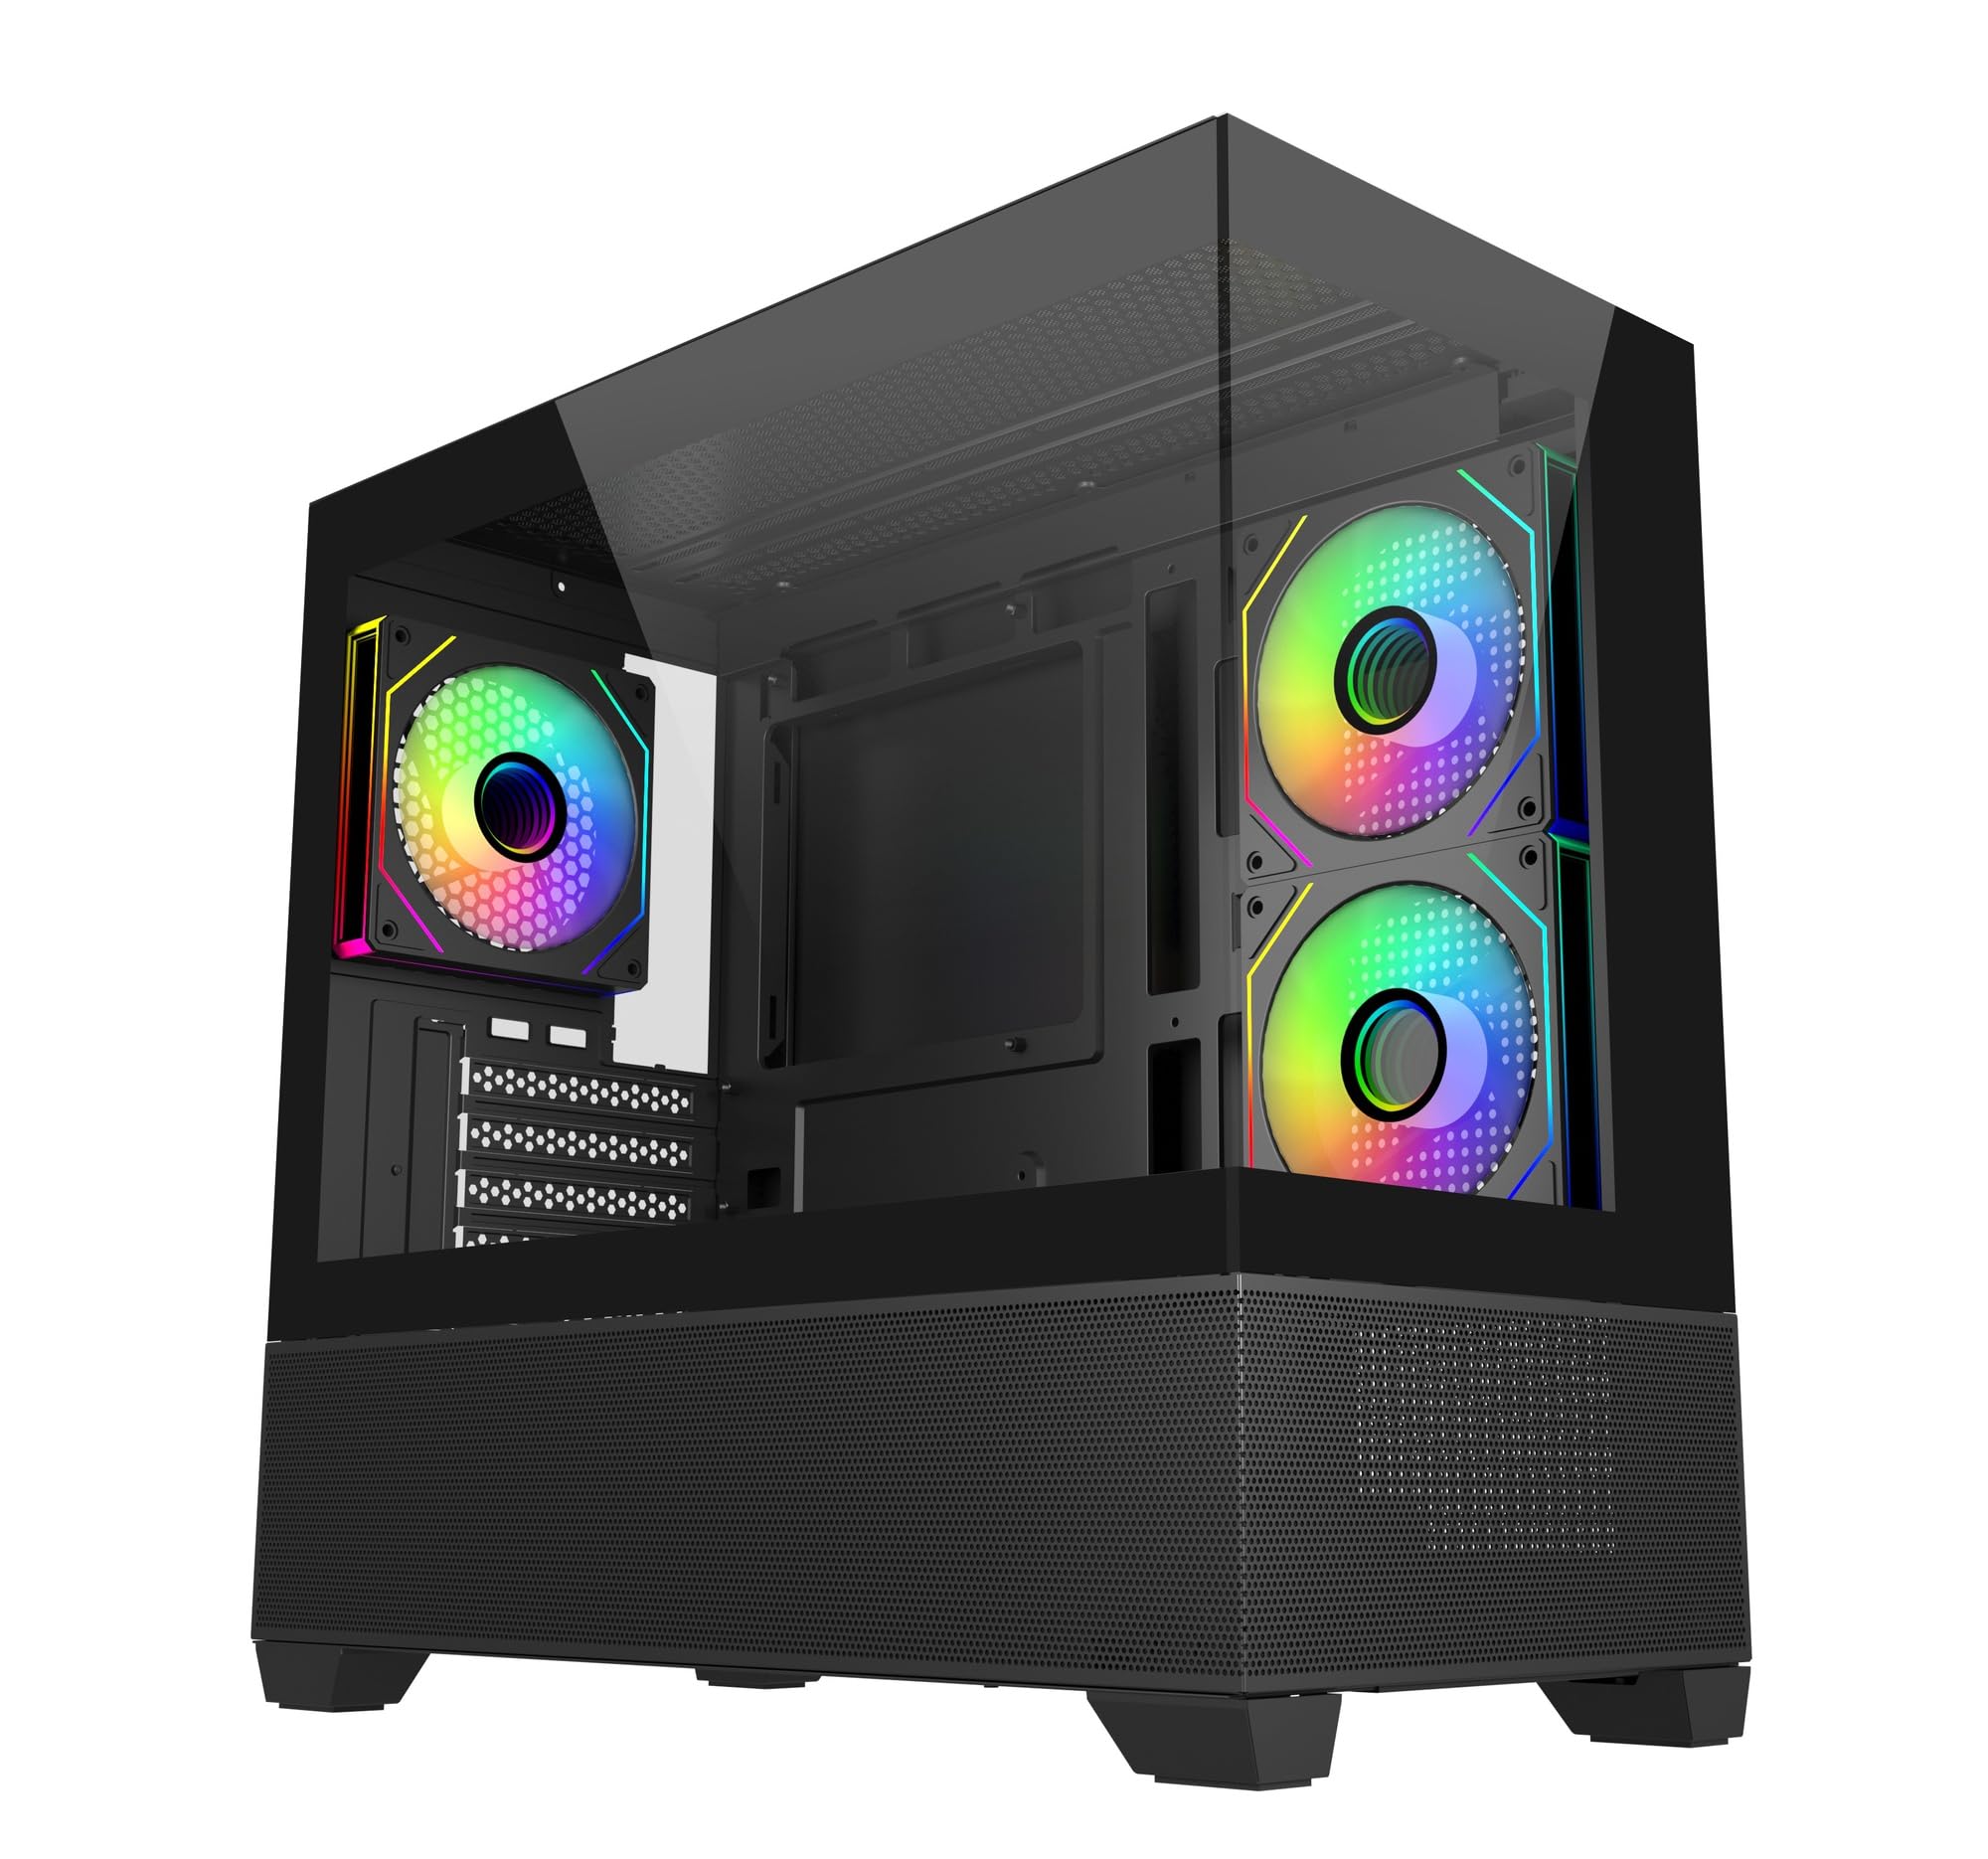
Image: Angled view of the Cooler Master Elite 490 computer case, showcasing its tempered glass panels and internal components with ARGB lighting.
Key Features:
- 270° Tempered Glass Panels: Dual tempered glass panels with seamless beveled edges provide a wide-angle view of your system.
- Compact mATX Form Factor: Designed for desks or tight spaces without compromising on cooling or GPU compatibility.
- High-End Radiator Support: Supports up to a 360mm radiator for advanced liquid cooling solutions.
- Vertical Cooling Configuration: Accommodates up to 9 fans with a bottom-to-top airflow layout for efficient heat dissipation.
- Pre-installed ARGB Fans: Includes 3 ARGB fans (2 reverse-blade side intake, 1 rear exhaust) with daisy-chain connectors and motherboard sync support.
- Top and Bottom Mesh Ventilation: Large mesh zones ensure unobstructed airflow.
- RTX 50 Series Graphics Card Support: GPU clearance up to 410mm for next-generation graphics cards.
- Upgraded High-Speed I/O Panel: Features dual USB 3.0 Type-A ports and a USB 3.2 Gen 2x2 Type-C port (up to 20Gbps).
2. Setup and Installation
This section provides general guidelines for assembling your computer components within the Cooler Master Elite 490 case. Always refer to your component manuals for specific installation instructions.
2.1 Unpacking and Inspection
- Carefully remove the case from its packaging.
- Inspect the case for any signs of damage during transit. Contact your retailer immediately if any damage is found.
- Remove all protective films from the tempered glass panels.
- Identify the accessory box, which typically contains screws, zip ties, and other mounting hardware.

Image: Front view of the Cooler Master Elite 490 case, showing the tempered glass and mesh bottom panel.
2.2 Motherboard Installation
- Lay the case on its side.
- Install the I/O shield (if not pre-installed on your motherboard).
- Align your mATX motherboard with the standoffs inside the case. Ensure all standoffs match the motherboard's mounting holes.
- Secure the motherboard with the appropriate screws provided in the accessory kit.

Image: Internal view of the Elite 490 case highlighting motherboard support for ITX/Micro ATX form factors.
2.3 Power Supply Unit (PSU) Installation
- Mount your PSU in the designated bottom compartment.
- Secure the PSU with screws from the rear of the case.
- Route the necessary power cables through the cable management cutouts to the motherboard and other components.
2.4 Graphics Card and Expansion Card Installation
- Remove the necessary PCIe slot covers from the rear of the case.
- Insert your graphics card or other expansion cards into the appropriate PCIe slots on the motherboard.
- Secure the cards with screws. The Elite 490 supports GPUs up to 410mm in length.

Image: Internal view of the Elite 490 case demonstrating compatibility with large graphics cards, indicating it is ready for RTX 50 Series GPUs.
2.5 Storage Drive Installation
The case provides internal bays for storage drives. Refer to the case diagram for specific mounting locations for 2.5" SSDs and 3.5" HDDs.
2.6 Cooling System Installation (Optional)
The Elite 490 supports various cooling configurations:
- Fans: Up to 9 fans can be installed for optimal airflow. The case comes with 3 pre-installed ARGB fans.
- Radiators: Supports radiators up to 360mm.

Image: Internal view of the Elite 490 case showing a liquid cooling radiator installed at the top, illustrating high-end radiator support.

Image: Internal view of the Elite 490 case demonstrating the vertical cooling layout with multiple fans for effective heat management.
2.7 Cable Management
Utilize the cable routing channels and tie-down points behind the motherboard tray to organize cables. This improves airflow and aesthetics.
3. Operating Instructions
Once all components are installed and connected, you can power on your system.
3.1 Powering On
- Ensure all external cables (power, monitor, peripherals) are securely connected.
- Press the power button located on the front I/O panel.
3.2 Front I/O Panel Usage
The front I/O panel provides convenient access to:
- Power Button: To turn the system on or off.
- Reset Button: To restart the system.
- USB 3.0 Type-A Ports (x2): For connecting USB devices.
- USB 3.2 Gen 2x2 Type-C Port (x1): For high-speed data transfer (up to 20Gbps) with compatible devices.
- Audio Jacks: For headphones and microphones.

Image: Close-up view of the Elite 490's top I/O panel, highlighting the USB 3.2 Gen 2x2 Type-C port and dual USB 3.0 ports.
3.3 ARGB Fan Control
The pre-installed ARGB fans can be controlled via your motherboard's ARGB software (e.g., ASUS Aura Sync, MSI Mystic Light, Gigabyte RGB Fusion, ASRock Polychrome Sync) if connected to a compatible ARGB header. Refer to your motherboard manual for specific software instructions.
4. Maintenance
Regular maintenance helps ensure optimal performance and longevity of your computer components.
4.1 Dust Filter Cleaning
The Elite 490 features removable dust filters on the top and bottom panels. Regularly clean these filters to prevent dust buildup and maintain good airflow.
- Gently slide out the dust filters.
- Use compressed air or a soft brush to remove accumulated dust.
- Reinstall the filters securely.
4.2 Exterior Cleaning
Wipe the exterior surfaces, including the tempered glass panels, with a soft, damp cloth. Avoid abrasive cleaners or solvents that could damage the finish.
5. Troubleshooting
This section addresses common issues you might encounter.
5.1 System Does Not Power On
- Check if the power cable is securely connected to both the PSU and the wall outlet.
- Ensure the PSU switch is in the "ON" position.
- Verify that the front panel power button cable is correctly connected to the motherboard's F_PANEL header.
- Confirm that all internal power cables (24-pin ATX, CPU, GPU) are properly seated.
5.2 Fans Are Not Spinning / ARGB Not Lighting Up
- Check if the fan power cables are securely connected to the motherboard fan headers or a fan controller.
- For ARGB lighting, ensure the ARGB cables are connected to a compatible motherboard ARGB header or a dedicated ARGB controller.
- Verify that your motherboard's ARGB software is installed and configured correctly.
5.3 Front I/O Ports Not Functioning
- Ensure the USB and audio cables from the front panel are correctly connected to the corresponding headers on your motherboard.
- Check your motherboard manual for the correct header locations.
6. Specifications
Detailed technical specifications for the Cooler Master Elite 490 Computer Case.
| Feature | Specification |
|---|---|
| Brand | Cooler Master |
| Model Name | E490 |
| Model Number | E490-KHNN-S00 |
| Case Type | Mid Tower |
| Motherboard Compatibility | Micro ATX |
| Dimensions (D x W x H) | 53.1D x 54.4W x 26.1H Centimeters |
| Item Weight | 5800 Grams |
| Enclosure Material | Aluminium |
| Cooling Method | Air |
| Pre-installed Fans | 3 ARGB Fans (2 reverse-blade side intake, 1 rear exhaust) |
| Max Fan Support | Up to 9 fans |
| Max Radiator Support | Up to 360mm |
| GPU Clearance | Up to 410mm |
| Total USB 3.0 Ports | 2 |
| USB 3.2 Gen 2x2 Type-C Port | 1 (20Gbps) |
| Internal Bays Quantity | 3 |
| Other Special Features | Customizable Inter-changeable Panels, 270° Tempered Glass |
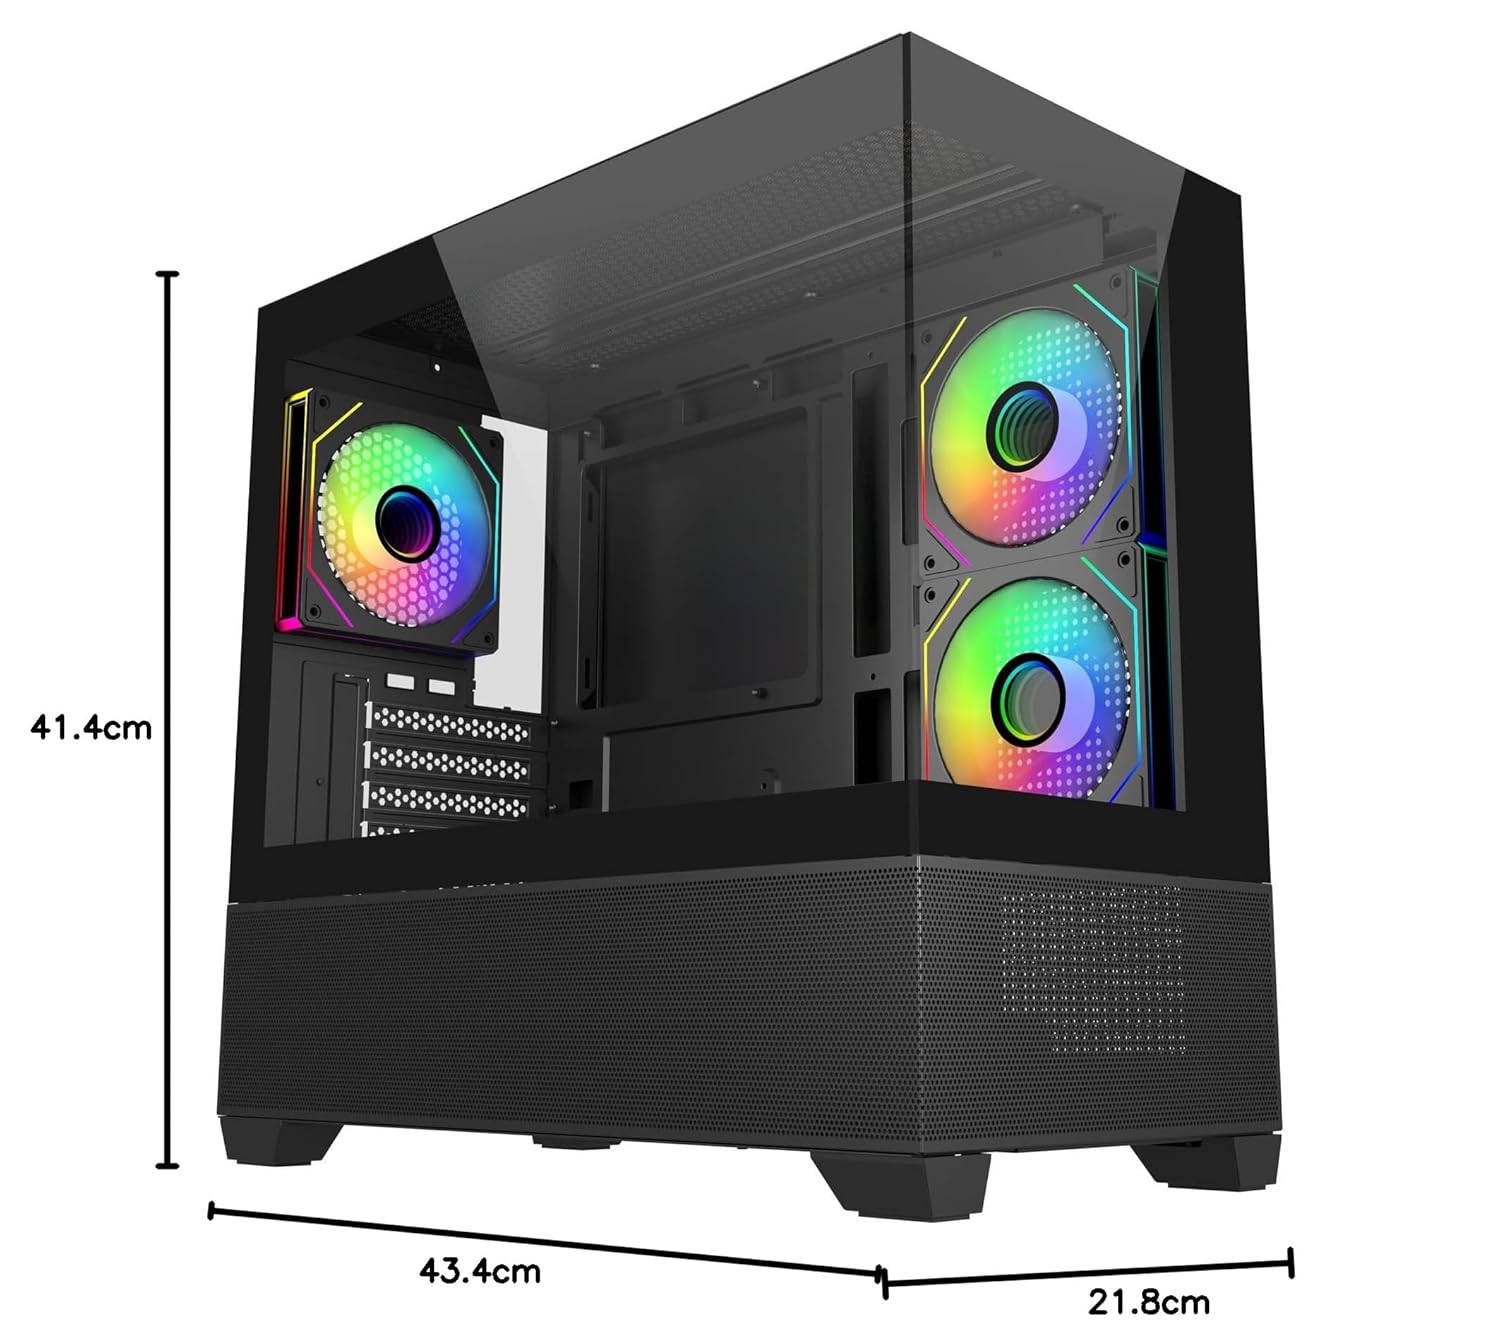
Image: Diagram showing the dimensions of the Cooler Master Elite 490 computer case: 41.4cm height, 43.4cm depth, and 21.8cm width.
7. Warranty and Support
7.1 Warranty Information
The Cooler Master Elite 490 Computer Case comes with a 2 Years warranty from the date of purchase. Please retain your proof of purchase for warranty claims.
7.2 Technical Support
For technical assistance, troubleshooting, or warranty inquiries, please contact Cooler Master support:
- Manufacturer: Cooler Master
- Importer: Creative New Tech
- Visit the official Cooler Master website for support resources and contact details: www.coolermaster.com