Introduction
Thank you for choosing the LWOHSI Wireless Home Security System. This system provides comprehensive protection for your home or business with easy installation and no monthly fees. It features wireless sensors, a loud siren, and smart alerts via GSM 4G, SMS, and the Tuya/Smart Life App. The system is compatible with Alexa and Google Assistant for convenient voice control.
This manual will guide you through the setup, operation, and maintenance of your security system to ensure optimal performance and peace of mind.

Image: The LWOHSI Home Security System offers no subscription fees for continuous home protection.
Package Contents
Please verify that all items listed below are included in your package:
- Alarm system LW-103-4G (Main Control Panel) x 1
- Wireless PIR Detector (Motion Sensor) x 1
- Remote Control x 2
- Door Sensor x 5
- PE-513 Siren x 1
- RFID Tag x 2
- Power Adapter (for Main Control Panel) x 1
- USB Type C Cable x 1
- Mounting Screws and Anchors
- User Manual

Image: An overview of the multi-accessory security system kit, including the main panel, sensors, remotes, and siren.
Product Overview
Main Control Panel (LW-103-4G)
The main control panel is the central unit of your security system. It features a TFT display screen, a numeric keypad, and dedicated buttons for arming, disarming, and SOS functions. It connects wirelessly to all sensors and communicates alerts via Wi-Fi, GSM 4G, and the mobile app.

Image: Detailed diagram of the main control panel, showing the TFT display, dialing buttons, function keys, RFID sensing area, speaker, SOS button, and various ports (On/Off, Microphone, Type C power, 3.5mm siren, SIM card interface).
- TFT Display Screen: Shows system status, time, and settings.
- Dialing Buttons: Numeric keypad for input and system control.
- Up/Function & Down/Backspace: Navigation and input correction.
- Back/Cancel & Confirm: Menu navigation and action confirmation.
- Disarming Button: Deactivates the alarm system.
- Away Arming Button: Activates full system protection when you are away.
- Home Arming Button: Activates perimeter protection while allowing free movement inside.
- SOS Button: Triggers an immediate emergency alarm.
- RFID Card Sensing Area: For quick arm/disarm using RFID tags.
- Speaker: For alarm sounds and voice prompts.
- Anti-Prying Switch: Triggers an alarm if the panel is tampered with.
- Ports: On/Off switch, Microphone, USB Type C power interface, 3.5mm siren interface, SIM card interface (2G/4G version).
Wireless PIR Detector (Motion Sensor)
These sensors detect movement within their coverage area. They are designed for indoor use and trigger an alarm when motion is detected while the system is armed.
- Detection Range: Approximately 26-40 ft (8-12 m) with a 110° wide-angle and 15° vertical detector angle.
- Placement: Ideal for hallways, living rooms, and entry points.
Image: A graphic depicting the extensive PIR detection range covering a room, indicating its effectiveness against intruders.
Door/Window Sensors
These two-part sensors are installed on doors and windows. When the two parts separate (i.e., a door or window is opened) while the system is armed, an alarm is triggered.
Remote Controls
Compact remote controls allow for convenient arming, disarming, and SOS activation from a distance.
PE-513 Siren
The external siren provides a loud audible alert (up to 120dB) when the alarm is triggered, deterring intruders and alerting neighbors.

Image: A graphic depicting a siren emitting a loud 100dB alert, indicating its effectiveness in deterring intruders.
RFID Tags
RFID tags offer a quick and easy way to arm or disarm the system by simply tapping them on the main control panel's RFID sensing area.
Setup Guide
1. Main Control Panel Installation
- Power Connection: Connect the main control panel to a power outlet using the provided USB Type C cable and power adapter.
- Placement: Choose a central location in your home, away from direct sunlight and heat sources. The panel can be placed on a tabletop or mounted on a wall using the included screws and anchors. Ensure it is within wireless range of all sensors.
- Anti-Tampering: The panel includes an anti-prying switch. Ensure it is properly engaged if wall-mounted to trigger an alarm upon unauthorized removal.
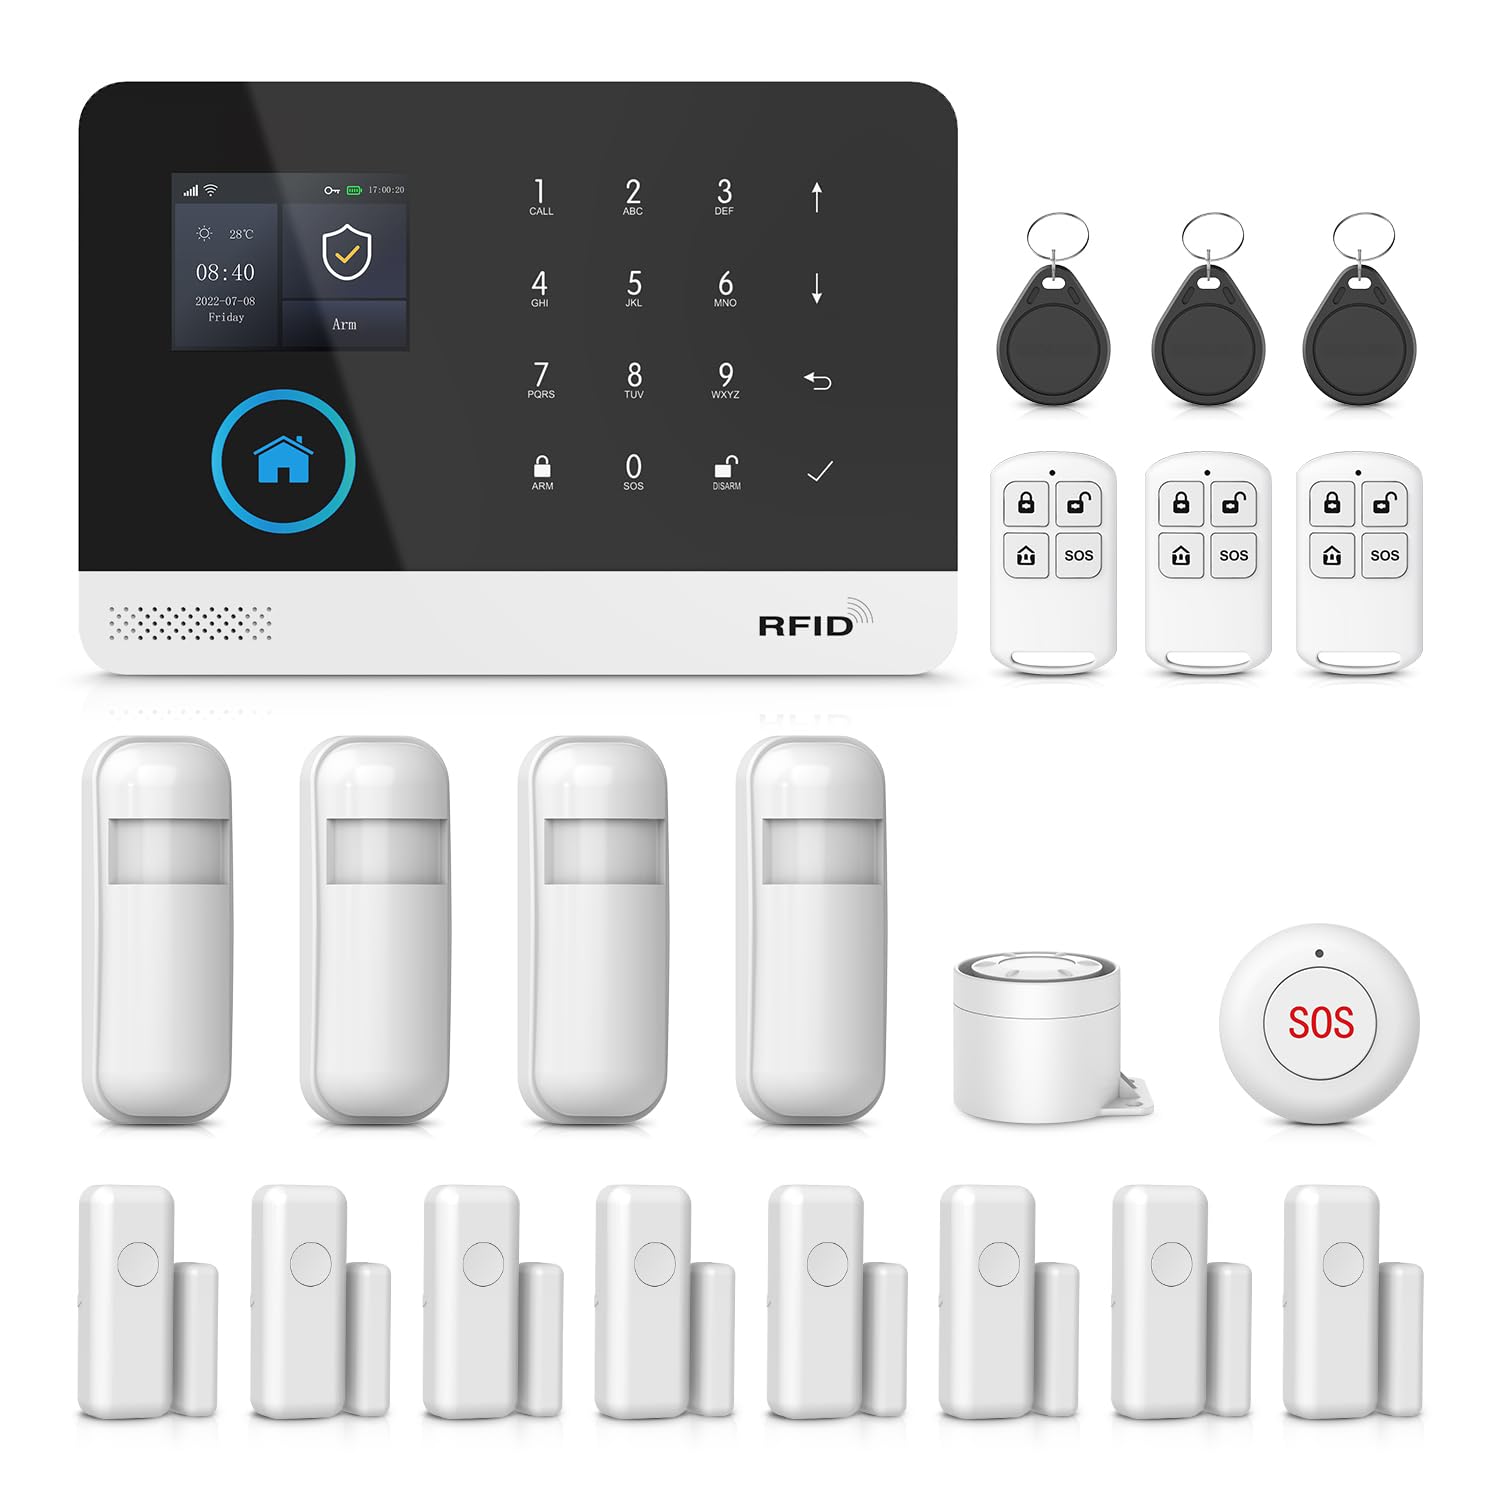
Image: The LWOHSI main control panel displayed on a wooden table in a living room setting.

Image: A hand interacting with the LWOHSI control panel mounted on a wall, demonstrating the arming function.

Image: A diagram illustrating the anti-tampering device on the back of the control panel, which triggers an alert if the device is removed from its mounting.
2. Sensor Installation
- Door/Window Sensors: Mount the two parts of each sensor on a door or window frame. Ensure they are aligned and within 1 cm of each other when the door/window is closed. Use the provided adhesive pads or screws.
- PIR Detectors: Install motion sensors in areas where intruders are likely to pass, such as hallways or main living areas. Mount them at a height of approximately 6-8 feet (1.8-2.4 meters) for optimal coverage. Avoid placing them near heat sources or in direct sunlight.

Image: A diagram illustrating the wireless coverage of the security system, showing the main control unit and various sensors placed around a house for full protection.
3. App Connection (Tuya / Smart Life App)
- Download App: Download the "Tuya Smart" or "Smart Life" app from your smartphone's app store (iOS or Android).
- Register/Login: Create an account or log in if you already have one.
- Add Device: Follow the in-app instructions to add your LWOHSI Home Security System. Ensure your phone is connected to a 2.4GHz Wi-Fi network during the pairing process.
- Wi-Fi Configuration: The app will guide you through connecting the main control panel to your home Wi-Fi network.

Image: A smartphone screen displaying the Smart Life app interface, showing options to add various smart home devices, including sensors and alarms.
4. Pairing Sensors and Accessories
- Enter Pairing Mode: On the main control panel, navigate to the sensor pairing menu (refer to the panel's on-screen instructions or the detailed manual available via QR code).
- Activate Sensor: For door/window sensors, separate the two parts. For PIR detectors, trigger motion. For remote controls, press any button. For RFID tags, tap them on the RFID sensing area.
- Confirmation: The main panel will confirm successful pairing. Repeat for all included sensors and accessories.
- Naming Sensors: Use the app to assign custom names to each sensor (e.g., "Front Door," "Living Room Motion") for easier identification of alerts.

Image: A smartphone screen showing the process of editing the name of a door/motion sensor within the app, allowing users to customize device labels for better management.
5. SIM Card Installation (Optional for GSM/4G Features)
If you wish to use GSM/4G features for SMS alerts and calls, install a compatible SIM card into the designated slot on the main control panel. Ensure the SIM card has an active plan for calls and SMS.
Operating Your Security System
Arming and Disarming
Your security system offers three main modes:
- Away Arm (Out Arm): Activates all sensors. Use this mode when no one is home.
- Home Arm (Stay Arm): Activates perimeter sensors (e.g., door/window sensors) while allowing free movement within the home (e.g., motion sensors are disarmed).
- Disarm: Deactivates all sensors.
You can arm or disarm the system using:
- The main control panel buttons.
- The remote controls.
- RFID tags (tap on the panel).
- The Tuya/Smart Life App.
- Voice commands via Alexa or Google Assistant.
Image: Icons representing the three security modes: Out Arm (fully locked), Disarm (unlocked), and Stay Arm (home locked, perimeter active).
App Control and Notifications
The Tuya/Smart Life App provides complete control over your security system:
- Arm/Disarm: Remotely arm or disarm your system from anywhere.
- Instant Alerts: Receive push notifications on your phone when a sensor is triggered (e.g., door opened, motion detected).
- Event Log: View a history of all alarm events and system activities.
- Settings: Adjust alarm modes, siren duration, entry/exit delays, and other system parameters.
- Device Sharing: Share access to the system with family members by adding their mobile numbers or email addresses in the app.

Image: A smartphone displaying an "Alarm Events" push notification, indicating a door sensor or PIR detector has been activated.
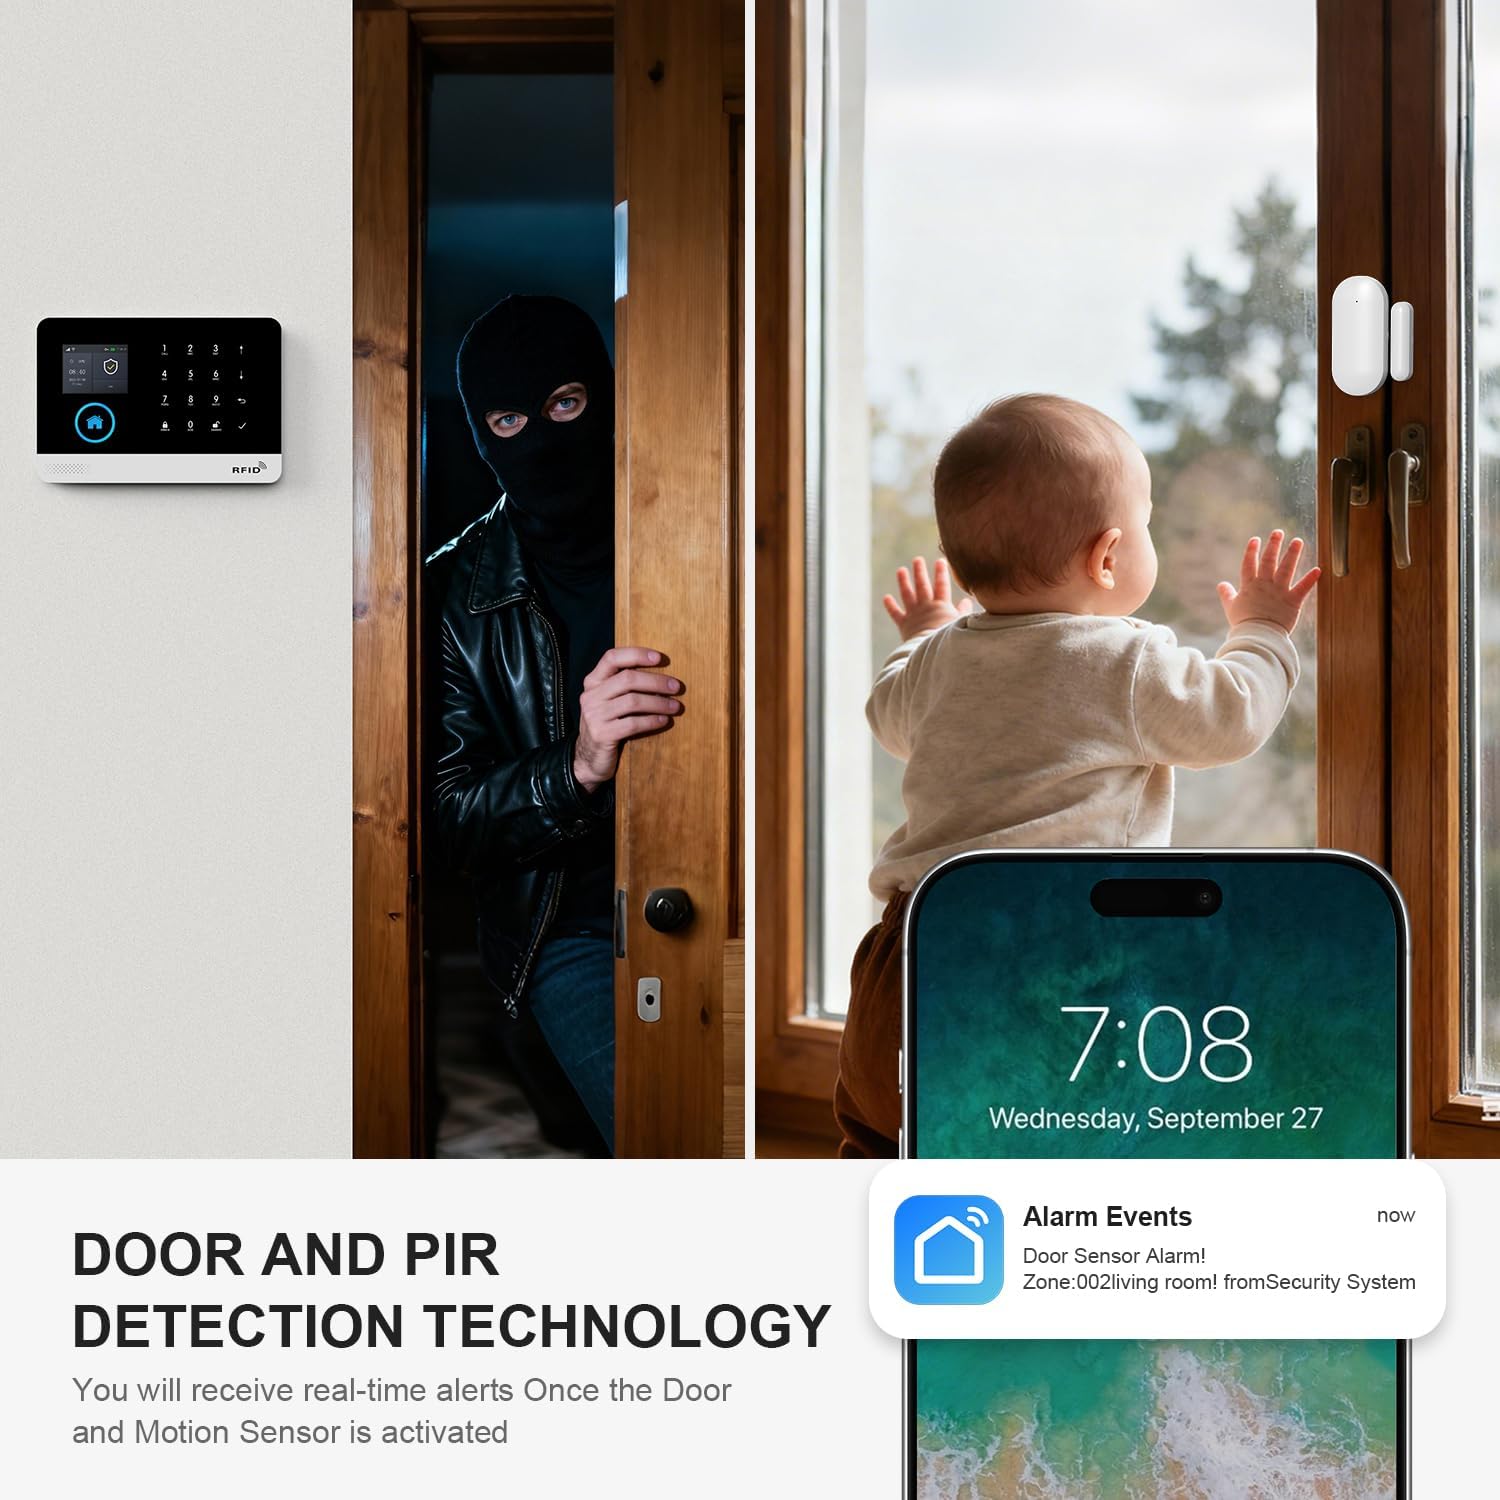
Image: A split image showing a person attempting to enter through a door and a baby near a window, with a smartphone displaying an "Alarm Events" notification for a door sensor, highlighting real-time alerts.

Image: A graphic illustrating the device sharing feature, where a user can add family members to share control and receive alerts from the home alarm system.
Monitoring Schedule
You can set up custom schedules for arming and disarming your system based on your daily routine. This feature allows the system to automatically arm when you leave for work and disarm when you return, or arm at bedtime and disarm in the morning.

Image: A visual representation of a monitoring schedule, showing examples like arming at 8:00 AM for work, disarming at 7:00 PM after work, arming at 10:20 PM for bed, and disarming at 6:30 AM upon waking.

Image: A graphic showing scheduled arming and disarming times (e.g., Arm at 08:00 when going out, Disarm at 18:00 when returning home) to fit a user's lifestyle.
Voice Control (Alexa & Google Assistant)
Integrate your LWOHSI security system with Amazon Alexa or Google Assistant for hands-free control. Once linked, you can use voice commands to arm or disarm your system.
- Example Commands: "Alexa, arm the security system," or "Hey Google, disarm the alarm."

Image: A woman relaxing in a living room, interacting with a smart speaker, illustrating the compatibility of the security system with Alexa and Google Assistant for voice control.
SOS Function
In case of an emergency, press the SOS button on the main control panel or remote control to immediately trigger the siren and send emergency alerts to pre-programmed contacts.
Maintenance
Battery Replacement
The main control panel has a built-in backup battery that provides power during outages. Sensors are typically battery-powered. Monitor battery levels through the app (if available) or replace batteries in sensors as needed. Refer to individual sensor manuals for specific battery types and replacement instructions.
Cleaning
Wipe the main control panel and sensors with a soft, dry cloth. Avoid using abrasive cleaners or solvents, which can damage the devices.
Troubleshooting
| Problem | Possible Cause | Solution |
|---|---|---|
| System does not connect to Wi-Fi. | Incorrect Wi-Fi password; connected to 5GHz network; weak signal. | Ensure correct password. Connect your phone to a 2.4GHz network during setup. Move the panel closer to the router. Restart router and panel. |
| Sensors are not pairing. | Sensor too far from panel; low sensor battery; panel not in pairing mode. | Move sensor closer to the panel. Replace sensor battery. Ensure the main panel is in pairing mode. |
| No SMS/Call alerts (with SIM card). | SIM card not inserted correctly; no active plan/credit; weak GSM signal. | Reinsert SIM card. Check SIM card balance and plan. Ensure good 2G/4G signal strength at the panel's location. |
| False alarms. | PIR sensor placed near heat sources/windows; incorrect sensitivity settings; loose sensor mounting. | Relocate PIR sensors away from heat vents or direct sunlight. Adjust PIR sensitivity in app settings. Securely mount all sensors. |
| App shows device offline. | Wi-Fi connection lost; power outage to panel. | Check home Wi-Fi network. Ensure the main panel is powered on. The panel has a backup battery for power outages, but Wi-Fi requires router power. |
Specifications
- Brand: LWOHSI
- Model Number: LW-A103F
- Power Source: Corded Electric (Main Panel)
- Connectivity Technology: Wireless (Wi-Fi, GSM 4G)
- Compatible Devices: Smartphone, Tablet (via Tuya/Smart Life App), Alexa, Google Assistant
- Control Method: App, Remote, Voice, Main Panel
- Alert Type: Audio (Siren), Motion, SMS, App Push Notifications
- Included Components: Alarm system LW-103-4G (1), Wireless PIR Detector (1), Remote control (2), Door sensor (5), PE-513 Siren (1), RFID tag (2)
- Main Panel Dimensions (L x W x H): Approximately 8 x 6 x 4 inches
- Item Weight (Main Panel): Approximately 8 ounces (0.5 Pounds)
- Connector Type: USB Type C (for Main Panel power)
- Recommended Uses: Indoor/Outdoor (sensors are typically indoor, siren can be outdoor rated if specified, but general system is for home security)
Warranty and Support
For warranty information and technical support, please refer to the documentation included with your purchase or contact LWOHSI customer service directly. You can typically find contact details on the manufacturer's website or through your retailer.