
1. Introduction
This manual provides comprehensive instructions for the installation, operation, maintenance, and troubleshooting of your ASRock X870 Pro-A WiFi ATX Motherboard. Please read this manual thoroughly before attempting any installation or configuration to ensure proper functionality and to prevent damage to your system components.
The ASRock X870 Pro-A WiFi motherboard is designed for enhanced stability, durability, and efficiency, offering reliable performance and user-friendly features for daily computing needs.
2. Key Features
- CPU Support: Supports AMD Socket AM5 Ryzen 9000, 8000, and 7000 Series Processors.
- Power Design: 16+2+1 Power Phase, 80A Dr.MOS for VCore+SOC+MISC.
- Memory: 4 x DDR5 DIMMs supporting Dual Channel, up to 8000+(OC) MHz.
- Expansion Slots: 1 PCIe 5.0 x16, 3 PCIe 4.0 x16.
- Storage: 1 Blazing M.2 (PCIe Gen5x4), 1 Hyper M.2 (PCIe Gen4x4), 1 M.2 (PCIe Gen3x2 & SATA3), 4 SATA3 ports. Supports M.2 Bottom Heatsink.
- Graphics Output: 1 HDMI, 2 USB4 Type-C.
- Audio: Realtek ALC897 7.1 CH HD Audio Codec, Nahimic Audio.
- USB Connectivity: 2 USB4 Type-C (Rear), 2 USB 3.2 Gen2 (Rear), 1 USB 3.2 Gen1 Type-C (Front), 5 USB 3.2 Gen1 (1 Rear, 4 Front), 8 USB 2.0 (4 Rear, 4 Front).
- Networking: Realtek 2.5GbE LAN, 802.11be Wi-Fi 7 + Bluetooth.
Note: Not compatible with all built-in computers or systems.
3. Setup and Installation
3.1 Motherboard Overview
Familiarize yourself with the layout of your ASRock X870 Pro-A WiFi motherboard before beginning installation. Below are images highlighting key components and ports.
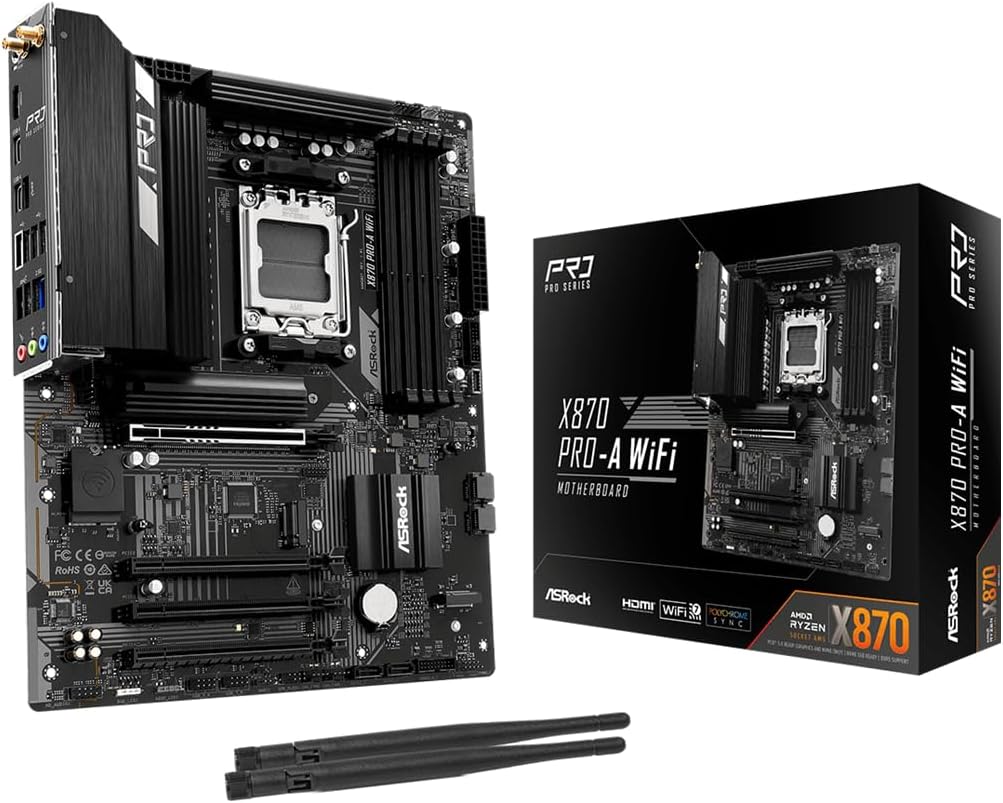
Image: ASRock X870 Pro-A WiFi Motherboard and its retail packaging. The motherboard features a black PCB with silver and black heatsinks, an AM5 CPU socket, four DDR5 DIMM slots, and multiple PCIe and M.2 slots. Two Wi-Fi antennas are also visible.
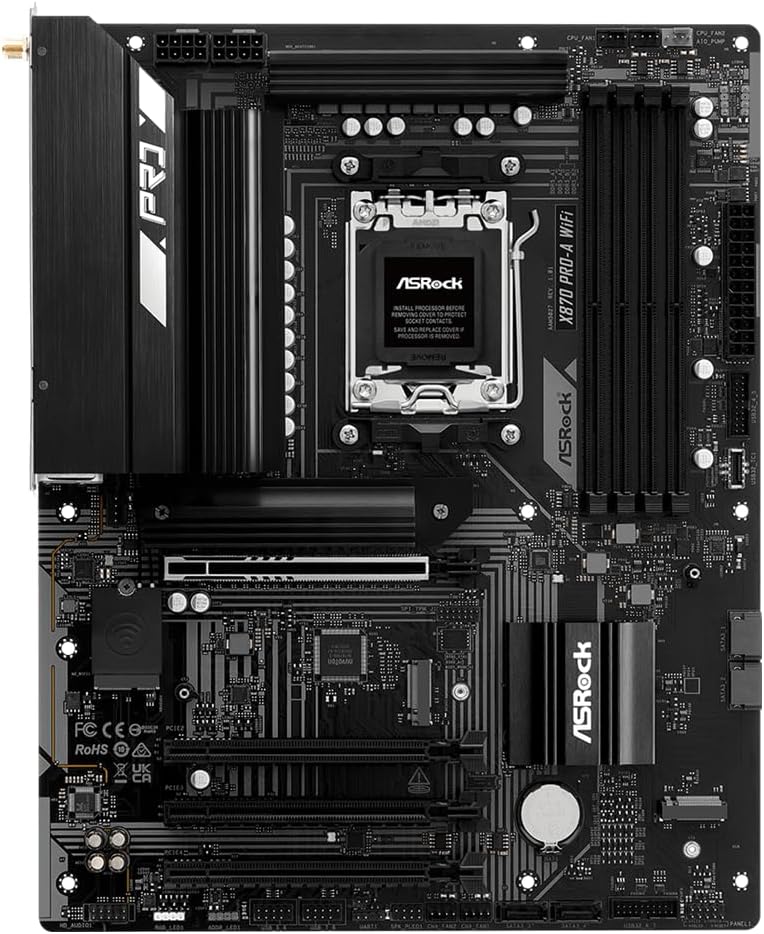
Image: A top-down view of the ASRock X870 Pro-A WiFi Motherboard, showcasing the AM5 CPU socket, four DDR5 memory slots, VRM heatsinks, chipset heatsink, and various expansion slots including PCIe and M.2 slots.

Image: Detailed view of the rear I/O panel of the ASRock X870 Pro-A WiFi Motherboard. It features multiple USB ports (including USB4 Type-C), HDMI, 2.5GbE LAN, Wi-Fi 7 antenna connectors, audio jacks, and a BIOS Flashback button.

Image: An annotated view of the ASRock X870 Pro-A WiFi Motherboard highlighting enlarged VRM heatsinks, CPU fan connectors, AIO pump connector, multi-layer M.2 heatsinks, M.2 bottom heatsink, chipset heatsink, and chassis fan connectors.

Image: A detailed diagram of the ASRock X870 Pro-A WiFi Motherboard, pointing out the high-density power connector, premium 8-layer PCB, 16+2+1 VRM design, 4 DDR5 DIMMs, Blazing M.2 (PCIe Gen5x4), Hyper M.2 (PCIe Gen4x4), M.2 (PCIe Gen3x2 & SATA3), PCIe Gen5 x16 slot with SMT technology and reinforced steel, premium audio, and 4 SATA3 6Gbps ports.
3.2 Component Installation
Follow these general steps for installing components onto your motherboard. Refer to the detailed motherboard manual for specific component placement and connection diagrams.
- CPU Installation: Carefully open the CPU socket lever, align the CPU with the socket (triangle indicator), gently place it, and close the lever.
- CPU Cooler Installation: Install your CPU cooler according to its manufacturer's instructions.
- Memory (RAM) Installation: Open the clips on the DDR5 DIMM slots, align the memory modules, and press firmly until the clips snap into place.
- Storage Device Installation: Install M.2 SSDs into the appropriate slots, securing them with screws or tool-less mechanisms. Connect SATA drives to the SATA ports.
- Graphics Card Installation: Insert your PCIe 5.0 x16 graphics card into the primary PCIe slot, ensuring it is fully seated and secured.
- Power Supply Connection: Connect the 24-pin ATX power connector and the 8-pin + 8-pin 12V power connectors to the motherboard.
4. Operating Instructions
4.1 BIOS Setup
To enter the BIOS setup utility, power on your system and repeatedly press the F2 or Delete key during the Power-On Self-Test (POST) process. The BIOS allows you to configure system settings, boot order, and monitor hardware status.
4.2 Software and Drivers
After installing your operating system, install the latest drivers for your motherboard components (chipset, audio, LAN, Wi-Fi, Bluetooth) from the ASRock official website. This ensures optimal performance and stability.
5. Maintenance
5.1 BIOS Update
Keeping your BIOS updated is crucial for system stability, compatibility with new hardware, and access to the latest features. ASRock provides two primary methods for BIOS updates: USB BIOS Flashback and Instant Flash.
Video: ASRock Motherboard BIOS Update Tutorial. This video demonstrates two methods for updating your ASRock motherboard's BIOS: USB BIOS Flashback and Instant Flash. These methods help ensure your motherboard has the latest firmware, enhancing compatibility, security, and features.
5.1.1 USB BIOS Flashback
- Prepare USB Drive: Format a USB drive (at least 32 GB) to FAT32.
- Download BIOS: Download the latest BIOS from the official ASRock website for your specific motherboard model. Extract the zip file and rename the BIOS ROM file to CREATIVE.ROM. Copy this file to the root directory of your FAT32-formatted USB drive.
- Insert USB: Refer to your motherboard manual to identify the dedicated USB BIOS Flashback port. Insert the prepared USB drive into this port.
- Initiate Flashback: Turn on the power supply's AC switch (do not power on the system). Press and hold the USB BIOS Flashback Switch on the rear I/O for approximately three seconds until the LED light starts to blink.
- Completion: Wait until the LED stops blinking, indicating the BIOS update is complete. If the LED turns solid green, the Flashback is not operating properly.
- Verify: Turn on the system and press F2 or Delete during POST to enter BIOS setup and verify the updated version.
5.1.2 Instant Flash
- Prepare USB Drive: Format a USB drive (at least 32 GB) to FAT32.
- Download BIOS: Download the latest BIOS from the official ASRock website. Extract the zip file and copy the BIOS ROM file to the FAT32-formatted USB drive.
- Insert USB: Insert the USB drive into any USB port on the motherboard and turn on the system.
- Enter BIOS: Press F2 or Delete during POST to enter the BIOS setup menu.
- Execute Instant Flash: Go to the Tool menu, select Instant Flash. The utility will automatically detect suitable BIOS versions. Select the correct BIOS file and confirm the update.
- Reboot: Once the BIOS is updated, the system will prompt you to reboot.
- Load Defaults: After rebooting and re-entering BIOS, go to the Exit menu, select Load UEFI Defaults, and press Yes to continue. Then select Save Changes and Exit and press Yes to exit the BIOS setup menu.
5.2 Cleaning
Regularly clean your motherboard and PC components to prevent dust buildup, which can lead to overheating and reduced performance. Use compressed air to remove dust from fans, heatsinks, and other components. Ensure the system is powered off and unplugged before cleaning.
6. Troubleshooting
If you encounter issues with your motherboard, refer to the following general troubleshooting steps. For more detailed solutions, consult the full ASRock user manual or contact ASRock support.
- No Power: Check all power connections (24-pin ATX, 8-pin CPU, GPU power). Ensure the power supply is switched on.
- No Display: Verify that the monitor is connected to the graphics card (or motherboard if using integrated graphics). Reseat the graphics card and memory modules.
- System Instability/Crashes: Check CPU and GPU temperatures. Ensure all drivers are up to date. Test memory modules individually.
- BIOS Issues: If the system fails to boot after a BIOS update, try clearing the CMOS (refer to the manual for jumper location).
- Peripheral Not Detected: Ensure the device is properly connected. Install necessary drivers. Test with a different port or device.
7. Specifications
| Feature | Specification |
|---|---|
| Brand | ASRock |
| Model Name | ASRock X870 Pro-A WiFi |
| CPU Socket | Socket AM5 |
| Compatible Processors | AMD Ryzen 9000, AMD Ryzen 8000, AMD Ryzen 7000 |
| Chipset Type | AMD X870 |
| RAM Memory Technology | DDR5 |
| Memory Clock Speed | 8000 MHz (OC) |
| Graphics Interface | 1 PCIe 5.0 x16 |
| Display Interface | 1 HDMI, 2 USB4 Type-C |
| LAN | Realtek 2.5GbE |
| Wireless | 802.11be Wi-Fi 7 + Bluetooth |
| USB Ports | 2 USB4 Type-C (Rear), 2 USB 3.2 Gen2 (Rear), 1 USB 3.2 Gen1 Type-C (Front), 5 USB 3.2 Gen1 (1 Rear, 4 Front), 8 USB 2.0 (4 Rear, 4 Front) |
| Storage | 1 Blazing M.2 (PCIe Gen5x4), 1 Hyper M.2 (PCIe Gen4x4), 1 M.2 (PCIe Gen3x2 & SATA3), 4 SATA3 |
| Form Factor | ATX |
| Item Weight | 4.13 pounds |
| Package Dimensions | 14.88 x 12.2 x 3.07 inches |
8. Warranty and Support
For warranty information, please refer to the warranty card included with your product or visit the official ASRock website. If you have any questions about the product, require technical assistance, or need to report an issue, please contact ASRock support directly through their official channels or via Amazon's customer service.
ASRock USA Support: Visit the ASRock Store on Amazon


